


文章目录
注入bean(配置文件)
set方式
public class Person {
    private String name;
    private String age;
    public void setName(String name) {
        this.name = name;
    }
    public void setAge(String age) {
        this.age = age;
    }
}
  <bean id="person" class="ioctest.Person" >
        <property name="name" value="Spring"/>
        <property name="age" value="15"/>
    </bean>
构造方法注入
根据参数类型注入
@ToString
public class Man {
    private String name;
    private Integer age;
    private double money;

    public Man(String name, Integer age,double money) {
        this.name = name;
        this.age = age;
        this.money = money;
    }
}
  <bean id="man" class="ioctest.Man">
        <constructor-arg type="java.lang.String">
           <value>ck</value>
        </constructor-arg>
        <constructor-arg type="java.lang.Integer">
           <value>15</value>
        </constructor-arg>
        <constructor-arg type="double">
            <value>66.6</value>
        </constructor-arg>
    </bean>
根据构造函数的顺序
如果构造函数有类型相同的时候使用
@ToString
public class Man {
    private String name;
    private String color;
    private Integer age;
    private double money;

    public Man(String name, Integer age,String color,double money) {
        this.name = name;
        this.age = age;
        this.money = money;
        this.color = color;
    }
}
    <bean id="man" class="ioctest.Man">
        <constructor-arg index="0" value="陈克"/>
        <constructor-arg index="1" value="16"/>
        <constructor-arg index="2" value="黑色"/>
        <constructor-arg index="3" value="16.66"/>
    </bean>
类型和顺序混合使用
拥有相同数量的构造器时,再加上类型区分
@ToString
public class Man {
    private String name;
    private String color;
    private Integer age;
    private double money;

    public Man(String name, String color, Integer age) {
        this.name = name;
        this.color = color;
        this.age = age;
    }

    public Man(String name, String color, double money) {
        this.name = name;
        this.color = color;
        this.money = money;
    }
}
    <bean id="man" class="ioctest.Man">
        <constructor-arg index="0" value="陈克"/>
        <constructor-arg index="1" value="16"/>
        <constructor-arg type="double" index="2" value="16"/>
    </bean>
使用name来注入
@ToString
public class Man {
    private String name;
    private String color;
    private Integer age;
    private double money;

    public Man(String name, String color) {
        this.name = name;
        this.color = color;

    }
}
<bean id="man" class="ioctest.Man">
        <constructor-arg name="color" value="黑色"/>
        <constructor-arg name="name" value="陈克"/>
    </bean>
工厂模式注入(少用)
普通工厂
public class TestFactory {

    public Man creatMan()
    {
        Man man = new Man("陈克","黑色");
        return man;
    }
}
 <bean id="factory" class="ioctest.TestFactory"/>
        <bean id="man" factory-bean="factory" factory-method="creatMan"></bean>
静态工厂(不用先new工厂对象)
public class TestFactory {

    public static Man creatMan()
    {
        Man man = new Man("陈克","黑色");
        return man;
    }
}
<bean id="man" class="ioctest.TestFactory" factory-method="creatMan"></bean>
注入不同的类型
字面量
通常已字符串格式
	<bean id="person" class="ioctest.Person" >
        <property name="name" value="Spring"/>
    </bean>


    <bean id="person1" class="ioctest.Person" >
        <property name="name">
            <value>Spring</value>
        </property>
    </bean>
如果存在空格,不会自动忽略而是会注入,可以配合属性转换器转成对应类型
特殊字符的处理
&,<,>,",’
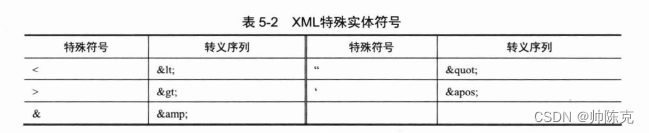
针对字面量特殊字符传导入
<!--注入红色<>特殊字符串,property不分开写只能用转义-->
<bean id="person" class="ioctest.Person" >
<property name="name" value="红色<>"/>
</bean>
<bean id="person1" class="ioctest.Person" >
<property name="name">
<value><![CDATA[红色<>]]></value>
</property>
</bean>
<bean id="person2" class="ioctest.Person" >
<property name="name">
<value>红色<></value>
</property>
</bean>
引用其他bean
<ref>标签
- bean 引用一个现成bean 优先同一个文件,没有可以引用父文件
- parent 引用父容器的bean
父文件beans.xml
<?xml version="1.0" encoding="UTF-8"?>
<beans xmlns="http://www.springframework.org/schema/beans"
       xmlns:xsi="http://www.w3.org/2001/XMLSchema-instance"
       xsi:schemaLocation="http://www.springframework.org/schema/beans
       http://www.springframework.org/schema/beans/spring-beans.xsd">

    <bean id="person" class="ioctest.Person" >
        <property name="name" value="父"/>
    </bean>

</beans>
子文件beans1.xml
<?xml version="1.0" encoding="UTF-8"?>
<beans xmlns="http://www.springframework.org/schema/beans"
       xmlns:xsi="http://www.w3.org/2001/XMLSchema-instance"
       xsi:schemaLocation="http://www.springframework.org/schema/beans
       http://www.springframework.org/schema/beans/spring-beans.xsd">
    <bean id="person" class="ioctest.Person" >
        <property name="name" value="子"/>
    </bean>
    <bean id="man" class="ioctest.Man">
        <property name="person" >
            <ref parent="person"/>
        </property>
    </bean>
</beans>
测试
ClassPathXmlApplicationContext ApplicationContext = new ClassPathXmlApplicationContext("beans.xml");
ClassPathXmlApplicationContext ApplicationContext1 = new ClassPathXmlApplicationContext(new String[]{"beans1.xml"},ApplicationContext);
Object man = ApplicationContext1.getBean("man");
System.out.println(man); //Man(person=Person(name=父, age=null))
内部bean
只用一次bean,用与创建其他bean的成员变量
<bean id="man" class="ioctest.Man">
        <property name="person" >
            <bean id="person" class="ioctest.Person" >
                <property name="name" value="子"/>
            </bean>
        </property>
    </bean>
设置null
 <bean id="man" class="ioctest.Man">
        <property name="person"><null/></property>
  </bean>
联级设置属性
修改设置person的name,可以多次联级
<bean id="person" class="ioctest.Person">
        <property name="name" value="ck"/>
        <property name="age" value="12"/>
    </bean>
    <bean id="man" class="ioctest.Man">
        <property name="person" ref="person"/>
        <property name="person.name" value="sb"/>
    </bean>
集合类型注入
List Set Map Properties
<?xml version="1.0" encoding="UTF-8"?>
<beans xmlns="http://www.springframework.org/schema/beans"
       xmlns:xsi="http://www.w3.org/2001/XMLSchema-instance"
       xsi:schemaLocation="http://www.springframework.org/schema/beans
       http://www.springframework.org/schema/beans/spring-beans.xsd">
    <bean id="person" class="ioctest.Person"></bean>
<bean id="man" class="ioctest.Man">
    <property name="list">
        <list>
            <value>ck</value>
            <value>陈克</value>
            <value>cxk</value>
        </list>
    </property>
    <property name="set">
        <set>
            <value>ikun</value>
            <value>cxk</value>
        </set>
    </property>
    <property name="map">
        <map>
            <entry>
                <key><value>ck</value></key>
                <value>陈克</value>
            </entry>
            <entry>
                <key><value>cxk</value></key>
                <value>坤坤</value>
            </entry>
            <entry>
                <key><ref bean="person"/></key>
                <ref bean="person"/>
            </entry>
        </map>
    </property>
     <property name="properties">
        <props>
            <prop key="cxk">坤坤</prop>
            <prop key="clr">纯鹿人</prop>
        </props>
    </property>
</bean>

</beans>
集合合并
<!--abstract代表不会被实例化-->
<bean id="man" class="ioctest.Man" abstract="true">
    <property name="list">
        <list>
            <value>ck</value>
            <value>陈克</value>
            <value>cxk</value>
        </list>
    </property>
</bean>


<bean id="man2" class="ioctest.Man" parent="man">
    <property name="list" >
        <!--merge true代表合并list内容,默认false-->
        <list merge="true">
            <value>纯鹿人</value>
        </list>
    </property>
</bean>
工具util导入集合类型
<beans xmlns="http://www.springframework.org/schema/beans"
       xmlns:xsi="http://www.w3.org/2001/XMLSchema-instance"
       xmlns:util="http://www.springframework.org/schema/util"
       xsi:schemaLocation="http://www.springframework.org/schema/beans
       http://www.springframework.org/schema/beans/spring-beans.xsd
        http://www.springframework.org/schema/util
         https://www.springframework.org/schema/util/spring-util.xsd">
    <!--记得加依赖-->
    <util:list id="list" list-class="java.util.LinkedList" value-type="java.lang.String">
    <value>CXK</value>
    <value>坤坤</value>
    <value>蔡徐坤</value>
    </util:list>
    <util:set id="set" set-class="java.util.HashSet" value-type="java.lang.Integer">
        <value>2</value>
        <value>3</value>
        <value>4</value>
    </util:set>
    <util:map id="map" key-type="java.lang.String" value-type="java.lang.String" map-class="java.util.HashMap">
        <entry key="name" value="cxk"/>
        <entry key="age" value="16"/>
    </util:map>
</beans>
- list-class 显示指定实现类型
- list和set 的 value-type 指定泛型
- map 的 key-type value-type指定key value类型
P命名空间
属于属性简写的一种
<?xml version="1.0" encoding="UTF-8"?>

<beans xmlns="http://www.springframework.org/schema/beans"
       xmlns:xsi="http://www.w3.org/2001/XMLSchema-instance"
       xmlns:p="http://www.springframework.org/schema/p"
       xsi:schemaLocation="http://www.springframework.org/schema/beans
       http://www.springframework.org/schema/beans/spring-beans.xsd
       ">

       <bean id="man" class="com.ke.test.Man"  p:name="陈克" />
       <bean id="person" class="com.ke.test.Person"
            p:name="cxk"
             p:age="12"
             p:man-ref="man"
       />

</beans>
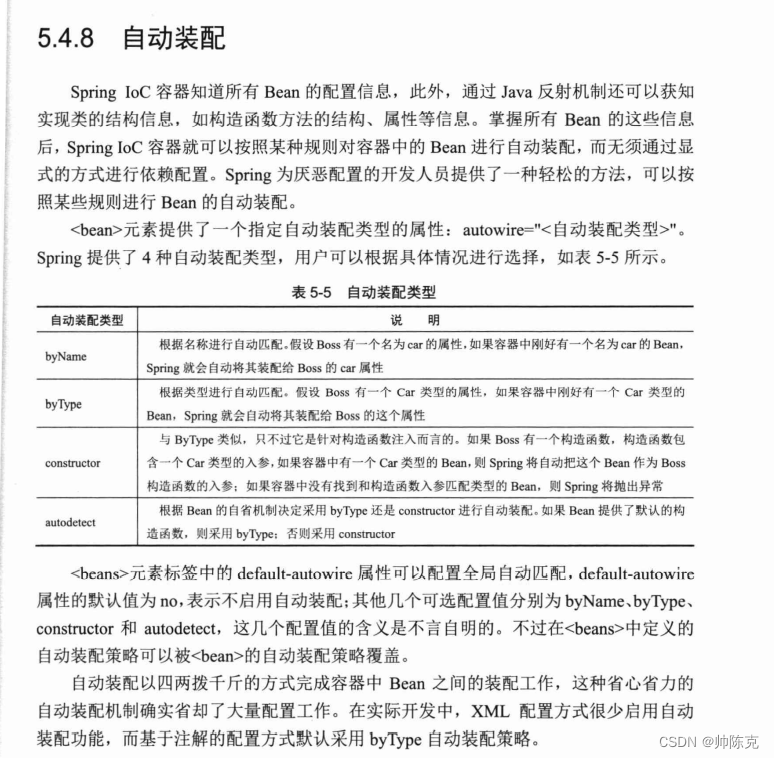
xml自动注入
lookup
如果一个单例bean中有一个prototype的bean的引用,正常情况在get这个单例bean时,其中的prototype的bean依然是同一个对象。用lookup标签。(需要CGLIB依赖)
<bean id="man" class="ioctest.Man" scope="prototype" p:name="纯鹿人" />

    <bean id="person" class="ioctest.Person"  p:name="cxk" p:age="20">
        <lookup-method name="getMan" bean="man"/>
    </bean>
        ClassPathXmlApplicationContext ApplicationContext = new ClassPathXmlApplicationContext("beans.xml");
        Person person = (Person)ApplicationContext.getBean("person");
        Person person1 = (Person)ApplicationContext.getBean("person");
        Man man2 = person.getMan();
        Man man3 = person1.getMan();
        System.out.println(man2 == man3); //false
或者耦合spring代码
    <bean id="man" class="ioctest.Man" scope="prototype" p:name="纯鹿人" />
    <bean id="person" class="ioctest.Person" p:man-ref="man" p:name="cxk" p:age="20"/>
person类修改,每次都从容器中取出man
@Data
public class Person implements ApplicationContextAware {
    private ApplicationContext applicationContext;
    private String name;
    private String age;
    private Man man;

    public Man getMan() {
        return (Man) applicationContext.getBean("man");
    }
    @Override
    public void setApplicationContext(ApplicationContext applicationContext) throws BeansException {
        this.applicationContext = applicationContext;
    }
}
方法替换
可以用实现了MethodReplacer接口的方法替换bean的注入方法
@Data
public class Person  {

    private String name;
    private String age;
    private Man man;

    public Man getMan() {
        Man man = new Man();
        man.setName("纯鹿人");
        return man;
    }
}

public class Person2 implements MethodReplacer {
    @Override
    public Object reimplement(Object o, Method method, Object[] objects) throws Throwable {
        Man man = new Man();
        man.setName("狮豹者");
        return man;
    }
}
配置文件
  <bean id="person2" class="ioctest.Person2"/>
   <bean id="person" class="ioctest.Person">
   		<!--用person2实现的方法替换person的getMan方法,将会注入"狮豹者"-->
       <replaced-method name="getMan" replacer="person2"/>
   </bean>
<bean> 之间的联系
继承
<bean id="person" class="ioctest.Person" p:name="cxk" p:age="18" p:color="黑色" abstract="true"/>

<bean id="son" parent="person" p:color="白色"/>

 <bean id="son1" parent="person"/>
abstract = true 代表抽象最后不会被实例化
继承后赋值属性会覆盖父类属性,不然等于父类
初始化顺序
   <bean  id="person" class="ioctest.Person" />
      <bean  id="man" class="ioctest.Man" depends-on="person"/>
表示person是man的前置bean。在初始化person后才会初始化man。多个可以用逗号 空格 分号分开
引用
      <bean  id="person" class="ioctest.Person" />
      <bean  id="man" class="ioctest.Man">
            <property name="name">
                  <idref bean="person"/>
            </property>
      </bean>
如果man的name属性要使用的是xml中其他bean的Id值,idref可以判断是否存在这个beanId
合并配置文件
<import resource="beans.xml"/>
也可以
ClassPathXmlApplicationContext ApplicationContext1 = new ClassPathXmlApplicationContext(new String[]{"beans1.xml","beans.xml"});
FactoryBean
可以利用实现了FactBean接口的类来生成对象
public class ManFactoryBean implements FactoryBean<Man> {

    private String name;

    //提供set方法给注入使用
    public void setManInfo(String name)
    {
        this.name = name;
    }
    //实际生产的对象由这个方法返回
    @Override
    public Man getObject() throws Exception {

        Man man = new Man();
        man.setName(this.name);
        return man;
    }
    //返回生成对象的class
    @Override
    public Class<?> getObjectType() {
        return Man.class;
    }
    //判断是否要放入单例缓存
    @Override
    public boolean isSingleton() {
        return true;
    }
}
配置文件
<bean id="man" class="com.ke.test.ManFactoryBean" p:manInfo="cxk"/>
使用
Object bean = classPathXmlApplicationContext.getBean("man");
        //如果想获得的是factoryBean的对象,前面加&
        Object bean1 = classPathXmlApplicationContext.getBean("&man");
注意事项
- set注入时必须要有一个无参的构造函数
- 实体类的成员变量前两个字母要么全大写,要么全小写
- 如果不写id,默认为类的全限定类名
- 如果相同类型的bean不写id,会同时注入ioc,已全限定类目+#+数字区分(ioctest.Person#0,ioctest.Person#1)
- 有相同别名的bean,后写的覆盖先写的
- 构造器注入如果多个构造器符合条件,不会报错而是随机选一个
- 两个bean的构造器互相使用对方,会报循环依赖,把一个改成属性注入
注入Bean(注解)
基本的注解,配置文件扫描
	不写id默认类名为id
	@Component("id")
	=
	@Service("id")
	@Repository("id")
	@Controller("id")
配置文件,扫描被spring注解标注的类
<beans xmlns="http://www.springframework.org/schema/beans"
       xmlns:xsi="http://www.w3.org/2001/XMLSchema-instance"
       xmlns:context="http://www.springframework.org/schema/context"
       xsi:schemaLocation="http://www.springframework.org/schema/beans
       http://www.springframework.org/schema/beans/spring-beans-4.2.xsd
       http://www.springframework.org/schema/context
       http://www.springframework.org/schema/context/spring-context-4.2.xsd">
	  <!--扫描ioctest包下的注解-->
      <context:component-scan base-package="ioctest"/>
		 <!--扫描ioctest包下子包anno中的注解-->
		<context:component-scan base-package="ioctest" resourc-pattern="anno/*.class"/>
</beans>
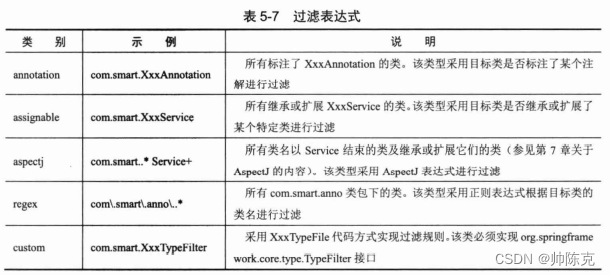
除了spring注解的类,还可以根据规则扫描其他的类
<context:component-scan base-package="ioctest">
      <context:exclude-filter type="annotation" expression="ioctest.anno.test"/>
      <context:include-filter type="annotation" expression="ioctest.anno.test"/>
</context:component-scan>
- context:exclude-filter 根据规则排除掉一些bean,可以存在若干个
- context:include-filter 根据规则加入一些bean,可以存在若干个
例子:
自定义注解
@Target({ElementType.TYPE})
@Retention(RetentionPolicy.RUNTIME)
public @interface test {
}
标注了自定义注解的bean(没有标注spring的注解)
@Data
@test
public class Kun {
   private String name;
}
配置文件添加白名单
  <context:component-scan base-package="ioctest">
           <context:include-filter type="annotation" expression="ioctest.anno.test"/>
     </context:component-scan>
使用可以获取bean
 ClassPathXmlApplicationContext ApplicationContext = new ClassPathXmlApplicationContext("beans.xml");
       Object person = ApplicationContext.getBean("kun");
       System.out.println(person);
context:component-scan 还有一个use-default-filters属性,默认为true表示注入@Component
@Service@Repository@Controller,false表示只注入白名单的bean
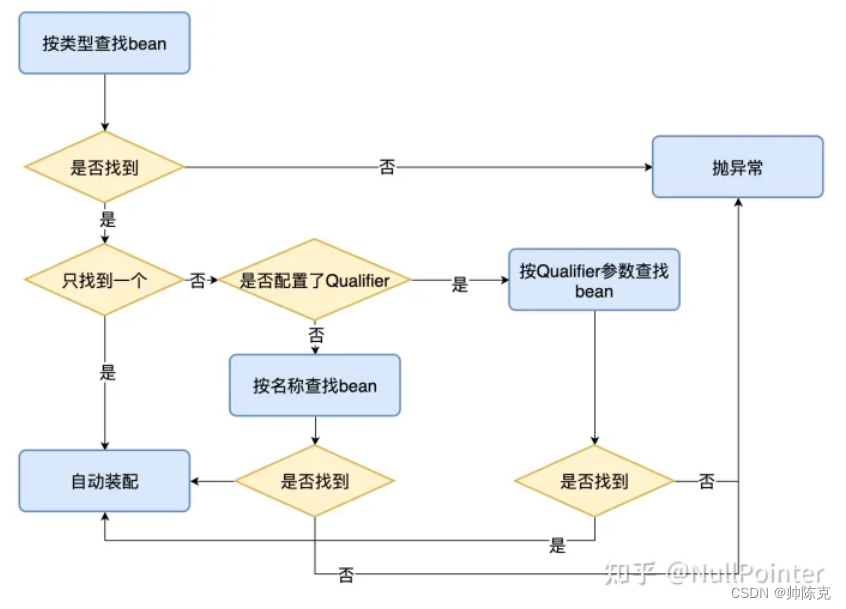
@Autowired
可以定义在成员变量上或者是方法上,默认以type形式匹配,如果匹配到多个再根据变量名字匹配。如果有多个相同类型,且变量名也匹配不上用@Qualifier(“NAME”)来区分,@Autowired默认是必须要有bean不然报错,可以设置@Autowired(required = false)表示没有匹配到也行。
@Component
@Data
public class KUN {

    public Man man;
    public Person person;

    @Autowired
    public void init(@Qualifier("man") Man man,Person person)
    {
        this.man = man;
        this.person = person;
    }

}
@Autowired 集合类型
测试实体类
@Data
@Component
public class Person  {
    private String name;
    private String age;
    private String color;
}

@Data
@Component
public class Man extends Person{

}
@Data
@Component
@Order(0)
public class Person2 extends Person {
}
注入类
@Component
@Data
public class KUN {
    List<Person> list;
    Map<String,Person> map;
    @Autowired
    public void init(List<Person> list,Map<String,Person> map)
    {
        this.list = list;
        this.map = map;
    }

}
或者
@Component
@Data
public class KUN {
    @Autowired
    List<Person> list;
    @Autowired
    Map<String,Person> map;
}
可以在list中注入容器中所有为Person类型得Bean(必须有类型不然报错),在Map中注入Key为BeanName,value为对应类型Bean的元素 ,但是注入的顺序不确定可以在Bean上添加@order在规定顺序,越小值越先加载
@Lazy
@Data
@Lazy
@Component
public class Man extends Person{

}


@Component
@Data
public class KUN {
    @Autowired
    @Lazy
    Man man;
}
延迟加载必须在类上和自动注入的地方加上,缺一不可
@Qualifier 和 @Primary
配合@Autowired使用,@Autowired默认根据类型来自动注入,可以用这两个注解进行区分
用来注入的实体类
@Data
@Component
public class Person  {
    private String name;
    private String age;
    private String color;
}

@Data
@Component
public class Man extends Person{

}
@Data
@Component
public class Person2 extends Person {
}
@Qualifier根据beanName进行区分
@Component
@Data
public class KUN  {

    @Autowired
    @Qualifier("man")
    Person person1;
}
@Primary标记类的优先级,只能存在一个
@Data
@Component
@Primary
public class Man extends Person{

}
@Resource,@inject,@Autowire 对比*
@Autowire
- 默认以类型开始匹配,类型匹配失败会用变量名和bean的name进行比较
- 如果两种匹配都匹配不到,如果要使用byName,需要使用@Qualifier一起配合
- 能够用在:构造器、方法、参数、成员变量和注解上
- 注解有一个required参数,默认true表示必须要匹配到
- 注解是spring提供
@Resource
- 默认以name进行匹配,匹配不到再以type进行匹配
- 注解有两个重要属性name和type
- java提供的注解
- 没有required参数
- 作用于类、成员变量和方法上。
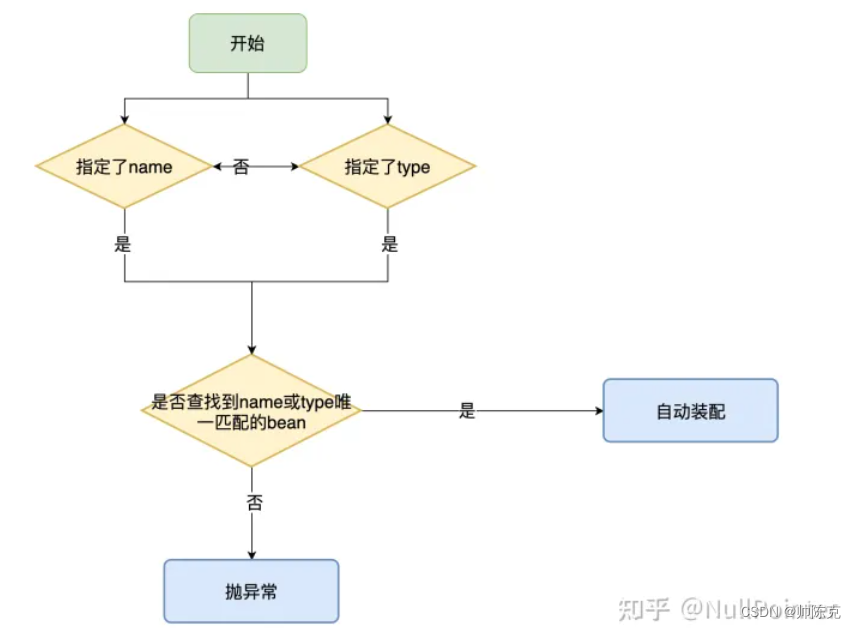
当使用type时有一个问题,如果指定了type,但是变量名是可以匹配到唯一值时会报错
实体类
@Component
public class Person{
}


@Component
@Data
public class Man extends Person{
}
@Component


@Data
public class Women extends Person{
}
注入类(错误)
@Component
@Data
public class Kun {
	//变量名为man,这个时候注入会报类型不匹配错误
    @Resource(type = Women.class)
    public Person man;
}
注入类(正确)
@Component
@Data
public class Kun {
	//变量名不为man,可以成功注入
    @Resource(type = Women.class)
    public Person man111;
}
@inject
- 要导入pom依赖
- 可以作用于构造方法,方法,和成员变量上
- 显示type匹配,然后name
- 配合@Named,用法等于@Qualifier
- 没有required参数
@Scope
- @Scope(“prototype”)
- @Scope(“singleton”)
@PostConstruct,@PreDestroy
- @PostConstruct 初始化
- @PreDestroy 结束时执行
<bean class="ioctest.Person2" id="person2" init-method="init2" destroy-method="des1" />
等价于
@Data
@Component
public class Person2 extends Person {

   @PostConstruct
   public void init2()
   {
       System.out.println("init2");
   }
   @PreDestroy
   public void des1()
   {
       System.out.println("des1");
   }

}
但是注解形式可以写多个初始化方法和结束方法
基于Java配置
@Configuration @bean
@Configuration 上标注了 @Component 本身自己也是一个bean,可以被配置文件扫描到
@bean 可以指定bean名 输出化,销毁方法
在调用@bean注释的方法时并不是普通方法,而是等于getBean
@Configuration
public class config {

   //默认注入的bean名称是方法名man111111
   @Bean(initMethod = "init")
   public Man man1111111()
   {
       return new Man();
   }
   //指定了bean名
   @Bean("w")
   public Women women()
   {
       return new Women();
   }
   @Bean
   public person person()
   {
       person person = new person();
       //调用被@bean修饰过的方法 就等于从容器中获取 而不是普通方法
       person.setMan(man1111111());
       person.setWomen(women());
       return person;
   }
}
配置文件引用配置文件
@Configuration
public class config1 {
    @Autowired
    private config config;
    @Bean
    public person person()
    {
        person person = new person();
        //调用被@bean修饰过的方法 就等于从容器中获取 而不是普通方法
        person.setMan(config.man1111111());
        person.setWomen(config.women());
        return person;
    }

}
容器启动方式
1.直接
AnnotationConfigApplicationContext ApplicationContext = new AnnotationConfigApplicationContext(config.class);
        ApplicationContext.register(config1.class);
        ApplicationContext.refresh();

        AnnotationConfigApplicationContext ApplicationContext1 = new AnnotationConfigApplicationContext(config.class,config1.class);
2.对应的配置文件注解扫描,因为也是 @Component
<context:component-scan base-package="config1" />
配置类引用xml
<beans xmlns="http://www.springframework.org/schema/beans"
       xmlns:xsi="http://www.w3.org/2001/XMLSchema-instance"
       xmlns:context="http://www.springframework.org/schema/context"
       xsi:schemaLocation="http://www.springframework.org/schema/beans
       http://www.springframework.org/schema/beans/spring-beans-4.2.xsd
       http://www.springframework.org/schema/context
       http://www.springframework.org/schema/context/spring-context-4.2.xsd">


      <bean id="cxk" class="ioctest.Man" />

</beans>
@Configuration
//引入配置文件
@ImportResource("classpath:beans.xml")
public class config {

    @Autowired
    //自动注入配置文件中的man
    public void b (Man man)
    {
        System.out.println(man);
    }

}
手动动态注入bean
手动注入ManService实例
实体类
@Data
public class Man {
}
@Data
public class ManService {
    private Man man;
}
工厂类(注入用,利用BeanFactoryPostProcessor)
public class ManServiceFactoryBean implements BeanFactoryPostProcessor {
    @Override
    public void postProcessBeanFactory(ConfigurableListableBeanFactory beanFactory) throws BeansException {
        DefaultListableBeanFactory factory = (DefaultListableBeanFactory) beanFactory;

        //Bean 定义
        BeanDefinitionBuilder builder=BeanDefinitionBuilder.genericBeanDefinition(ManService.class);

        //设置属性 第一个参数为对应bean的成员变量(要提供set方法)第二个参数为容器中已存在的beanName
        builder.addPropertyReference("man","man");

        //注册 Bean 定义,后面也会解析成实例
        factory.registerBeanDefinition("ManService",builder.getRawBeanDefinition());

        //注册 Bean 实例,直接注入实例
        factory.registerSingleton("ManService2",new ManService());
    }
}
正常的注入bean。注解配置文件都可以
@Configuration
public class config {


    @Bean
    public Man man ()
    {
       return new Man();
    }

    @Bean
    public static ManServiceFactoryBean c ()
    {
        return new ManServiceFactoryBean();
    }
}
调用容器注册就发现已经存在ManService,和ManService2的bean了
扩展自定义xml标签
在spring的xml配置文件中加入自己的自定义标签
首先创建以下文件夹和文件
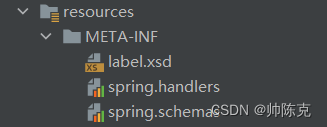
label.xsd 是自定义标签的规则 spring.handlers是加载解析器的,spring.schemas是写label.xsd的路径
label.xsd
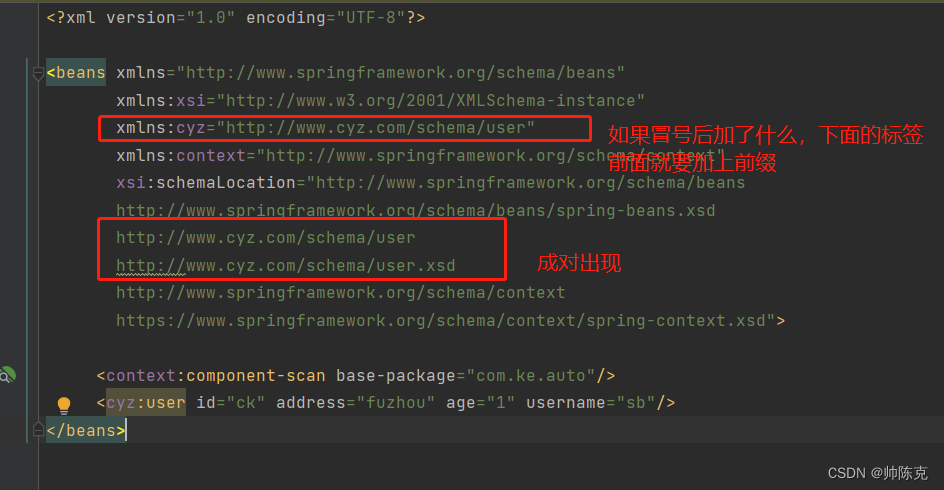
第二行的targetNamespace为命名空间,到时候需要在bean.xml中引用
<schema xmlns="http://www.w3.org/2001/XMLSchema"
        targetNamespace="http://www.cyz.com/schema/user"
        elementFormDefault="qualified">
<element name="user">
    <complexType>
        <attribute name="id" type="string"/>
        <attribute name="username" type="string"/>
        <attribute name="address" type="string"/>
        <attribute name="age" type="int"/>
    </complexType>
</element>
</schema>
有了标签就需要解析器来解析标签的内容MyParser.java
    public class MyParser implements BeanDefinitionParser {
    @Override
    public BeanDefinition parse(Element element, ParserContext parserContext) {
        //获得bean的定义
        BeanDefinitionBuilder beanDefinitionBuilder = BeanDefinitionBuilder.genericBeanDefinition(User.class);
        //获得对应标签的值
        String id = element.getAttribute("id");
        //给定义赋值,方法还可以构造器,或者给引用类型赋值
        beanDefinitionBuilder.addPropertyValue("id",id);
        //根据定义得到beanDefinition
        AbstractBeanDefinition beanDefinition = beanDefinitionBuilder.getBeanDefinition();
        //将beanDefinition写入容器并给上id
        parserContext.registerBeanComponent(new BeanComponentDefinition(beanDefinition,"test"));
        return null;
    }
}
有了解析器还需要将解析器注入到spring,MyParserHandler.java
 @Override
    public void init() {
    	//这里的user要和xsd中<element name="user">相等,代表解析的是user这个标签
        registerBeanDefinitionParser("user",new MyParser());
    }
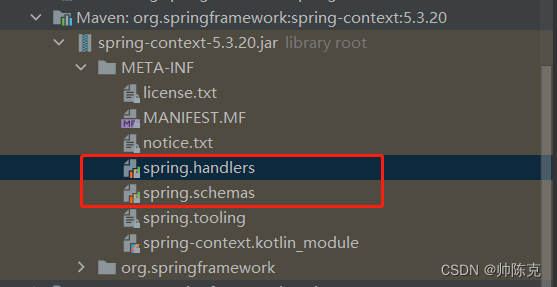
最后要让spring识别到 handler 和 xsd文件的位置,用命名空间
spring.handlers(找到注入器的位置)
http\://www.cyz.com/schema/user=com.ke.xsd.MyParserHandler
spring.schemas(找到xsd的位置)
http\://www.cyz.com/schema/user.xsd=META-INF/label.xsd
最后就可以在bean的定义中使用(这样就可以在容器中注入一个名字为test的bean)
根据这个原理可以知道context的定义的自动扫描包注入bean的原理
国际化
前置
https://blog.csdn.net/weixin_44316557/article/details/128586250?spm=1001.2014.3001.5501
体系结构
spring 的 MessageSource 接口定义了国际化的功能
public interface MessageSource {
	//code 表示国际化中的属性名 arg表示填充的参数 defaultMessage 表示参数指定的默认信息,locale代表本地化对象
    @Nullable
    String getMessage(String code, @Nullable Object[] args, @Nullable String defaultMessage, Locale locale);
	//与第一个类似,但是在找不到资源文件对应的属性名时报错
    String getMessage(String code, @Nullable Object[] args, Locale locale) throws NoSuchMessageException;
	//将属性名,参数,默认信息封装起来  和第一个用法一样
    String getMessage(MessageSourceResolvable resolvable, Locale locale) throws NoSuchMessageException;
}
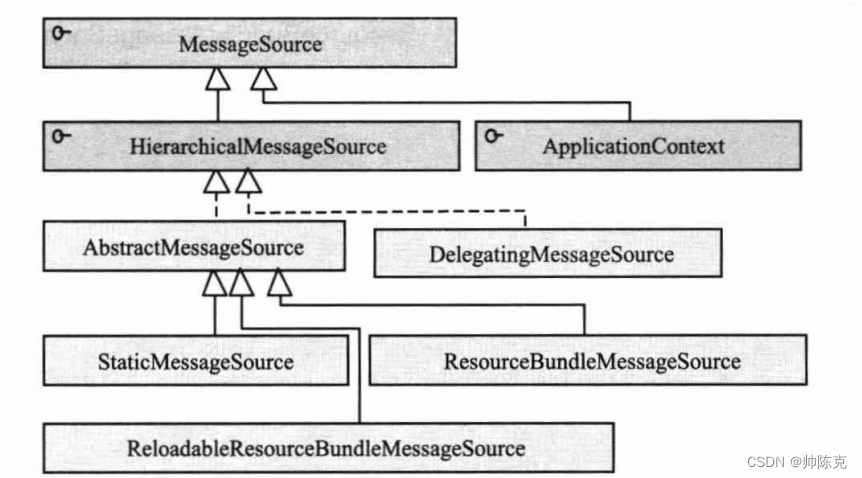
- HierarchicalMessageSource 接口定义了父子MessageSource的功能,获得父MessageSource
- ReloadableResourceBundleMessageSource 提供了定时刷新功能,在不重启项目的情况下更新配置
- ResourceBundleMessageSource 主要实现,基于java的ResourceBundle
- StaticMessageSource 主要用于程序测试,用编程的方式提供国际化信息
- DelegatingMessageSource 方便操作父MessageSource提供的代替类
测试
国际化文件。类路径下
resource_en_US.properties
greeting.common=How are you
greeting.morning= good moring {0},give me {1,number,currency}
resource_zh_CN.properties
greeting.common=你好
greeting.morning= 早上好啊 {0},给我 {1,number,currency}
resource_cyz_CYZ.properties
greeting.common=#¥%!@#
greeting.morning= #¥%!@ {0},#¥%!@ {1,number,currency}
ResourceBundleMessageSource
在配置文件中,将配置文件已资源名方式导入
beam.xml
 <bean id="messageSource" class="org.springframework.context.support.ResourceBundleMessageSource">
          <property name="basenames">
               <list>
               		<!--文件路径+资源名-->
                    <value>resource</value>
               </list>
          </property>
          <property name="defaultEncoding" value="UTF-8"/>
 </bean>
使用
ClassPathXmlApplicationContext classPathXmlApplicationContext = new ClassPathXmlApplicationContext("beans.xml");
MessageSource messageSource = (MessageSource)classPathXmlApplicationContext.getBean("messageSource");
Object[] para = {"cxk",10.11d};
String message = messageSource.getMessage("greeting.morning", para, Locale.CHINA);
System.out.println(message);
ReloadableResourceBundleMessageSource
比ResourceBundleMessageSource 多一个刷新的功能
 <bean id="messageSource" class="org.springframework.context.support.ResourceBundleMessageSource">
          <property name="basenames">
               <list>
               		<!--文件路径+资源名-->
                    <value>resource</value>
               </list>
          </property>
          <property name="defaultEncoding" value="UTF-8"/>
          <property name="cacheSeconds" value="5"/>
 </bean>
容器级的国际化
ApplicationContext 已经实现了MessageSource 接口
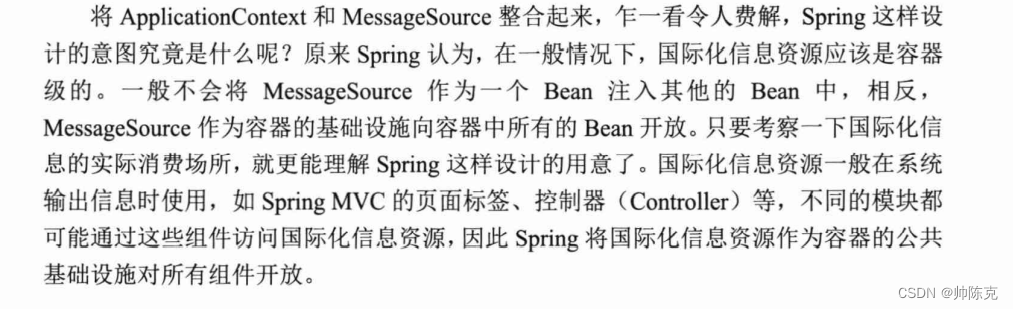
在refresh()方法中的initMessageSource方法中利用后置处理器找到beanName为messageSource且类型为MessageSource自动加载,所以可以直接使用以下代码。(beanName必须为messageSource)
ApplicationContext applicationContext = new ClassPathXmlApplicationContext("beans.xml");
Object[] para = {"cxk",10.11d};
String message = applicationContext.getMessage("greeting.morning", para, Locale.CHINA);
System.out.println(message);
注意点
- 中文乱码需要在bean中配置指定的编码或者将中文翻译成ASCII码
- 测试修改配置文件自动刷新需要在targer目录的配置文件进行修改才能看到效果
- 如果配置文件写在代码路径中,需要在pom文件中添加过滤(刷新maven)
<resources>
            <!-- 表示编译java源码时,包含src/main/java和src/main/resources目录下的xml、properties一起 -->
            <!--如果mapper.xml在src/main/java目录下,就必须做这个配置,不然编译后会丢弃mapper.xml文件-->
            <resource>
                <directory>src/main/java</directory>
                <includes>
                    <include>**/*.*</include>
                </includes>
            </resource>
            <resource>
                <directory>src/main/resources</directory>
                <includes>
                    <include>**/*.*</include>
                </includes>
            </resource>
        </resources>
监听器和广播器简单使用
监听时自定义事件(配置注解通用)
public class TestEvent extends ApplicationEvent {
    public String msg;

    public TestEvent(Object source, String msg) {
        super(source);
        this.msg = msg;
    }

    public void print(){
        System.out.println(msg+"监听被触发");
    }
}
配置文件形式
监听器(配置文件使用)
public class TestListener implements ApplicationListener {
    @Override
    public void onApplicationEvent(ApplicationEvent event) {
        TestEvent testEvent = (TestEvent) event;
        testEvent.print();
    }
}
注册监听器
<bean id="testListener" class="com.ke.Listener.TestListener"/>
使用
public class test {
    public static void main(String[] args) throws IOException {
 		ClassPathXmlApplicationContext classPathXmlApplicationContext = new ClassPathXmlApplicationContext("beans.xml");
        TestEvent testEvent = new TestEvent("hello","msg");
        classPathXmlApplicationContext .publishEvent(testEvent);
    }


}
注解形式
监听器(注解使用)
@Component
public class TestListener {

    @EventListener
    public void onApplicationEvent(ApplicationEvent event) {
        TestEvent testEvent = (TestEvent) event;
        testEvent.print();
    }
}
config扫描注入bean
@Configuration
@ComponentScan(basePackages = "com.ke.Listener")
public class MainConfig {
}
使用
public class test {
    public static void main(String[] args) throws IOException {

        AnnotationConfigApplicationContext context = new AnnotationConfigApplicationContext(MainConfig.class);
        TestEvent testEvent = new TestEvent("hello","msg");
        context.publishEvent(testEvent);
    }
}
属性编辑器使用(基于javaBean内省)
自动将配置的字符串转换成对应的对象
配置文件使用
将配置文件中的字符串转换成Car对象
实体类
@Data
public class Boss {
    private String name;
    private Car car;
}

@Data
public class Car {
    private String brand;
    private int speed;
    private double price;
}
自己编写的Editor
public class CustomCarEditor extends PropertyEditorSupport {
    @Override
    public void setAsText(String text) throws IllegalArgumentException {
        //通过格式 xxx,xxx,xxx来创建对象
        String[] split = text.split(",");
        Car car = new Car();
        car.setBrand(split[0]);
        car.setSpeed(Integer.parseInt(split[1]));
        car.setPrice(Double.parseDouble(split[2]));
        //回写值
        setValue(car);
    }
}
使用配置文件注入
<?xml version="1.0" encoding="UTF-8"?>
<beans xmlns="http://www.springframework.org/schema/beans"
       xmlns:xsi="http://www.w3.org/2001/XMLSchema-instance"
       xsi:schemaLocation="http://www.springframework.org/schema/beans
       http://www.springframework.org/schema/beans/spring-beans.xsd">

    <bean id="boss" class="com.ke.editor.Boss">
        <property name="name" value="陈克"/>
        <!--这里注入car采用字符串形式-->
        <property name="car" value="保时捷,200,1000000.01"/>
    </bean>

    <bean class="org.springframework.beans.factory.config.CustomEditorConfigurer">
        <property name="customEditors">
            <map>
                <entry key="com.ke.editor.Car" value="com.ke.editor.CustomCarEditor">
                </entry>
            </map>
        </property>
    </bean>
</beans>
使用
ApplicationContext ApplicationContext = new ClassPathXmlApplicationContext("beans.xml");
Boss boss =(Boss)ApplicationContext.getBean("boss");
System.out.println(boss);//Boss(name=陈克, car=Car(brand=保时捷, speed=200, price=1000000.01))
注解使用
实体类
@Data
@Component //注册bean
public class Boss {
    @Value("CK")
    private String name;
    @Value("保时捷,200,1000000.01")
    private Car car;
}

@Data
public class Car {
    private String brand;
    private int speed;
    private double price;
}
配置类
@Configuration
@ComponentScan(basePackages = "com.ke.editor")
public class MainConfig {
    @Bean
    //这里要用static,为什么在另一篇文章,《spring使用记录》
    public static CustomEditorConfigurer customEditorConfigurer()
    {
        CustomEditorConfigurer customEditorConfigurer = new CustomEditorConfigurer();
        HashMap map = new HashMap<>();
        map.put(Car.class,CustomCarEditor.class);
        customEditorConfigurer.setCustomEditors(map);
        return customEditorConfigurer;
    }
}
使用
ApplicationContext applicationContext = new AnnotationConfigApplicationContext(MainConfig.class);
Boss boss =(Boss)applicationContext.getBean("boss");
System.out.println(boss);//Boss(name=陈克, car=Car(brand=保时捷, speed=200, price=1000000.01))
注意事项
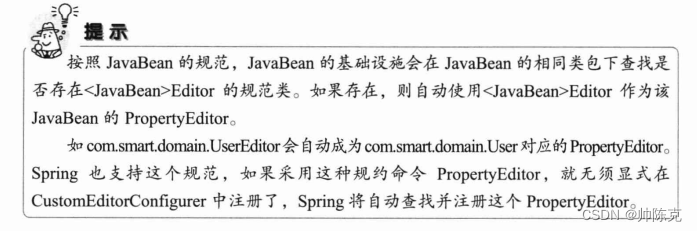
所以上面自定义的CustomCarEditor 如果名字改成 CarEditor 就不用写配置,会自动注入容器
属性编辑器使用(spring3.0)
因为基于内省的方式只支持string转对象。新版可实现对象到对象的互转
如何自定义类型转换器?分两步走:
实现 Converter / GenericConverter / ConverterFactory 接口
将该类注册到 ConversionServiceFactoryBean 中。
Converter(一对一)
实体类
@Data
public class Cat {
    String name;
    String age;
}

@Data
public class Dog {
    String name;
    String age;
}

@Data
public class Man {
    String name;
    Dog Dog;
}
转换器实现类
public class DogConverter implements Converter<Cat,Dog> {
    @Override
    public Dog convert(Cat source) {
        Dog dog = new Dog();
        dog.setName(source.getName());
        dog.setAge(source.getAge());
        return dog;
    }
}
配置文件
<?xml version="1.0" encoding="UTF-8"?>
<beans xmlns="http://www.springframework.org/schema/beans"
       xmlns:xsi="http://www.w3.org/2001/XMLSchema-instance"
       xsi:schemaLocation="http://www.springframework.org/schema/beans
       http://www.springframework.org/schema/beans/spring-beans.xsd">

    <bean id="cat" class="com.ke.converter0.Cat">
        <property name="name" value="陈克"/>
        <property name="age" value="16"/>
    </bean>
    <bean id="dogConverter" class="com.ke.converter0.DogConverter"/>
    <bean id="conversionService"
          class="org.springframework.context.support.ConversionServiceFactoryBean">
        <property name="converters">
            <set>
                <ref bean="dogConverter"/>
            </set>
        </property>
    </bean>
    <bean id="man" class="com.ke.converter0.Man">
        <property name="name" value="陈克"/>
        <property name="dog" >
            <ref bean="cat" />
        </property>
    </bean>
</beans>
使用(把狗变成猫)
ApplicationContext ApplicationContext = new ClassPathXmlApplicationContext("beans.xml");
Man man =(Man)ApplicationContext.getBean("man");
System.out.println(man);//Man(name=陈克, Dog=Dog(name=陈克, age=16))
ConverterFactory(一对多)
可以将一个类转换成一个类或者他的子类(例子person->dog或者person->cat)
@Data
public class Animal {
    String name;
    String age;
}

@Data
public class Dog extends Animal{
    private String type;
}
@Data
public class Cat extends Animal{
    private String color;
}
@Data
public class Person {
    String name;
    String age;
}
@Data
public class Man {
    String name;
    Dog dog;
}
转换实现类
public class PersonToAnimal implements ConverterFactory<Person,Animal> {

    @Override
    public <T extends Animal> Converter<Person, T> getConverter(Class<T> targetType) {
        return new myConverter<>(targetType);
    }

    class  myConverter<T extends Animal> implements Converter<Person,T>
    {
        private Class<T> aClass;
        public myConverter(Class<T> targetType) {
            this.aClass = targetType;
        }

        @SneakyThrows
        @Override
        public T convert(Person source) {
            T t = aClass.newInstance();
            t.setName(source.getName());
            t.setAge(source.getAge());
            return t;
        }
    }
}
配置
<?xml version="1.0" encoding="UTF-8"?>
<beans xmlns="http://www.springframework.org/schema/beans"
       xmlns:xsi="http://www.w3.org/2001/XMLSchema-instance"
       xsi:schemaLocation="http://www.springframework.org/schema/beans
       http://www.springframework.org/schema/beans/spring-beans.xsd">

    <bean id="person" class="com.ke.converter0.Person">
        <property name="name" value="陈克"/>
        <property name="age" value="16"/>
    </bean>

    <bean id="personToAnimal" class="com.ke.converter0.PersonToAnimal"/>


    <bean id="conversionService"
          class="org.springframework.context.support.ConversionServiceFactoryBean">
        <property name="converters">
            <set>
                <ref bean="personToAnimal"/>
            </set>
        </property>
    </bean>

    <bean id="man" class="com.ke.converter0.Man">
        <property name="name" value="陈克"/>
        <property name="dog" >
            <ref bean="person" />
        </property>
    </bean>
</beans>
使用
ApplicationContext ApplicationContext = new ClassPathXmlApplicationContext("beans.xml");
        Man man =(Man)ApplicationContext.getBean("man");
        System.out.println(man);
        //Man(name=陈克, Dog=Dog{name='陈克', age='16', type='null'})
如果把man的属性修改为Cat
@Data
public class Man {
    String name;
    Cat cat;
}
再次执行
ApplicationContext ApplicationContext = new ClassPathXmlApplicationContext("beans.xml");
        Man man =(Man)ApplicationContext.getBean("man");
        System.out.println(man);
        //Man(name=陈克, cat=Cat{name='陈克', age='16', color='null'})
GenericConverter(多对多)
查看spring的实现类
读取配置文件properties
test.properties
name=陈克
age=19
实体类
@Data
public class Person {
    private String name;
    private String age;
}
配置文件
使用PropertySourcesPlaceholderConfigurer类,旧版本使用PropertyPlaceholderConfigurer
<?xml version="1.0" encoding="UTF-8"?>
<beans xmlns="http://www.springframework.org/schema/beans"
       xmlns:xsi="http://www.w3.org/2001/XMLSchema-instance"
       xsi:schemaLocation="http://www.springframework.org/schema/beans
       http://www.springframework.org/schema/beans/spring-beans.xsd">
    <bean class="org.springframework.context.support.PropertySourcesPlaceholderConfigurer">
        <property name="location" value="classpath:test.properties"/>
        <property name="fileEncoding">
            <value>UTF-8</value>
        </property>
    </bean>
    <bean id="person" class="com.ke.readproperties.Person">
        <property name="name" value="${name}"/>
        <property name="age" value="${age}"/>
    </bean>
</beans>
或者,但是这种无法配置更细节的常用属性
<context:property-placeholder location="classpath:test.properties"/>
常用属性
- location 配置文件位置 可以用配置list的方式配置多个
- fileEncoding 读取配置文件的编码格式 (如果无效可以试试修改idea的编码)
- order 如果有多个PropertySourcesPlaceholderConfigurer 可以定义顺序
- placeholderPrefix 配置前缀 默认 ${
- placeholderSuffix 配置后缀 默认 }
代码加注解配置
@Configuration
@ComponentScan(basePackages = "com.ke.readproperties")
public class MainConfig {

    @Bean
    public static PropertySourcesPlaceholderConfigurer propertySourcesPlaceholderConfigurer()
    {
        PropertySourcesPlaceholderConfigurer propertySourcesPlaceholderConfigurer = new PropertySourcesPlaceholderConfigurer();
        propertySourcesPlaceholderConfigurer.setLocation(new ClassPathResource("test.properties"));
        propertySourcesPlaceholderConfigurer.setFileEncoding("UTF-8");
        return propertySourcesPlaceholderConfigurer;
    }

}
@Data
@Component
public class Person {
    @Value("${name}")
    private String name;
    @Value("${age}")
    private String age;
}
纯注解@PropertySource
@Configuration
@ComponentScan(basePackages = "com.ke.readproperties")
@PropertySource("classpath:test.properties")
public class MainConfig {
}
@Data
@Component
public class Person {
    @Value("${name}")
    private String name;

    private String age;

    public Person(@Value("${age}") String age) {
        this.age = age;
    }
}
根据环境切换配置 @Profile
注意事项
1.读取配置文件也可以使用自定义数据转换器
@Configuration
public class AppConfig {

    @Bean
    public ConversionService conversionService() {
        DefaultFormattingConversionService conversionService = new DefaultFormattingConversionService();
        conversionService.addConverter(new MyCustomConverter());
        return conversionService;
    }
}
2.可以使用以下格式在找不到值时设置默认值
@Data
@Component
public class Person {
    @Value("${name}")
    private String name;

    private String age;

    public Person(@Value("${age1:66}") String age) {
        this.age = age;
    }
}
3.@PropertySource 配合 @ConfigurationProperties(springboot的)
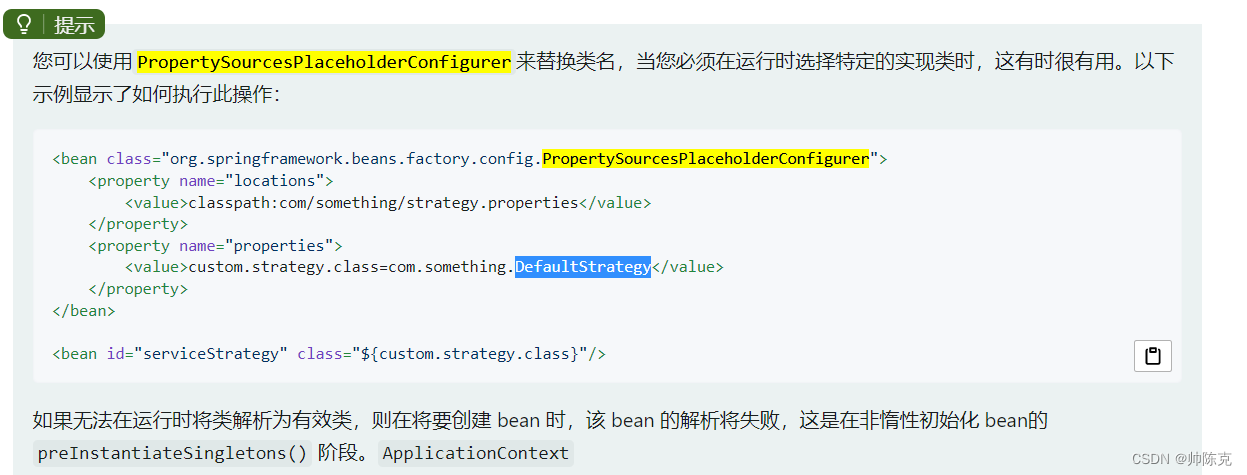
4.动态选择实现类


 568
568


 被折叠的 条评论
为什么被折叠?
被折叠的 条评论
为什么被折叠?
 到【灌水乐园】发言


