


6.1 从全连接到卷积
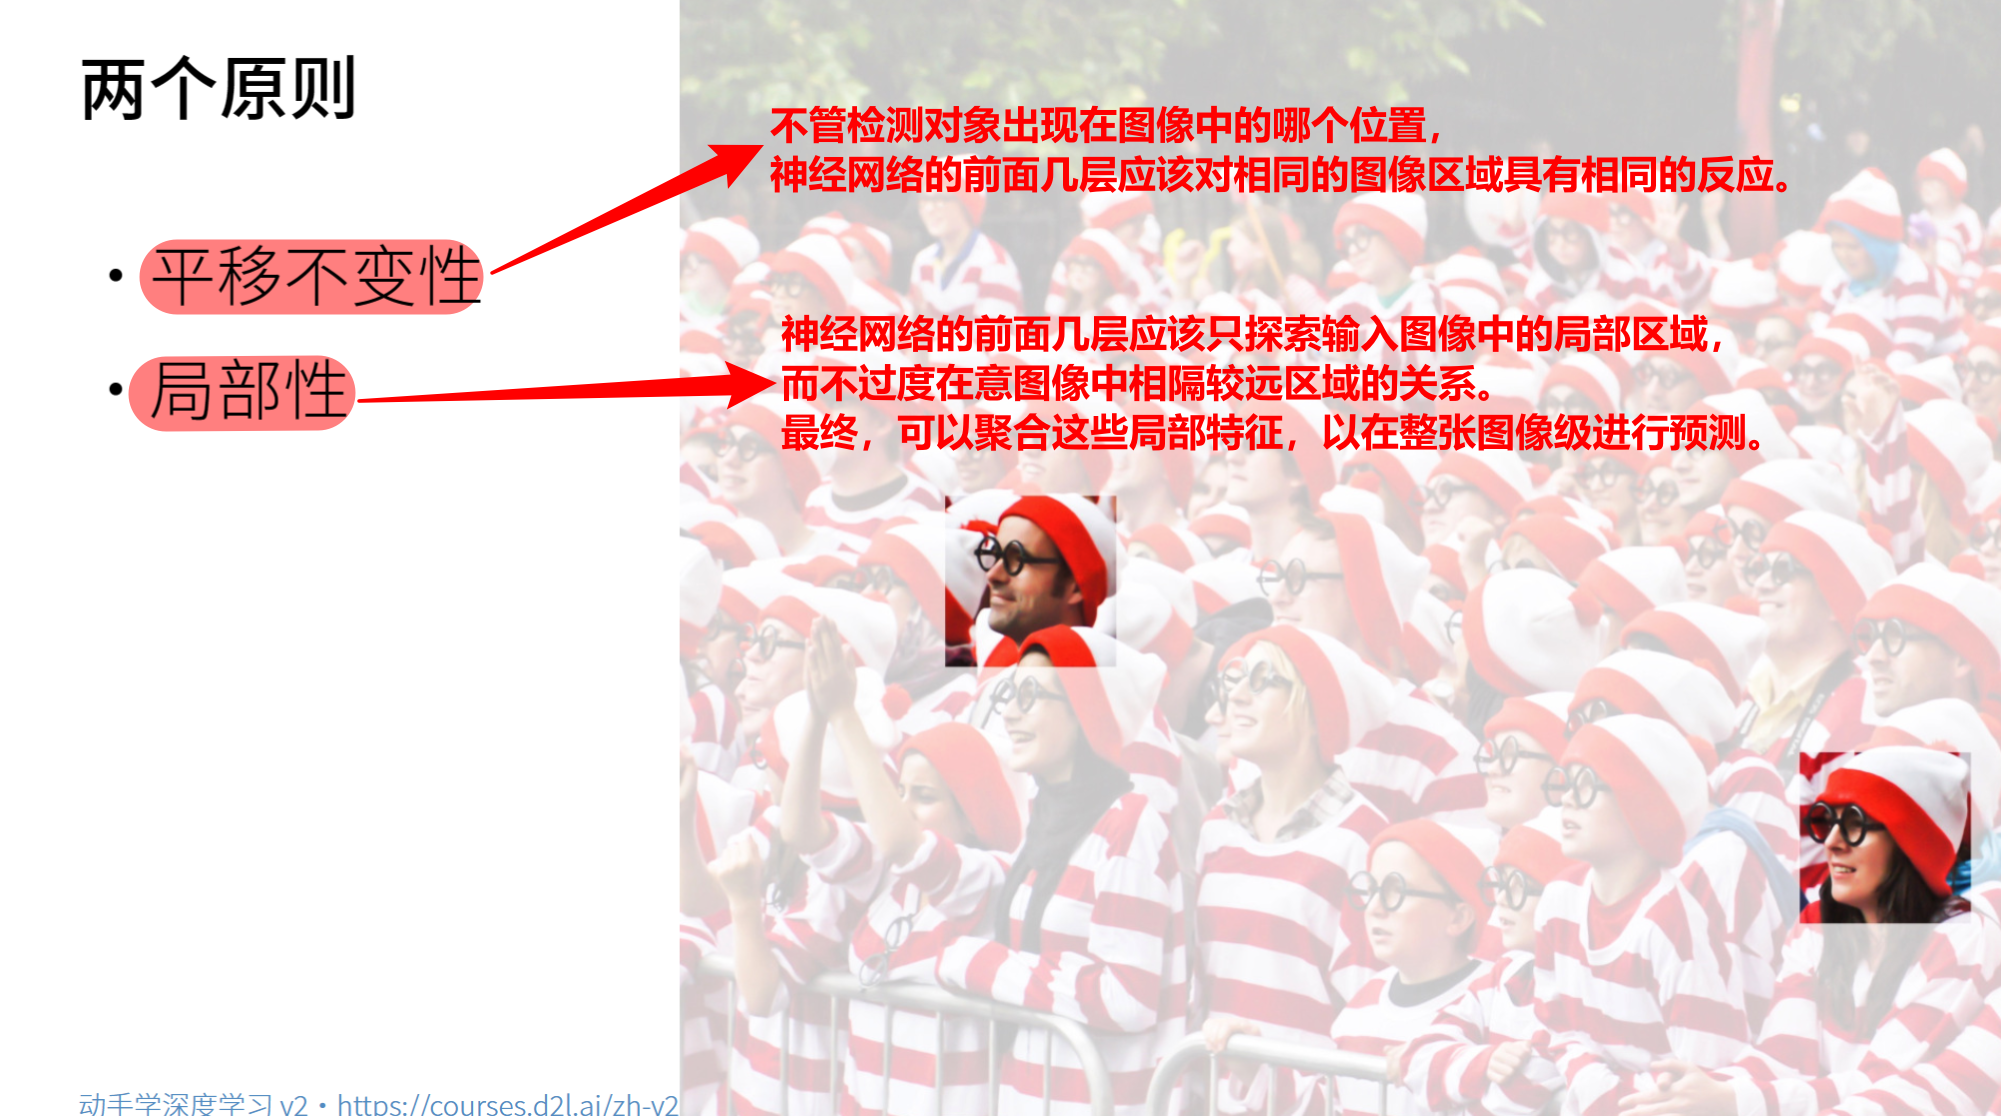
6.1.1 两个原则
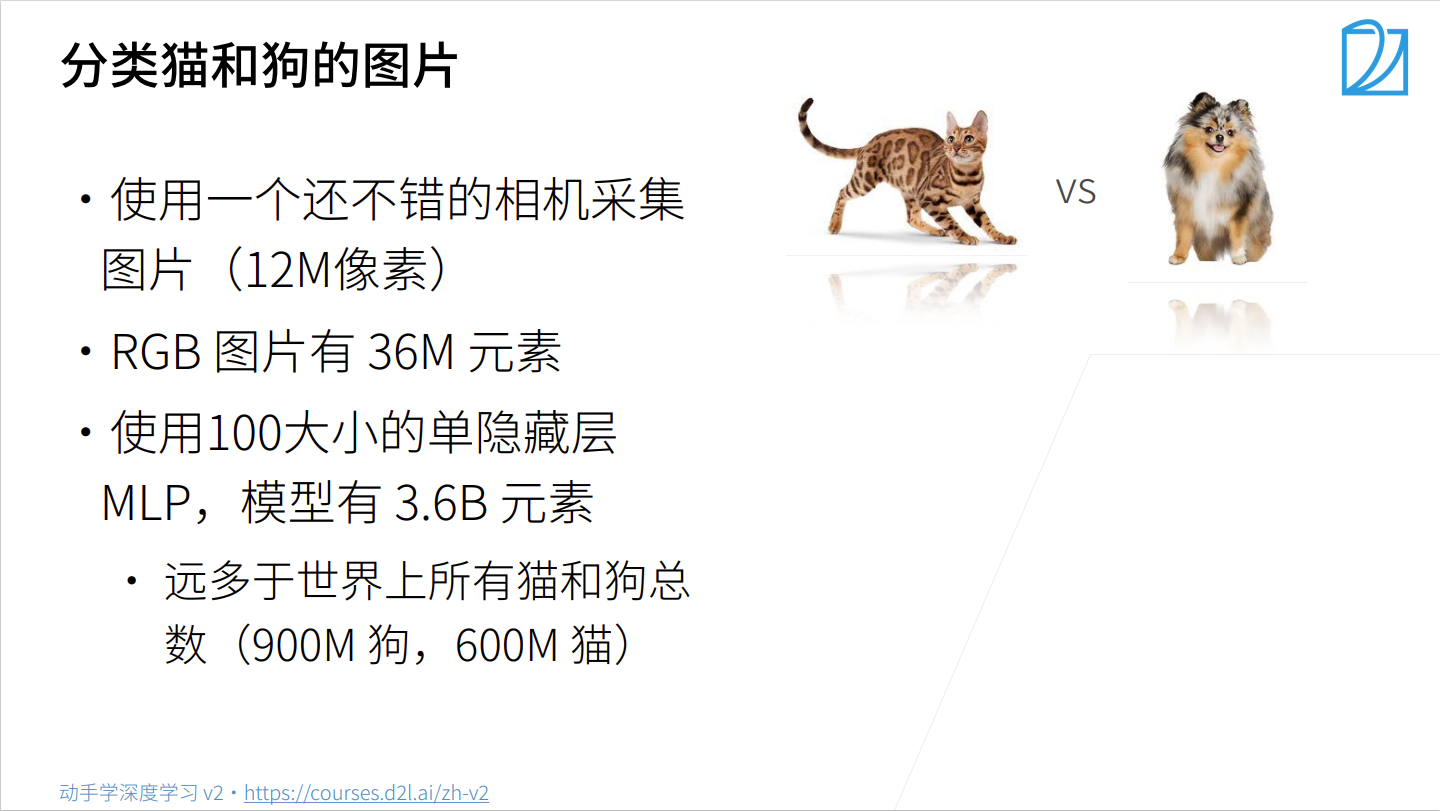
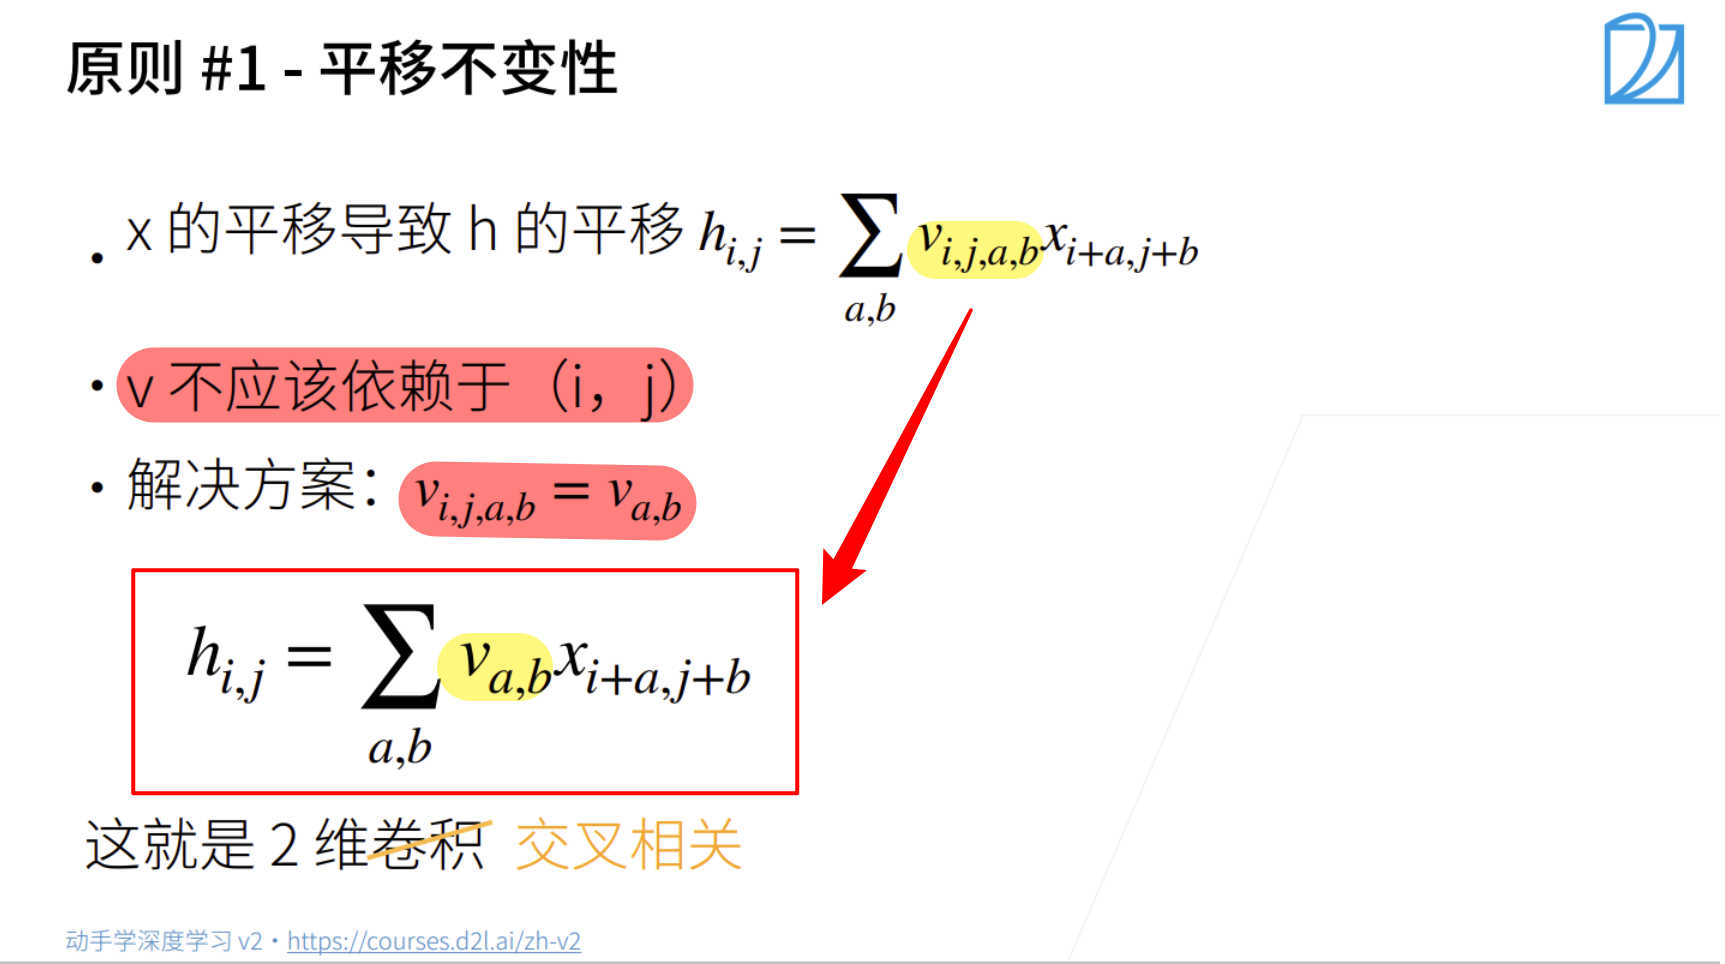
假设从一张图像中找到某个物体。合理的假设事:无论用那种方法找到这个物体,都应该和物体的位置不变。
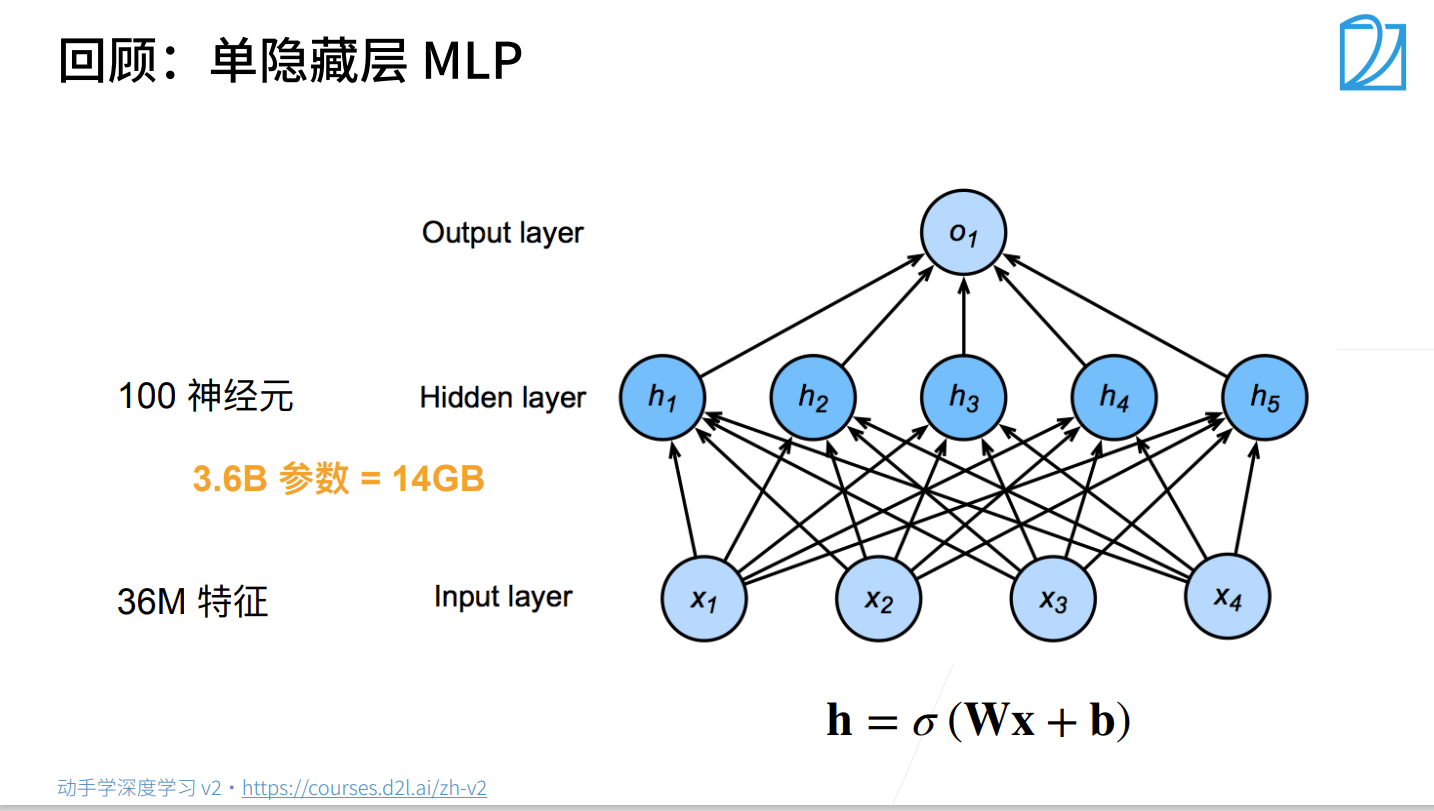
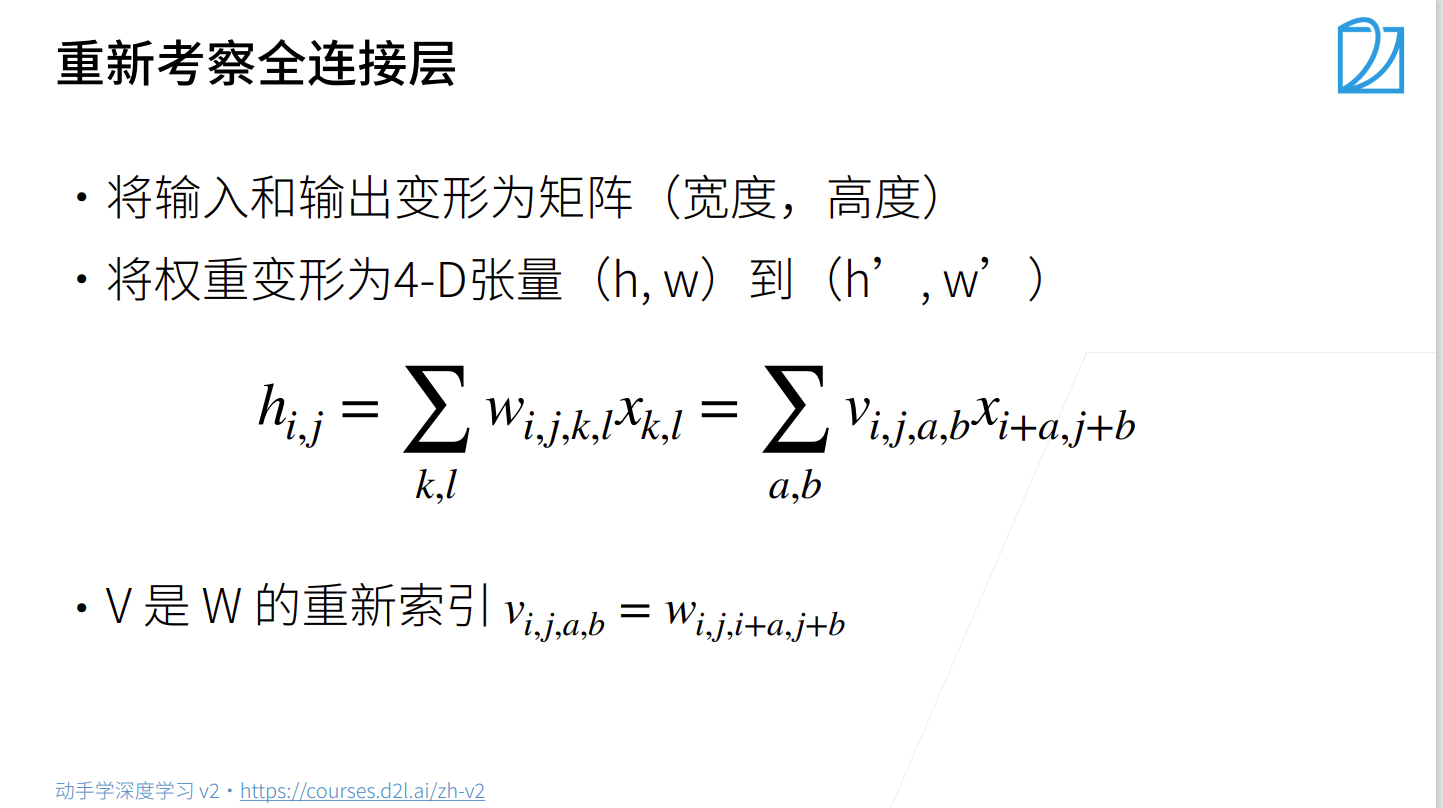
6.1.2 多层感知机的限制
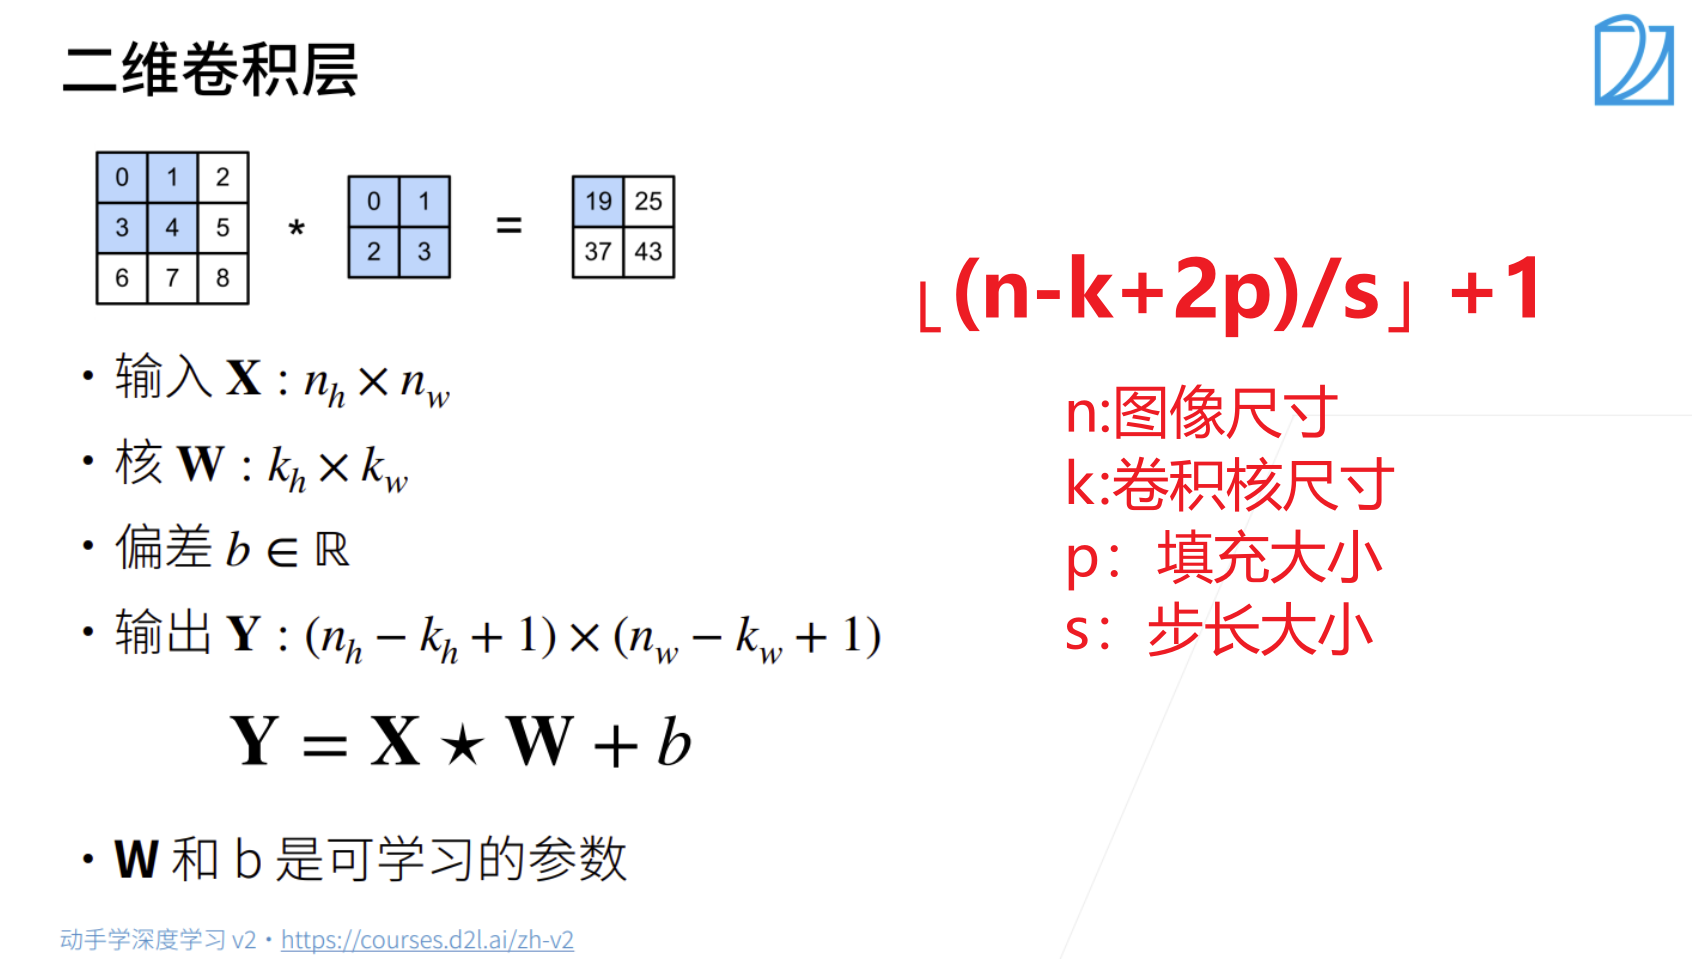
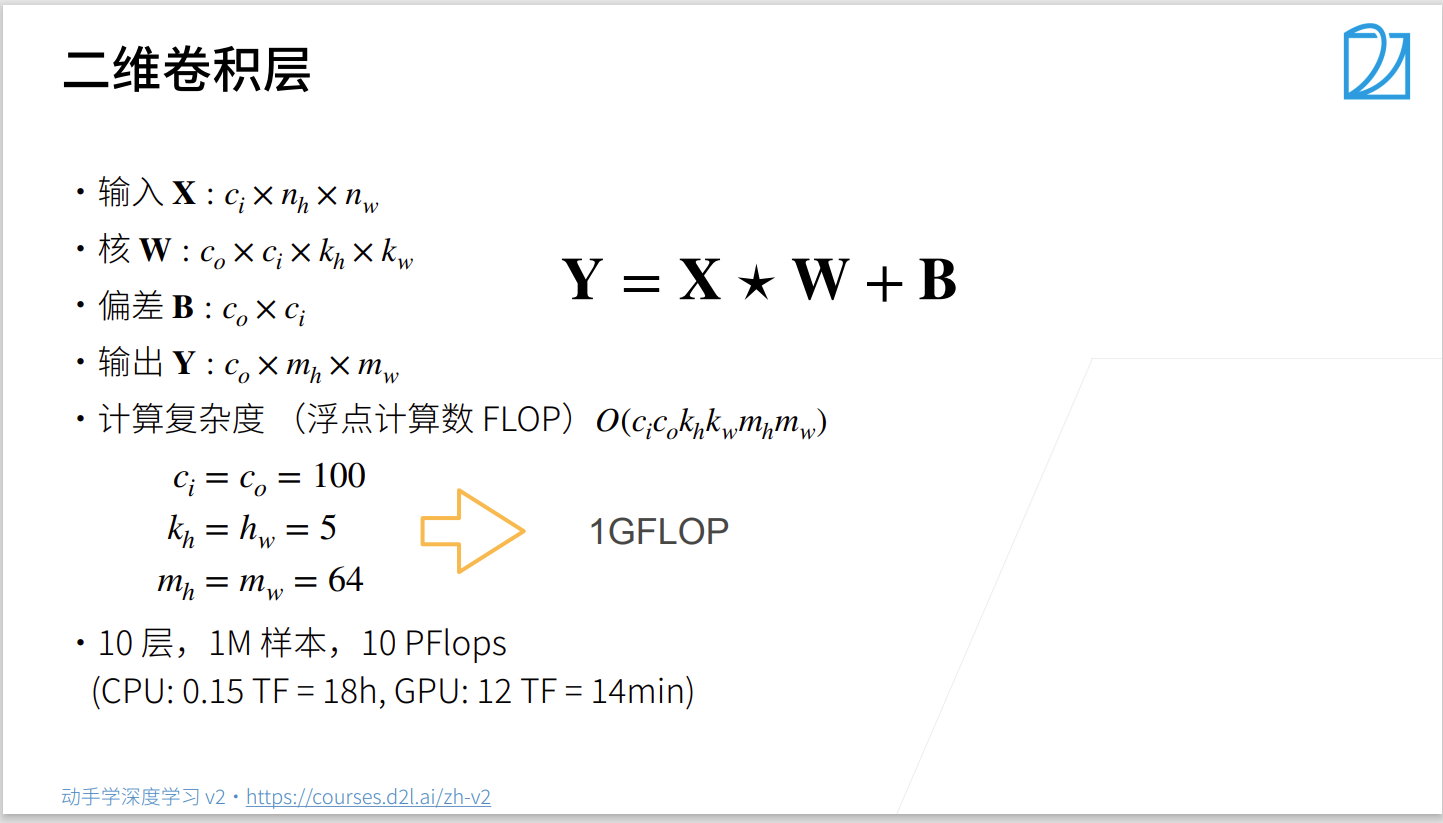
6.2 图像卷积
总结:
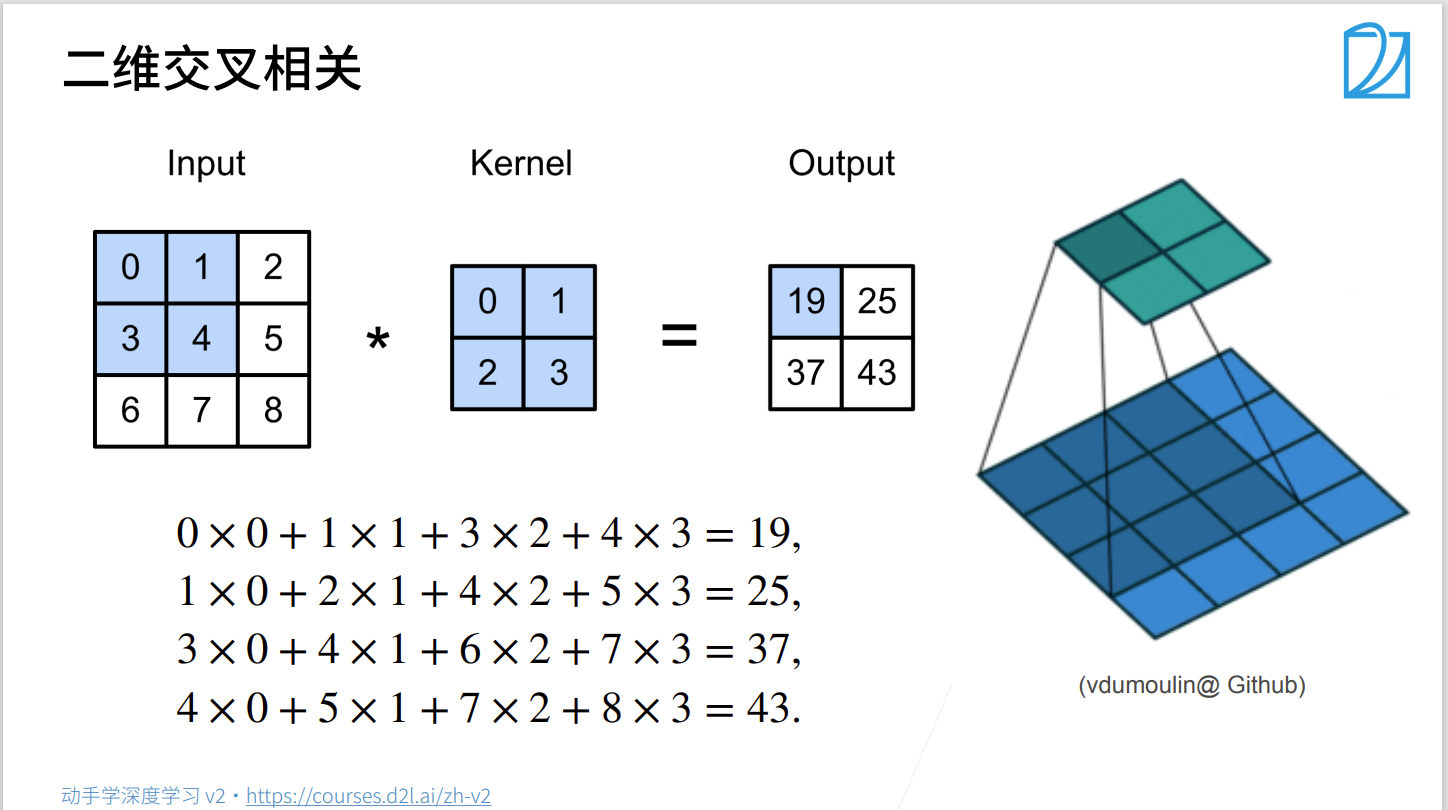
- 卷积层将输入和核矩阵进行交互相关,加上偏移后得到输出
- 核矩阵和偏移是可学习的参数
- 核矩阵的大小是超参数
代码实现图像卷积
- 互相关运算
import torch
from torch import nn
from d2l import torch as d2l
def corr2d(X, K):
    """计算二维互相关运算"""
    h, w = K.shape  # h =K.shape[0], w = K.shape[1]
    Y = torch.zeros((X.shape[0] - h + 1, X.shape[1] - w + 1))
    for i in range(Y.shape[0]):
        for j in range(Y.shape[1]):
            Y[i, j] = (X[i:i+h, j:j+w] * K).sum()
    return Y
X = torch.tensor([[0.0, 1.0, 2.0], [3.0, 4.0, 5.0], [6.0, 7.0, 8.0]])
K = torch.tensor([[0.0, 1.0], [2.0, 3.0]])
corr2d(X, K)

- 实现二维卷积层
# 实现二维卷积层
class Conv2D(nn.Module):
    def __init__(self, kernel_size):
        super().__init__()
        self.weight = nn.Parameter(torch.rand(kernel_size))
        self.bias = nn.Parameter(torch.zeros(1))

    def forward(self):
        return corr2d(x, self.weight) + self.bias
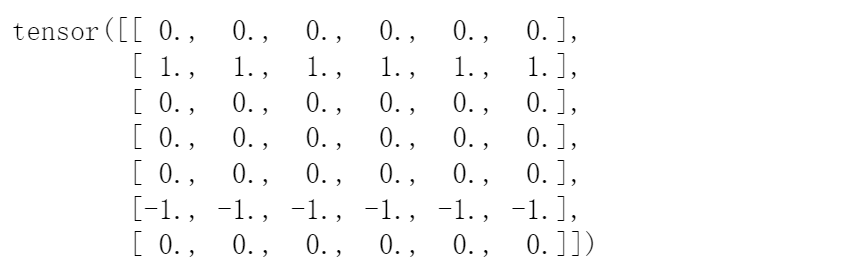
# 边缘检测
X = torch.ones((6, 8))
X[:, 2:6] = 0
print(X)

K = torch.tensor([[1.0, -1.0]])
- 1:白色
- 0:黑色
输出Y中的1代表从白色到黑色的边缘,-1代表从黑色到白色的边缘
Y = corr2d(X, K)
print(Y)

- 卷积核k只可以检测垂直边缘:因为卷积核的形状是1*2
- 将卷积核形状转置后,只可以检测水平边缘
corr2d(X.t(), K)

corr2d(X.t(), K.t()) # 卷积核也转置
学习由X生成Y的卷积核
# 学习由x生成y的卷积核
conv2d = nn.Conv2d(1, 1, kernel_size=(1, 2), bias=True)
X = X.reshape((1, 1, 6, 8))  # 批量大小、 通道、高度、宽度
Y = Y.reshape((1, 1, 6, 7))

for i in range(10):
    Y_hat = conv2d(X)
    l = (Y_hat - Y)**2  # 损失= 预测值与真实值的均方误差
    conv2d.zero_grad()  # 梯度清零
    l.sum().backward()  # 方向传播
    conv2d.weight.data[:] -= 3e-2 * conv2d.weight.grad  # 手动梯度下降更新权重参数 :权重 = 权重-学习率*反向传播的梯度
    if (i + 1) % 2 ==0:
        print(f'batch{i+1}, loss{l.sum():.3f}')
 所学的卷积核的权重张量
conv2d.weight.data.reshape((1, 2))

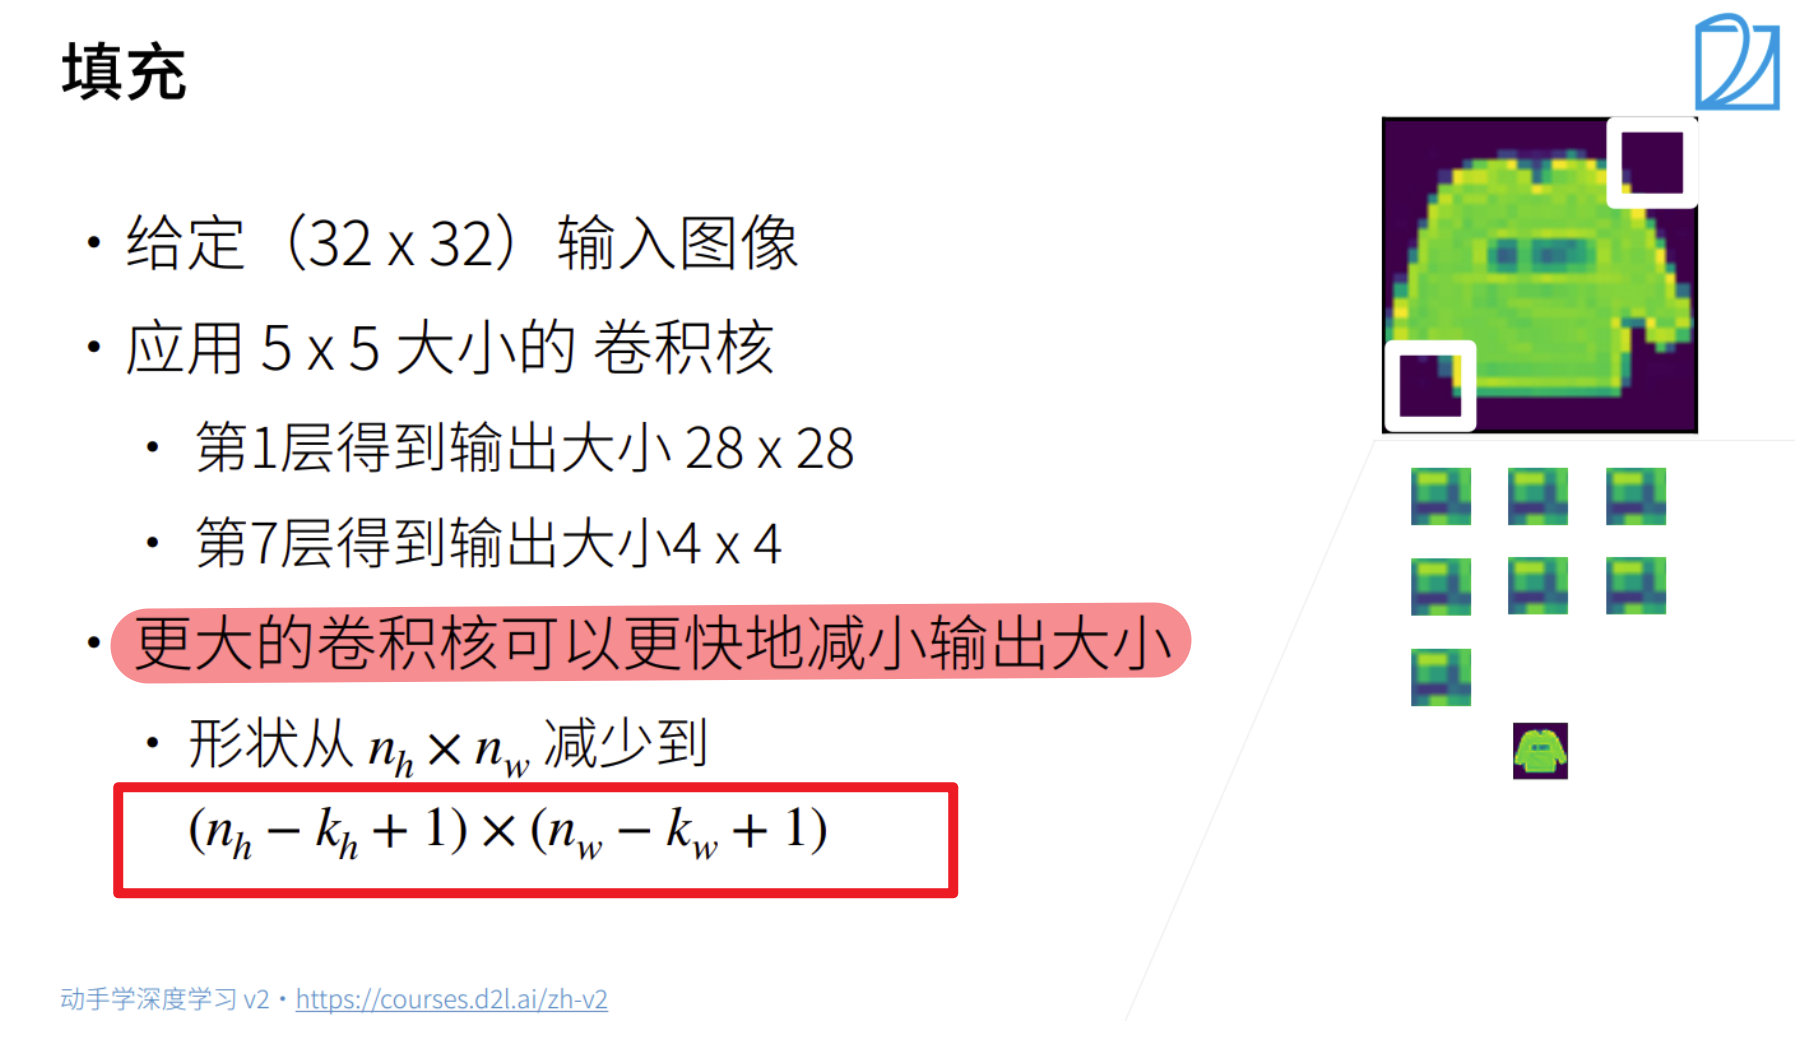
6.3 填充与步幅
6.3.1填充
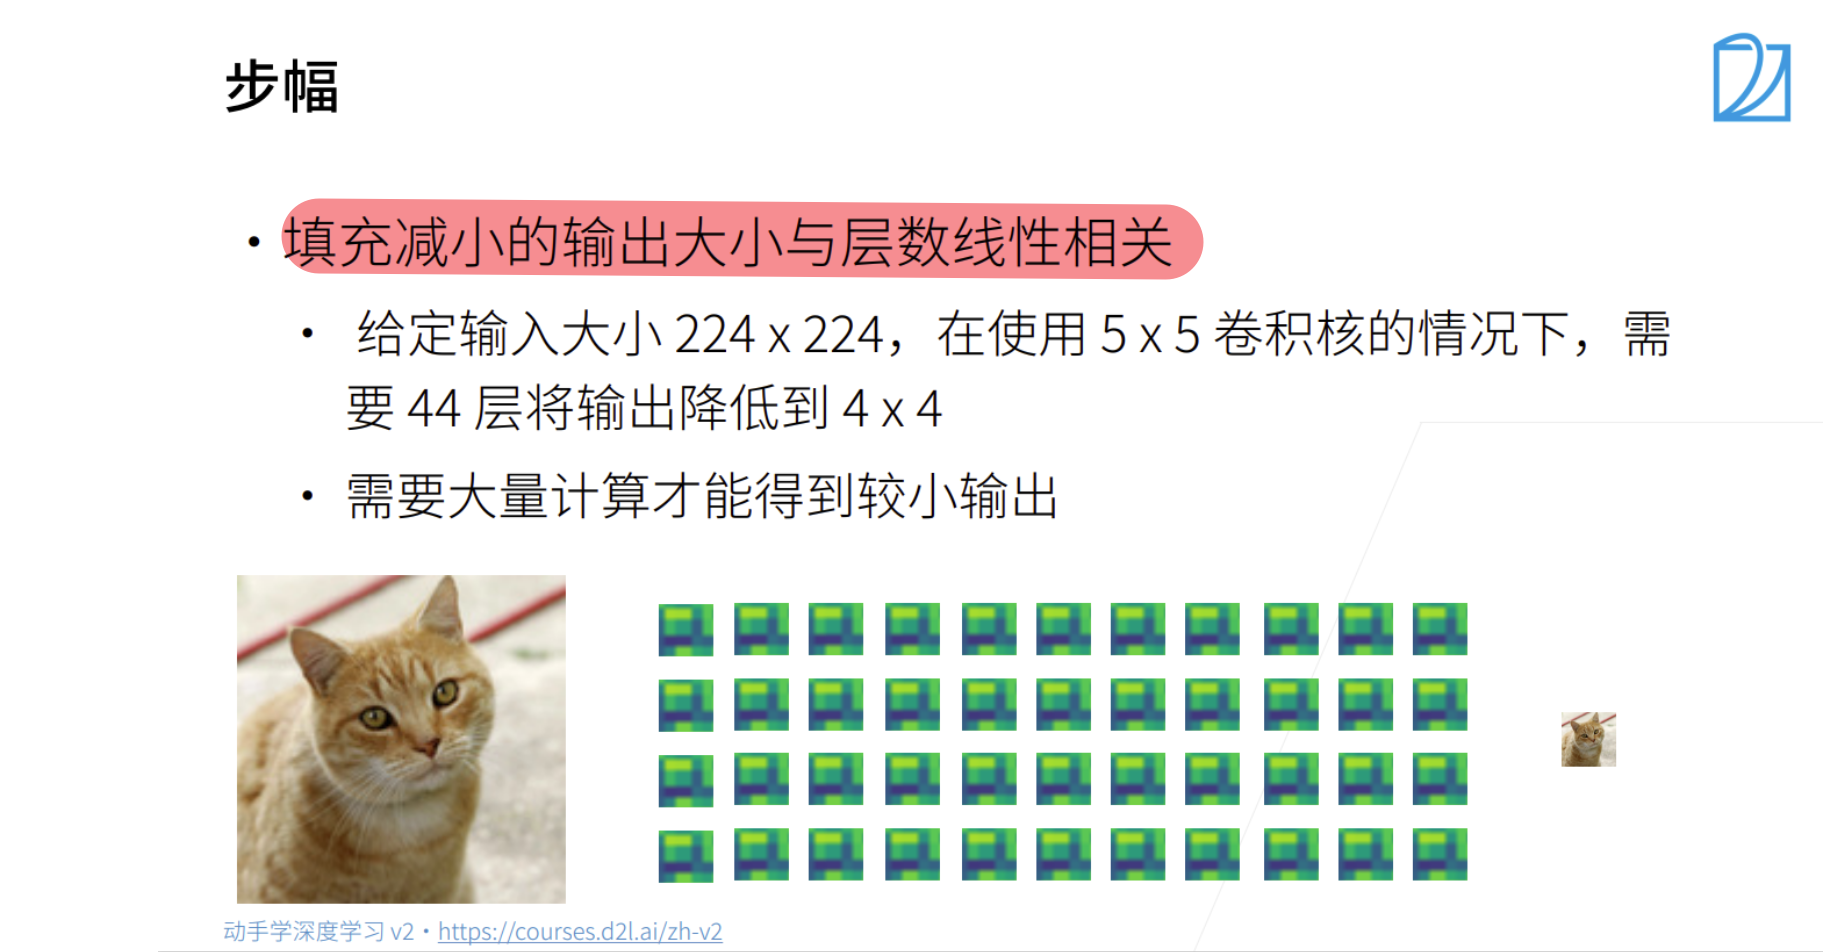
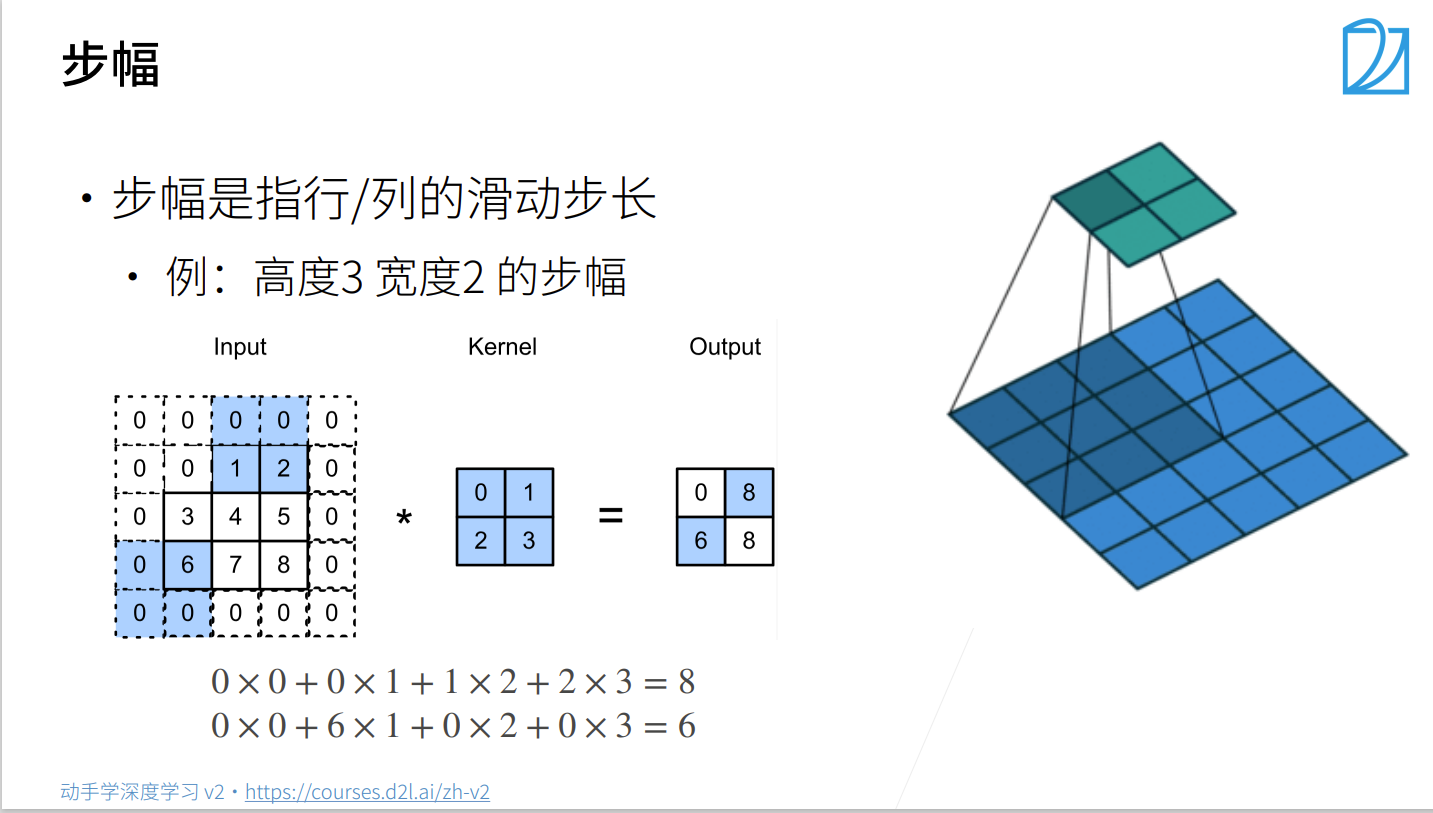
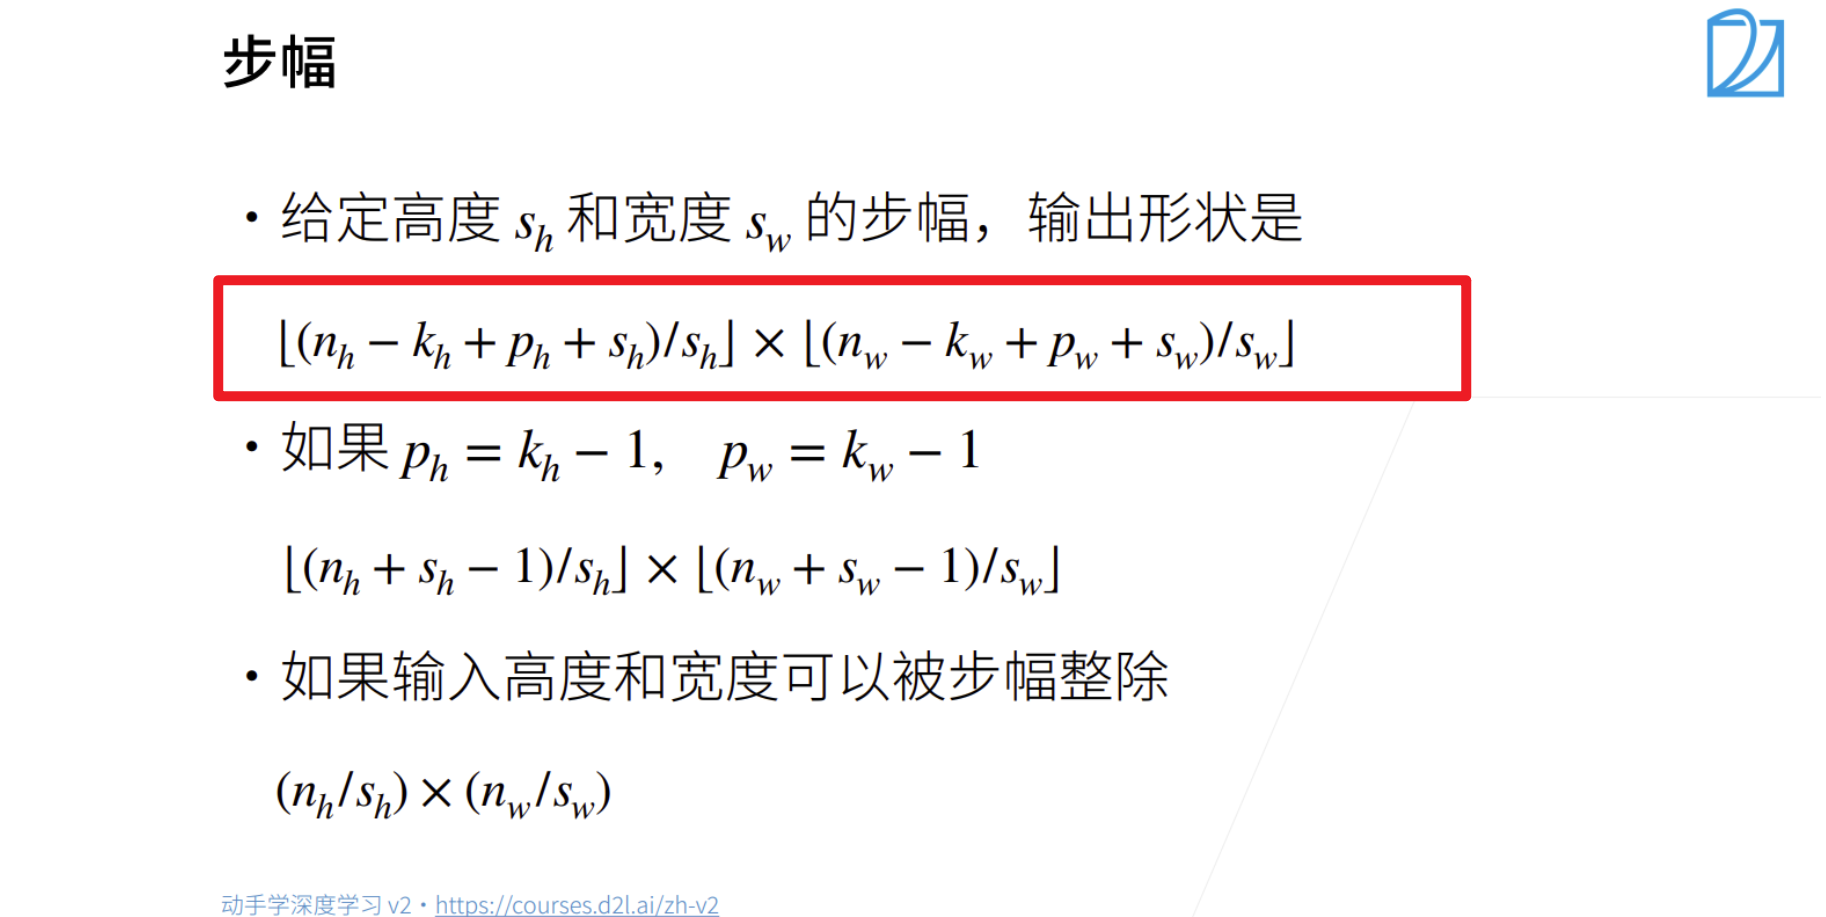
6.3.2 步幅
总结
- 填充和步幅是卷积层的超参数
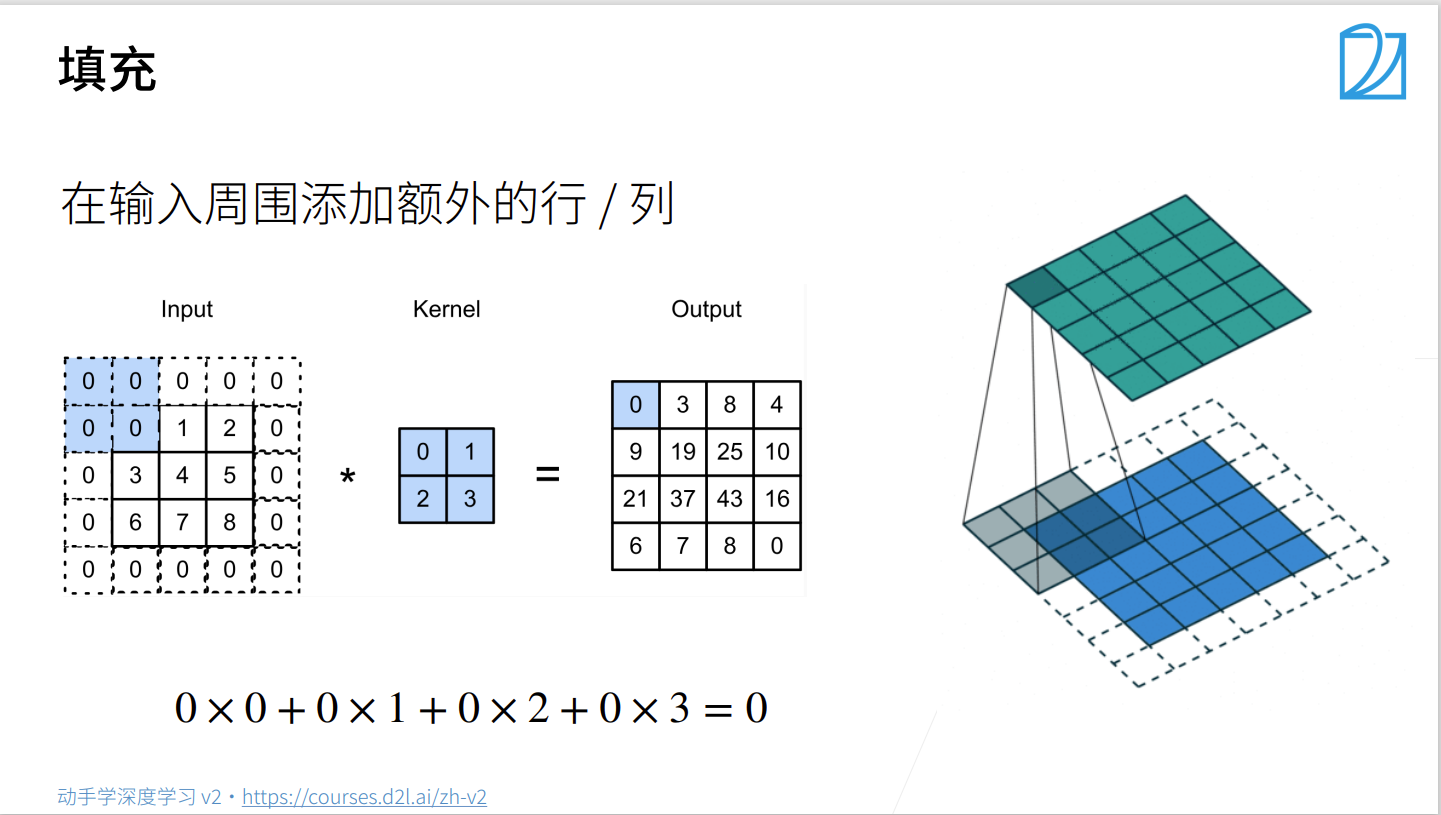
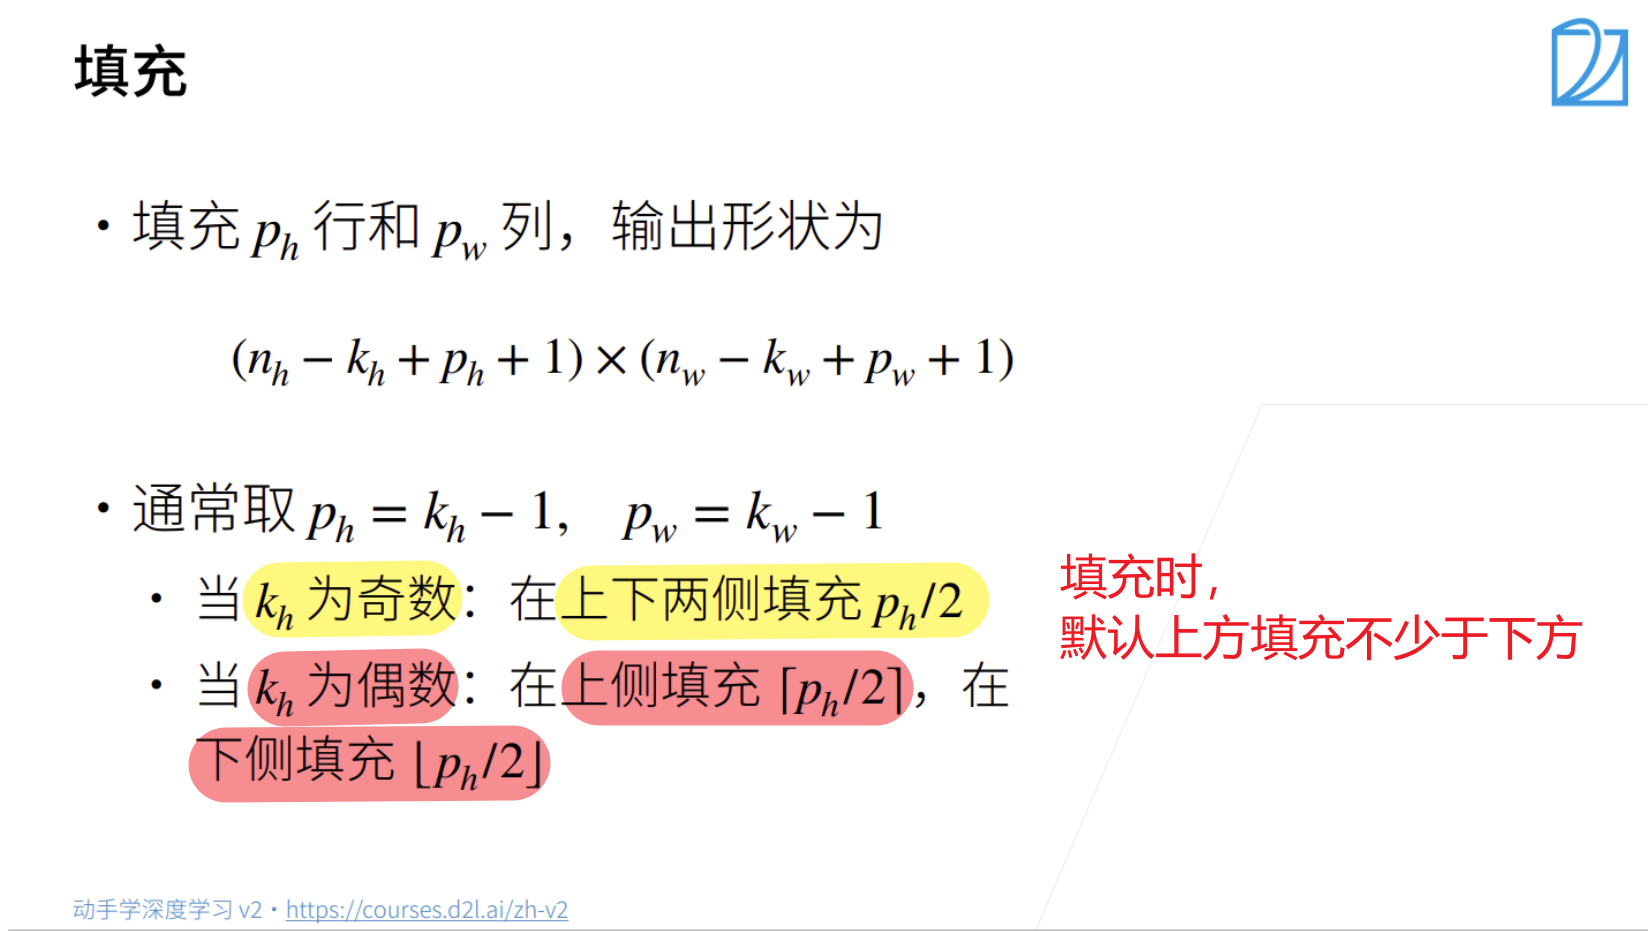
- 填充在输入周围添加额外的行/列,来控制输出形状的减少量
- 步幅是每次滑动核窗口时的行/列的步长,可以成倍的减少输出形状
代码实现填充与步幅
在所有侧边填充1个像素
# 在所有侧边填充1个像素
import torch
from torch import nn


def cmp_conv2d(conv2d, X):
    X = X.reshape((1, 1) + X.shape)
    Y = conv2d(X)
    return Y.reshape(Y.shape[2:])


conv2d = nn.Conv2d(1, 1, kernel_size=3, padding=1)
X = torch.rand(size=(8, 8))
print(cmp_conv2d(conv2d, X).shape)

卷积核的高度和宽度不同时,填充不同的高度和宽度
conv2d = nn.Conv2d(1, 1, kernel_size=(5, 3), padding=(2, 1))
print(cmp_conv2d(conv2d, X).shape)

将高度和宽度的步幅设置为2
conv2d = nn.Conv2d(1, 1, kernel_size=3, padding=1, stride=2)
print(cmp_conv2d(conv2d, X).shape)

卷积核的高度和宽度不同时,设置不同高度和宽度的填充与步幅
conv2d = nn.Conv2d(1, 1, kernel_size=(3, 5), padding=(0, 1), stride=(3, 4))
# h = (8-3+2*0)/3 + 1 = 2, w = (8-5+2*1)/4 + 1 = 2
print(cmp_conv2d(conv2d, X).shape)  # 2*2

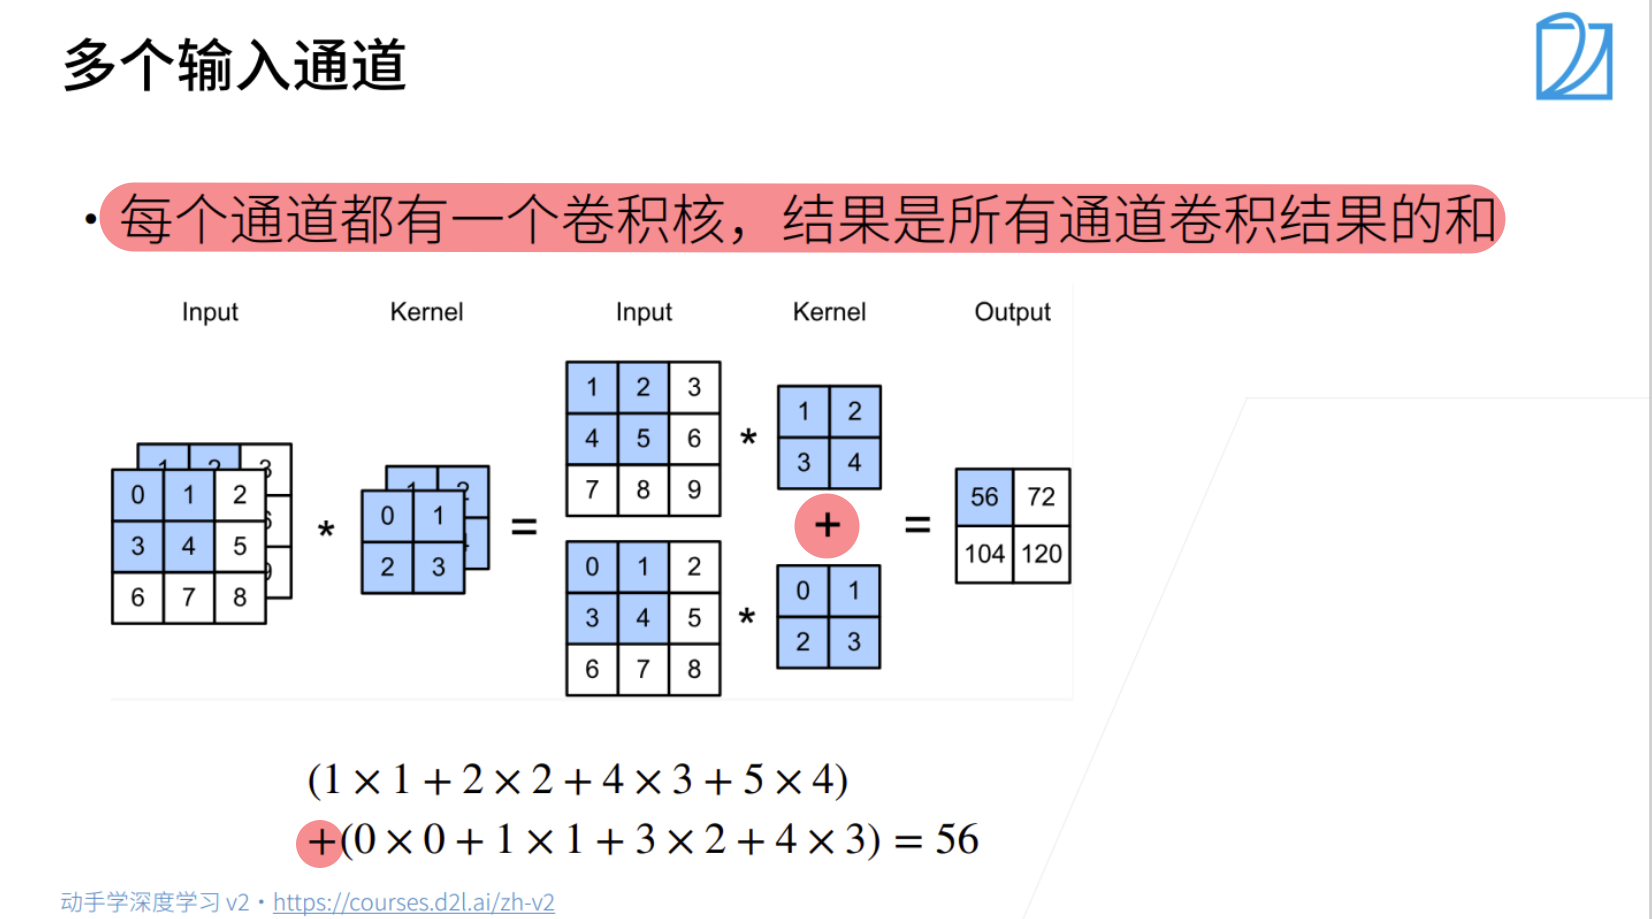
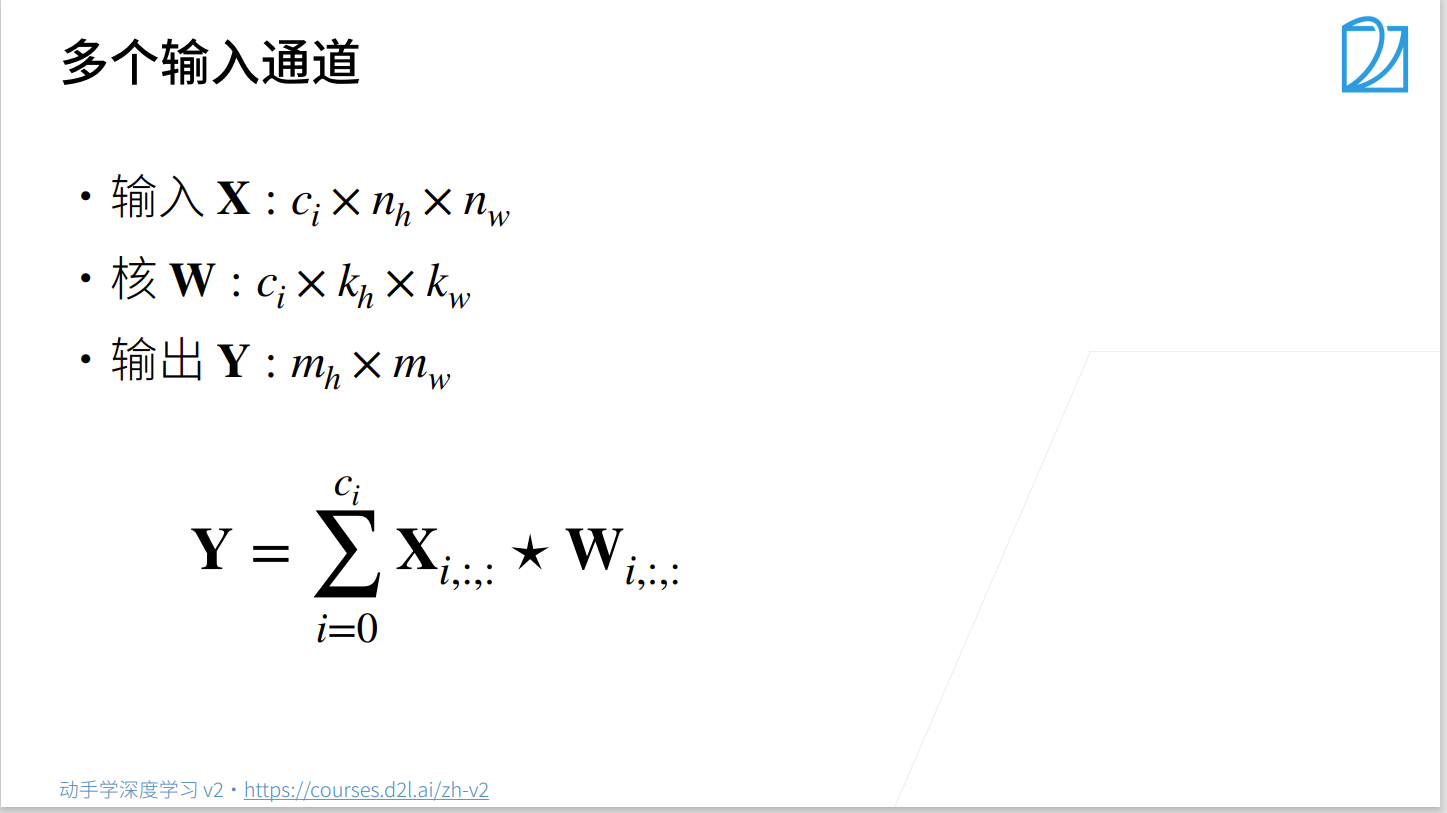
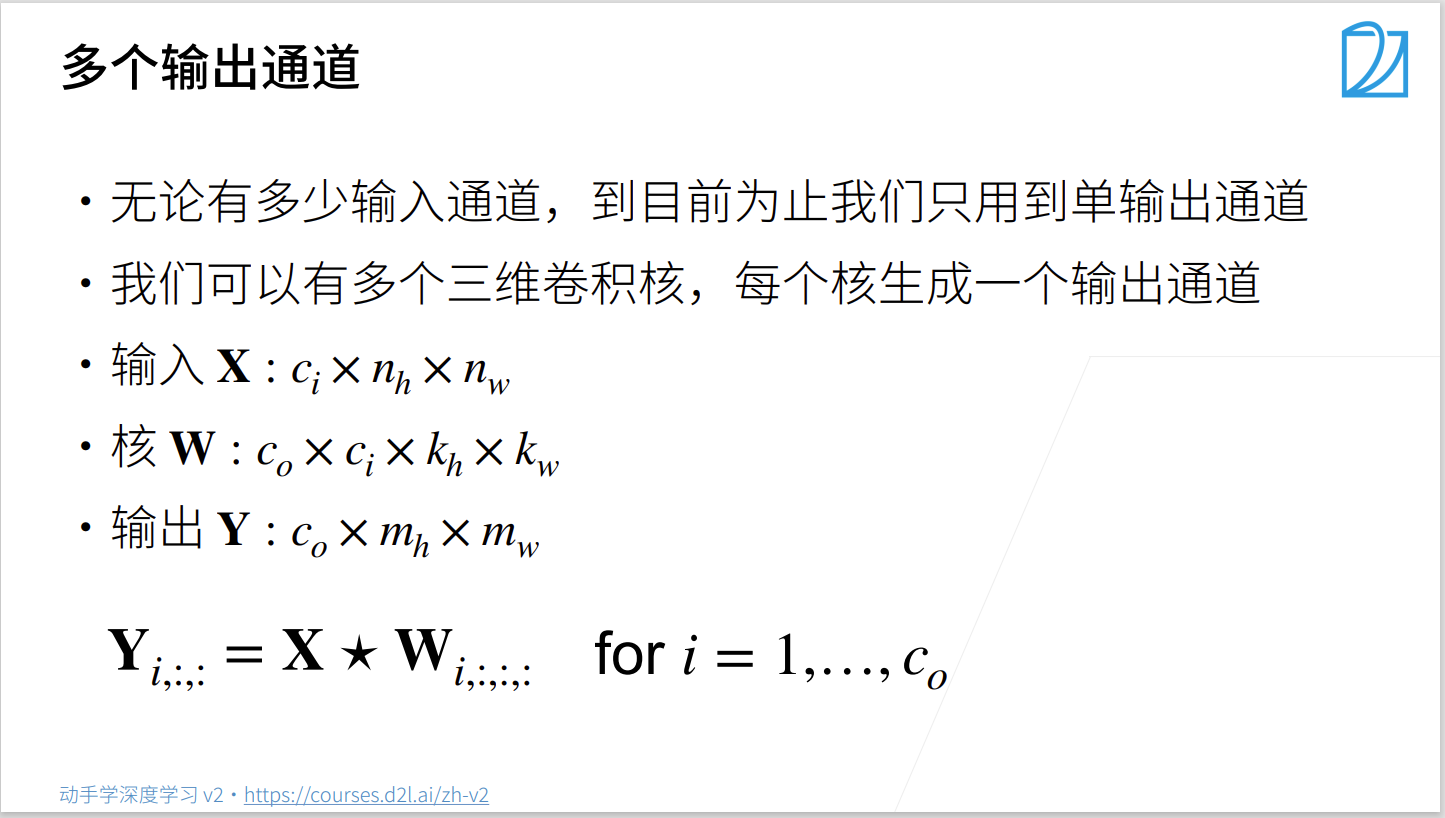
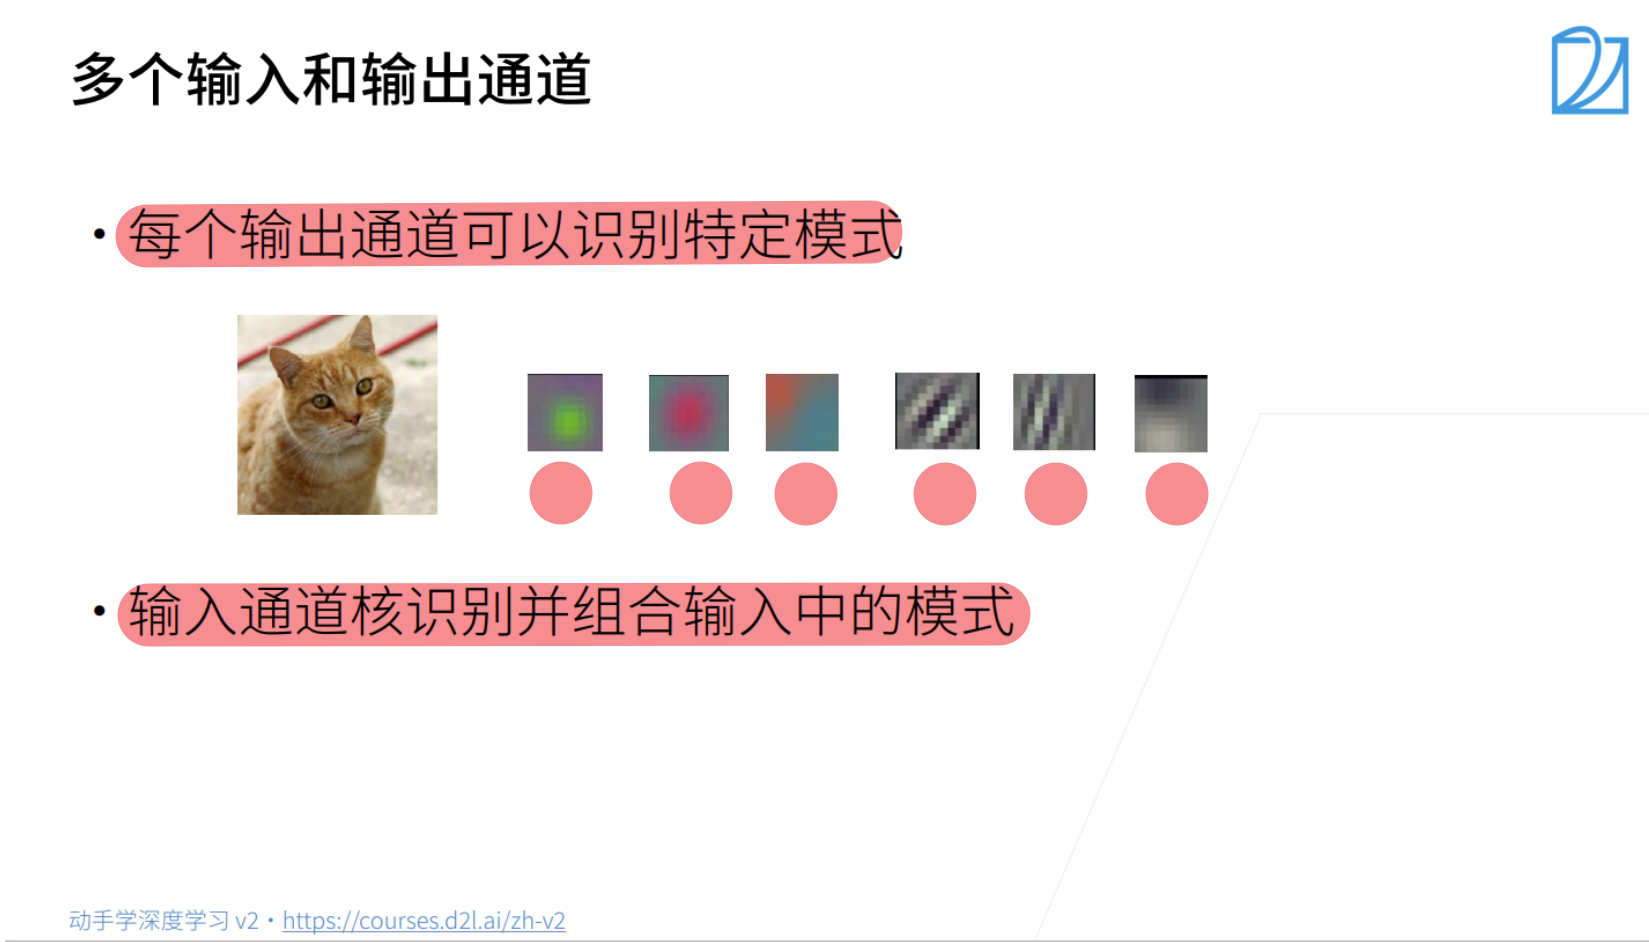
6.4 多输入多输出通道

总结
- 输出通道数是卷积层的超参数
- 每个输入通道有独立的二维卷积核, 所有通道结果相加得到一个输出通道结果
- 每个输出通道有独立的三维卷积核
代码实现多输入多输出通道
实现多输入通道互相关运算
# 多输入互相关运算
import torch
from d2l import torch as d2l


def corr2d_multi_in(X, K):
    return sum(d2l.corr2d(x, k) for x, k in zip(X, K))
X = torch.tensor([[[0.0, 1.0, 2.0], [3.0, 4.0, 5.0], [6.0, 7.0, 8.0]],
                  [[1.0, 2.0, 3.0], [4.0, 5.0, 6.0], [7.0, 8.0, 9.0]]])
K = torch.tensor([[[0.0, 1.0], [2.0, 3.0]],
                  [[1.0, 2.0], [3.0, 4.0]]])
print(X.shape)
print(K.shape)
print(corr2d_multi_in(X, K))
print(corr2d_multi_in(X, K).shape)

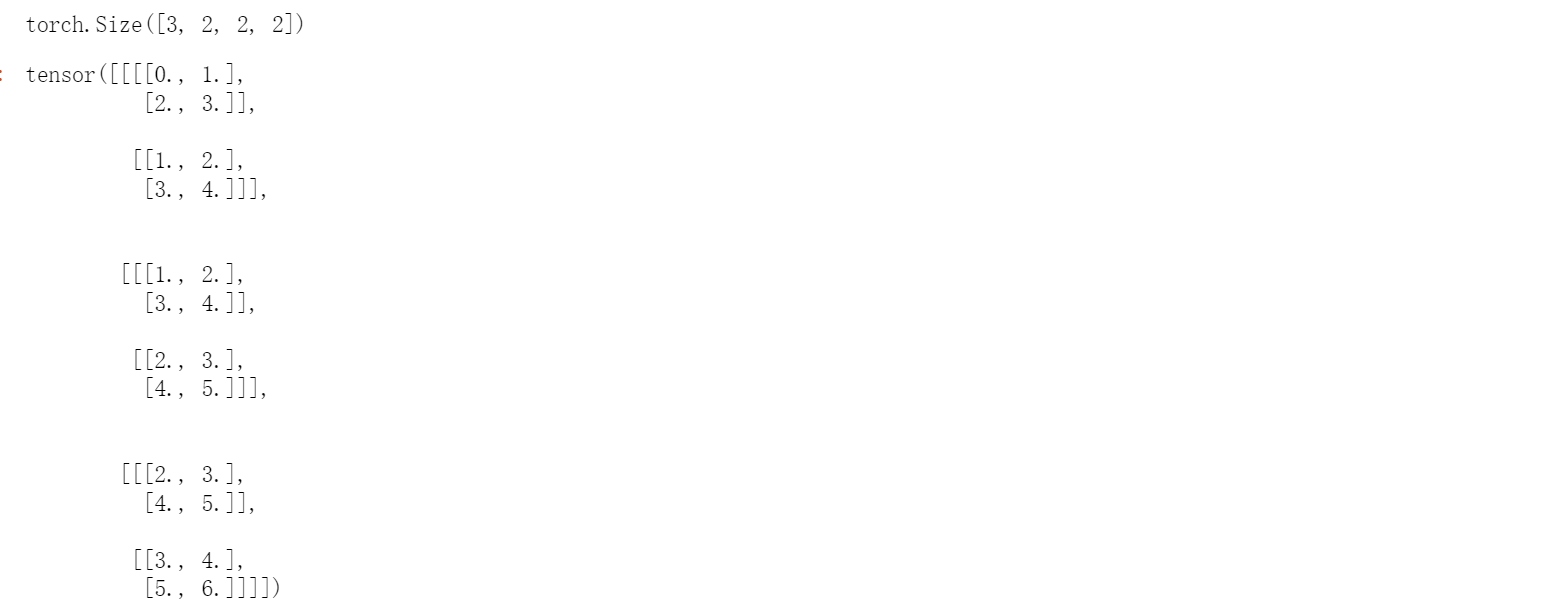
计算多通道的输出的互相关函数
多输出互相关运算
def corr2d_multi_in_out(X, K):
    return torch.stack([corr2d_multi_in(X, k) for k in K], 0)


K = torch.stack((K, K + 1, K + 2), 0)
print(K.shape)
K
corr2d_multi_in_out(X, K)
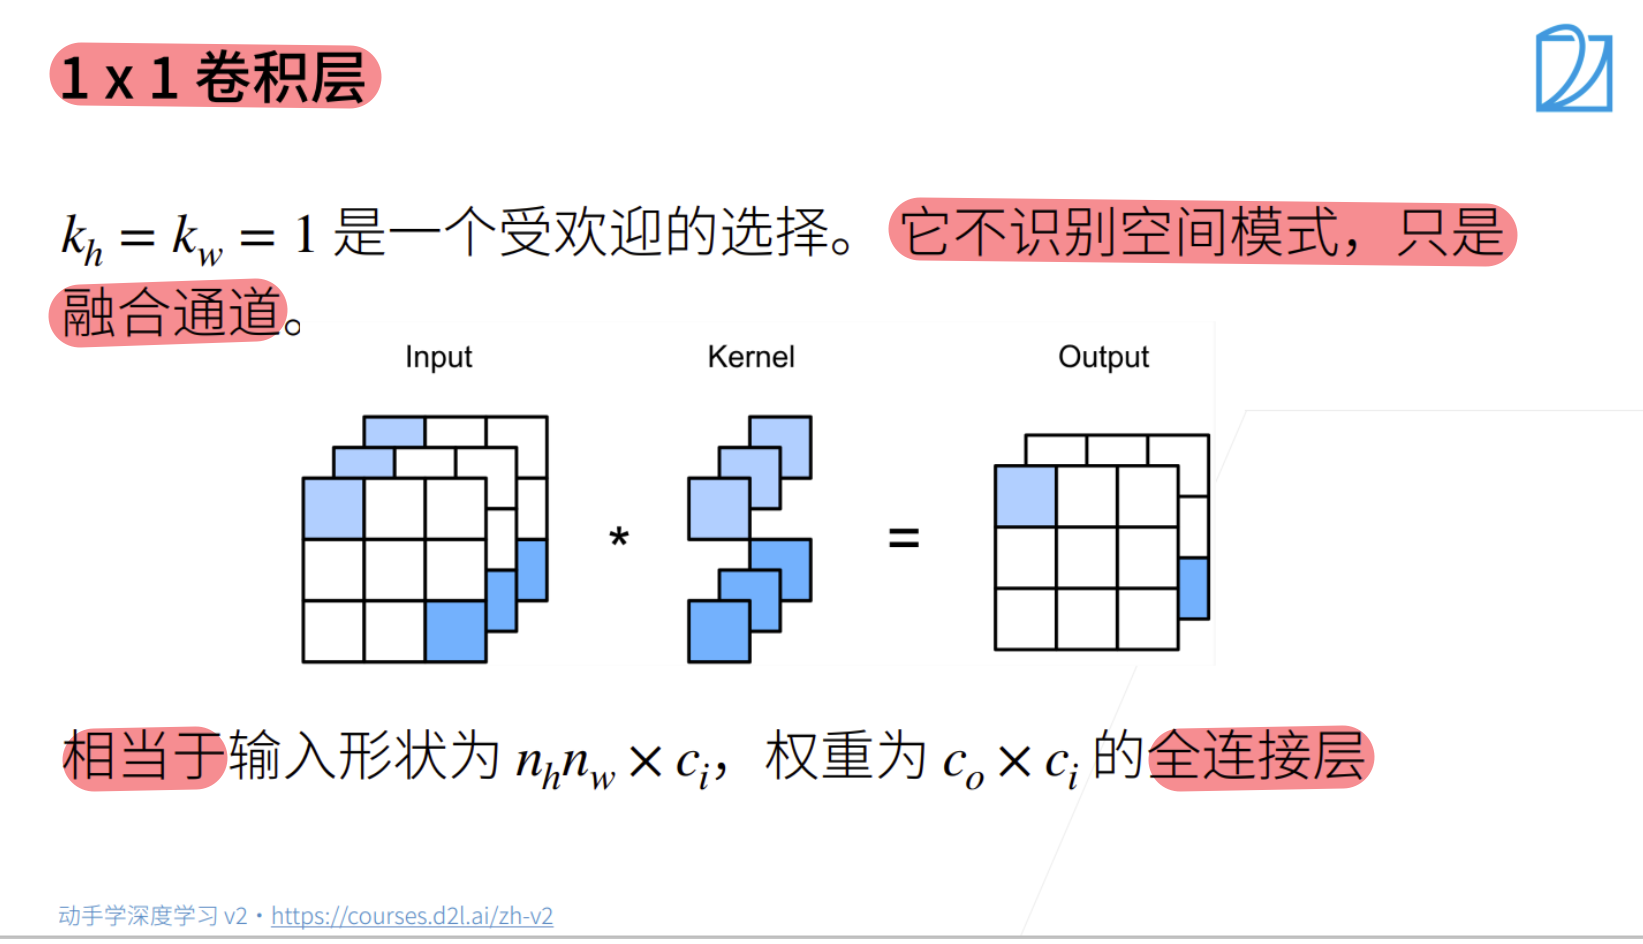
 1*1卷积:实质上就是全连接运算
# 1*1卷积
def corr2d_multi_in_out_1x1(X, K):
    c_i, h, w = X.shape  # c_i:输入通道数 h、w:输入的长和宽
    c_o = K.shape[0]  # c_o:输出通道数:与卷积核个数一致
    X = X.reshape((c_i, h * w))  # 把X拉平进行全连接运算 [3, 9]
    K = K.reshape((c_o, c_i))  # 把卷积核K拉平  [2, 3]
    # 全连接层中的矩阵乘法
    Y = torch.matmul(K, X)  # 输出Y=K与X做矩阵乘法  [2, 3] * [3, 9] = [2, 9]
    return Y.reshape((c_o, h, w))  # 将Y恢复成空间向量 [通道数,长,宽]
X = torch.normal(0, 1, (3, 3, 3))  # 输入X的通道数为3, 长和宽:3,3
K = torch.normal(0, 1, (2, 3, 1, 1))  # 卷积核的输出通道:2,输入通道:3(与输入X的通道数一致), 长和宽:1,1

Y1 = corr2d_multi_in_out_1x1(X, K)  # [2, 3, 3]
print(Y1.shape)
Y2 = corr2d_multi_in_out(X, K)  # [2, 3, 3]
print(Y2.shape)
assert float(torch.abs(Y1 - Y2).sum()) < 1e-6

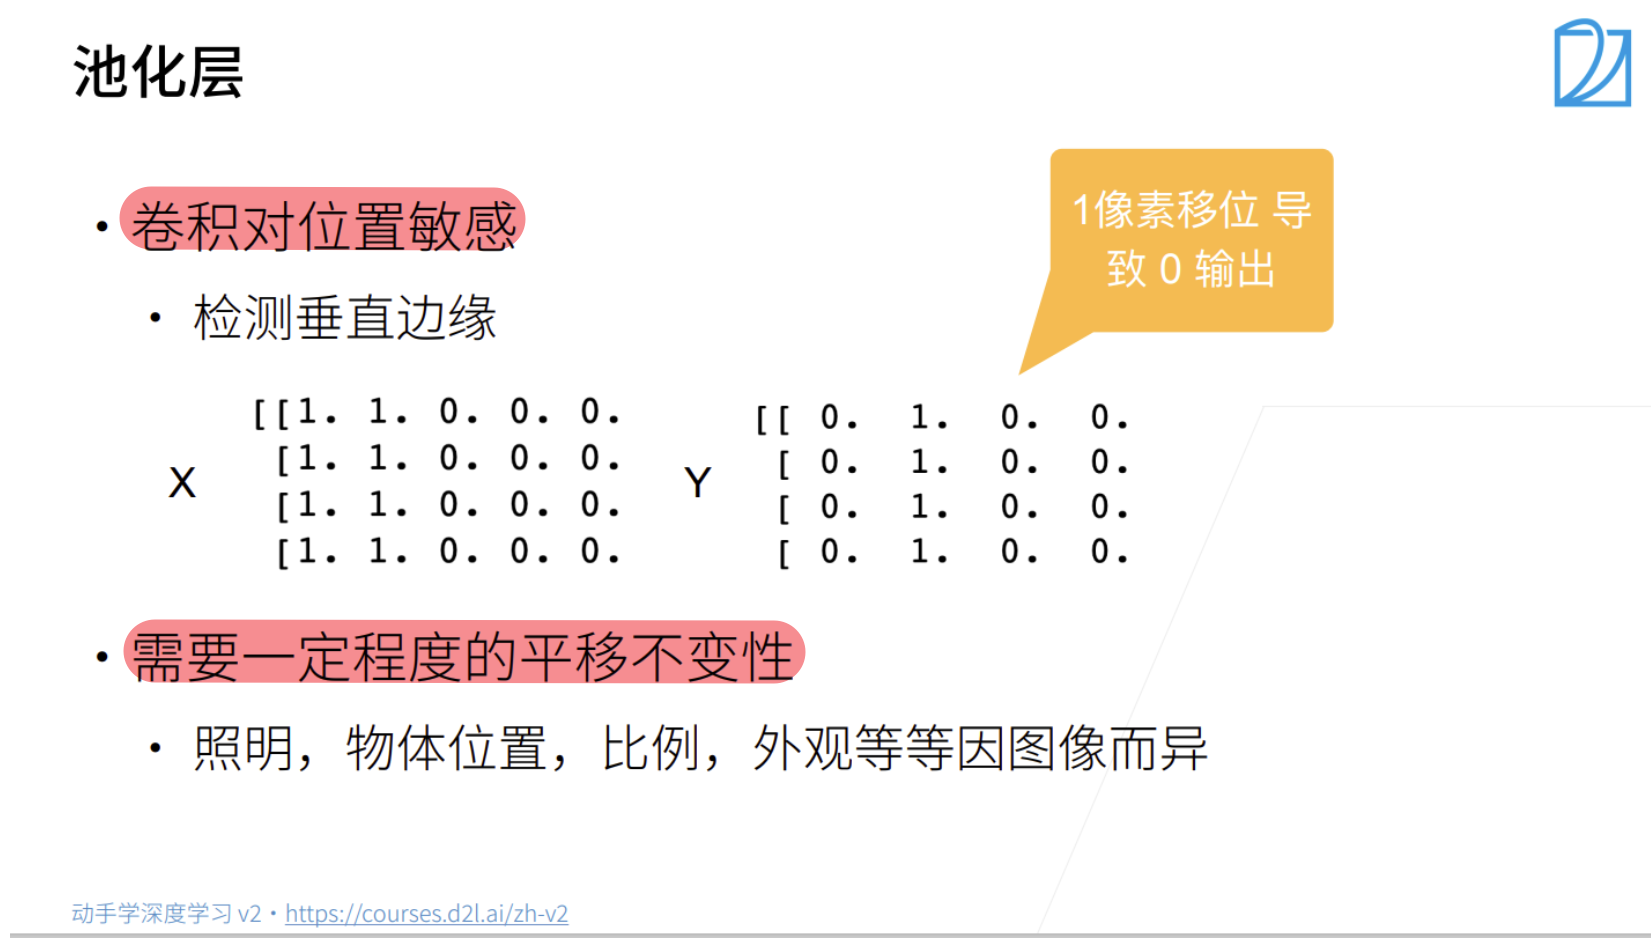
6.5 汇聚层(池化层)
总结
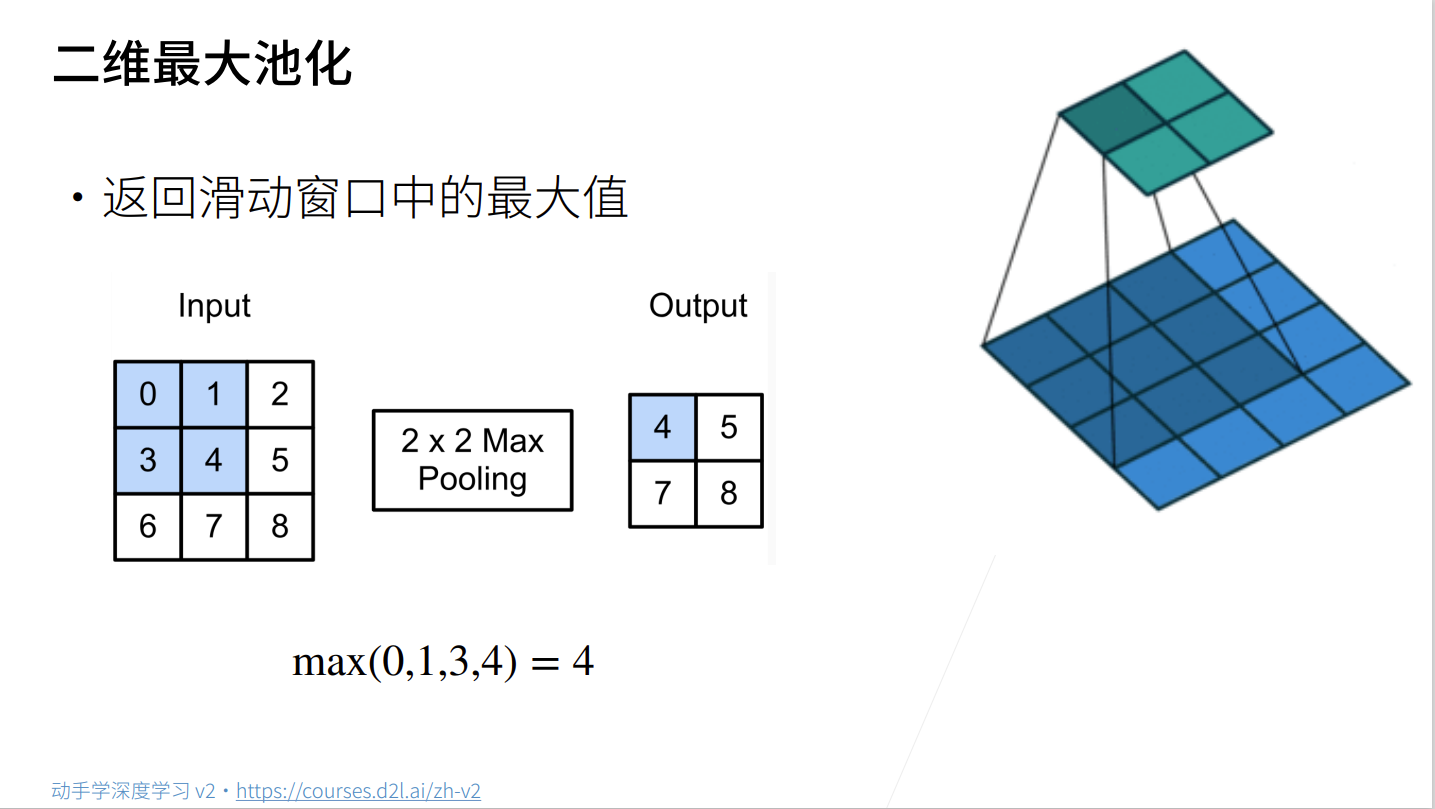
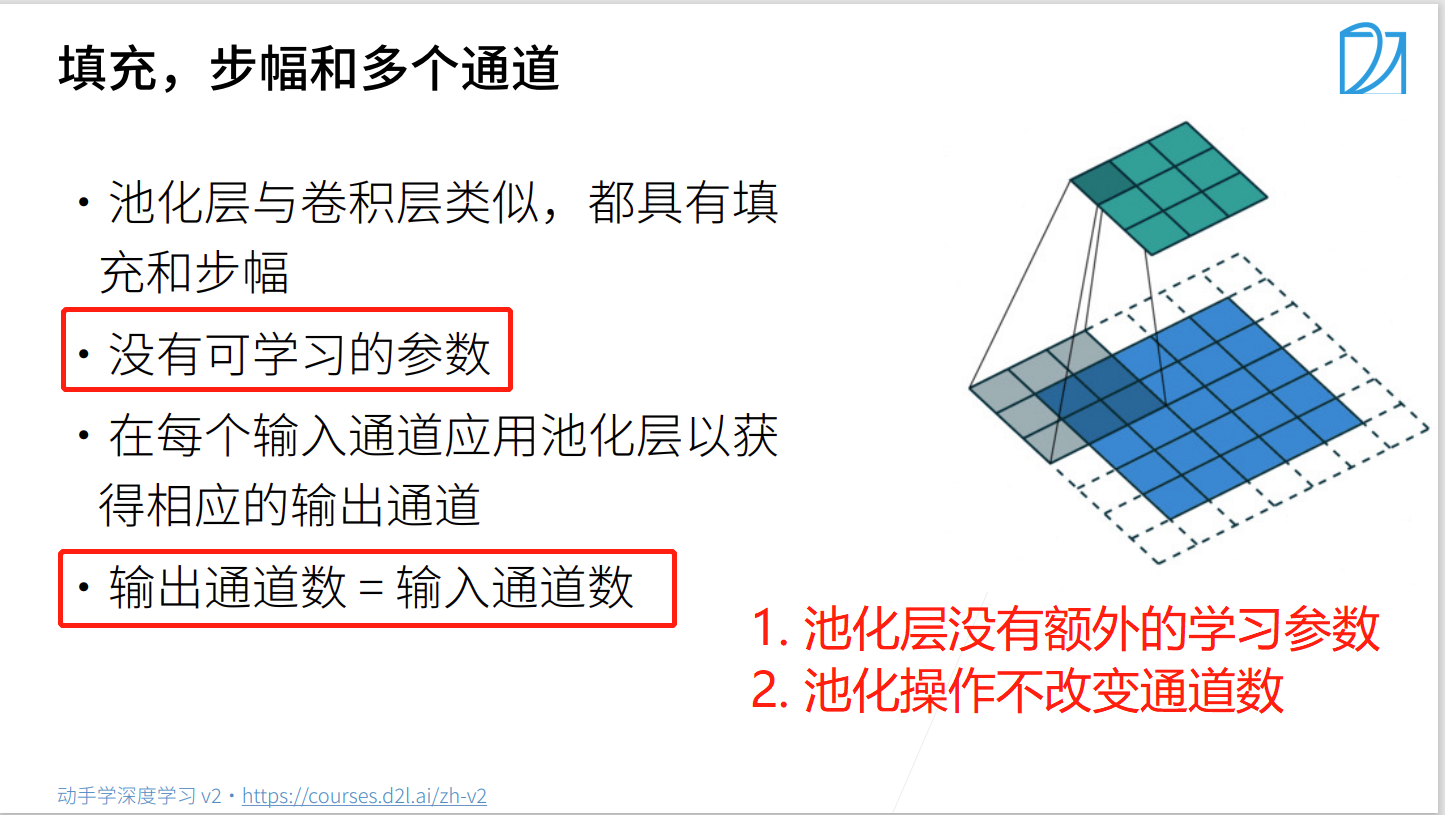
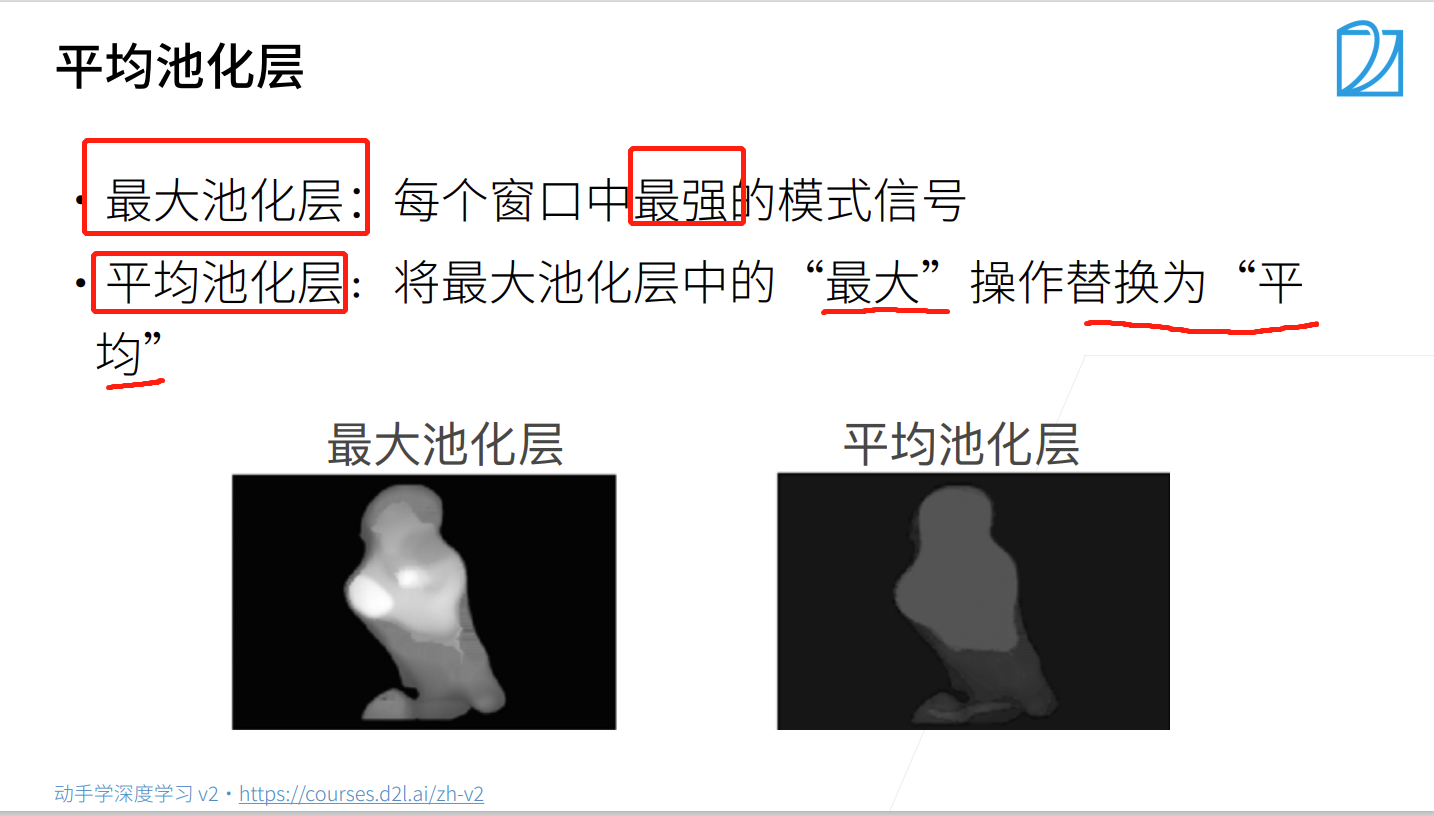
- 池化层返回窗口中最大或平均值
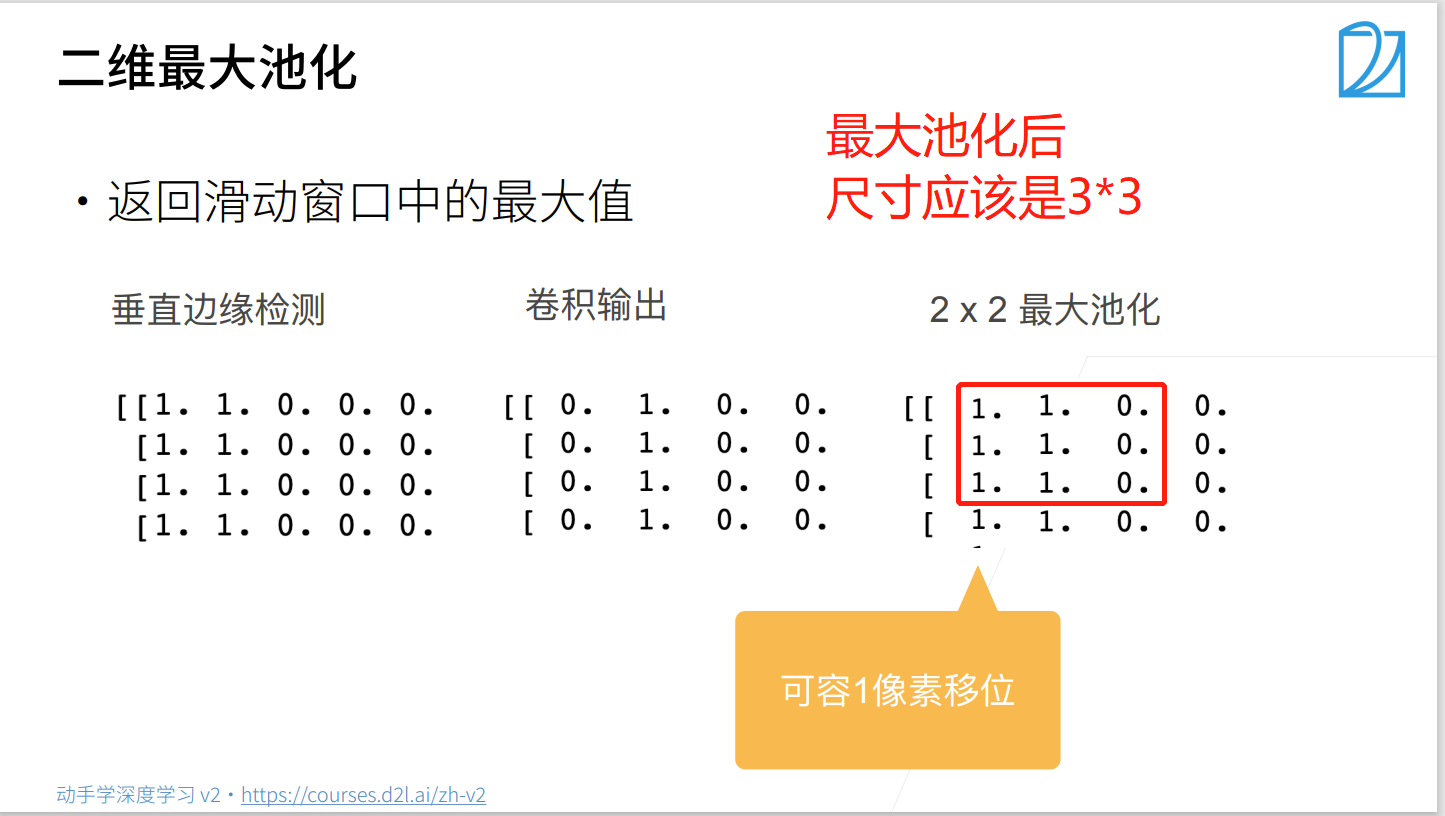
- 缓解卷积层对位置的敏感性
- 同样有窗口大小、填充、和步幅作为超参数
代码实现池化层
实现池化层的正向传播
# 实现池化层的正向传播
import torch
from torch import nn
from d2l import torch as d2l


def pool2d(X, pool_size, mode='max'):
    p_h, p_w = pool_size
    Y = torch.zeros((X.shape[0] - p_h + 1, X.shape[1] - p_w + 1))
    for i in range(Y.shape[0]):
        for j in range(Y.shape[1]):
            if mode == 'max':
                Y[i, j] = X[i:i + p_h, j:j + p_w].max()
            elif mode == 'avg':
                Y[i, j] = X[i:i + p_h, j:j + p_w].mean()

    return Y
验证最大池化层的输出
# 验证二维最大池化层的输出
X = torch.tensor([[0.0, 1.0, 2.0], [3.0, 4.0, 5.0], [6.0, 7.0, 8.0]])
pool2d(X, (2, 2))

验证平均池化层的输出
# 验证平均池化层的输出
pool2d(X, (2, 2), 'avg')

填充与步幅
X = torch.arange(16, dtype=torch.float32).reshape(1, 1, 4, 4)
print(X)

深度学习框架中的步幅与池化窗口的大小相同:特点:每次滑动的窗口不会重叠
pool2d = nn.MaxPool2d(3)
pool2d(X)

填充和步幅可以手动设定
pool2d = nn.MaxPool2d(3, padding=1, stride=2)
pool2d(X)

设定一个任意大小的矩阵池化窗口,并分别设定填充和步幅的高度和宽度
pool2d = nn.MaxPool2d((2, 3), padding=(1, 1), stride=(2, 3))
pool2d(X)

池化层在每个输入通道上单独运算
# 池化层在每个通道上单独运算
X = torch.cat((X, X), 1)
print(X)

pool2d = nn.MaxPool2d(3, padding=1, stride=2)
pool2d(X)


 被折叠的 条评论
为什么被折叠?
被折叠的 条评论
为什么被折叠?
 到【灌水乐园】发言


