


之前系统地学习了Spring5框架的使用,比如IOC的实现、AOP的底层原理与实现方法等,现在用此文章做一个记录,方便之后使用的时候出现遗忘。
一. 概念
Spring 是轻量级的开源的 JavaEE 框架。
Spring 有两个核心部分:IOC 和 Aop :
(1)IOC:控制反转,把创建对象过程交给 Spring 进行管理
(2)Aop:面向切面,不修改源代码进行功能增强
个人理解:IOC控制反转的作用就是,本来我们需要不断地new出新的对象,现在可以直接通过注解的方式,让Spring来自动地创建需要的对象,减少了复杂性。AOP面向切面,就是说,本来有个功能A,如果我们要在其之前、或者之后再添加一些功能,本来需要在功能A中修改源码,现在能够使用注解的方式完成自动修改,无需修改源码。
二. IOC操作Bean管理(基于注解方式)
本来要通过xml文件来配置Bean(也就是各个类和对象)管理,现在用注解的方式更加简便快捷。
Spring针对Bena管理中创建对象提供以下四种注解:
(1)@Component (2)@Service (3)@Controller (4)@Repository
功能是一样地,都是用来创建bean实例。
2.1 创建对象的具体步骤
步骤1:引入依赖包(建议使用版本高一些的,不然可能会报错)
![]()
步骤2:xml文件中开启组件扫描
xml要放在src源文件目录下,首先要在<beans>标签中加入配置:
<beans xmlns="http://www.springframework.org/schema/beans"
       xmlns:xsi="http://www.w3.org/2001/XMLSchema-instance"
       xmlns:p="http://www.springframework.org/schema/p"
       xmlns:util="http://www.springframework.org/schema/util"
       xmlns:context="http://www.springframework.org/schema/context"
       xsi:schemaLocation="http://www.springframework.org/schema/beans
http://www.springframework.org/schema/beans/spring-beans.xsd
 http://www.springframework.org/schema/util
http://www.springframework.org/schema/util/spring-util.xsd
http://www.springframework.org/schema/context
http://www.springframework.org/schema/context/spring-context.xsd">
开启组件扫描:
(因为需要Spring自动扫描寻找“注解”,所以要设定扫描的包是什么,例如我要扫描com.zqh包下的所有文件可能出现的注解,那么就这样操作:
注意,步骤二也可以替换成完全注解开发,例如下图,来替代xml文件。

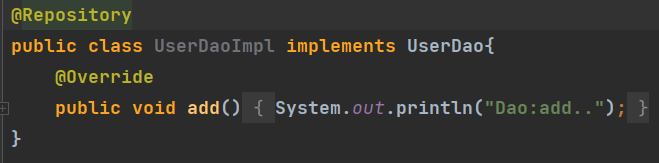
步骤3:在需要创建对象的类上添加“注解”
使用上文提到的四种注解任意一个即可,例如下图,UserService类的属性值就是userService。(注意,如果不写value,默认的value为首字母小写的类名,即userService)

以上步骤完成后,测试一下:我们就可以通过以下步骤的getBean方法,得到value为userService类的对象实例,即可完成对象创建了。
2.2 注入属性的具体步骤
何为注入属性?我的理解是
注入属性既可以是:
为某一个属性赋值:例如private String name,我现在让这个name = ‘zqh’,这是一种注入属性。
还有可以:
比如说在javaweb的Dao持久层中,通常会先写出Dao接口和DaoImple的接口实现类,那么如果在service中定义private Dao dao,我们可以让他指向其实现类:
完成:Dao dao = new DaoImpl();也是一种属性注入。
属性注入的注解关键字为:
@Autowired、@Qualifier、@Value
步骤1:
在需要实现属性注入的类的上方加入关键字,例如:
步骤2:
直接在需要注入的属性上方添加注解关键字。例如我们在Service方法中添加以下内容。
其中,Autowired关键字会自动搜索关键字,寻找合适的对象创建实例。
Qualifier关键字是在用于有多个实现类的情况,无法自动实现,则用这个注解。value就是设置的类的value值
Value用于直接给属性赋值。
三. AOP面向切面编程
概念:面向切面编程(方面),利用 AOP 可以对业务逻辑的各个部分进行隔离,从而使得 业务逻辑各部分之间的耦合度降低,提高程序的可重用性,同时提高了开发的效率。
个人理解:就是不通过修改源代码方式,在主干功能里面添加新功能。
底层逻辑:
AOP的几个术语
1.连接点:可以被增强的类
2.切入点 :实际被增强的类
3.通知:就是增强部分的功能(逻辑),共5中通知类型:

4.切面:把通知运用到切入点的过程
具体步骤
步骤1:引入AOP相关依赖

步骤2:创建切入点类User(举例)和增强类UserProxy


步骤3:在spring配置文件(xml)中开启注解扫描
<?xml version="1.0" encoding="UTF-8"?>
<beans xmlns="http://www.springframework.org/schema/beans"
       xmlns:xsi="http://www.w3.org/2001/XMLSchema-instance"
       xmlns:p="http://www.springframework.org/schema/p"
       xmlns:aop="http://www.springframework.org/schema/aop"
       xmlns:context="http://www.springframework.org/schema/context"

       xsi:schemaLocation="http://www.springframework.org/schema/beans
http://www.springframework.org/schema/beans/spring-beans.xsd
http://www.springframework.org/schema/context
http://www.springframework.org/schema/context/spring-context.xsd
http://www.springframework.org/schema/aop
http://www.springframework.org/schema/aop/spring-aop.xsd">

    <!--开启扫描-->
    <context:component-scan base-package="aop_Ano"></context:component-scan>

    <!-- 开启 Aspect 生成代理对象-->
    <aop:aspectj-autoproxy></aop:aspectj-autoproxy>
</beans> Aspect用于生成代理对象,是AOP所必须的。
同样的,该步骤也可以采用注解来替代:
@Configuration
@ComponentScan(basePackages = {"com.zqh"})
@EnableAspectJAutoProxy(proxyTargetClass = true)
public class ConfigAop {
}
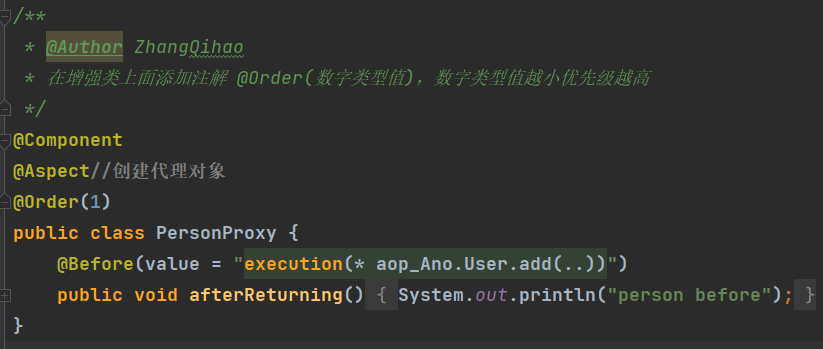
步骤4:在增强类上添加注解 @Aspect
主要有五种通知,顾名思义,例如before就是在切入点之前要执行的通知。
需要介绍一下execution的作用:指明被增强的是哪个类的哪个方法
格式:execution([权限修饰符] [返回类型] [类全路径] [方法名称]([参数列表]) )
本例中,包名aop_Ano,类名User,被增强的方法add(),参数无,写".."
package aop_Ano;

import org.aspectj.lang.ProceedingJoinPoint;
import org.aspectj.lang.annotation.*;
import org.springframework.beans.factory.annotation.Value;
import org.springframework.core.annotation.Order;
import org.springframework.stereotype.Component;

/**
 * @Author ZhangQihao
 *  execution([权限修饰符] [返回类型] [类全路径] [方法名称]([参数列表]) )
 *  作用:指明被增强的哪个类的哪个方法
 */
@Component
@Aspect
@Order(3)
public class UserProxy {
    @Pointcut(value = "execution(* aop_Ano.User.add(..))")
    public void pointdemo() {
    }
    //前置通知
    @Before(value = "pointdemo()")//被增强的哪个类的哪个方法
    public void before() {
        System.out.println("before!!");
    }

    //后置通知(返回通知)
    @AfterReturning(value = "pointdemo()")
    public void afterReturning() {
        System.out.println("后置通知");
    }

    //最终通知
    @After(value = "execution(* aop_Ano.User.add(..))")
    public void after() {
        System.out.println("最终");
    }

    //异常通知
    @AfterThrowing(value = "execution(* aop_Ano.User.add(..))")
    public void afterThrowing() {
        System.out.println("afterThrowing.........");
    }

    //环绕通知
    @Around(value = "execution(* aop_Ano.User.add(..))")
    public void around(ProceedingJoinPoint proceedingJoinPoint) throws Throwable {
        System.out.println("环绕之前.........");
        //被增强的方法执行
        proceedingJoinPoint.proceed();
        System.out.println("环绕之后.........");
    }
}
在以上代码中,我们发现,如果对一个同一个切点多次增强,要写很多个execution,非常不方便,所以可以对同一个切点使用PointCut方法来设置目标切点,后面的注解直接使用PointCut下的方法即可。例如:
步骤5:若有多个增强类对同一个切点增强,使用Order排序
四. 使用Spring框架实现JdbcTemplate与事务
1.JDBCTemplate
顾名思义,是一种模板,方便快速调用sql语句对数据库进行操作完成crud。使用的时候只需要提供相应的sql语句和其中的变量即可。例如:当我们想增加一条数据
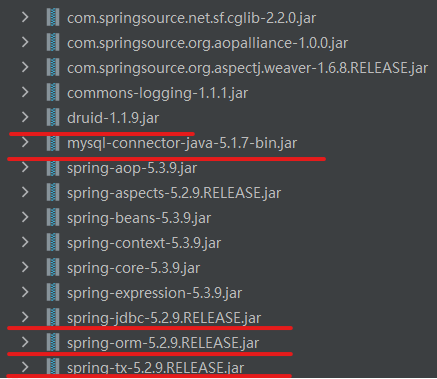
步骤1:引入相关jar包
步骤2:配置xml文件
<?xml version="1.0" encoding="UTF-8"?>
<beans xmlns="http://www.springframework.org/schema/beans"
       xmlns:xsi="http://www.w3.org/2001/XMLSchema-instance"
       xmlns:p="http://www.springframework.org/schema/p"
       xmlns:aop="http://www.springframework.org/schema/aop"
       xmlns:context="http://www.springframework.org/schema/context"

       xsi:schemaLocation="http://www.springframework.org/schema/beans
http://www.springframework.org/schema/beans/spring-beans.xsd
http://www.springframework.org/schema/context
http://www.springframework.org/schema/context/spring-context.xsd
http://www.springframework.org/schema/aop
http://www.springframework.org/schema/aop/spring-aop.xsd">
    <!-- 组件扫描 -->
    <context:component-scan base-package="com.zqh.spring5"></context:component-scan>

    <!-- 数据库连接池 -->
    <bean id="dataSource11" class="com.alibaba.druid.pool.DruidDataSource"
          destroy-method="close">
        <property name="url" value="jdbc:mysql:///user_db" />
        <property name="username" value="root" />
        <property name="password" value="123456" />
        <property name="driverClassName" value="com.mysql.jdbc.Driver" />
    </bean>

    <!-- JdbcTemplate 对象 -->
    <bean id="jdbcTemplate" class="org.springframework.jdbc.core.JdbcTemplate">
        <!--注入 dataSource-->
        <property name="dataSource" ref="dataSource11"></property>
    </bean>

</beans>
步骤3:创建相应的Dao层和Servie层
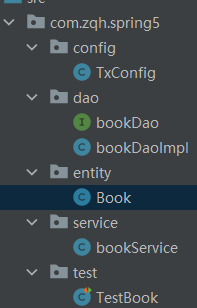
其中,entity用于初始化存入对象的属性。dao中的接口用于定义增删改查的各种方法,而impl用于实现。
以下是impl实现的具体代码,采用Autowire来创建JDBCTemplate的对象实例,然后调用其中的方法来完成对数据库的crud。
其中的方法:
update是用于”修改“数据库中的数据,我们辅佐以sql语句,就可以实现增加和删除和修改这三项功能。batchUpdate就是按组修改,即一次可以进行多条增删改。
queryForObject用于“查”,那么我们可以辅佐以sql语句实现一些功能,例如查找id为?的一条数据。而query可以查找多条,用于查全部(select * from ......)。
package com.zqh.spring5.dao;

import com.zqh.spring5.entity.Book;
import org.springframework.beans.factory.annotation.Autowired;
import org.springframework.jdbc.core.BeanPropertyRowMapper;
import org.springframework.jdbc.core.JdbcTemplate;
import org.springframework.stereotype.Repository;

import java.util.Arrays;
import java.util.List;

/**
 * @Author ZhangQihao
 * (1)@Component
 * (2)@Service
 * (3)@Controller
 * (4)@Repository
 * * 上面四个注解功能是一样的,都可以用来创建 bean 实例
 */
@Repository
public class bookDaoImpl implements bookDao{
    @Autowired
    private JdbcTemplate jdbcTemplate;

    @Override
    public void add(Book book) {
        String sql = "insert into t_book values(?,?,?)";
        Object[] args = {book.getUserId(), book.getUsername(), book.getUstatus()};
        int update = jdbcTemplate.update(sql, args);
        System.out.println(update);//增加了update条记录
    }

    //增加一条记录
    @Override
    public void update(Book book) {
        String sql = "update t_book set username=?,ustatus=? where user_id=?";
        Object[] args = {book.getUsername(), book.getUstatus(),book.getUserId()};
        int update = jdbcTemplate.update(sql, args);
        System.out.println(update);
    }

    //批量增加
    @Override
    public void batchAddBook(List<Object[]> batchArgs) {
        String sql = "insert into t_book values(?,?,?)";
        int[] ints = jdbcTemplate.batchUpdate(sql, batchArgs);
        //batchUpdate用于批量添加,底层会遍历List集合,把其中每一个Object数组内的几个数据提取出来,并封装成book对象进行添加。
        System.out.println(Arrays.toString(ints));
    }

    //批量修改
    @Override
    public void batchUpdateBook(List<Object[]> batchArgs) {
        String sql = "update t_book set username=?,ustatus=? where user_id=?";
        int[] ints = jdbcTemplate.batchUpdate(sql, batchArgs);
        System.out.println(Arrays.toString(ints));
    }
    @Override
    public void batchDeleteBook(List<Object[]> batchArgs) {
        String sql = "delete from t_book where user_id=?";
        int[] ints = jdbcTemplate.batchUpdate(sql, batchArgs);
        System.out.println(Arrays.toString(ints));
    }

    //删
    @Override
    public void delete(String id) {
        String sql = "delete from t_book where user_id=?";
        int update = jdbcTemplate.update(sql, id);
        System.out.println(update);
    }

    //查select一条or多条
    @Override
    public int selectCount() {
        String sql = "select count(*) from t_book";
        Integer count = jdbcTemplate.queryForObject(sql, Integer.class);
        return count;
    }

    @Override
    public Book FindBookInfo(String id) {
        String sql = "select * from t_book where user_id = ?";
//      RowMapper 是接口,针对返回不同类型数据,使用这个接口里面实现类完成数据封装
        //我理解是,把数据封装到Book的对象中去
        Book book = jdbcTemplate.queryForObject(sql, new BeanPropertyRowMapper<Book>(Book.class), id);
        return book;
    }

    //封装的区别,关键在于使用的jdbc方法不同,一个是queryfoObject,一个是query(用于多条)
    @Override
    public List<Book> findAllBook() {
        String sql = "select * from t_book";
        List<Book> bookList = jdbcTemplate.query(sql, new BeanPropertyRowMapper<Book>(Book.class));
        return bookList;
    }
}
最后编写个测试类测试一下即可:
2.事务
学过数据库应该知道,事务是数据库操作最基本单元,特点是:逻辑上一组的操作,要么都成功,如果有一个失败则所有操作都失败。
事务的四个特性:(1)原子性 (2)一致性 (3)隔离性 (4)持久性
事务需要添加到 JavaEE 三层结构里面 Service 层(业务逻辑层)
步骤1:配置xml
(1)在 spring 配置文件引入名称空间 tx
<?xml version="1.0" encoding="UTF-8"?>
<beans xmlns="http://www.springframework.org/schema/beans"
       xmlns:xsi="http://www.w3.org/2001/XMLSchema-instance"
       xmlns:p="http://www.springframework.org/schema/p"
       xmlns:aop="http://www.springframework.org/schema/aop"
       xmlns:tx="http://www.springframework.org/schema/tx"
       xmlns:context="http://www.springframework.org/schema/context"

       xsi:schemaLocation="http://www.springframework.org/schema/beans
http://www.springframework.org/schema/beans/spring-beans.xsd
http://www.springframework.org/schema/context
http://www.springframework.org/schema/context/spring-context.xsd
http://www.springframework.org/schema/aop
http://www.springframework.org/schema/aop/spring-aop.xsd
http://www.springframework.org/schema/tx
http://www.springframework.org/schema/tx/spring-tx.xsd">
(2)在上文1中的基础上,开启事务注解和创建事务管理器(本例中数据库连接池的bean的id为dataSource22)
<!--开启事务注解-->
    <tx:annotation-driven transaction-manager="transactionManager"></tx:annotation-driven>


    <!--创建事务管理器-->
    <bean id="transactionManager" class="org.springframework.jdbc.datasource.DataSourceTransactionManager">
        <!--注入数据源(对那个数据库进行操作)-->
        <property name="dataSource" ref="dataSource22"></property>
    </bean>
以上模块也可以使用完全注解开发:
@Configuration注解的作用:声明一个类为配置类,用于取代bean.xml配置文件注册bean对象。
package com.zqh.spring5.config;

import com.alibaba.druid.pool.DruidDataSource;
import org.springframework.context.annotation.Bean;
import org.springframework.context.annotation.ComponentScan;
import org.springframework.context.annotation.Configuration;
import org.springframework.jdbc.core.JdbcTemplate;
import org.springframework.jdbc.datasource.DataSourceTransactionManager;
import org.springframework.transaction.annotation.EnableTransactionManagement;

import javax.sql.DataSource;

/**
 * @Author ZhangQihao
 */
@Configuration //配置类
@ComponentScan(basePackages = "com.zqh") //组件扫描
@EnableTransactionManagement //开启事务
public class TxConfig {
    //创建数据库连接池
    @Bean
    public DruidDataSource getDruidDataSource() {
        DruidDataSource dataSource = new DruidDataSource();
        dataSource.setDriverClassName("com.mysql.jdbc.Driver");
        dataSource.setUrl("jdbc:mysql:///user_db");
        dataSource.setUsername("root");
        dataSource.setPassword("123456");
        return dataSource;
    }
    //创建 JdbcTemplate 对象
    @Bean
    public JdbcTemplate getJdbcTemplate(DataSource dataSource) {
        //到 ioc 容器中根据类型找到 dataSource
        JdbcTemplate jdbcTemplate = new JdbcTemplate();
        //注入 dataSource
        jdbcTemplate.setDataSource(dataSource);
        return jdbcTemplate;
    }
    //创建事务管理器
    @Bean
    public DataSourceTransactionManager
    getDataSourceTransactionManager(DataSource dataSource) {
        DataSourceTransactionManager transactionManager = new
                DataSourceTransactionManager();
        transactionManager.setDataSource(dataSource);
        return transactionManager;
    }
}
步骤3:在需要用到事务的Service类或者具体方法的上方添加@Transactional注解
例如本例中的bookService:
可以设置传播类别和隔离级别。

以上。


 90
90


 被折叠的 条评论
为什么被折叠?
被折叠的 条评论
为什么被折叠?
 到【灌水乐园】发言


