


一、Spring Boot入门
视频学习资料(雷神):
https://www.bilibili.com/video/BV19K4y1L7MT?p=1
github:
https://github.com/12722097458/springboot-20220403.git
1、Spring Boot简介
简化Spring的一个框架;
是整个Spring技术栈的一个整合;
是简化Spring技术栈的快速开发脚手架。
生效
开启
2、Spring Boot入门案例
通过创建一个maven项目,改造成一个简单的Spring Boot项目。
官网指引:https://spring.io/guides/gs/spring-boot/
(1)新建一个普通的maven项目
(2)导入父项目依赖以及配置
<modelVersion>4.0.0</modelVersion>
<!-- 导入父项目 -->
<parent>
    <groupId>org.springframework.boot</groupId>
    <artifactId>spring-boot-starter-parent</artifactId>
    <version>2.6.6</version>
    <relativePath/> <!-- lookup parent from repository -->
</parent>

<!-- 导入简单的依赖 -->
<dependencies>
    <dependency>
        <groupId>org.springframework.boot</groupId>
        <artifactId>spring-boot-starter-web</artifactId>
    </dependency>
</dependencies>

<!-- 可以通过maven进行jar包生成 -->
<plugin>
    <groupId>org.springframework.boot</groupId>
    <artifactId>spring-boot-maven-plugin</artifactId>
</plugin>
(3)创建一个启动类,进行配置
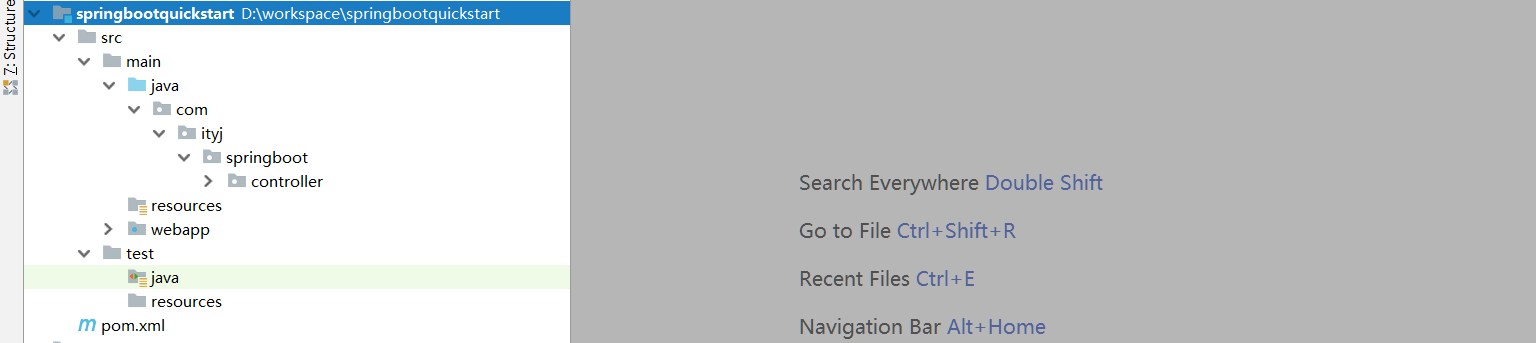
注意文件的位置:保证它在controller、mapper包的同级
@SpringBootApplication
public class QuickStartApplication {
    public static void main(String[] args) {
        SpringApplication.run(QuickStartApplication.class, args);
    }
}
(4)创建一个HelloController
@Controller
public class HelloController {

    @RequestMapping(path = "/hello")
    @ResponseBody
    public String sayhello() {
        System.out.println("Hello World!");
        return "Hello";
    }

}
(5)启动项目,进行测试
运行QuickStartApplication的main方法,成功启动后访问url:http://localhost:8080/hello
3、使用Spring Initializr快速创建Spring Boot项目
默认生成的Spring Boot项目:
- 基本框架已经搭好,主程序也已经编好,我们只需要写自己的逻辑。
- resources文件夹的结构
- static:保存所有的静态资源(js / css / images)
- templates:保存所有的模板页面;(Spring Boot默认jar包使用嵌入式的tomcat,默认不支持jsp页面);可以使用模板引擎(framemarker,thymeleaf)
- application.yml:配置文件,可以修改一些默认设置
4、SpringBoot的特点:
1.1 依赖管理
- 父项目的依赖管理
	<parent>
		<groupId>org.springframework.boot</groupId>
		<artifactId>spring-boot-starter-parent</artifactId>
		<version>2.6.6</version>
		<relativePath/> <!-- lookup parent from repository -->
	</parent>
又有一个父项目:
  <parent>
    <groupId>org.springframework.boot</groupId>
    <artifactId>spring-boot-dependencies</artifactId>
    <version>2.6.6</version>
  </parent>
spring-boot-dependencies这个项目里有一个properties的标签,里面定义了差不多我们开发所需要的所有依赖版本号。自动版本仲裁。
- 修改版本号
首先从spring-boot-dependencies里面查看我们引入的jar包默认配置的版本,如果不合适取出配置的key,在自己的pom中重新配置
<properties>
    <java.version>11</java.version>
    <mysql.version>5.1.43</mysql.version>
</properties>
-
开发中的各种场景启动器starter
https://docs.spring.io/spring-boot/docs/current/reference/html/using.html#using.build-systems.starters1. spring-boot-starter-* : 这种命名的依赖一般是官方提供的,引入后这个场景所需要的依赖会自动导入 2. *-spring-boot-starter :第三方提供的简化开发的启动器 3. 所有场景启动器最底层的依赖 <dependency> <groupId>org.springframework.boot</groupId> <artifactId>spring-boot-starter</artifactId> <version>2.6.6</version> <scope>compile</scope> </dependency> 也是springboot自动配置的核心依赖 -
有默认版本号,自动版本仲裁
1. 引入依赖默认可以不写版本号(spring-boot-dependencies指定好的话)
2. spring-boot-dependencies没有指定的话,需要自己写版本号
1.2 自动配置
-
自动配置好了Tomcat
-
引入Tomcat的依赖(依赖管理 web -> tomcat)
<dependency> <groupId>org.springframework.boot</groupId> <artifactId>spring-boot-starter-tomcat</artifactId> <version>2.6.6</version> <scope>compile</scope> </dependency> -
配置tomcat(自动配置将分析)
-
-
自动配好了SpringMVC
- 引入了SpringMVC的全套组件
- 自动配置好了SpringMVC的常用组件
-
自动配置好了web的常见功能:如字符编码等
- SpringBoot帮我们配置好了所有Web开发常见的场景
-
默认的包结构
- @SpringBootApplication,默认扫描主程序所在的包及其子包里的所有组件
- 若想改变扫描路径,添加属性即可@SpringBootApplication(scanBasePackages = {“com.ityj”})
-
各种配置拥有默认值
- 默认配置最终都是映射到XxxProperties的类上:ServerProperties、WebMvcProperties、Knife4jProperties
- 配置文件最终都会绑定到每个类上,这个类会在容器中创建对象。
-
按需加载所有的配置项
- 非常多的starter
- 以后纳入了相关场景,这些自动配置才会起作用
- SpringBoot的所有自动配置供能都在spring-boot-auto-configure包里
5、容器功能
1.1 组件添加
(1)@Configuration
- 基本使用
- Full模式和Lite模式: proxyBeanMethods属性,默认为true(Full模式)
- 最佳实战
- 配置类组件之间有依赖关系,方法会被调用得到之前单实例组件,用Full模式(代理方法,多次调用getBean()也是同一个方法,会进行判断),通过代理生成com.ityj.boot.config.MyConfig E n h a n c e r B y S p r i n g C G L I B EnhancerBySpringCGLIB EnhancerBySpringCGLIB146ac44c@aca3c85
- 配置类组件之间无依赖关系用Lite模式加速容器启动过程,减少判断(Lite模式是真实的方法)
- 最佳实战
(2)@Bean, @Component, @Controller, @Service, @repository
(3)@ComponentScan, @Import
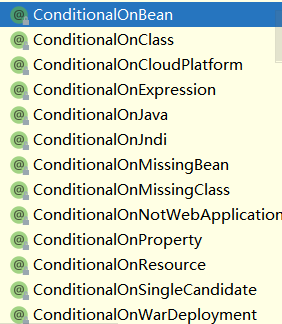
(4)@Conditional
条件装配,满足conditional的某种条件时,才进行组件的注入
- @ConditionOnBean(name=“Dog”) --> 当组件中有Dog时,才会对下面的组件进行注入
1.2 原生配置文件引入
(1) @ImportResource
可以将配置文件中的组件注入到容器中:@ImportResource(“classpath:bean-pet.xml”)
1.3 配置绑定
@ConfigurationProperties
(1) ConfigurationProperties + Component将自己类Person和配置文件中的属性绑定在一起,并注入到容器中
@Data
@NoArgsConstructor
@AllArgsConstructor
@Component  //注册bean到容器中
/*
    @ConfigurationProperties 作用:
    将配置文件中配置的每一个属性的值,映射到这个组件中;
    告诉SpringBoot将本类中的所有属性和配置文件中相关的配置进行绑定
    参数 prefix = “person” : 将配置文件中的person下面的所有属性一一对应
*/
@ConfigurationProperties(value = "person")
@Validated         //JSR303数据校验
public class Person implements Serializable {

    private String id;
    private String name;
    private String gender;
    private int age;
    private List<String> allPets;
    private Set<String> set;
    private List<String> list;
    private String[] stringArr;
    private Map<String,Object> map;
    private Date date;
    private boolean status;

    @Email(message = "邮箱格式错误!")
    @NotNull
    private String email;

}

public class Pet implements Serializable{
    private String id;
    private String name;
}
person:
  id: s001${random.uuid}
  name: Jack
  gender: male
  age: 24
  allPets:
    - dog
    - pig
    - cat
  set:
    - a
    - b
    - c
    - c
    - b
  list:
    - 1
    - 2
    - 3
    - 4
  stringArr:
    - banana
    - apple
    - orange
  map: {k1: v1,k2: v2}
  date: 2020/09/19
  status: false
  email: ayinjun1109@163.com
(2)通过一个配置类开启配置绑定
@EnableConfigurationProperties(Car.class)  // 第二种注入容器中的方式(ConfigurationProperties)
// 作用 1: 开启Car配置绑定功能  2: 把Car组件自动注入到容器中
public class MyConfig {}
@Data
@ConfigurationProperties(prefix = "mycar")
public class Car {
    private String brand;
    private double price;
}
6、配置绑定
1.1 引导加载配置类
@SpringBootApplication

↓↓↓↓

@SpringBootConfiguration
@EnableAutoConfiguration
@ComponentScan(excludeFilters = { @Filter(type = FilterType.CUSTOM, classes = TypeExcludeFilter.class),
		@Filter(type = FilterType.CUSTOM, classes = AutoConfigurationExcludeFilter.class) })
public @interface SpringBootApplication {}
(1) SpringBootConfiguration
其内部就是一个@Configuration,表明是一个配置类
(2) @ComponentScan
指明扫描哪些包
(3) @EnableAutoConfiguration
@AutoConfigurationPackage
@Import(AutoConfigurationImportSelector.class)
public @interface EnableAutoConfiguration {}
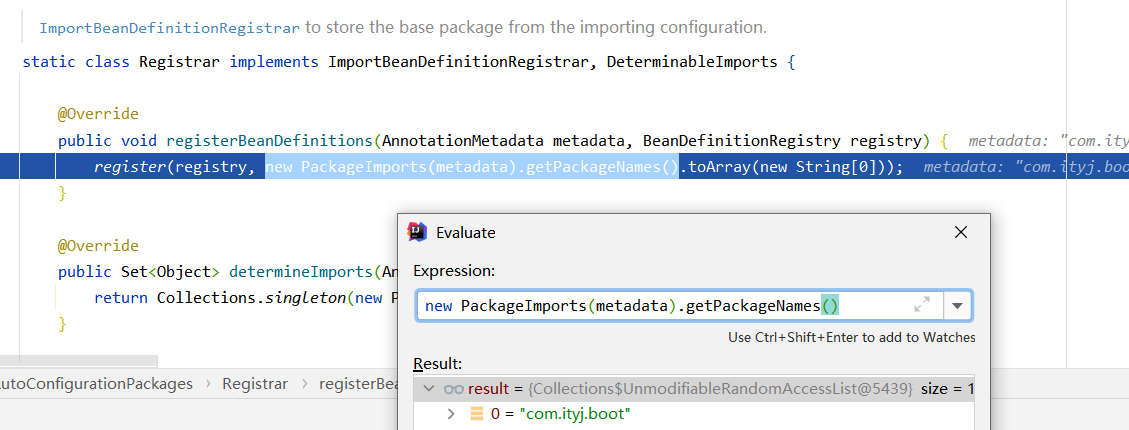
a. @AutoConfigurationPackage
@Import(AutoConfigurationPackages.Registrar.class)
public @interface AutoConfigurationPackage {}

// 通过@Import给容器中导入了一个组件。(通过一个Registrar.calss批量注册)
// 就是将指定包下的所有组件导入到容器中。Main程序所在的包下:com.ityj.boot
b. @Import(AutoConfigurationImportSelector.class)
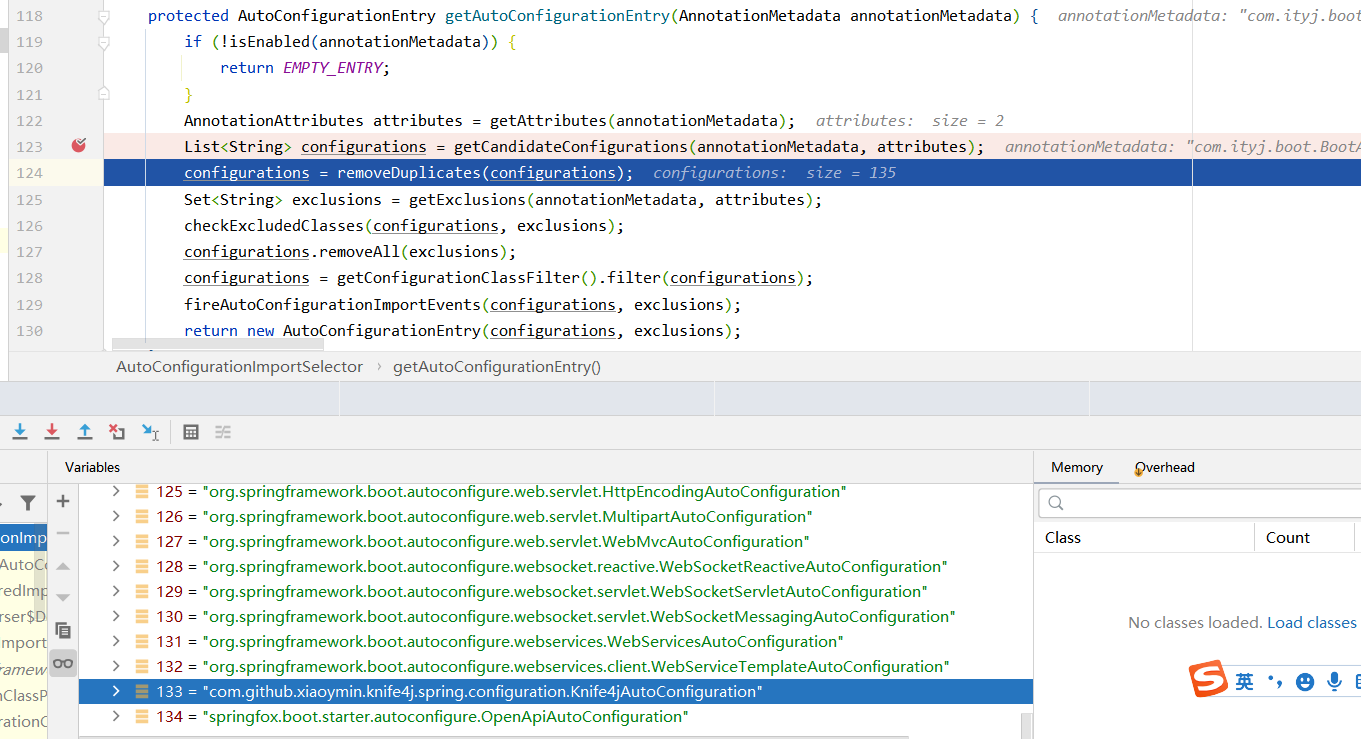
1. AutoConfigurationImportSelector.selectImports中的getAutoConfigurationEntry(annotationMetadata)批量获取所有的组件
2. List<String> configurations = getCandidateConfigurations(annotationMetadata, attributes);
3. 最终通过工厂架子啊loadSpringFactories(classLoaderToUse)得到所有组件
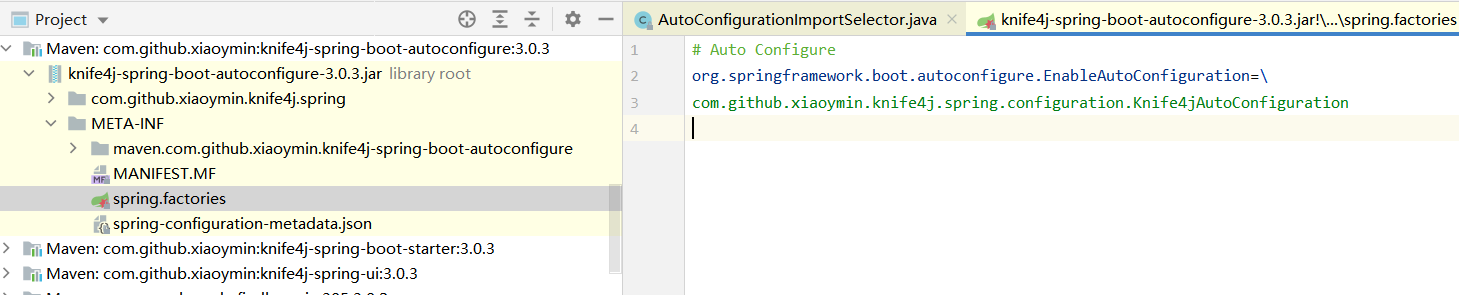
4. Enumeration<URL> urls = classLoader.getResources("META-INF/spring.factories");
默认扫描我们系统中所有目录下的META-INF\spring.factories
主要是spring-boot-autoconfigure-2.6.6.jar!\META-INF\spring.factories下org.springframework.boot.autoconfigure.EnableAutoConfiguration属性,其中2.6.6有134个,在程序中又引入了@EnableKnife4j,所以一共有加载了135个组件配置类
1.2 按需加载配置项
虽然我们133个默认场景的自动配置项启动的时候全部加载。
最终是按照条件装配规则@Conditional,按需装配的。
可以通过几个案例来查看最终效果:
-
AopAutoConfiguration是进行注册并使用的了。可以通过run.getBean(AopAutoConfiguration.class);进行确认
@Configuration(proxyBeanMethods = false) @ConditionalOnProperty(prefix = "spring.aop", name = "auto", havingValue = "true", matchIfMissing = true) // 表示如果配置了spring.aop.auto=true, 会进行注册。如果没有配置也会注册。怎样都会注册 public class AopAutoConfiguration {} 里面的类org.springframework.boot.autoconfigure.aop.AopAutoConfiguration$ClassProxyingConfiguration也进行了注册。 @Configuration(proxyBeanMethods = false) @ConditionalOnMissingClass("org.aspectj.weaver.Advice") // 如果没有引入Advice这个类,确实没有导入这个包 @ConditionalOnProperty(prefix = "spring.aop", name = "proxy-target-class", havingValue = "true", matchIfMissing = true) // 怎样都满足 static class ClassProxyingConfiguration {} // 所以也进行了注册。 -
CacheAutoConfiguration没有生效
@Configuration(proxyBeanMethods = false) @ConditionalOnClass(CacheManager.class) @ConditionalOnBean(CacheAspectSupport.class) // 不满足条件,所以CacheAutoConfiguration没有注册 @ConditionalOnMissingBean(value = CacheManager.class, name = "cacheResolver") @EnableConfigurationProperties(CacheProperties.class) @AutoConfigureAfter({ CouchbaseDataAutoConfiguration.class, HazelcastAutoConfiguration.class, HibernateJpaAutoConfiguration.class, RedisAutoConfiguration.class }) @Import({ CacheConfigurationImportSelector.class, CacheManagerEntityManagerFactoryDependsOnPostProcessor.class }) public class CacheAutoConfiguration {} -
DispatcherServletAutoConfiguration生效的
1 DispatcherServletAutoConfiguration
@AutoConfigureOrder(Ordered.HIGHEST_PRECEDENCE)
@Configuration(proxyBeanMethods = false)
@ConditionalOnWebApplication(type = Type.SERVLET)
@ConditionalOnClass(DispatcherServlet.class)
@AutoConfigureAfter(ServletWebServerFactoryAutoConfiguration.class)
public class DispatcherServletAutoConfiguration {}
1.1 内部类DispatcherServletConfiguration
@Configuration(proxyBeanMethods = false)
@Conditional(DefaultDispatcherServletCondition.class)   // 当满足这个类里面代码逻辑给定的条件时,为true
@ConditionalOnClass(ServletRegistration.class)			// 有这个类时
@EnableConfigurationProperties(WebMvcProperties.class)
// 1.开启WebMvcProperties这个类和对应配置文件spring.mvc的配置绑定功能;配置文件里的所有spring.mvc.xxx都会被WebMvcProperties封装。
// 2. 把WebMvcProperties放到容器中
protected static class DispatcherServletConfiguration {}
1.1.1方法dispatcherServlet
@Bean(name = "dispatcherServlet")
public DispatcherServlet dispatcherServlet(WebMvcProperties webMvcProperties) {  // 这个webMvcProperties是从容器中拿的。webMvcProperties又是通过@EnableConfigurationProperties(WebMvcProperties.class)注入到容器中的
   DispatcherServlet dispatcherServlet = new DispatcherServlet();
   dispatcherServlet.setDispatchOptionsRequest(webMvcProperties.isDispatchOptionsRequest());
   dispatcherServlet.setDispatchTraceRequest(webMvcProperties.isDispatchTraceRequest());
   dispatcherServlet.setThrowExceptionIfNoHandlerFound(webMvcProperties.isThrowExceptionIfNoHandlerFound());
   dispatcherServlet.setPublishEvents(webMvcProperties.isPublishRequestHandledEvents());
   dispatcherServlet.setEnableLoggingRequestDetails(webMvcProperties.isLogRequestDetails());
   return dispatcherServlet;
}
1.1.2方法multipartResolver,文件上传解析器
@Bean
@ConditionalOnBean(MultipartResolver.class)   // 容器中有了MultipartResolver类型的bean
@ConditionalOnMissingBean(name = "multipartResolver")  // 容器中没有multipartResolver名字的bean
public MultipartResolver multipartResolver(MultipartResolver resolver) {
   // MultipartResolver resolver这个对象作为参数传入到@Bean标注的配置里,则resolver这个值就是从容器中获取。
   // 直接将容器中MultipartResolver类型的bean返回,这个名字设置为multipartResolver,防止用户配置的文件上传解析器不符合规范。(名字必须是multipartResolver)
   return resolver;
}
- HttpEncodingAutoConfiguration
目前发现SpringBoot前后端交互没有出现中文乱码现象,主要是自动配置了HttpEncodingAutoConfiguration.characterEncodingFilter
@Configuration(proxyBeanMethods = false)
@EnableConfigurationProperties(ServerProperties.class)
@ConditionalOnWebApplication(type = ConditionalOnWebApplication.Type.SERVLET)
@ConditionalOnClass(CharacterEncodingFilter.class)
@ConditionalOnProperty(prefix = "server.servlet.encoding", value = "enabled", matchIfMissing = true)
public class HttpEncodingAutoConfiguration {}
private final Encoding properties;

public HttpEncodingAutoConfiguration(ServerProperties properties) {
   this.properties = properties.getServlet().getEncoding();
}
@Bean
@ConditionalOnMissingBean
public CharacterEncodingFilter characterEncodingFilter() {
   CharacterEncodingFilter filter = new OrderedCharacterEncodingFilter();
   filter.setEncoding(this.properties.getCharset().name());
   filter.setForceRequestEncoding(this.properties.shouldForce(Encoding.Type.REQUEST));
   filter.setForceResponseEncoding(this.properties.shouldForce(Encoding.Type.RESPONSE));
   return filter;
}
总结:
- SpringBoot首先加载所有的自动配置类XxxAutoConfiguration
- 每个自动配置类按照条件(conditional)判断是否生效,默认都会绑定配置文件指定的值.XxxProperties.class里面。XxxProperties和配置文件中的属性又是一一对应的。
- 生效的配置类就会给容器汇总装配非常多的组件。
- 只要容器中有这些组件,就相当于有了这些功能。
- 定制化配置
- 用户直接自己@Bean替换底层的组件
- 用户去看这个组件对应的配置文件,通过yml进行修改
XxxAutoConfiguration --> 组件 -> 去XxxProperties的Bean中进行取值 --> 可通过application.yml进行修改
7、最佳实战
1.1 引入场景依赖
- Spring官方的:https://docs.spring.io/spring-boot/docs/current/reference/html/using.html#using.build-systems.starters
- 第三方的:http://www.mybatis.cn/archives/861.html
1.2 查看自动配置了哪些(选做)
- 自己分析:根据XxxAutoConfiguration类上以及方法上的注解分析是否生效
- 配置文件中debug=true开启自动配置报告,可以看到positive/negative的组件,以及满足与否的原因
1.3 配置是否需要修改
-
参考文档修改配置项
https://docs.spring.io/spring-boot/docs/current/reference/html/application-properties.html#appendix.application-properties
-
自己根据XxxProperties的属性进行分析
-
自定义加入或修改配置型:@Bean…
-
自定义器: XxxCustomizer
-
…
8、开发小技巧
1.1 Lombok
在IDE中下载lombok插件再引入依赖即可,springboot已经对版本进行了控制
<dependency>
   <groupId>org.projectlombok</groupId>
   <artifactId>lombok</artifactId>
</dependency>
1.2 devtools
修改代码后,IDE手动编译一次,会进行重启。Automatic Restart
https://docs.spring.io/spring-boot/docs/current/reference/html/using.html#using.devtools
<dependency>
   <groupId>org.springframework.boot</groupId>
   <artifactId>spring-boot-devtools</artifactId>
   <optional>true</optional>
</dependency>
1.3 Spring Initializr
https://start.spring.io/
二、Spring Boot2 核心技术
1、配置文件
1.1 配置文件
Spring Boot使用一个全局的配置文件,其配置文件名是固定的。
- application.properties
- application.yml
配置文件的作用:修改Spring Boot自动配置的默认值。
标记语言:
以前的配置文件,大多是使用xxx.xml的方式,比较繁琐。
XML:
<server>
	<port>9090</port>
</server>
YMAL是以数据为中心,比json、xml等更加适合做配置文件。
eg:
server:
  port: 9090
1.2 YMAL语法
(1)基本语法
k: (空格)v:表示一对键值对(空格必须有)
以空格的缩进来控制层级关系,只要是左对齐的一列数据,都是一个层级的。
server:
  port: 9090
  servlet:
    context-path: /sb
属性跟值大小写敏感
(2)值的写法
(1)字面量: 普通的值(数字,字符串,布尔值)
k: v 字面量直接来写。
字符串默认不需要加双引号。
如果加了需要跟单引号做好区分:
双引号:写的如果是换行(\n)类的字符,最终会进行换行输出。
单引号:写的如果是换行(\n)类的字符,最终会把输入的值原封不动输出。
(2)对象,Map(属性和值)(键值对)
friend:
	lastName: san
	age: 20
行内写法:friend: {lastName: san,age: 20}
(3)数组(List、Set)
用 - 值来表示数组中的一个元素
pets:
	- cat
	- pig
	- dog
行内写法:pets: [cat, pig, dog]
如果想要通过@Value获取到数组或集合,可以这样写(逗号隔开):
data:
  list: Jack,Rose,Tom
@Value("${data.list}")
private List<String> list;  // Spring默认情况下会以','进行分割,转换成对应的数组或List。
@Value("${data.list}")
private String[] arr;

@Value("#{'${data.list}'.split(',')}")   // 数组或list接收都可以
private List<String> list2;
@Value("#{'${data.list}'.split(',')}")
private String[] arr2;
1.3 Profile 文件
(1)通过yml文件的spring: profiles: active: 指明
server:
  port: 9090
  servlet:
    context-path: /sb
spring:
  profiles:
    active: prd


---
server:
  port: 8888
spring:
  profiles: dat

---

server:
  port: 9999
spring:
  profiles: prd
(2)通过application-{profile}.properties实现动态切换。
application.properties
server.port=7777
# 如果没有指定spring.profiles.active,默认是application.properties对应的值
spring.profiles.active=prd
application-dev.properties
server.port=6666
application-prd.properties
server.port=5555
(3)使用命令行,启动jar包,指定对应的配置文件
java -jar springboot-review1214-0.0.1-SNAPSHOT.jar --spring.profiles.active=dev
(4)也可以使用spring.config.location指定文件位置
java -jar springboot-review1214-0.0.1-SNAPSHOT.jar --spring.config.location=./application.yml
最后指定的端口号是外部location的端口:优先,并且和其他内部配置文件互补。
---------------------------------------------------------
springboot-review1214-0.0.1-SNAPSHOT.jar和外部配置文件application.yml所在同一个文件夹下,其实直接
`java -jar springboot-review1214-0.0.1-SNAPSHOT.jar`就会默认先读取外部的端口为1111的application.yml配置文件。
1.4 SpringBoot默认日志(slf4j --> logback)
如果想要使用,直接引入logback.xml或者logback-spring.xml即可。
- SpringBoot如何整合使用更加优秀的log4j2的日志框架呢?
(1)排除spring的spring-boot-starter-logging框架,再引入spring-boot-starter-log4j2依赖
<!--要想使用log4j2的日志框架,需要排除掉原始的-->
<exclusions>
    <exclusion>
        <artifactId>spring-boot-starter-logging</artifactId>
        <groupId>org.springframework.boot</groupId>
    </exclusion>
</exclusions>
<dependency> <!-- 引入log4j2依赖 -->
    <groupId>org.springframework.boot</groupId>
    <artifactId>spring-boot-starter-log4j2</artifactId>
</dependency>
logback-demo
<?xml version="1.0" encoding="UTF-8"?>
<configuration debug="false">
    <!--定义日志文件的存储地址 勿在 LogBack 的配置中使用相对路径-->
    <property name="LOG_HOME" value="C:home" />

    <!-- 控制台输出 -->
    <appender name="STDOUT" class="ch.qos.logback.core.ConsoleAppender">
        <encoder class="ch.qos.logback.classic.encoder.PatternLayoutEncoder">
            <!--格式化输出:%d表示日期,%thread表示线程名,%-5level:级别从左显示5个字符宽度%msg:日志消息,%n是换行符-->
            <pattern>%d{yyyy-MM-dd HH:mm:ss.SSS} [%thread] %-5level %logger{50} - %msg%n</pattern>
        </encoder>
    </appender>
    <!-- 按照每天生成日志文件 + 单个文件大小为10M  +  保留7天 -->
    <appender name="FILE" class="ch.qos.logback.core.rolling.RollingFileAppender">
        <rollingPolicy class="ch.qos.logback.core.rolling.TimeBasedRollingPolicy">
            <!--日志文件输出的文件名-->
            <FileNamePattern>${LOG_HOME}/spring-logback-druid.log.%d{yyyy-MM-dd}.log</FileNamePattern>
            <!--日志文件保留天数-->
            <MaxHistory>7</MaxHistory>
        </rollingPolicy>
        <encoder class="ch.qos.logback.classic.encoder.PatternLayoutEncoder">
            <!--格式化输出:%d表示日期,%thread表示线程名,%-5level:级别从左显示5个字符宽度%msg:日志消息,%n是换行符-->
            <pattern>%d{yyyy-MM-dd HH:mm:ss.SSS} [%thread] %-5level %logger{50} - %msg%n</pattern>
        </encoder>
        <!--日志文件最大的大小-->
        <triggeringPolicy class="ch.qos.logback.core.rolling.SizeBasedTriggeringPolicy">
            <MaxFileSize>10MB</MaxFileSize>
        </triggeringPolicy>
    </appender>

    <!-- 日志输出级别 -->
    <root level="info">
        <appender-ref ref="STDOUT"/>
        <appender-ref ref="FILE"/>
    </root>
</configuration>
log4j2.xml
<?xml version="1.0" encoding="UTF-8"?>
<Configuration status="WARN">

    <!--全局参数-->
    <Properties>
        <Property name="pattern">%d{yyyy-MM-dd HH:mm:ss,SSS} %5p %c{1}:%L - %m%n</Property>
        <Property name="logDir">/data/logs/dust-server</Property>
    </Properties>

    <Loggers>
        <Root level="INFO">
            <AppenderRef ref="console"/>
            <AppenderRef ref="rolling_file"/>
        </Root>
    </Loggers>

    <Appenders>
        <!-- 定义输出到控制台 -->
        <Console name="console" target="SYSTEM_OUT" follow="true">
            <!--控制台只输出level及以上级别的信息-->
            <ThresholdFilter level="INFO" onMatch="ACCEPT" onMismatch="DENY"/>
            <PatternLayout>
                <Pattern>${pattern}</Pattern>
            </PatternLayout>
        </Console>
        <!-- 同一来源的Appender可以定义多个RollingFile,定义按天存储日志 -->
        <RollingFile name="rolling_file"
                     fileName="${logDir}/dust-server.log"
                     filePattern="${logDir}/dust-server_%d{yyyy-MM-dd}.log">
            <ThresholdFilter level="INFO" onMatch="ACCEPT" onMismatch="DENY"/>
            <PatternLayout>
                <Pattern>${pattern}</Pattern>
            </PatternLayout>
            <Policies>
                <TimeBasedTriggeringPolicy interval="1"/>
            </Policies>
            <!-- 日志保留策略,配置只保留七天 -->
            <DefaultRolloverStrategy>
                <Delete basePath="${logDir}/" maxDepth="1">
                    <IfFileName glob="dust-server_*.log" />
                    <IfLastModified age="7d" />
                </Delete>
            </DefaultRolloverStrategy>
        </RollingFile>
    </Appenders>
</Configuration>
2、Web开发
1.1 简单功能分析
(1)静态资源访问
https://docs.spring.io/spring-boot/docs/current/reference/html/web.html#web.servlet.spring-mvc.static-content
- 静态资源默认路径
By default, Spring Boot serves static content from a directory called /static (or /public or /resources or /META-INF/resources) in the classpath.
只要静态资源放在上面四个目录下,可以直接访问:项目根目录/ + 资源名称(http://localhost:8080/img1.jpg)
- 静态资源访问前缀:默认没有
By default, resources are mapped on /**, but you can tune that with the spring.mvc.static-path-pattern property. For instance, relocating all resources to /res/** can be achieved as follows:
spring:
  mvc:
    static-path-pattern: /res/**
http://localhost:8080/res/img1.jpg才能正常访问。
-
修改资源默认文件夹
spring:
  web:
    resources:
      static-locations: classpath:/aa/   # 修改默认静态资源的文件夹
(2)欢迎页支持
- 静态资源下添加index.html
- 如果自定义了静态资源路径和访问前缀,可能会出问题。访问前缀不能开启
- 静态资源路径可以开启。
- controller能处理/index请求
(3)自定义Favicon
只要在静态目录下放入一个favicon.ico图片即可
static-path-pattern也会导致favicon失效。
(4)静态资源原理 - 源码解析
MVC相关功能的自动配置类最终来自WebMvcAutoConfiguration
通过分析注解,可以看到WebMvcAutoConfiguration是处于开启状态。
关于资源映射,最终来到了内部类WebMvcAutoConfigurationAdapter,这里有一个带参的内部类,这里的参数都是来自于容器。
public WebMvcAutoConfigurationAdapter(WebProperties webProperties, WebMvcProperties mvcProperties,
      ListableBeanFactory beanFactory, ObjectProvider<HttpMessageConverters> messageConvertersProvider,
      ObjectProvider<ResourceHandlerRegistrationCustomizer> resourceHandlerRegistrationCustomizerProvider,
      ObjectProvider<DispatcherServletPath> dispatcherServletPath,
      ObjectProvider<ServletRegistrationBean<?>> servletRegistrations) {
   this.resourceProperties = webProperties.getResources();
   this.mvcProperties = mvcProperties;
   this.beanFactory = beanFactory;
   this.messageConvertersProvider = messageConvertersProvider;
   this.resourceHandlerRegistrationCustomizer = resourceHandlerRegistrationCustomizerProvider.getIfAvailable();
   this.dispatcherServletPath = dispatcherServletPath;
   this.servletRegistrations = servletRegistrations;
   this.mvcProperties.checkConfiguration();
}
-
静态资源映射源码
- 可以看到访问/webjars/abc时,会自动映射到/META-INF/resources/webjars/abc
- StaticPathPattern和StaticLocations如果没有配置时,访问/**默认会映射到classpath:[/META-INF/resources/, /resources/, /static/, /public/].
@Override public void addResourceHandlers(ResourceHandlerRegistry registry) { if (!this.resourceProperties.isAddMappings()) { logger.debug("Default resource handling disabled"); return; } addResourceHandler(registry, "/webjars/**", "classpath:/META-INF/resources/webjars/"); addResourceHandler(registry, this.mvcProperties.getStaticPathPattern(), (registration) -> { registration.addResourceLocations(this.resourceProperties.getStaticLocations()); if (this.servletContext != null) { ServletContextResource resource = new ServletContextResource(this.servletContext, SERVLET_LOCATION); registration.addResourceLocations(resource); } }); } -
欢迎页配置源码
- 通过源码可以看出,welcomePage != null && “/**”.equals(staticPathPattern),也就是说staticPathPattern没有修改时,index页才会生效
@Bean
public WelcomePageHandlerMapping welcomePageHandlerMapping(ApplicationContext applicationContext,
                                                           FormattingConversionService mvcConversionService, ResourceUrlProvider mvcResourceUrlProvider) {
    WelcomePageHandlerMapping welcomePageHandlerMapping = new WelcomePageHandlerMapping(
        new TemplateAvailabilityProviders(applicationContext), applicationContext, getWelcomePage(),
        this.mvcProperties.getStaticPathPattern());
    welcomePageHandlerMapping.setInterceptors(getInterceptors(mvcConversionService, mvcResourceUrlProvider));
    welcomePageHandlerMapping.setCorsConfigurations(getCorsConfigurations());
    return welcomePageHandlerMapping;
}

WelcomePageHandlerMapping(TemplateAvailabilityProviders templateAvailabilityProviders,
			ApplicationContext applicationContext, Resource welcomePage, String staticPathPattern) {
    if (welcomePage != null && "/**".equals(staticPathPattern)) {
        logger.info("Adding welcome page: " + welcomePage);
        setRootViewName("forward:index.html");
    }
    else if (welcomeTemplateExists(templateAvailabilityProviders, applicationContext)) {
        logger.info("Adding welcome page template: index");
        setRootViewName("index");
    }
}

1.2 请求参数处理
DispatcherServlet
checkMultipart(request);  // 处理文件上传请求
	isMultipart(request) ? this.multipartResolver.resolveMultipart(request) : requeset
        parseRequest(request) // 针对isMultipart==true文件上传
        	setMultipartFiles(files)
getHandler(request)  // 获得处理请求的Handler以及拦截器信息
getHandlerAdapter(handler)
mappedHandler.applyPreHandle(processedRequest, response)  // 处理拦截器的preHandle()方法
ha.handle(..., handler)
    handleInternal()
    	invokeHandlerMethod()
    		argumentResolvers
    		returnValueHandlers
    		invocableMethod.invokeAndHandle(webRequest, mavContainer);
				invokeForRequest(request,xxx,providedArgs);
                    getMethodArgumentValues()
                        // RequestParamMethodArgumentResolver / PathVariableMethodArgumentResolver
                        // resolveArgument()是一个接口,ModelAttributeMethodProcessor处理自定义参数Cat
                        // RequestPartMethodArgumentResolver处理文件上传参数:@RequestPart
                        resolvers.resolveArgument()
                returnValueHandlers.handleReturnValue(returnValue,type,...)
                        selectHandler(value, type); //RequestResponseBodyMethodProcessor处理自定义类型参数Cat
						handler.handleReturnValue(value, type, mavContainer, webRequest);
							AbstractMessageConverterMethodProcessor#writeWithMessageConverters()
                            	acceptableTypes
                                producibleTypes
                                selectedMediaType
                                messageConverters
                                genericConverter.write(body,...)// 将Person转换成对应的数据类型
			getModelAndView(mavContainer, modelFactory, webRequest);
mappedHandler.applyPostHandle(processedRequest, response, mv); // 处理拦截器的postHandle()方法
processDispatchResult(processedRequest, response, mappedHandler, mv, dispatchException);
	render(mv, request, response);// 就是渲染视图
		view = resolveViewName(viewName, mv.getModelInternal(), locale, request);
		view.render(mv.getModelInternal(), request, response); // 常用ThymeleafView和【AbstractView】
			//InternalResourceView和RedirectView分别处理forward:和redirect:
			renderMergedOutputModel(mergedModel,getRequestToExpose(request),response);
				1.sendRedirect(request, response, targetUrl, this.http10Compatible);//RedirectView
				2.request.setAttribute(name, value);//InternalResourceView  将Map/Model的值放入request请求域中
				getRequestDispatcher(request, dispatcherPath).forward(request, response);
	mappedHandler.triggerAfterCompletion(request, response, null);// 视图渲染后执行拦截器的afterCompletion()方法
(1)请求映射
1.1 REST使用与原理
OrderedHiddenHttpMethodFilter
前端form表单实现PUT/DELETE/PATCH请求
@GetMapping(path = "/user")
public String getMethod() {
    return "GET";
}
@PostMapping(path = "/user")
public String postMethod() {
    return "POST";
}
@PutMapping(path = "/user")
public String putMethod() {
    return "PUT";
}
@DeleteMapping(path = "/user")
public String deleteMethod() {
    return "DELETE";
}
@PatchMapping(path = "/user")
public String patchMethod() {
    return "PATCH";
}
测试页面REST请求:
<form action="/user" method="get">
    <input value="GET请求" type="submit"/>
</form>

<form action="/user" method="post">
    <input value="POST请求" type="submit"/>
</form>

<form action="/user" method="post">
    <input hidden="hidden" name="_method" value="put"/>
    <input value="PUT请求" type="submit">
</form>

<form action="/user" method="post">
    <input hidden="hidden" name="_method" value="delete"/>
    <input value="DELETE请求" type="submit">
</form>

<form action="/user" method="post">
    <input hidden="hidden" name="_method" value="patch"/>
    <input value="PATCH请求" type="submit">
</form>
spring:
  mvc:
    hiddenmethod:
      filter:
        enabled: true
form表单默认只支持GET和POST请求,若想要发送PUT请求,需要通过过滤器将request的method进行重新设置来实现。
SpringBoot中的OrderedHiddenHttpMethodFilter就可以实现这个功能。
@Bean
@ConditionalOnMissingBean(HiddenHttpMethodFilter.class)
@ConditionalOnProperty(prefix = "spring.mvc.hiddenmethod.filter", name = "enabled", matchIfMissing = false)
public OrderedHiddenHttpMethodFilter hiddenHttpMethodFilter() {
   return new OrderedHiddenHttpMethodFilter();
}
默认这个配置不会加载,只有添加了spring.mvc.hiddenmethod.filter.enable=true才能注册。
其最终的实现原理是HiddenHttpMethodFilter
@Override
protected void doFilterInternal(HttpServletRequest request, HttpServletResponse response, FilterChain filterChain)
      throws ServletException, IOException {

   HttpServletRequest requestToUse = request;

   if ("POST".equals(request.getMethod()) && request.getAttribute(WebUtils.ERROR_EXCEPTION_ATTRIBUTE) == null) {
      String paramValue = request.getParameter(this.methodParam);
      if (StringUtils.hasLength(paramValue)) {
         String method = paramValue.toUpperCase(Locale.ENGLISH);
         if (ALLOWED_METHODS.contains(method)) {
            requestToUse = new HttpMethodRequestWrapper(request, method);
         }
      }
   }

   filterChain.doFilter(requestToUse, response);
}
-
默认的this.methodParam=_method, 提供了set方法,可以修改
-
@Bean
public OrderedHiddenHttpMethodFilter hiddenHttpMethodFilter() {
    OrderedHiddenHttpMethodFilter orderedHiddenHttpMethodFilter = new OrderedHiddenHttpMethodFilter();
    orderedHiddenHttpMethodFilter.setMethodParam("_hide_method");
    return orderedHiddenHttpMethodFilter;
}
-
-
ALLOWED_METHODS=[PUT,DELETE,PATCH],仅支持这三种请求
-
原请求必须是POST类型
-
new HttpMethodRequestWrapper(request, method) 实现将_method=xx的请求设置进原始request, 达到xx请求效果
当时用客户端工具如POSTMAN时,不会走这个过滤,因为过来的请求直接就是PUT或者其他的类型了
1.2 请求映射原理(DispatcherServlet)
所有的请求都会走org.springframework.web.servlet.DispatcherServlet#doDispatch方法
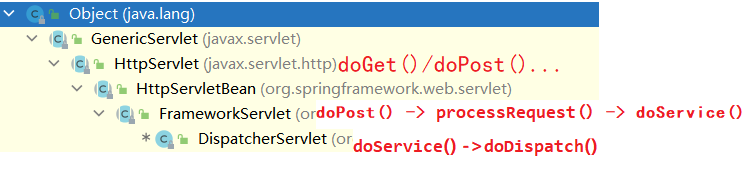
SpringMVC功能都从org.springframework.web.servlet.DispatcherServlet#doDispatch方法开始分析。
解析doDispatch()方法
// Determine handler for the current request.
// 找到当前请求是使用哪个Handler(Controller的方法)处理
mappedHandler = getHandler(processedRequest);
Handler是通过遍历HandlerMapping处理器映射中的值来判断并获取的

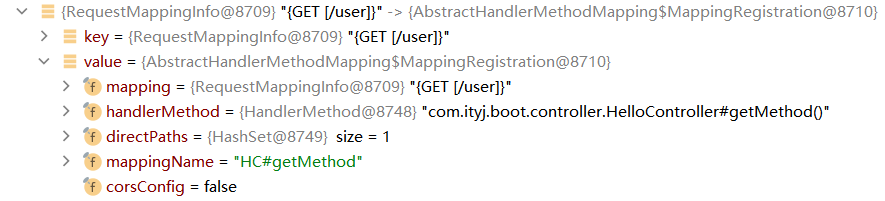
可以看到访问的GET请求http://localhost:8080/user是在RequestMappingHandlerMapping中的
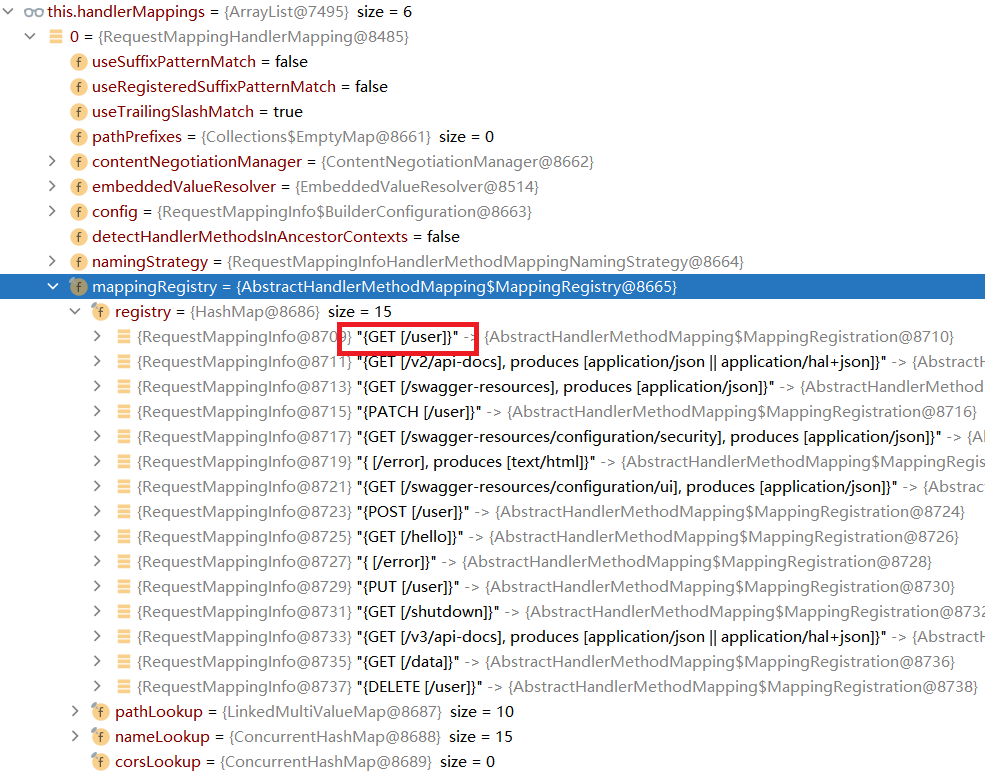
mappingRegistory中有着请求以及对应的Handler方法具体映射。
所有的映射都是在HandlerMapping中:
-
SpringBoot自动配置了欢迎页的WelcomePageHandlerMapping。访问/默认找静态资源目录下的index.html文件
// We need to care for the default handler directly, since we need to
// expose the PATH_WITHIN_HANDLER_MAPPING_ATTRIBUTE for it as well.
org.springframework.web.servlet.handler.AbstractUrlHandlerMapping#getHandlerInternal,这里的WelcomePageHandlerMapping最终将/映射到ParameterizableViewController,forward:index.html
Object rawHandler = null;
if (StringUtils.matchesCharacter(lookupPath, '/')) {
    rawHandler = getRootHandler();
}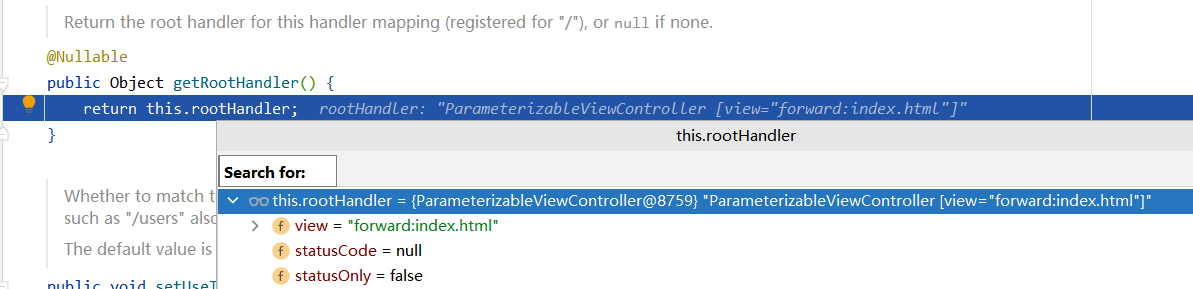
-
SpringBoot自动配置了默认的RequestMappingHandlerMapping
-
请求进来挨个尝试所有的HandlerMapping看是否有请求信息
- 如果有,就找到这个请求对应的Handler
- 如果没有,就从下一个HandlerMapping中找
(2)普通参数与基本注解
1.1 注解
- @PathVariable/@RequestParam/@RequestHeader/@CookieValue
@GetMapping("/person/{id}/{name}")
public Map<String, Object> getRequest(@PathVariable("id") String id,
                                      @PathVariable("name") String personName,
                                      @PathVariable Map<String, Object> map,
                                      @RequestParam("age") Integer age,
                                      @RequestHeader("User-Agent") String userAgent,
                                      @CookieValue("Idea-7e7a18c1") String cookieIde,
                                      @CookieValue("Idea-7e7a18c1") Cookie cookie) {
    Map<String, Object> result = new HashMap<>();
    result.put("id", id);
    result.put("personName", personName);
    result.put("age", age);
    result.put("userAgent", userAgent);
    result.put("cookieIde", cookieIde);

    log.info("map = {}", map.toString());
    log.info("cookie.key = {}; cookie.value = {}", cookie.getName(), cookie.getValue());

    return result;
}
test: http://localhost:8080/person/1/hello?age=21
- @RequestBody
@PostMapping(path = "/saveUserInfo", produces = "application/json; charset=utf-8")
public Map<String, Object> saveUserInfo(@RequestBody String content) throws UnsupportedEncodingException {
    Map<String, Object> result = new HashMap<>();
    result.put("content", URLDecoder.decode(content, StandardCharsets.UTF_8));

    return result;
}
<form action="/saveUserInfo" method="post">
    <h2>测试@RequestBody获取数据</h2>
    用户名:<input name="userName"/> <br/>
    邮箱:<input name="email"/> <br/>
    <input type="submit" value="提交">
</form>
- @RequestAttribute
@Controller
public class RequestController {

    @GetMapping("/goto")
    public String gotoPage(HttpServletRequest request) {
        request.setAttribute("msg", "信息");
        return "forward:/success";    // 请求转发到 /success请求, 服务期间, 地址不变,一次请求一次相应
    }

    @GetMapping("/success")
    @ResponseBody
    public Map<String, Object> success(@RequestAttribute("msg") String message,
                                       HttpServletRequest request) {
        Map<String, Object> result = new HashMap<>();
        result.put("anno_message", message);
        result.put("request_message", request.getAttribute("msg"));
        return result;
    }

}
1.2 Servlet API
WebRequest/ServletRequest...ZoneId
对于HttpServletRequest request这种参数,也是通过参数解析器来进行处理的。
ServletRequest对应的是ServletRequestMethodArgumentResolver
@GetMapping("/goto")
public String gotoPage(HttpServletRequest request) {
    request.setAttribute("msg", "信息");
    return "forward:/success";    // 请求转发到 /success请求, 服务期间, 地址不变,一次请求一次相应
}
@Override
public boolean supportsParameter(MethodParameter parameter) {
   Class<?> paramType = parameter.getParameterType();
   return (WebRequest.class.isAssignableFrom(paramType) ||
         ServletRequest.class.isAssignableFrom(paramType) ||
         MultipartRequest.class.isAssignableFrom(paramType) ||
         HttpSession.class.isAssignableFrom(paramType) ||
         (pushBuilder != null && pushBuilder.isAssignableFrom(paramType)) ||
         (Principal.class.isAssignableFrom(paramType) && !parameter.hasParameterAnnotations()) ||
         InputStream.class.isAssignableFrom(paramType) ||
         Reader.class.isAssignableFrom(paramType) ||
         HttpMethod.class == paramType ||
         Locale.class == paramType ||
         TimeZone.class == paramType ||
         ZoneId.class == paramType);
}
1.3 复杂参数
Map,Model,
RedirectAttributes,ServletResponse,
Errors/BindingResult,SessionStatus,UriComponentsBuilder,ServletUriComponentBuilder
Map,Model里的参数最终会被放到request请求域中,使用map.put(x, v)相当于request.setAttribute(x, v)
@GetMapping("/params")
public String params(Map<String, Object> map,
                     Model model,
                     RedirectAttributes attribute,
                     HttpServletRequest request,
                     HttpServletResponse response) {
    map.put("map", "HelloMap");
    model.addAttribute("model", "HelloModel");
    attribute.addAttribute("redirectAttributes", "HelloRedirectAttributes");
    request.setAttribute("request", "HelloRequest");
    response.addCookie(new Cookie("k", "v-"));
    return "forward:/success";    // 请求转发到 /success请求, 服务期间, 地址不变,一次请求一次相应
}

@GetMapping("/success")
@ResponseBody
public Map<String, Object> success(@RequestAttribute(value = "msg", required = false) String message,
                                   HttpServletRequest request) {
    Map<String, Object> result = new HashMap<>();
    result.put("anno_message", message);
    result.put("request_message", request.getAttribute("msg"));
    result.put("map", request.getAttribute("map"));
    result.put("model", request.getAttribute("model"));
    result.put("redirectAttributes", request.getAttribute("redirectAttributes"));
    result.put("request", request.getAttribute("request"));
    return result;
}
是在doDispatch()的最后一步 --> processDispatchResult() --> render(mv, request, response);进行视图渲染赋值

protected void exposeModelAsRequestAttributes(Map<String, Object> model,
      HttpServletRequest request) throws Exception {

   model.forEach((name, value) -> {
      if (value != null) {
         request.setAttribute(name, value);   // 将Map和Model中的值放入request请求域中
      }
      else {
         request.removeAttribute(name);
      }
   });
}
1.4 自定义参数
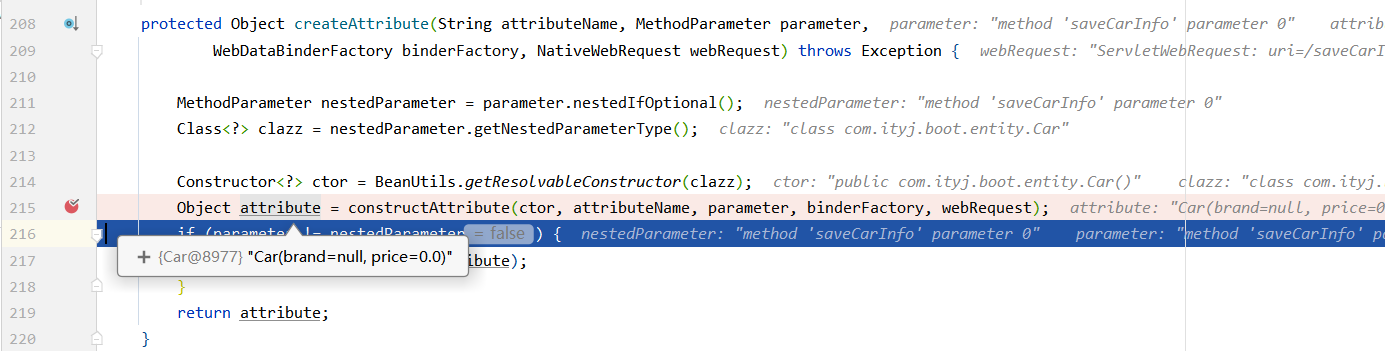
最终走的也是DispatcherServlet,在参数解析resolveArgument时,走了ModelAttributeMethodProcessor解析器。
内部通过反射以及一系列的converter实现了数据的绑定
@PostMapping(path = "/saveCarInfo")
public Car saveCarInfo(Car car) {
    return car;
}
<form action="/saveCarInfo" method="post">
    <h2>测试自定义参数是如何解析的</h2>
    品牌:<input name="brand"/> <br/>
    价格:<input name="price"/> <br/>
    <input type="submit" value="提交">
</form>
ModelAttributeMethodProcessor.resolveArgument
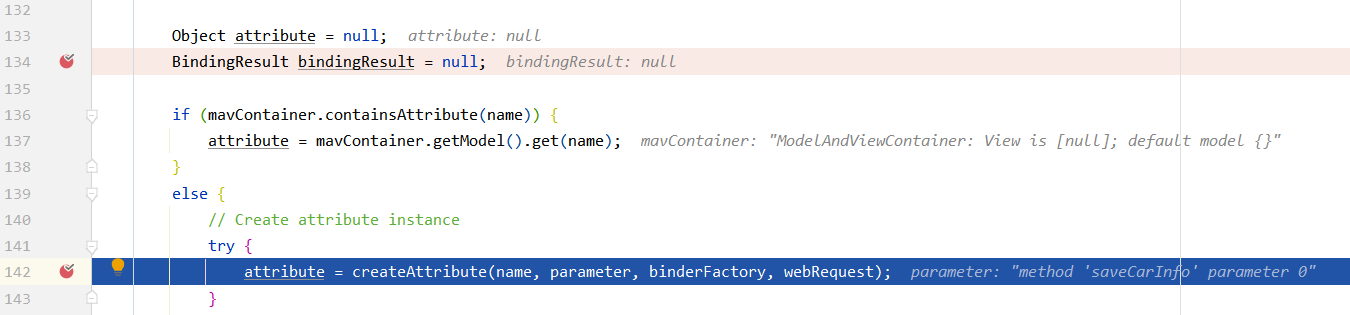
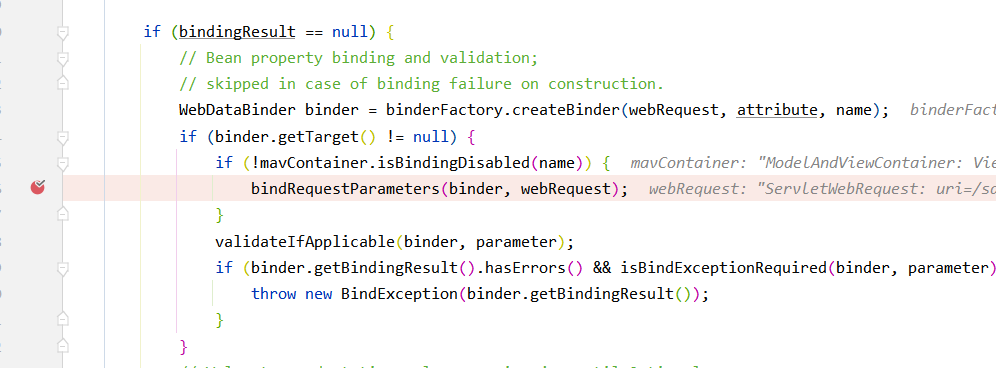
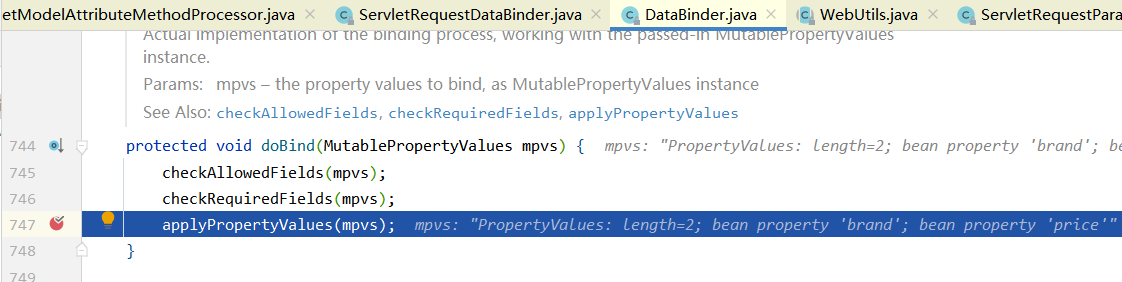
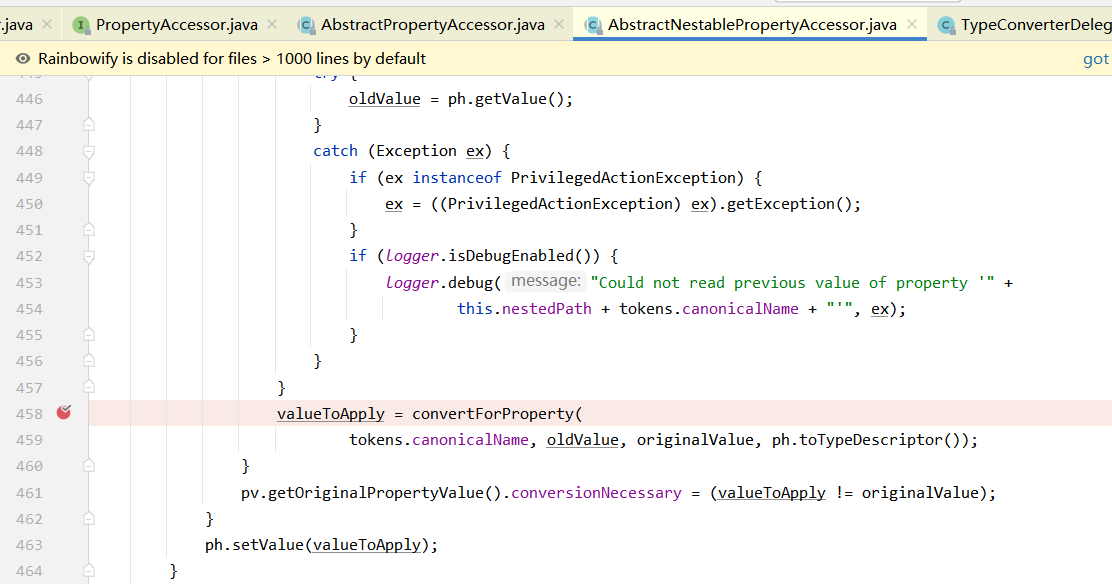
bindRequestParameters解析request中的参数,将值绑定到binder的target对象中,到此参数获取完毕
convertForProperty()方法会进行类型转换
org.springframework.validation.DataBinder#doBind
(3)请求参数处理原理
- HandlerMapping中找到能处理请求的Handler(Controller.method())

- 为当前Handler找到一个适配器Adapter

1.1 HandlerAdapter
根据请求的类型,确认对应的适配器Adapter
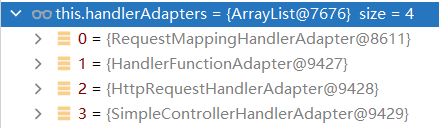
0 - 支持方法上标注@RequestMapping
1- 支持函数式编程
…
1.2 执行目标方法
根据Handler和Adapter执行目标方法
// Actually invoke the handler.  DispatcherServlet.doDispatch()
mv = ha.handle(processedRequest, response, mappedHandler.getHandler());
// No synchronization on session demanded at all... 执行目标方法RequestMappingHandlerAdapter
mav = invokeHandlerMethod(request, response, handlerMethod);
invocableMethod.invokeAndHandle(webRequest, mavContainer);

// ServletInvocableHandlerMethod  执行方法
Object returnValue = invokeForRequest(webRequest, mavContainer, providedArgs);

// 获取方法参数值 InvocableHandlerMethod
Object[] args = getMethodArgumentValues(request, mavContainer, providedArgs);
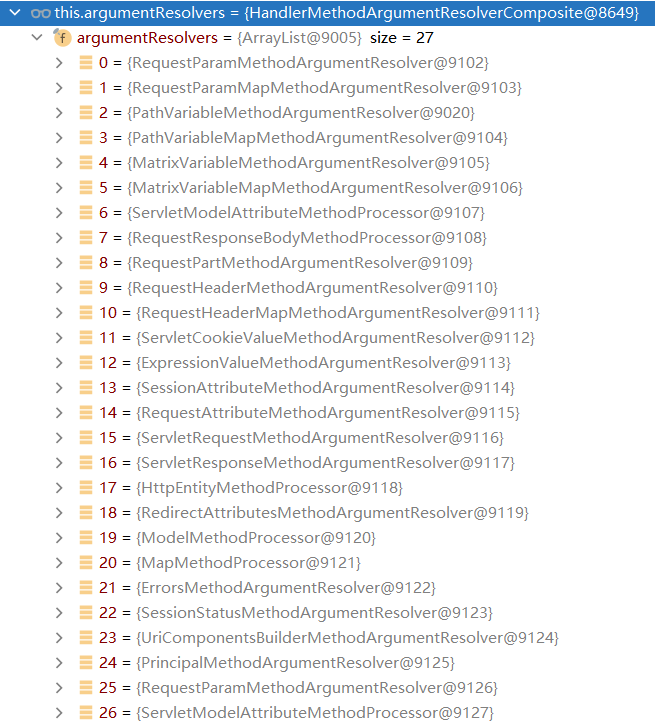
1.3 参数解析器
确定将要执行目标方法的每一个参数是什么。argumentResolvers
SpringMVC目标方法能支持多少种参数类型,取决于参数解析器。
参数解析器接口
- 首先判断是否支持解析这种参数supportsParameter()
- 支持的话执行resolveArgument()方法

1.4 如何确定目标方法的每一个值
InvocableHandlerMethod,获取到所有参数及其对应的值
protected Object[] getMethodArgumentValues(NativeWebRequest request, @Nullable ModelAndViewContainer mavContainer,
      Object... providedArgs) throws Exception {

   // 获取到参数的所有详细信息:参数标注的注解(以及name,isRequired等信息),参数的类型,参数的名称等信息
   MethodParameter[] parameters = getMethodParameters();
   if (ObjectUtils.isEmpty(parameters)) {
      return EMPTY_ARGS;
   }

   Object[] args = new Object[parameters.length];
   for (int i = 0; i < parameters.length; i++) {
      MethodParameter parameter = parameters[i];
      parameter.initParameterNameDiscovery(this.parameterNameDiscoverer);
      args[i] = findProvidedArgument(parameter, providedArgs);
      if (args[i] != null) {
         continue;
      }
      // 判断解析器是否支持当前的参数类型
      if (!this.resolvers.supportsParameter(parameter)) {
         throw new IllegalStateException(formatArgumentError(parameter, "No suitable resolver"));
      }
      try {
          // 真正的获取参数值方法
         args[i] = this.resolvers.resolveArgument(parameter, mavContainer, request, this.dataBinderFactory);
      }
      catch (Exception ex) {
         // Leave stack trace for later, exception may actually be resolved and handled...
         if (logger.isDebugEnabled()) {
            String exMsg = ex.getMessage();
            if (exMsg != null && !exMsg.contains(parameter.getExecutable().toGenericString())) {
               logger.debug(formatArgumentError(parameter, exMsg));
            }
         }
         throw ex;
      }
   }
   return args;
}
1.4.1 挨个判断哪个解析器执行这个参数类型
@Override
public boolean supportsParameter(MethodParameter parameter) {
   return getArgumentResolver(parameter) != null;
}

@Nullable
private HandlerMethodArgumentResolver getArgumentResolver(MethodParameter parameter) {
    HandlerMethodArgumentResolver result = this.argumentResolverCache.get(parameter);
    if (result == null) {
        for (HandlerMethodArgumentResolver resolver : this.argumentResolvers) {
            if (resolver.supportsParameter(parameter)) {
                result = resolver;
                // 这里会将参数类型解析器resolver放入到缓存argumentResolverCache中。
                // 所以项目启动后,同一个请求第一次执行会慢于后续的
                this.argumentResolverCache.put(parameter, result);
                break;
            }
        }
    }
    return result;
}
1.4.2 获取参数值
return resolver.resolveArgument(parameter, mavContainer, webRequest, binderFactory);
1.5 返回值处理器
(4)请求响应与内容协商
1.1 响应JSON
1.1.1 @ResponseBody + jackson.jar
将结果转换成JSON格式
<dependency>
    <groupId>org.springframework.boot</groupId>
    <artifactId>spring-boot-starter-web</artifactId>
</dependency>

web场景会自动引入json
↓↓↓
<dependency>
    <groupId>org.springframework.boot</groupId>
    <artifactId>spring-boot-starter-json</artifactId>
    <version>2.4.4</version>
    <scope>compile</scope>
</dependency>

json场景主要用的是jackson
↓↓↓
<dependency>
    <groupId>com.fasterxml.jackson.core</groupId>
    <artifactId>jackson-databind</artifactId>
    <version>2.11.4</version>
    <scope>compile</scope>
</dependency>
<dependency>
    <groupId>com.fasterxml.jackson.datatype</groupId>
    <artifactId>jackson-datatype-jdk8</artifactId>
    <version>2.11.4</version>
    <scope>compile</scope>
</dependency>
<dependency>
    <groupId>com.fasterxml.jackson.datatype</groupId>
    <artifactId>jackson-datatype-jsr310</artifactId>
    <version>2.11.4</version>
    <scope>compile</scope>
</dependency>
<dependency>
    <groupId>com.fasterxml.jackson.module</groupId>
    <artifactId>jackson-module-parameter-names</artifactId>
    <version>2.11.4</version>
    <scope>compile</scope>
</dependency>
@GetMapping("/person")
@ResponseBody
public Person getPerson() {
    Person person = new Person();
    person.setAge(11);
    person.setName("杰克");
    return person;
}
1.1.2 返回参数解析原理
(1)DispatcherServlet在处理完request后会收到一个返回值returnValue
Object returnValue = invokeForRequest(webRequest, mavContainer, providedArgs);

(2)然后执行handleReturnValue()方法
this.returnValueHandlers.handleReturnValue(
      returnValue, getReturnValueType(returnValue), mavContainer, webRequest);
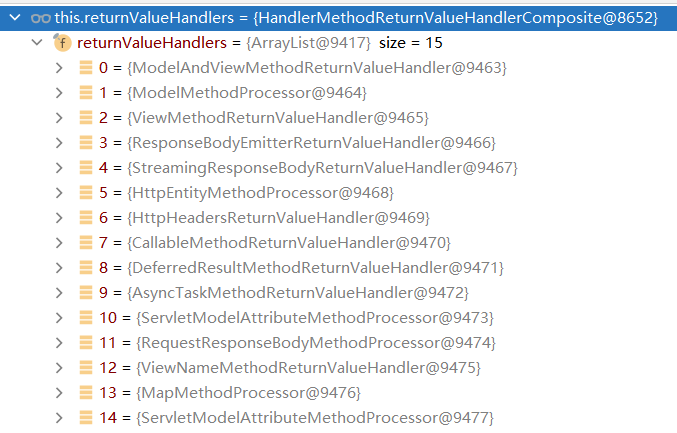
(3)然后通过selectHandler()方法获取到处理当前返回参数的处理器returnValueHandlers
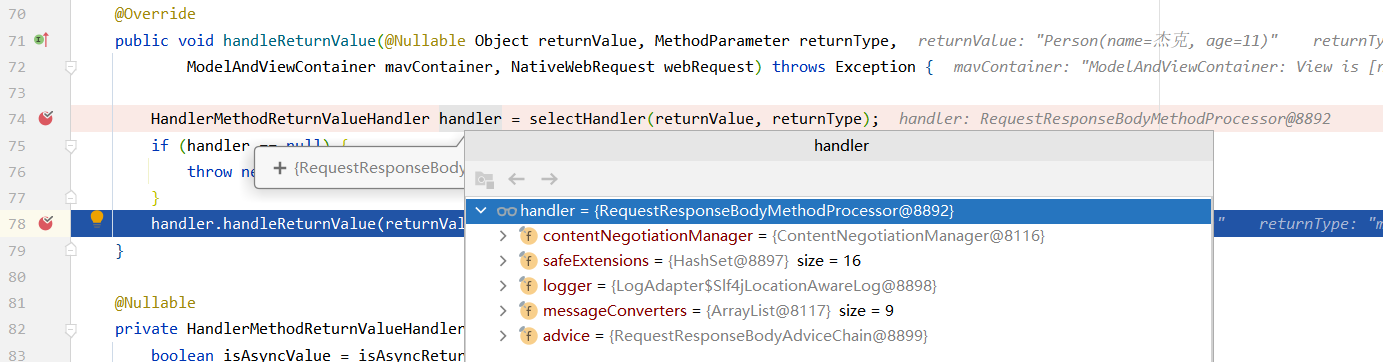
ReturnValueHandler一共有15种:
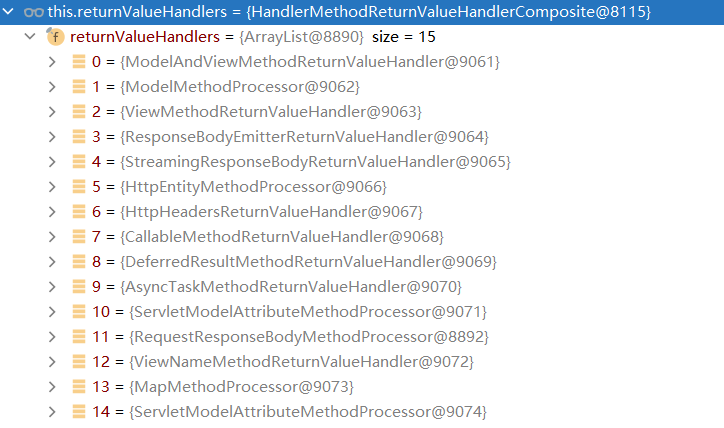
这里可以看到对于自定义的参数类型Person,对应的ValueHandler是RequestResponseBodyMethodProcessor,因为满足标注了**@ResponseBody**注解
@Override
public boolean supportsReturnType(MethodParameter returnType) {
   return (AnnotatedElementUtils.hasAnnotation(returnType.getContainingClass(), ResponseBody.class) ||
         returnType.hasMethodAnnotation(ResponseBody.class));
}
(4)最后对参数进行处理
通过内容协商writeWithMessageConverters处理
- 利用messageConverters,将person对象写为JSON
- MediaType内容协商:浏览器默认会以请求头的方式告诉服务器它能就收什么类型的数据。(Accept)
- 服务器最终根据自己自身的能力,决定自己能生产出(product)什么类型的数据
- SpringMVC挨个遍历容器底层的HttpMessageConverter,找到能够处理的converter
- 最终MappingJackson2HttpMessageConverter可以将对象处理成JSON,并利用其转换成JSON
handler.handleReturnValue(returnValue, returnType, mavContainer, webRequest);

// 使用消息转换器进行写出操作
writeWithMessageConverters(returnValue, returnType, inputMessage, outputMessage);
// 找到对应的MessageConverter
genericConverter.write(body, targetType, selectedMediaType, outputMessage);
// 针对Person->JSON 是利用AbstractJackson2HttpMessageConverter中的ObjectWriter进行转化
writeInternal(t, type, outputMessage);
objectWriter.writeValue(generator, value);
1.1.3 HttpMessageConverter原理
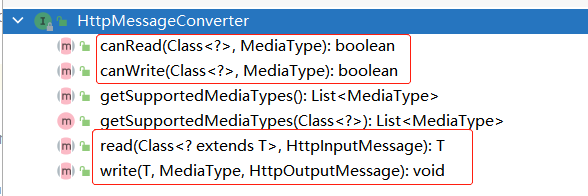
HttpMessageConverter:看能否将此Class类型的对象,转化成MediaType类型的数据。
即:能否将Person对象的数据转换为JSON.(write)
或将JSON类型数据转换成Person对象.(read)
这里MappingJackson2HttpMessageConverter能够实现对Person转化为JSON的处理。
利用jackson底层的objectMapper转换的。
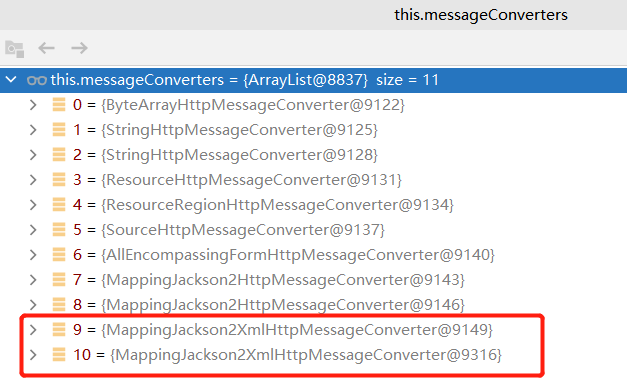
MessageConverters对数据进行处理,转换成json类型,一共9种
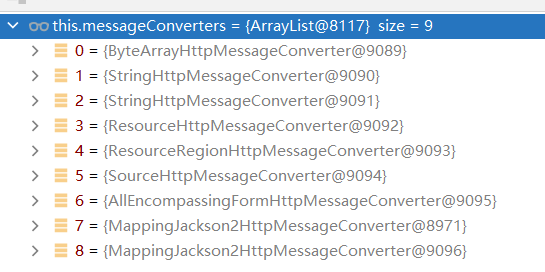
supports(clazz);
0 --> byte[].class
1 --> String.class
2 --> String.class
3 --> Resource.class
4 --> not exists == true
5 --> DOMSource.class/SAXSource.class/StAXSource.class/StreamSource.class/Source.class
6 --> not exists == true
7 --> not exists == true
8 --> not exists == true
1.2 内容协商
1.2.1 浏览器可以接受的数据类型Accept以及服务器可以product(提供)的类型.
浏览器支持的类型:
q是指权重,越大越优先


服务器可以提供的类型

通过遍历发现服务器可提供的四种类型(有重复),浏览器都能够支持
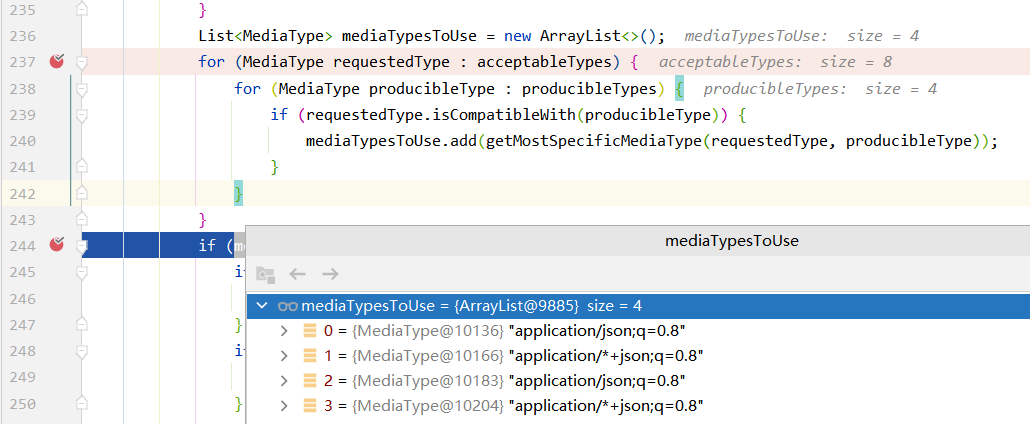
最后通过选择,得到application/json;q=0.8的返回类型
1.2.2 内容协商使用
根据客户端接收能力不同,返回不同媒体类型的数据。
(1)对于普通的请求http://localhost:8080/person,根据1.2.1可知最终的MediaType是applicatiin/json。所以返回的是JSON类型数据
@GetMapping("/person")
@ResponseBody
public Person getPerson() {
    Person person = new Person();
    person.setAge(11);
    person.setName("杰克");
    return person;
}
(2)在pom.xml中添加支持xml转换的依赖
<dependency>
   <groupId>com.fasterxml.jackson.dataformat</groupId>
   <artifactId>jackson-dataformat-xml</artifactId>
</dependency>
原理:
org.springframework.boot.autoconfigure.web.servlet.WebMvcAutoConfiguration.WebMvcAutoConfigurationAdapter#configureMessageConverters

org.springframework.web.servlet.config.annotation.WebMvcConfigurationSupport#addDefaultHttpMessageConverters
if (jackson2XmlPresent) {
    Jackson2ObjectMapperBuilder builder = Jackson2ObjectMapperBuilder.xml();
    if (this.applicationContext != null) {
        builder.applicationContext(this.applicationContext);
    }
    messageConverters.add(new MappingJackson2XmlHttpMessageConverter(builder.build()));
}

jackson2XmlPresent = ClassUtils.isPresent("com.fasterxml.jackson.dataformat.xml.XmlMapper", classLoader);
再次用chrome浏览器访问http://localhost:8080/person,最终结果是xml文件。
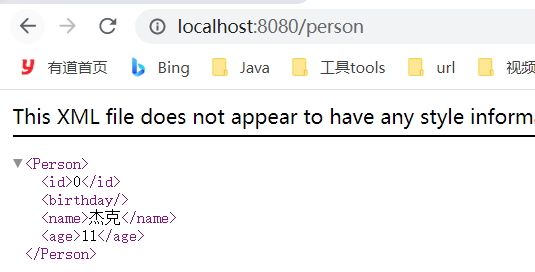
是内容协商导致的:
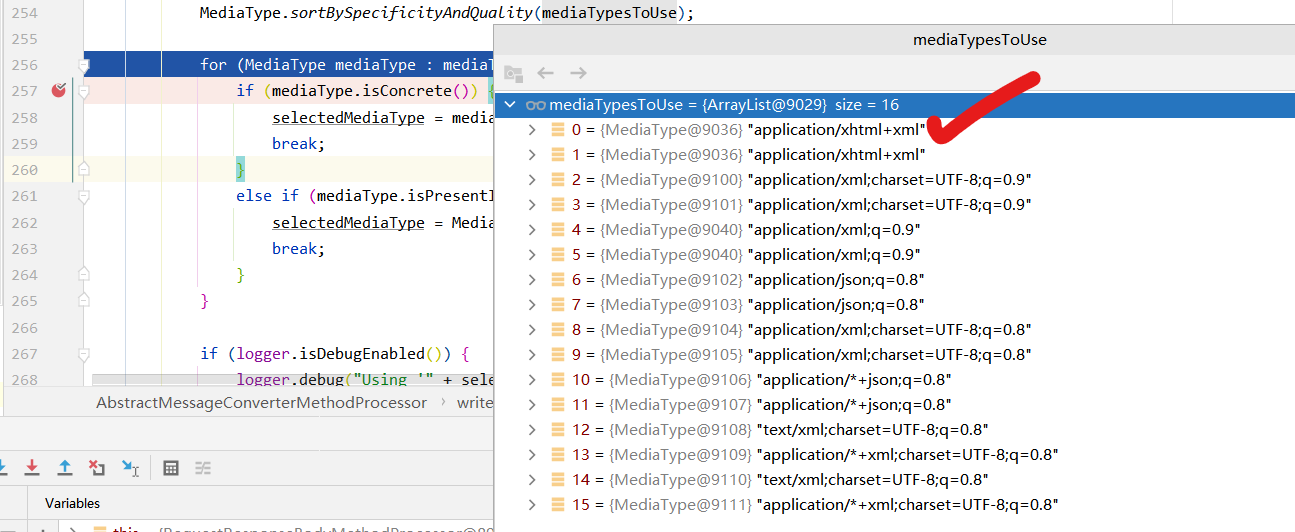
可以看到浏览器可接受的参数类型包括了xml和*/*,但是xml的权重是0.9,所以优先级较高。
服务器端在加入jackson-dataformat-xml依赖后,也支持返回xml类型数据,所以最终的返回值类型是application/xhtml+xml,即XML

新加了一个MappingJackson2XmlHttpMessageConverter
服务器支持的类型:
最终使用的类型
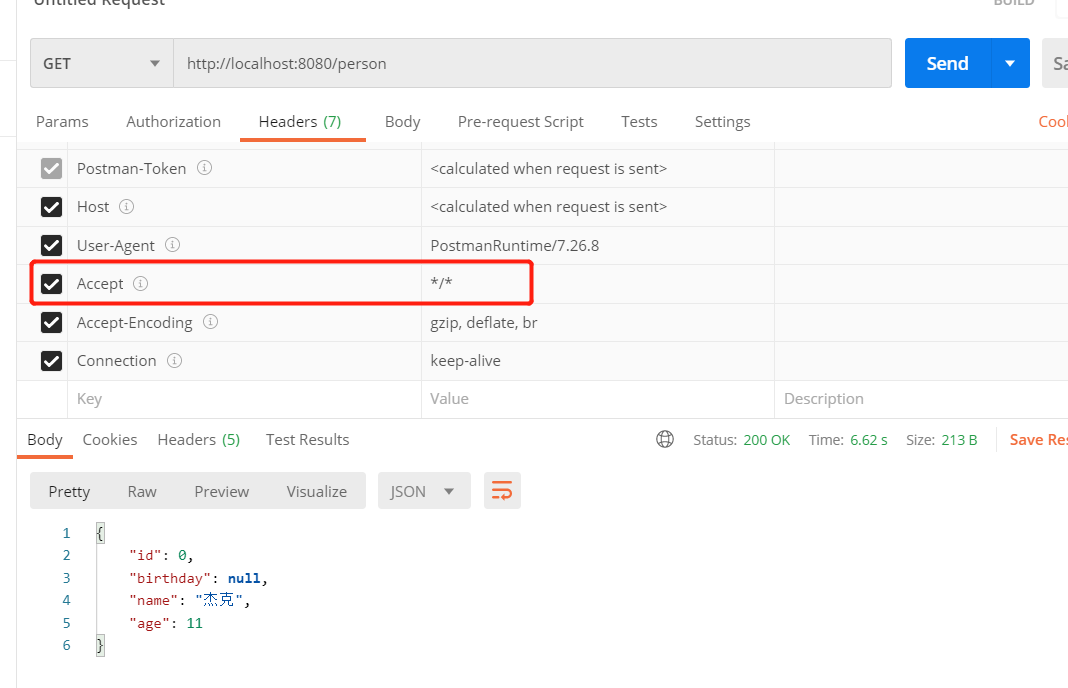
(3)在新加了jackson-dataformat-xml依赖的情况下,再次用POSTMAN访问http://localhost:8080/person
最终发现结果还是JSON类型,以为此时POSTMAN配置的Accept是*/*,而JSON的优先级较高,所以返回的是JSON类型

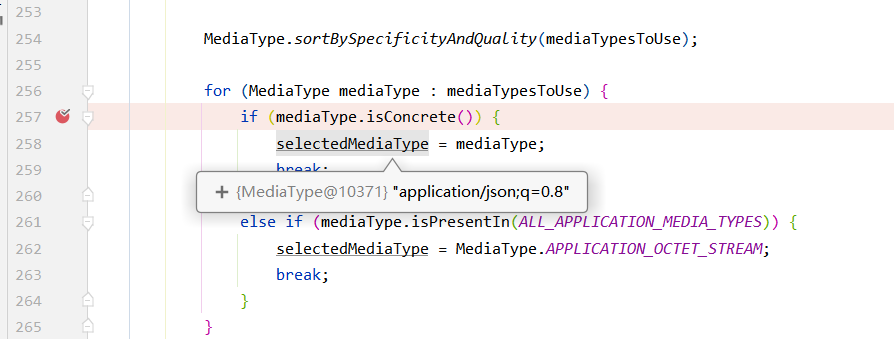
内容协商原理总结:
- 1、判断当前响应头中是否已经有确定好的媒体类型(一般是过滤器直接处理的)。MediaType
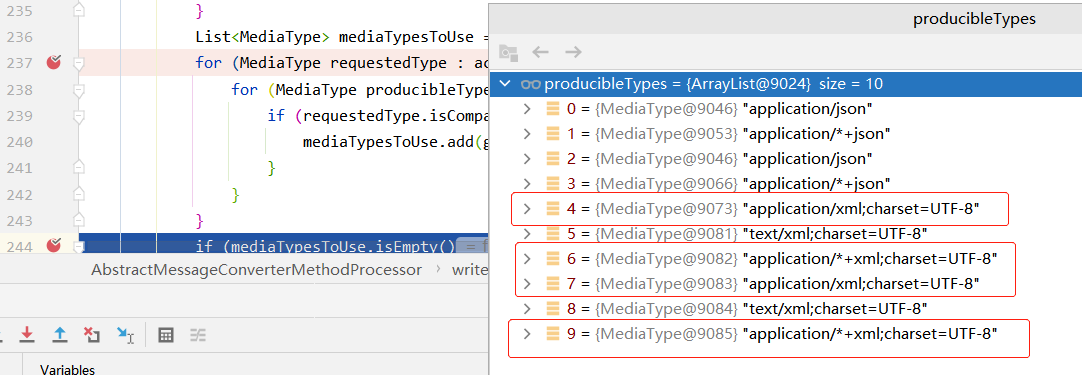
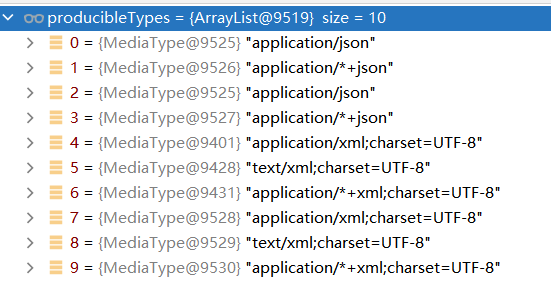
- 2、找出系统能够支持的媒体类型ProducibleMediaTypes
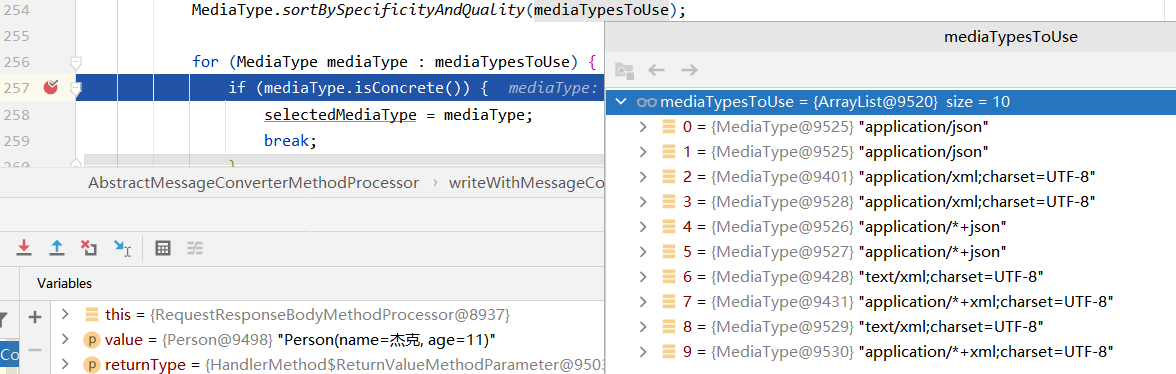
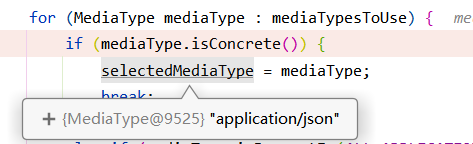
- 3、获取最佳匹配的媒体类型mediaTypesToUse
- 4、获取客户端(浏览器/postman)所支持接收的内容类型。Request Header中的Accept字段
- 2.1 通过contentNegotiationManager进行处理,默认通过HeaderContentNegotiationStrategy获取请求头中的Accept的值作为支持的类型
- 5、遍历循环当前系统中所有的messageConverters,看谁支持操作当前对象(Person)
- 6、利用当前的converter将对象转成对应的媒体类型。
1.2.3 开启浏览器参数方式的内容协商功能
浏览器中的请求头信息Accept不容易改变,想要获取不同的(xml/json)返回值类型可以通过修改配置,通过参数format来指定结果的类型。开启基于请求参数的内容协商功能。
(1)修改配置
spring:
  mvc:
    contentnegotiation:
      favor-parameter: true   # 开启浏览器请求参数的内容协商
(2)URL添加参数format=json/xml
http://localhost:8080/person?format=json
http://localhost:8080/person?format=xml
会根据format的值,返回不同类型的数据
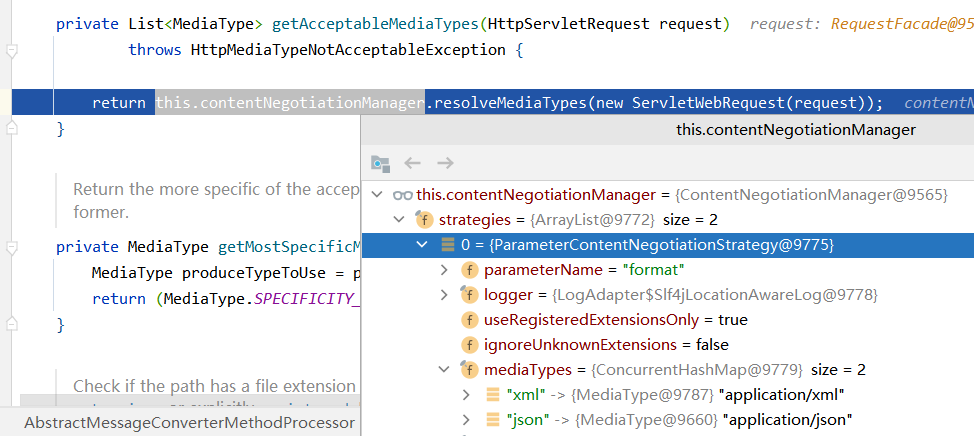
(3)原理
对getAcceptableMediaTypes(request);进行处理,获取到format对应的值
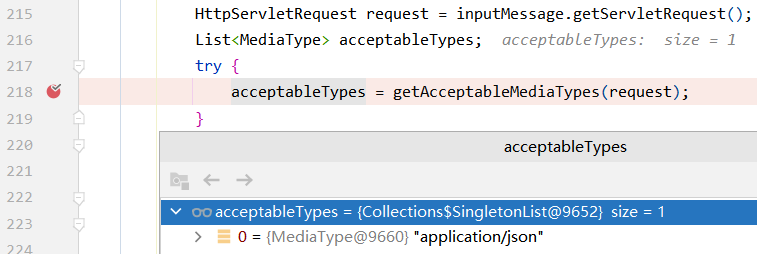
此时的contentNegotiationManager是ParameterContentNegotiationStrategy,最终就是从request中拿到format对应的值,封装成MediaType作为浏览器支持的类型。
1.2.4 自定义MessageConverter
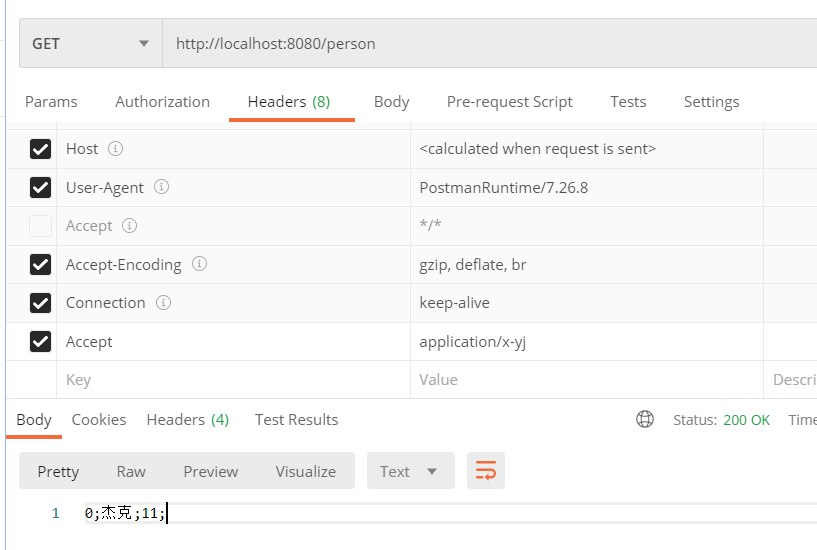
需求介绍:
目前已知对于/person接口,通过postman可以通过控制Accept参数来决定返回的数据类型是JSON还是XML.(application/json或application/xml)
现在想要通过对于application/x-yj的类型返回0;杰克;11;这样类型的数据,可以通过自定义converter,结合内容协商来实现。
(1)编写MessageConverter
package com.ityj.boot.converter;

import com.ityj.boot.entity.Person;
import org.springframework.http.HttpInputMessage;
import org.springframework.http.HttpOutputMessage;
import org.springframework.http.MediaType;
import org.springframework.http.converter.HttpMessageConverter;
import org.springframework.http.converter.HttpMessageNotReadableException;
import org.springframework.http.converter.HttpMessageNotWritableException;

import java.io.IOException;
import java.io.OutputStream;
import java.nio.charset.StandardCharsets;
import java.util.List;

/**
 *  目前支持写出
 */
public class MyPersonMessageConverter implements HttpMessageConverter<Person> {
    @Override
    public boolean canRead(Class<?> clazz, MediaType mediaType) {
        return false;
    }

    @Override
    public boolean canWrite(Class<?> clazz, MediaType mediaType) {
        return clazz.isAssignableFrom(Person.class);
    }

    @Override
    public List<MediaType> getSupportedMediaTypes() {
        return MediaType.parseMediaTypes("application/x-yj");
    }

    @Override
    public Person read(Class<? extends Person> clazz, HttpInputMessage inputMessage) throws IOException, HttpMessageNotReadableException {
        return null;
    }

    @Override
    public void write(Person person, MediaType contentType, HttpOutputMessage outputMessage) throws IOException, HttpMessageNotWritableException {
        String result = new StringBuilder().append(person.getId()).append(";")
                .append(person.getName()).append(";")
                .append(person.getAge()).append(";").toString();
        OutputStream outputStream = outputMessage.getBody();
        outputStream.write(result.getBytes(StandardCharsets.UTF_8));
    }
}
(2)配置MessageConverter
// WebMvcConfigurer定制化SpringMVC的功能
@Bean
public WebMvcConfigurer webMvcConfigurer() {

    return new WebMvcConfigurer() {
        @Override
        public void extendMessageConverters(List<HttpMessageConverter<?>> converters) {
            converters.add(new MyPersonMessageConverter());
        }
    };
}
(3)测试
(4)原理分析
-
解析浏览器,发现可接受的类型只有一个application/x-yj

-
服务器可以产出的多了一个,就是自定义的那个x-yj类型
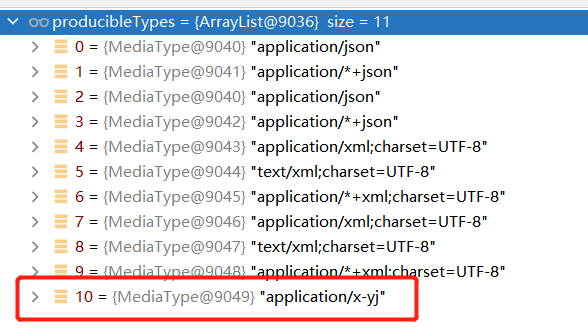
-
最终返回的类型就是x-yj

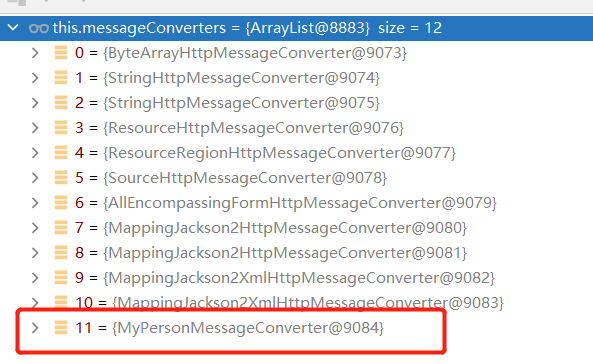
-
messageConverters中也有自己定义的那一个
1.2.5 浏览器与PostMan内容协商完全适配
根据上面的配置可以通过postman配置Accept值为application/x-yj来返回自定义格式的数据。
如果想要在浏览器中通过format=yj来返回自定义数据,目前无法实现。
(1)需要增加配置:
我们新增这个配置后,有可能会覆盖掉默认的一些功能,所以必须保证原有的ContentNegotiation都是已经添加到这个配置中
@Bean
    public WebMvcConfigurer webMvcConfigurer() {

        return new WebMvcConfigurer() {

            /*
            * 我们新增这个配置后,有可能会覆盖掉默认的一些功能,所以必须保证原有的ContentNegotiation都是已经添加到这个配置中
            * */
            @Override
            public void configureContentNegotiation(ContentNegotiationConfigurer configurer) {
                Map<String, MediaType> mediaTypes = new HashMap<>();
                mediaTypes.put("json", MediaType.APPLICATION_JSON);
                mediaTypes.put("xml", MediaType.APPLICATION_XML);
                // 为了满足浏览器实现format=yj 来返回MyPersonMessageConverter对应的数据类型,需要添加如下MediaType
                mediaTypes.put("yj", MediaType.parseMediaType(CommonConstant.MEDIA_TYPE_YJ));

                ParameterContentNegotiationStrategy parameterContentNegotiationStrategy = new ParameterContentNegotiationStrategy(mediaTypes);
                //parameterContentNegotiationStrategy.setParameterName("yyy");   // 默认format作为key,可以修改
                ContentNegotiationStrategy headerContentNegotiationStrategy = new HeaderContentNegotiationStrategy();
                configurer.strategies(Stream.of(parameterContentNegotiationStrategy, headerContentNegotiationStrategy).collect(Collectors.toList()));
            }
        };
    }
当然不能缺少上一步配置的MyPersonMessageConverter().
(2)测试
已经支持了所需要的内容协商内容。原有功能也不受影响。
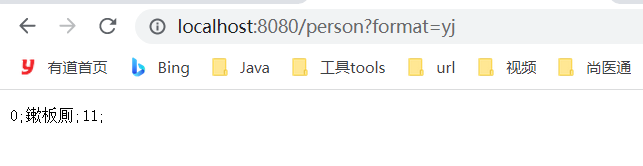
浏览器:
http://localhost:8080/person?format=json
http://localhost:8080/person?format=xml
http://localhost:8080/person?format=yj
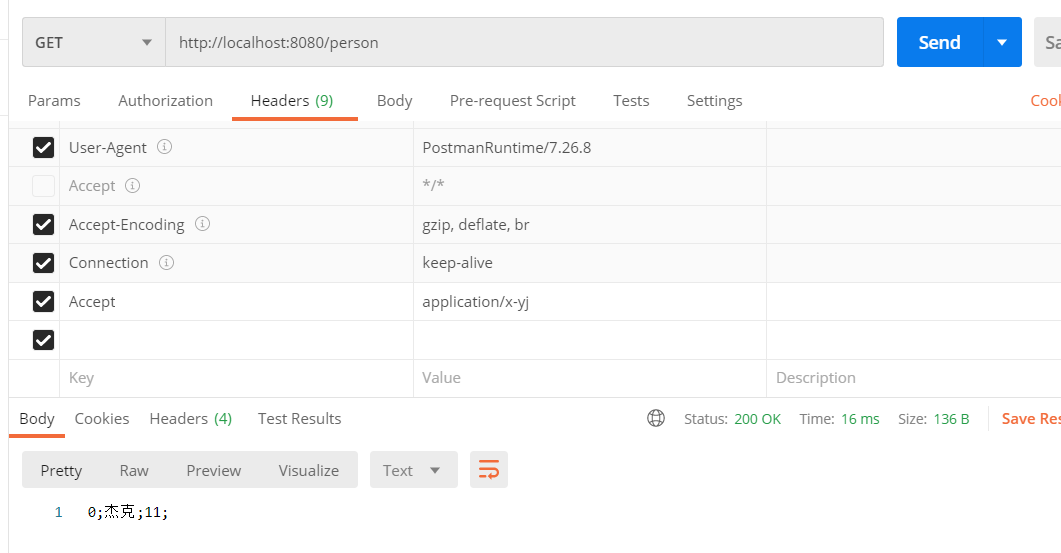
PostMan
http://localhost:8080/person
Accept:application/json
Accept:application/xml
Accept:application/x-yj
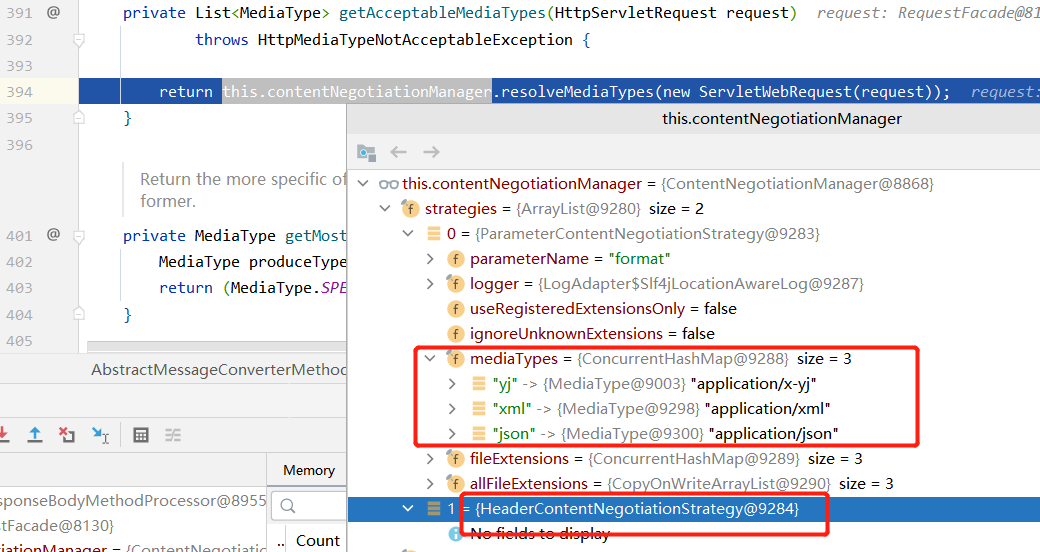
(3)原理
首先计算AcceptableMediaTypes时的ParameterContentNegotiationStrategy多了我们配置的yj类型
producibleTypes还是11个,多了我们之前配置的MyPersonMessageConverter
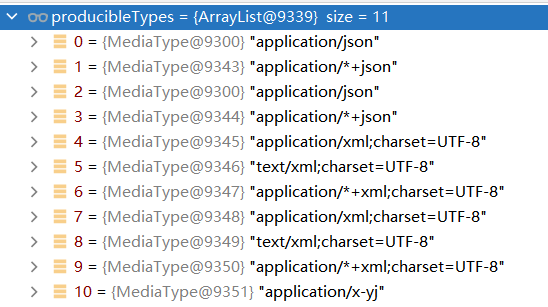
selectedMediaType选中的是application/x-yj

通过application/x-yj找到对应的messageConverter:MyPersonMessageConverter
通过执行里面的write()方法,把Person对象转换成最终结果展示出来。
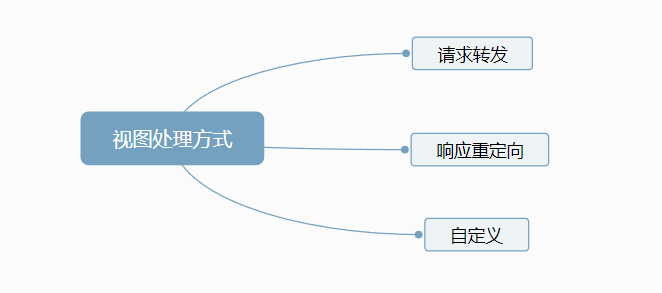
1.3 视图解析与模板引擎
(1)视图解析
@Controller
public class ProcessDispatchResultController {

    /**
     * 不能直接返回 forward:success来跳转到success.html,因为他的视图解析走的是AbstractView.render()
     * 不走thymeleaf的前缀和后缀规则。走的是  spring.web.resources.static-locations=classpath:/aa/  默认资源路径是/aa/
     * @param model
     * @return
     */
    @GetMapping("/fwd")
    public String forwardPage(Model model) {
        model.addAttribute("msg", "test forward");
        return "forward:index.html";  // 访问
    }

    // AbstractView.render()
    @GetMapping("/red")
    public String redirect(Model model) {
        model.addAttribute("msg", "test redirect");
        return "redirect:/suc";
    }

    /**
     * 直接返回字符串不带forward,会走thymeleafView.render() 所以可以进行页面跳转
     *
     * @param model
     * @return
     */
    @GetMapping("/suc")
    public String suc(Model model) {
        model.addAttribute("param", "test");
        return "success";
    }

}
1.1 视图解析原理流程
-
1、在handler.handleReturnValue()中,是ViewNameMethodReturnValueHandler对字符串类型的返回值进行处理,这里会将viewName赋值到ModelAndViewContainer中,并对RedirectViewName做一定处理
-
2、invokeAndHandle目标方法处理完成后,会调用getModelAndView()方法,将mavContainer转换成ModelAndView。所有请求最终都会返回一个ModelAndView对象:包括数据和视图信息
-
3、processDispatchResult(processedRequest, response, mappedHandler, mv, dispatchException);处理派发结果(决定页面如何响应)
-
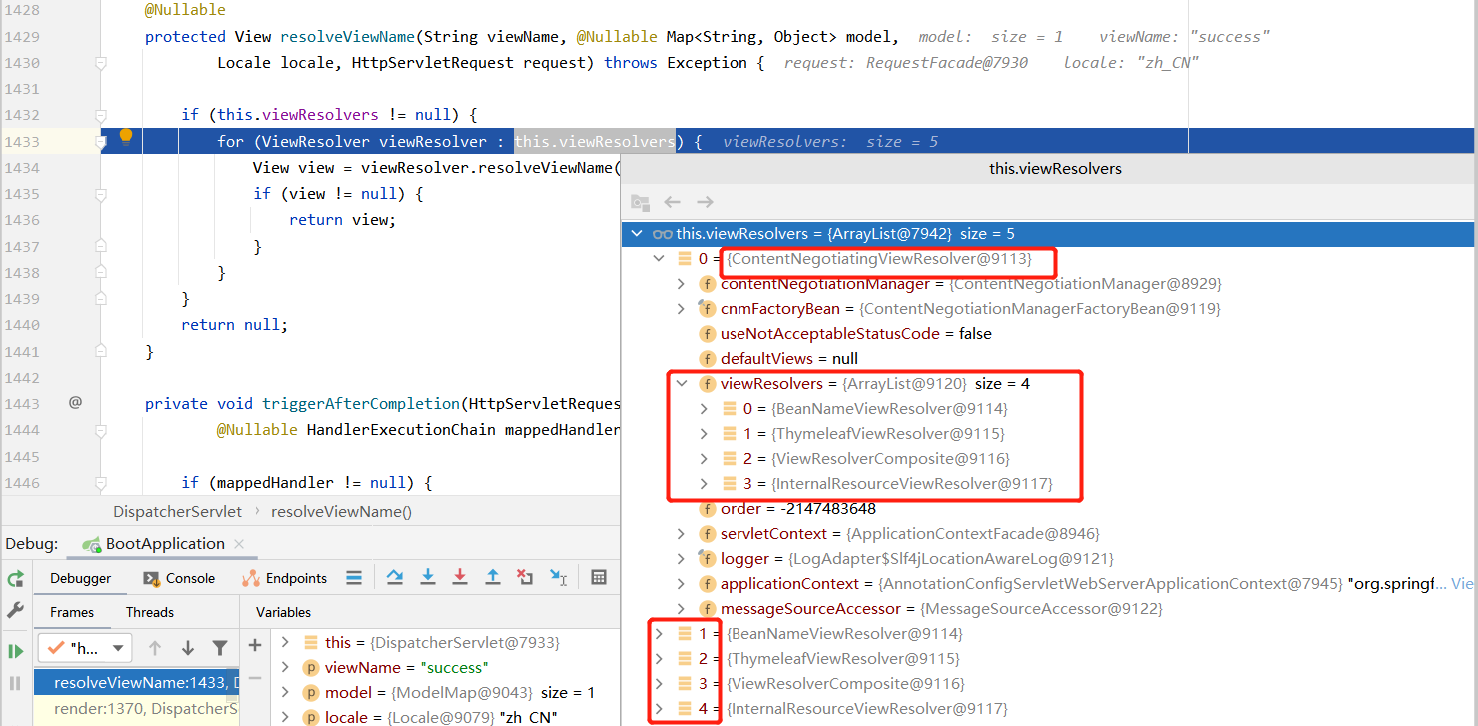
3.1 进入render()方法进行视图渲染
-
3.2 resolveViewName() //最终走的都是ContentNegotiatingViewResolver,视图解析器来解析视图对象
-
3.3 view.render(mv.getModelInternal(), request, response); // mv.getModelInternal()就是数据
-
3.3.1 ThymeleafView.render() --> 处理直接返回字符串(没有forward)的情况。结合thymeleaf的配置前后缀
- 这里会默认创建一个模板引擎,然后viewTemplateEngine.process()进行页面渲染处理
-
3.3.2 AbstractView.render() -> 处理字符串中有forward或redirect的响应。
- 3.3.2.1 renderMergedOutputModel()
- redirect --> DirectView --> response.sendRedirect(encodedURL);
- forward --> InternalResourceView
- exposeModelAsRequestAttributes(model, request); // 将map和model的值放入request中
- request.getRequestDispatcher(path).forward(request, response);
- 3.3.2.1 renderMergedOutputModel()
-
-

(2)模板引擎-Thymeleaf
1.1 Thymeleaf简介
https://www.thymeleaf.org/doc/tutorials/3.0/usingthymeleaf.html#dialects-the-standard-dialect
1.2 基本语法
1.3 Thymeleaf的基本使用
1.3.1 Thymeleaf使用
(1)引入starter
<dependency>
   <groupId>org.springframework.boot</groupId>
   <artifactId>spring-boot-starter-thymeleaf</artifactId>
</dependency>
(2)编写controller
@GetMapping("/succ")
public String success(Model model) {
    model.addAttribute("msg", "Hello Thymeleaf!");
    model.addAttribute("link", "https://www.thymeleaf.org/doc/tutorials/3.0/usingthymeleaf.html#dialects-the-standard-dialect");
    // ThymeleafProperties可以看到默认的视图位置为classpath:/templates/, 默认的后缀为.html
    return "success";
}
(3)编写html
根据Thymeleaf的默认配置:文件需要放在templates目录下, 默认html格式
public static final String DEFAULT_PREFIX = "classpath:/templates/";

public static final String DEFAULT_SUFFIX = ".html";
<!DOCTYPE html>
<html lang="en" xmlns:th="http://www.thymeleaf.org">
<head>
    <meta charset="UTF-8">
    <title>Title</title>
</head>
<body>
<h1 th:text="${msg}">你好啊</h1>
<a href="http://www.baidu.com" th:href="${link}">百度</a>

</body>
</html>
(4)自动配置
Thymeleaf是通过ThymeleafAutoConfiguration进行自动配置的,其绑定的配置文件是ThymeleafProperties
可以看到配置好了
-
defaultTemplateResolver
-
SpringTemplateEngine
-
ThymeleafViewResolver
我们只需要关注页面的开发,无需进行其他配置。
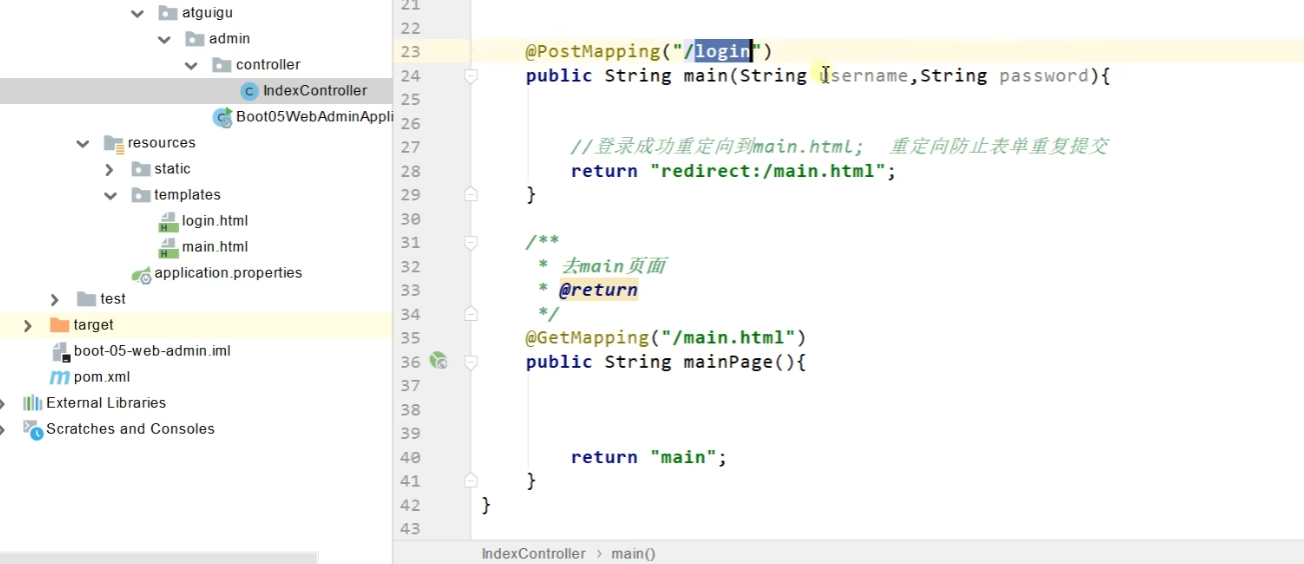
解决表单重复提交的一种方式:登录成功后响应重定向处理。这样url会进行变化。
1.4 拦截器
实现HandlerInterceptor接口
(1)自定义拦截器的业务逻辑
@Slf4j
public class LoginInterceptor implements HandlerInterceptor {

    @Override
    public boolean preHandle(HttpServletRequest request, HttpServletResponse response, Object handler) throws Exception {
        // 进行业务逻辑判断,权限控制等操作
        Object key = request.getAttribute("key");
        Object sessionKey = request.getSession().getAttribute("sessionKey");
        if (key != null || sessionKey != null) {
            // 用户校验,有权限或者已经登录,继续执行(放行)
            return true;
        }

        // 认证未通过,跳转到登录页面
        request.setAttribute("msg", "请先进行登录操作!");
        request.getRequestDispatcher("/login").forward(request, response);
        return false;
    }

    @Override
    public void postHandle(HttpServletRequest request, HttpServletResponse response, Object handler, ModelAndView modelAndView) throws Exception {
        log.info("postHandle...{}", modelAndView);
    }

    @Override
    public void afterCompletion(HttpServletRequest request, HttpServletResponse response, Object handler, Exception ex) throws Exception {
        log.info("afterCompletion.....");
    }
}
(2)将自定义的拦截器注册到容器中
package com.ityj.boot.config;

import com.ityj.boot.interceptor.LoginInterceptor;
import org.springframework.web.servlet.config.annotation.InterceptorRegistry;
import org.springframework.web.servlet.config.annotation.WebMvcConfigurer;

/**
 * 登录拦截:
 *  1. 编写好拦截器及其业务逻辑,实现HandlerInterceptor接口
 *  2. 将自定义的拦截器放入容器中
 *  3. 配置好拦截及放行的请求
 */
//@Configuration
public class LoginInterceptorConfig implements WebMvcConfigurer {

    @Override
    public void addInterceptors(InterceptorRegistry registry) {
        registry.addInterceptor(new LoginInterceptor())
                .addPathPatterns("/**")   //拦截所有请求包括静态资源
                .excludePathPatterns("/", "/login", "/css/**", "/js/**", "/fonts/**", "/images/**"); // 放行静态资源
    }

}
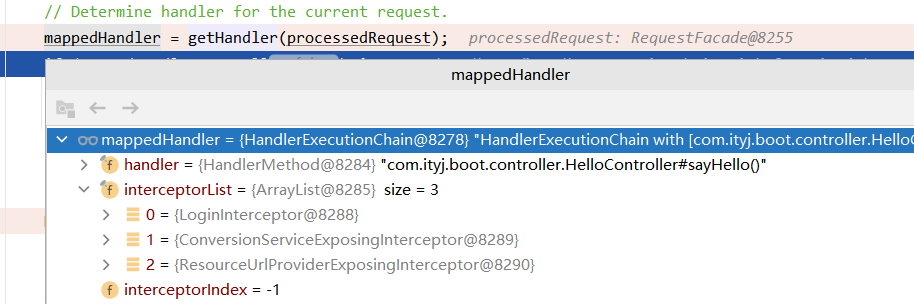
(3)拦截器源码解析

-
1、根据当前的请求,在doDispatcher()获取Handler的同时得到了处理此请求的所有拦截器interceptorList
-
2、获取完HandlerAdapter,并且在开始处理Handler之前执行拦截器的preHandle()方法。
- 2.1 正序执行所有拦截器的preHandle()方法,如果所有返回值都为true,则开始执行ha.handle()目标方法
- 2.2 如果一个拦截器返回false, 则会倒序执行已经执行过的拦截器的afterCompletion()方法,然后当前请求直接结束
if (!mappedHandler.applyPreHandle(processedRequest, response)) { return; } boolean applyPreHandle(HttpServletRequest request, HttpServletResponse response) throws Exception { for (int i = 0; i < this.interceptorList.size(); i++) { HandlerInterceptor interceptor = this.interceptorList.get(i); if (!interceptor.preHandle(request, response, this.handler)) { triggerAfterCompletion(request, response, null); return false; } this.interceptorIndex = i; } return true; } void triggerAfterCompletion(HttpServletRequest request, HttpServletResponse response, @Nullable Exception ex) { for (int i = this.interceptorIndex; i >= 0; i--) { HandlerInterceptor interceptor = this.interceptorList.get(i); try { interceptor.afterCompletion(request, response, this.handler, ex); } catch (Throwable ex2) { logger.error("HandlerInterceptor.afterCompletion threw exception", ex2); } } } -
3、同时triggerAfterCompletion()方法在多个层级的catch里面,如果代码出现异常,则会直接执行
afterCompletion()方法。
-
4、执行完目标方法后,会执行postHandler()方法,可以看到也是倒序执行
mappedHandler.applyPostHandle(processedRequest, response, mv); void applyPostHandle(HttpServletRequest request, HttpServletResponse response, @Nullable ModelAndView mv) throws Exception { for (int i = this.interceptorList.size() - 1; i >= 0; i--) { HandlerInterceptor interceptor = this.interceptorList.get(i); interceptor.postHandle(request, response, this.handler, mv); } } -
5、如果程序正常执行,会在视图渲染之后(render()执行完毕),调用triggerAfterCompletion()方法,倒序执行
mappedHandler.triggerAfterCompletion(request, response, null);
1.5 文件上传
SpringBoot文件上传Demo
(1)前端页面
<!DOCTYPE html>
<html lang="en" xmlns:th="http://www.thymeleaf.org">
<head>
    <meta charset="UTF-8">
    <title>文件上传</title>
</head>
<body>

<form method="post" th:action="@{/upload}" enctype="multipart/form-data">
    用户名:<input name="username" type="text"/> <br/>
    头像:<input name="profilePhoto" type="file"/> <br/>
    生活照:<input name="lifePhotos" type="file" multiple/> <br/>
    <input type="submit" value="提交">
</form>

</body>
</html>
(2)后端代码
@Controller
@Slf4j
public class FileUploadTestController {

    @Value("${path.fileupload}")
    private String destPath;

    @GetMapping("/fileupload")
    public String toFileUploadPage() {
        return "fileupload";
    }

    @PostMapping("/upload")
    public String upload(@RequestParam("username") String username,
                         @RequestPart MultipartFile profilePhoto,
                         @RequestPart List<MultipartFile> lifePhotos,
                         Model model) {
        log.info("username = {}", username);
        log.info("profilePhoto.size() = {}", profilePhoto.getSize());
        log.info("lifePhotos数量 = {}", lifePhotos.size());

        CommonUtils.transfer(Stream.of(profilePhoto).collect(Collectors.toList()), destPath);
        CommonUtils.transfer(lifePhotos, destPath);

        model.addAttribute("msg", "文件上传成功!");
        return "success";

    }
}
spring:
  servlet:
    multipart:
      max-file-size: 10MB
      max-request-size: 100MB  # 文件上传大小限制
path:
  fileupload: C:/upload/
@Slf4j
public class CommonUtils {

    public static void transfer(List<MultipartFile> files, String destDirectory) {
        files.forEach(file -> {
            String originalFilename = file.getOriginalFilename();
            if (file.isEmpty()) {
                log.warn("The size of file:{} is 0", originalFilename);
            }
            FileUtil.mkdir(destDirectory);
            try {
                File dest = new File(destDirectory + originalFilename);
                file.transferTo(dest);
                log.info("File upload successfully: {}", dest.getAbsolutePath());
            } catch (IOException e) {
                log.error("Error transferTo:", e);
            }
        });

    }
}
(3)开发要点
3.1 前端提交方式
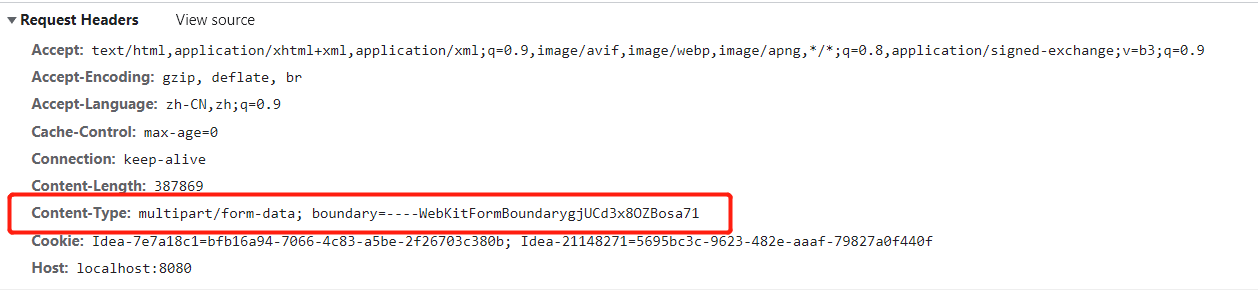
form表单的必须是post,类型enctype=“multipart/form-data”
request.getContentType()在GET请求下是没有值的,所以isMultipart返回值肯定为false
@Override
public boolean isMultipart(HttpServletRequest request) {
   return StringUtils.startsWithIgnoreCase(request.getContentType(), "multipart/");
}
3.2 文件上传大小有默认限制
MultipartAutoConfiguration自动配置的中规定了文件默认大小
/**
 * Max file size.
 */
private DataSize maxFileSize = DataSize.ofMegabytes(1);

/**
 * Max request size.
 */
private DataSize maxRequestSize = DataSize.ofMegabytes(10);
The field profilePhoto exceeds its maximum permitted size of 1048576 bytes.
可以通过配置文件进行修改:
spring:
  servlet:
    multipart:
      max-file-size: 10MB
      max-request-size: 100MB  # 文件上传大小限制
(4)文件上传源码解析
文件上传主要是对参数@RequestPart MultipartFile profilePhoto进行组装,也就是说最主要的就是参数解析步骤,这里用到的是:RequestPartMethodArgumentResolver.resolveArgument()
步骤:
-
1、入口还是DispatcherServlet.doService(),首先对请求request封装处理
-
1.1 processedRequest = checkMultipart(request);
-
1.1.1 multipartResolver.isMultipart(request)判断了是否符合文件上传的规范,这里multipartResolver解析器是StandardServletMultipartResolver
@Override public boolean isMultipart(HttpServletRequest request) { return StringUtils.startsWithIgnoreCase(request.getContentType(), "multipart/"); } -
1.1.2 不是的话,返回普通请求request
-
1.1.3 是的话,对request进行封装return this.multipartResolver.resolveMultipart(request);
-
1.1.3.1 会拿到请求中的所有文件参数,放入到缓存中 MultiValueMap<String, MultipartFile> multipartFiles;
private void parseRequest(HttpServletRequest request) {
    try {
        Collection<Part> parts = request.getParts();
        this.multipartParameterNames = new LinkedHashSet<>(parts.size());
        MultiValueMap<String, MultipartFile> files = new LinkedMultiValueMap<>(parts.size());
        for (Part part : parts) {
            String headerValue = part.getHeader(HttpHeaders.CONTENT_DISPOSITION);
            ContentDisposition disposition = ContentDisposition.parse(headerValue);
            String filename = disposition.getFilename();
            if (filename != null) {
                if (filename.startsWith("=?") && filename.endsWith("?=")) {
                    filename = MimeDelegate.decode(filename);
                }
                files.add(part.getName(), new StandardMultipartFile(part, filename));
            }
            else {
                this.multipartParameterNames.add(part.getName());
            }
        }
        setMultipartFiles(files);
    }
    catch (Throwable ex) {
        handleParseFailure(ex);
    }
}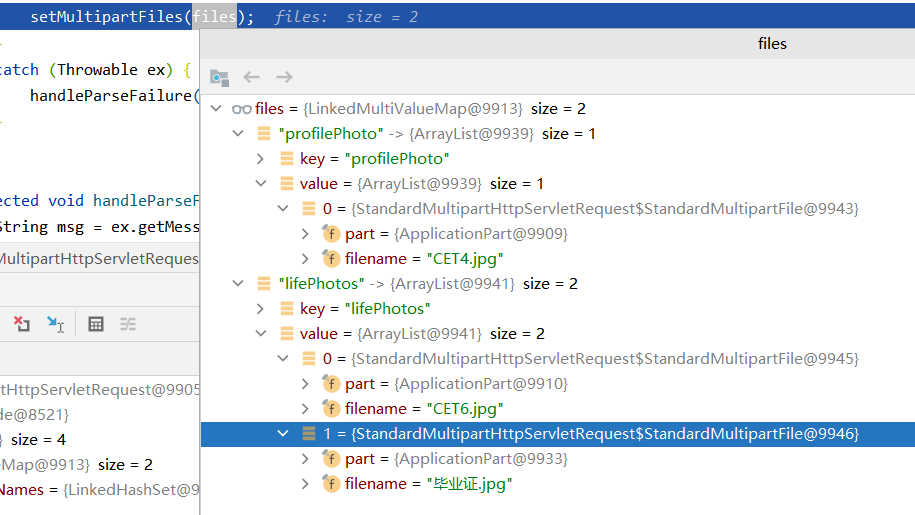
-
-
-
1.2 然后正常地拿到Handler, Adapter。执行Handler
-
1.3 …
-
1.4 在获取参数时有一点不同,这里用的是RequestPartMethodArgumentResolver
-
1.4.1 拿到参数名,直接获取其对应的文件信息即可(1.1.3.1的内容)。看到是同一个对象

@Nullable public static Object resolveMultipartArgument(String name, MethodParameter parameter, HttpServletRequest request) throws Exception { MultipartHttpServletRequest multipartRequest = WebUtils.getNativeRequest(request, MultipartHttpServletRequest.class); if (MultipartFile.class == parameter.getNestedParameterType()) { if (!isMultipart) { return null; } if (multipartRequest == null) { multipartRequest = new StandardMultipartHttpServletRequest(request); } return multipartRequest.getFile(name); } else if (isMultipartFileCollection(parameter)) { if (!isMultipart) { return null; } if (multipartRequest == null) { multipartRequest = new StandardMultipartHttpServletRequest(request); } List<MultipartFile> files = multipartRequest.getFiles(name); return (!files.isEmpty() ? files : null); } else if (isMultipartFileArray(parameter)) { if (!isMultipart) { return null; } if (multipartRequest == null) { multipartRequest = new StandardMultipartHttpServletRequest(request); } List<MultipartFile> files = multipartRequest.getFiles(name); return (!files.isEmpty() ? files.toArray(new MultipartFile[0]) : null); } else if (Part.class == parameter.getNestedParameterType()) { if (!isMultipart) { return null; } return request.getPart(name); } else if (isPartCollection(parameter)) { if (!isMultipart) { return null; } List<Part> parts = resolvePartList(request, name); return (!parts.isEmpty() ? parts : null); } else if (isPartArray(parameter)) { if (!isMultipart) { return null; } List<Part> parts = resolvePartList(request, name); return (!parts.isEmpty() ? parts.toArray(new Part[0]) : null); } else { return UNRESOLVABLE; } } -
1.4.2 @RequestPart可以支持单一的文件,数组或集合(前端需要调整:multiple属性)
-
-
1.5 拿到参数后执行目标方法,处理对应的文件上传业务逻辑
Object returnValue = invokeForRequest(webRequest, mavContainer, providedArgs); -
1.6 返回值处理就和文件上传没有关系了,页面跳转等功能可以由视图解析器处理。
-
1.6 异常页面处理
https://docs.spring.io/spring-boot/docs/2.4.13/reference/html/spring-boot-features.html#boot-features-error-handling
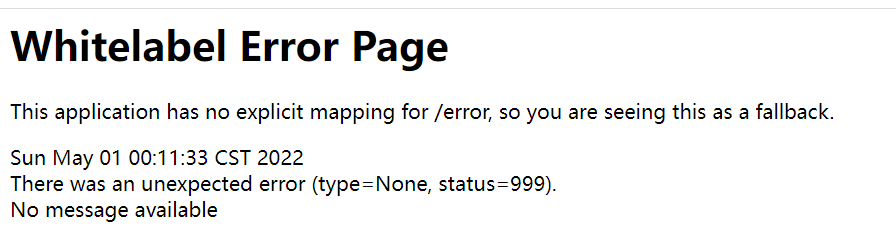
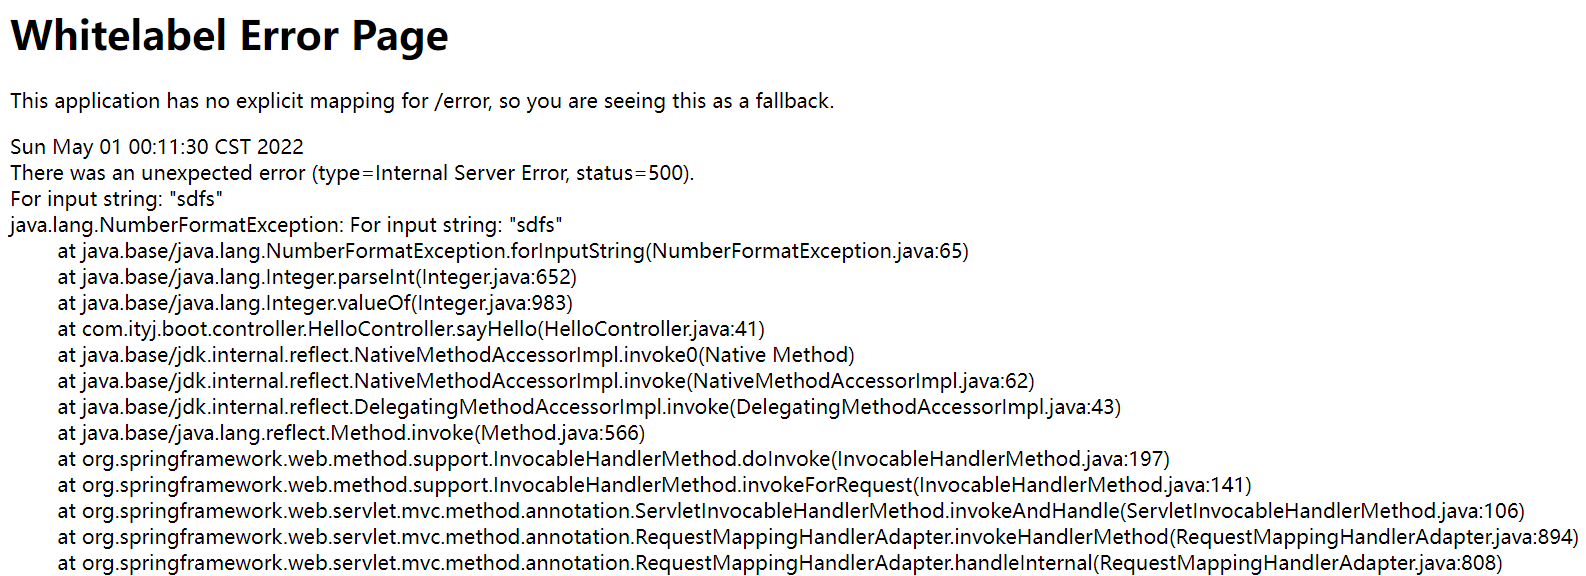
当程序出现错误时,默认会退出当前请求,携带当前的错误信息执行一个**/error**的请求。SpringBoot进行对/error的处理解析,最终返回定义好的页面或者JSON数据。
(1)默认错误页面
- 1、默认情况下,SpringBoot提供了一个/error的请求,处理所有的错误映射。
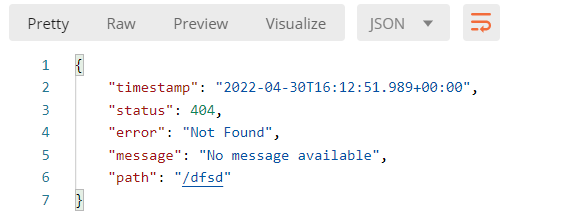
- 2、对于浏览器客户端,响应一个white page错误视图,以Html的形式展示;对机器客户端(Postman),会返回JSON数据
- 3、若对其进行自定义,添加View解析/error
- 4、若完全替换默认行为,可以实现
ErrorController并注册该类型的bean定义,或添加ErrorAttributes类型的组件以实现现有功能的替换。
针对浏览器请求和Postman发送请求,有两种返回方式:页面和json
404
500

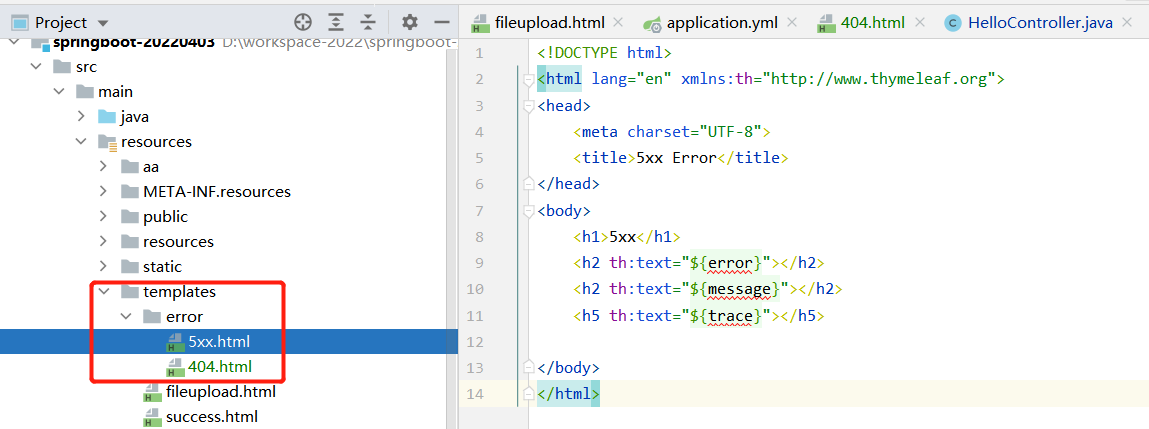
(2)自定义错误页面内容
-
1、添加一个
/error文件夹。可以是public目录或者templates目录 -
2、添加一个404.html来映射404错误
-
3、添加一个5xx.html来映射5xx错误
-
4、@ControllerAdvice + @ExceptionHandler处理异常
-
5、实现HandlerExceptionResolver处理异常
(3)错误页面自动配置原理
ErrorMvcAutoConfiguration自动配置了异常处理规则:
- 重要的组件:
- 1、DefaultErrorAttributes --> errorAttributes
- 2、BasicErrorController --> basicErrorController
- 3、View defaultErrorView() {} --> error
3.1 DefaultErrorAttributes
public DefaultErrorAttributes errorAttributes() {}
public class DefaultErrorAttributes implements ErrorAttributes, HandlerExceptionResolver, Ordered {}
里面有一个getErrorAttributes()方法,定义了错误页面可以支持的字段:
timestamp,
status,
error,
exception,
trace,
message,
errors,
path
3.2 BasicErrorController
这是一个controller,当程序出现异常时,默认会再次发送一个携带异常数据的/error请求,由此controller进行处理
3.2.1 @RequestMapping(“KaTeX parse error: Expected '}', got 'EOF' at end of input: …ver.error.path:{error.path:/error}}”)
类名上标注的这个注解表示动态配置
- 如果配置了server.error.path, 取其值
- 如果配置了error.path,取其值
- 都没有配置,取默认值/error
3.2.2 两类处理异常的方法
- 1、如果我们的请求者(浏览器或其他)支持接收text/html类型数据,则会使用errorHtml(),因为RequestMapping没有加value/path的映射,所以默认是类名上的/error。
- 2、如Postman不支持接收html,则会走error(),返回JSON数据。
@RequestMapping(produces = MediaType.TEXT_HTML_VALUE)
public ModelAndView errorHtml(HttpServletRequest request, HttpServletResponse response) {
    HttpStatus status = getStatus(request);
    Map<String, Object> model = Collections
        .unmodifiableMap(getErrorAttributes(request, getErrorAttributeOptions(request, MediaType.TEXT_HTML)));
    response.setStatus(status.value());
    ModelAndView modelAndView = resolveErrorView(request, response, status, model);
    return (modelAndView != null) ? modelAndView : new ModelAndView("error", model);
}

@RequestMapping
public ResponseEntity<Map<String, Object>> error(HttpServletRequest request) {
    HttpStatus status = getStatus(request);
    if (status == HttpStatus.NO_CONTENT) {
        return new ResponseEntity<>(status);
    }
    Map<String, Object> body = getErrorAttributes(request, getErrorAttributeOptions(request, MediaType.ALL));
    return new ResponseEntity<>(body, status);
}
3.2.3 resolveErrorView的逻辑
- 1、 首先获取到状态码: 500
- 2、调用ErrorViewResolver对请求以及解析好的状态码500进行处理。
- 2.1 如果在系统中配置了templates/error/500.html, 则直接返回500.html这个视图
- 2.2 会解析是否有5xx.html,有的话返回5xx.html
- 2.3 都没有的话返回new ModelAndView(“error”, model); error视图解析是通过defaultErrorView实现的。
protected ModelAndView resolveErrorView(HttpServletRequest request,
                                        HttpServletResponse response,
                                        HttpStatus status,
                                        Map<String, Object> model) {
   for (ErrorViewResolver resolver : this.errorViewResolvers) {
      ModelAndView modelAndView = resolver.resolveErrorView(request, status, model);
      if (modelAndView != null) {
         return modelAndView;
      }
   }
   return null;
}

DefaultErrorViewResolver:
@Override
public ModelAndView resolveErrorView(HttpServletRequest request, HttpStatus status, Map<String, Object> model) {
    ModelAndView modelAndView = resolve(String.valueOf(status.value()), model);
    if (modelAndView == null && SERIES_VIEWS.containsKey(status.series())) {
        modelAndView = resolve(SERIES_VIEWS.get(status.series()), model);
    }
    return modelAndView;
}

private ModelAndView resolve(String viewName, Map<String, Object> model) {
    String errorViewName = "error/" + viewName;
    TemplateAvailabilityProvider provider = this.templateAvailabilityProviders.getProvider(errorViewName,
                                                                                           this.applicationContext);
    if (provider != null) {
        return new ModelAndView(errorViewName, model);
    }
    return resolveResource(errorViewName, model);
}
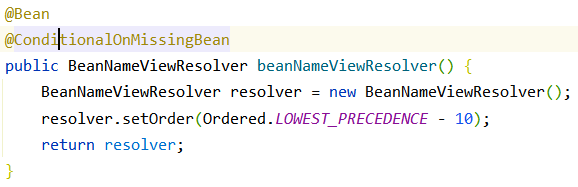
3.3 defaultErrorView
private final StaticView defaultErrorView = new StaticView();

@Bean(name = "error")
@ConditionalOnMissingBean(name = "error")
public View defaultErrorView() {
   return this.defaultErrorView;
}
-
3.3.1 首先bean的name是error,同时配置了BeanNameViewResolver,也就是说可以处理View为error的请求。
-
BeanNameViewResolver: 将逻辑视图名解析为bean的name属性,从而根据name属性去找对应的bean
-
-
3.3.2 StaticView就是SpringBoot给的默认错误页,里面会展示一些基本的错误信息:timestamp, trace, message…
(4)异常处理流程源码解析
1、请求进入DispatcherServlet,通过adapter执行对应的handler。执行目标方法时如果出现异常,会直接结束当前请求(webRequest.requestCompleted();)进入catch逻辑。并将异常信息封装在dispatchException中。
2、返回的mv=null, 进入视图解析流程:
processDispatchResult(processedRequest, response, mappedHandler, mv, dispatchException)
3、处理handler发生的异常,处理完成后返回ModelAndView
mv = processHandlerException(request, response, handler, exception);
-
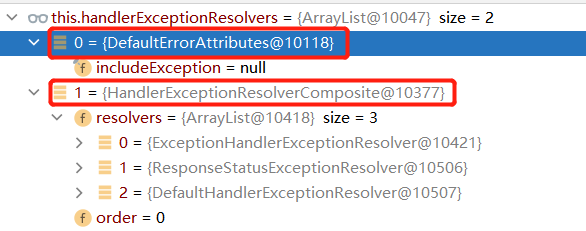
3.1 系统默认的异常解析器:
-
3.2 遍历所有的异常解析器,看谁能处理当前的异常:HandlerExceptionResolver

-
3.2.1 DefaultErrorAttributes首先进行处理,将异常信息保存到request请求域中,并返回null
DefaultErrorAttributes实现了HandlerExceptionResolver接口,也是一个异常处理器
public class DefaultErrorAttributes implements ErrorAttributes, HandlerExceptionResolver, Ordered {} -
3.2.2 默认没有任何人能处理异常,processHandlerException()的返回值也是null。本次请求结束,异常未能处理继续抛出。
4、请求结束但没有任何人处理此异常,底层默认会发送/error请求。
- 4.1 再次进入DispatcherServlet,获取到处理此请求的是BasicErrorController
- 4.2 BasicErrorController.errorHtml()处理对应的异常,用到了errorViewResolvers,这里默认只有一个:DefaultErrorViewResolver, 而这个resolver是在ErrorMvcAutoConfiguration进行配置的,其最终返回的就是4xx.html或error请求。
- 4.3 方法返回ModelAndView,模板引擎进行视图渲染,返回错误提示页面。
首先使用系统默认异常解析器进行解析,如果无法处理会启用底层默认的错误页面解析器(DefaultErrorViewResolver)
(5)几种异常处理原理
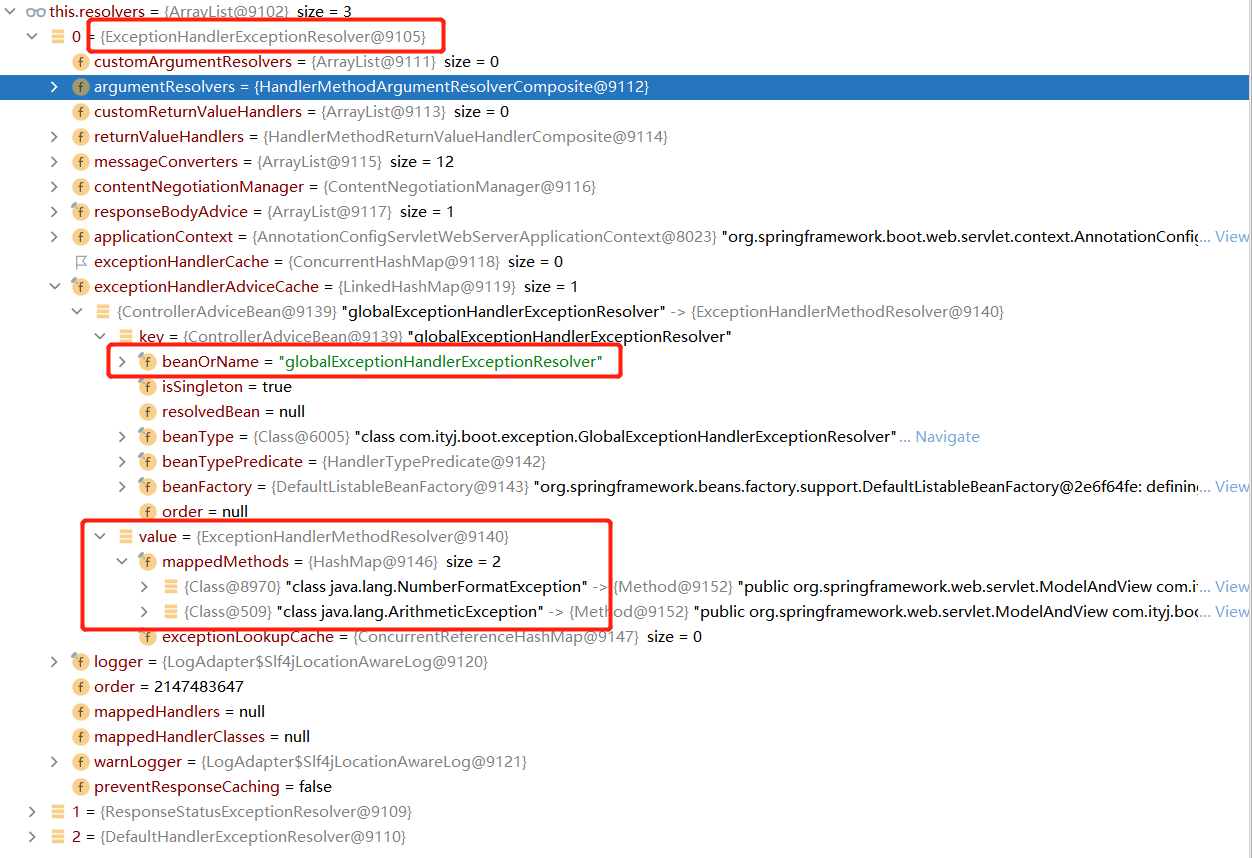
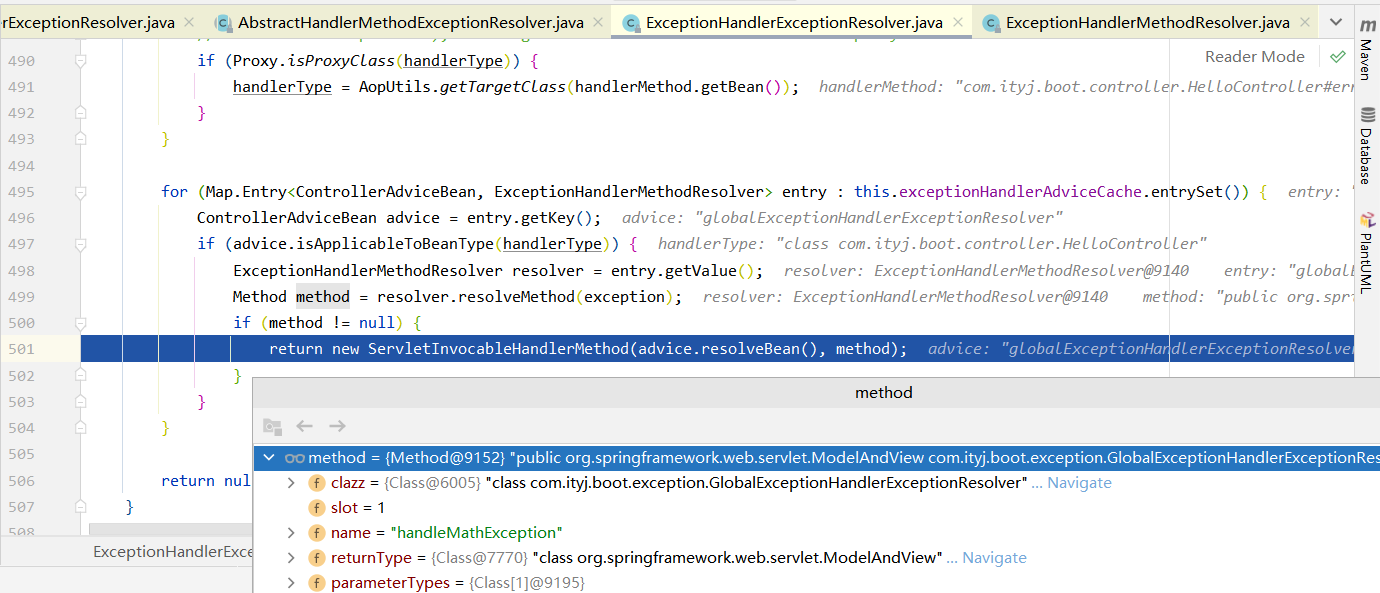
5.1 @ControllerAdvice + @ExceptionHandler
实现指定异常的处理。请求发生异常后,通过ExceptionHandlerExceptionResolver找到处理当前类型异常的方法handleMathException,利用当前方法进行处理。这里返回的是ModelAndView,等于是直接进行页面渲染,不会再次发送请求。
@ControllerAdvice
public class GlobalExceptionHandlerExceptionResolver {

    /**
     * 项目启动过程中会加载当前方法,读取ExceptionHandler注解,并将handleMathException能处理能异常类型
     * 绑定到ExceptionHandlerExceptionResolver中
     * @param e
     * @return
     */
    @ExceptionHandler(value = {ArithmeticException.class, NumberFormatException.class})
    public ModelAndView handleMathException(Exception e) {
        ModelAndView mv = new ModelAndView();
        mv.setViewName("error/number_error");
        mv.addObject("msg", e.toString());
        return mv;
    }

}
5.2 自定义异常 + @ResponseStatus
-
1、 在ResponseStatusExceptionResolver中会判断当前异常有没有@ResponseStatus注解
-
2、有的话return resolveResponseStatus(status, request, response, handler, ex); 拿到statusCode和reason然后执行applyStatusAndReason(statusCode, reason, response);
protected ModelAndView applyStatusAndReason(int statusCode, @Nullable String reason, HttpServletResponse response)throws IOException { response.sendError(statusCode, resolvedReason); return new ModelAndView(); } -
3、所做的事情就是tomcat直接将状态码以及原因通过sendError再次发送一个请求/error,并返回一个空的ModelAndView来结束本次的请求。
@ResponseStatus(code = HttpStatus.INTERNAL_SERVER_ERROR, reason = "年龄输入错误!")
public class IncorrectAgeException extends RuntimeException {
    public IncorrectAgeException(String msg) {
        super(msg);
    }

    public IncorrectAgeException() {
        super();
    }
}
@GetMapping(path = "/err")
public Integer errorMethod(@RequestParam("age") Integer age) {
    if (age < 0) {
        throw new IncorrectAgeException();
    }
    Double.valueOf("sdf");
    return age;
}
5.3 DefaultHandlerExceptionResolver处理Spring底层的异常
也是直接由tomcat发送一个/error请求来处理。

if (ex instanceof MissingServletRequestParameterException) {
   return handleMissingServletRequestParameter(
         (MissingServletRequestParameterException) ex, request, response, handler);
}

protected ModelAndView handleMissingServletRequestParameter(MissingServletRequestParameterException ex,
			HttpServletRequest request, HttpServletResponse response, @Nullable Object handler) throws IOException {

    response.sendError(HttpServletResponse.SC_BAD_REQUEST, ex.getMessage());
    return new ModelAndView();
}
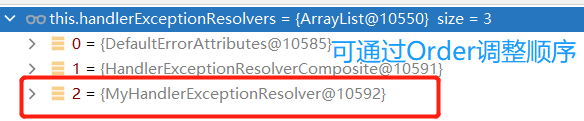
5.4 自定义HandlerExceptionResolver
@Component
@Order   // 默认最低优先级Ordered.LOWEST_PRECEDENCE,可以调整。
public class MyHandlerExceptionResolver implements HandlerExceptionResolver {

    @Override
    public ModelAndView resolveException(HttpServletRequest request, HttpServletResponse response, Object handler, Exception ex) {
        // 具体的异常处理逻辑可以在这里处理。比如支持什么异常,参数怎么处理
        ModelAndView mv = new ModelAndView();
        mv.addObject("msg", ex.toString());
        mv.setViewName("error/handler_resolver_error_page");
        return mv;
    }
}
5.5 ErrorViewResolver也可以实现自定义异常
1.7 原生组件的注入
Registering Servlets, Filters, and Listeners as Spring Beans
https://docs.spring.io/spring-boot/docs/2.4.13/reference/html/spring-boot-features.html#boot-features-embedded-container-servlets-filters-listeners
注入原生组件 Servlets, Filters, and Listeners的方式有两种:注解和配置类
(1)注解方式注入原生组件
通过注解方式注入的原生组件,我们需要在启动类上标注==@ServletComponentScan==注解
@ServletComponentScan(basePackages = {"com.ityj.boot.servlet"})
1.1 Servlet
针对/myservlet/t1和/myservlet/t2的GET请求,会进入doGet()方法,并打印出字符串:MyServlet.doGet()…
@WebServlet(name = "myServlet", urlPatterns = {"/myservlet/t1", "/myservlet/t2"})
public class MyServlet extends HttpServlet {

    @Override
    protected void doGet(HttpServletRequest req, HttpServletResponse resp) throws ServletException, IOException {
        resp.getWriter().write("MyServlet.doGet()...");
    }
}
1.2 Filter
通过urlPatterns或者servletNames都是可以实现对请求的过滤。
@Slf4j
//@WebFilter(urlPatterns = {"/myservlet/t1", "/myservlet/t2"})
@WebFilter(servletNames = {"myServlet"})
public class MyServletFilter extends HttpFilter {

    @Override
    public void init() throws ServletException {
        log.info("MyServletFilter.init()...");
        super.init();
    }

    @Override
    public void doFilter(ServletRequest request, ServletResponse response, FilterChain chain) throws IOException, ServletException {
        log.info("MyServletFilter.doFilter()...");
        super.doFilter(request, response, chain);
    }

    @Override
    public void destroy() {
        log.info("MyServletFilter.destroy()...");
        super.destroy();
    }
}
1.3 Listener
可以监控项目的启动以及销毁
@WebListener
@Slf4j
public class MyWebListener implements ServletContextListener {
    @Override
    public void contextInitialized(ServletContextEvent sce) {
        log.info("MyWebListener.contextInitialized()...");

    }

    @Override
    public void contextDestroyed(ServletContextEvent sce) {
        log.info("MyWebListener.contextDestroyed()...");
    }
}
(2)配置类方式注入原生组件
配置的方式就不需要在启动类上标注==@ServletComponentScan==注解
将上面的注解全部取消掉。添加如下的配置类,可以实现同样的注册绑定。
// 可以通过这个配置类,来应用自己定义的WebServlet/Filter/Listener
// 同时不需要在启动类上标注@ServletComponentScan(basePackages = {"com.ityj.boot.servlet"})注解
@Configuration
public class MyServletRegistrationConfig {

    // 替代@WebServlet(urlPatterns = {"/myservlet/t1", "/myservlet/t2"})
    @Bean
    public ServletRegistrationBean myServlet() {
        MyServlet myServlet = new MyServlet();
        return new ServletRegistrationBean(myServlet, "/myservlet/t1", "/myservlet/t2", "/bb/*");
    }

    // 替代@WebFilter(urlPatterns = {"/myservlet/t1", "/myservlet/t2"})
    @Bean
    public FilterRegistrationBean filter() {
        MyServletFilter myServletFilter = new MyServletFilter();
        FilterRegistrationBean filterRegistrationBean = new FilterRegistrationBean(myServletFilter);
        // 1. myServletFilter可以直接针对myServlet,放入bean
        filterRegistrationBean.addServletNames("myServlet");
        // 2. 同时也可以指定过滤的url  单个*指代所有是servlet的用法,双星**是spring的写法
        filterRegistrationBean.setUrlPatterns(Stream.of("/aa/*").collect(Collectors.toList()));

        return filterRegistrationBean;
    }

    // 替代 @WebListener
    @Bean
    public ServletListenerRegistrationBean listenerRegistration() {
        MyWebListener myWebListener = new MyWebListener();
        return new ServletListenerRegistrationBean(myWebListener);
    }

}
(3)总结
3.1 MyServlet异常处理
出现异常会默认走/error请求
@Override
protected void doGet(HttpServletRequest req, HttpServletResponse resp) throws ServletException, IOException {
    Double.valueOf("safds");
    resp.getWriter().write("MyServlet.doGet()...");
}
出现异常,最终会走到org.apache.catalina.core.StandardHostValve#status,拼接出一个/error的请求,再次执行处理。
3.2 请求的精确优先原则
访问http://localhost:8080/myservlet/t1为什么是由MyServlet来处理呢?
因为MyServlet可以处理**/myservlet/t1**请求,DispatcherServlet默认处理/请求,根据精确优先原则,/myservlet/t1请求由MyServlet处理。
@Bean(name = DEFAULT_DISPATCHER_SERVLET_REGISTRATION_BEAN_NAME)
@ConditionalOnBean(value = DispatcherServlet.class, name = DEFAULT_DISPATCHER_SERVLET_BEAN_NAME)
public DispatcherServletRegistrationBean dispatcherServletRegistration(DispatcherServlet dispatcherServlet,
                                                                       WebMvcProperties webMvcProperties, ObjectProvider<MultipartConfigElement> multipartConfig) {
    DispatcherServletRegistrationBean registration = new DispatcherServletRegistrationBean(dispatcherServlet, webMvcProperties.getServlet().getPath()); // path=/
    registration.setName(DEFAULT_DISPATCHER_SERVLET_BEAN_NAME);
    registration.setLoadOnStartup(webMvcProperties.getServlet().getLoadOnStartup());
    multipartConfig.ifAvailable(registration::setMultipartConfig);
    return registration;
}
1.8 嵌入式Servlet容器
SpringBoot默认支持tomcat,jetty,undertow三种服务器。他们是通过配置类选择使用的。默认为tomcat
https://docs.spring.io/spring-boot/docs/2.4.13/reference/html/spring-boot-features.html#boot-features-embedded-container-application-context
(1)服务器启动
ServletWebServerApplicationContext是一个特殊的IOC容器,Usually a TomcatServletWebServerFactory, JettyServletWebServerFactory, or UndertowServletWebServerFactory has been auto-configured.
- 1.1 SpringBoot项目启动时,调用run方法
SpringApplication.run(BootApplication.class, args);
-
1.2 refreshContext(context); --> refresh((ApplicationContext) context); --> refresh((ConfigurableApplicationContext) applicationContext); --> applicationContext.refresh(); --> super.refresh(); --> onRefresh() --> createWebServer();
ServletWebServerApplicationContext.java
this.webServer = factory.getWebServer(getSelfInitializer());
通过上面的流程,开始创建WebServer, 而创建是通过ServletWebServerFactory进行的。
-
1.3 factory.getWebServer(getSelfInitializer());开始创建并启动服务器:TomcatServletWebServerFactory。这里是通过代码的方式启动。(替代了原先tomcat双击startup.bat)
@Override
public WebServer getWebServer(ServletContextInitializer... initializers) {
   if (this.disableMBeanRegistry) {
      Registry.disableRegistry();
   }
   Tomcat tomcat = new Tomcat();
   File baseDir = (this.baseDirectory != null) ? this.baseDirectory : createTempDir("tomcat");
   tomcat.setBaseDir(baseDir.getAbsolutePath());
   Connector connector = new Connector(this.protocol);
   connector.setThrowOnFailure(true);
   tomcat.getService().addConnector(connector);
   customizeConnector(connector);
   tomcat.setConnector(connector);
   tomcat.getHost().setAutoDeploy(false);
   configureEngine(tomcat.getEngine());
   for (Connector additionalConnector : this.additionalTomcatConnectors) {
      tomcat.getService().addConnector(additionalConnector);
   }
   prepareContext(tomcat.getHost(), initializers);
   return getTomcatWebServer(tomcat);
}
到这里就创建了一个WebServer。
(2)ServletWebServerFactoryAutoConfiguration
这个配置类是对服务器的自动配置。
@EnableConfigurationProperties(ServerProperties.class)
@Import({ ServletWebServerFactoryAutoConfiguration.BeanPostProcessorsRegistrar.class,
		ServletWebServerFactoryConfiguration.EmbeddedTomcat.class,
		ServletWebServerFactoryConfiguration.EmbeddedJetty.class,
		ServletWebServerFactoryConfiguration.EmbeddedUndertow.class })
public class ServletWebServerFactoryAutoConfiguration {}
-
可以看出当前配置类绑定了ServerProperties.class,同时导入了ServletWebServerFactoryConfiguration,也可以看出默认支持三种类型的服务器。
-
ServletWebServerFactoryConfiguration中配置了tomcatServletWebServerFactory,JettyServletWebServerFactory和undertowServletWebServerFactory
(3)切换默认服务器
spring-boot-starter-web默认导入了spring-boot-starter-tomcat服务器,所以SpringBoot默认是tomcat服务器。
如果想要切换,首先exclude掉spring-boot-starter-tomcat,再加入对应的jetty/undertow依赖。
<dependency>
   <groupId>org.springframework.boot</groupId>
   <artifactId>spring-boot-starter-web</artifactId>
   <exclusions>
      <exclusion>
         <groupId>org.springframework.boot</groupId>
         <artifactId>spring-boot-starter-tomcat</artifactId>
      </exclusion>
   </exclusions>
</dependency>

<dependency>
   <groupId>org.springframework.boot</groupId>
   <artifactId>spring-boot-starter-jetty</artifactId>
</dependency>
(4)定制Servlet容器
- 1、实现 WebServerFactoryCustomizer,重写customize()方法,将配置文件里的值和WebServerFactory进行绑定。
- 2、修改配置文件server.xxx
- 3、直接自定义ConfigurableServletWebServerFactory
xxxCustomizer是spring中的一种思想,定制化器。可以改变xxx的默认规则
1.9 定制化原理总结
(1)定制化常见方式
-
1、直接修改配置文件
-
2、编写自定义的配置类,加上注解@Configuration + @Bean向容器中添加或替换默认组件。
@Bean public OrderedHiddenHttpMethodFilter hiddenHttpMethodFilter() { OrderedHiddenHttpMethodFilter orderedHiddenHttpMethodFilter = new OrderedHiddenHttpMethodFilter(); orderedHiddenHttpMethodFilter.setMethodParam("_hide_method"); return orderedHiddenHttpMethodFilter; } -
3、对于Web应用,编写一个配置类,实现WebMvcConfigurer接口,重写对应方法即可实现定制化web功能
public class MyConfig implements WebMvcConfigurer {}
-
4、@EnableWebMvc + WebMvcConfigurer + @Bean可以实现全面接管SpringMVC,所有的规则都需要自己重新配置。WebMvcAutoConfiguration自动配置功能失效。
-
4.1 EnableWebMvc导入了DelegatingWebMvcConfiguration.class
@Import(DelegatingWebMvcConfiguration.class) public @interface EnableWebMvc { }-
DelegatingWebMvcConfiguration继承了WebMvcConfigurationSupport,而WebMvcAutoConfiguration生效的一个条件是:容器中不能有WebMvcConfigurationSupport组件。不满足
public class DelegatingWebMvcConfiguration extends WebMvcConfigurationSupport {} @ConditionalOnMissingBean(WebMvcConfigurationSupport.class) public class WebMvcAutoConfiguration {} -
WebMvcConfigurationSupport里面配置了一些基本的组件。RequestMappingHandlerAdapter等,这些组件所原来的组件都是从容器中获取的。
-
-
4.2 DelegatingWebMvcConfiguration是把系统中的WebMvcConfigurer 拿过来,所有功能的定制都是这些WebMvcConfigurer 合并起来一起生效。
-
(2)原理套路分析
场景starter依赖 – 》 xxxAutoConfiguration --> 里面定义了一系列的组件 --》 这些组件都会绑定一个xxxProperties --> 配置文件绑定xxxProperties
所以我们针对不同功能,通过修改配置文件,也可以达到想要的目的。
3、数据访问
1.1 SQL
(1)数据源的自动配置
- 1、导入依赖
<dependency>
    <groupId>org.springframework.boot</groupId>
    <artifactId>spring-boot-starter-data-jdbc</artifactId>
</dependency>
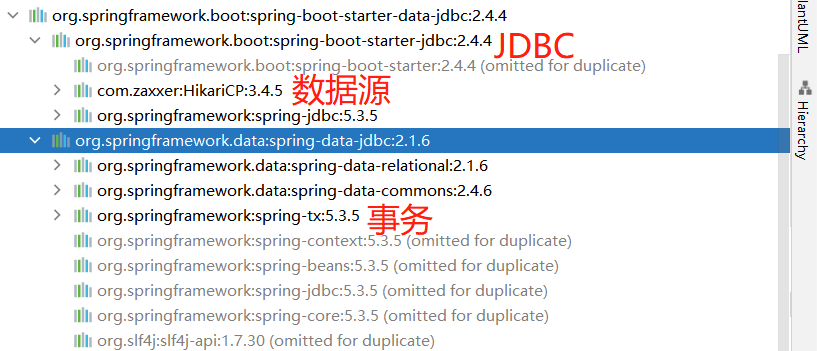
根据所需要连接的数据库类型,导入相关的驱动conncetor
<!--maven属性就近优先原则-->
<properties>
    <mysql.version>8.0.22</mysql.version>
</properties>
<dependency>
    <groupId>mysql</groupId>
    <artifactId>mysql-connector-java</artifactId>
</dependency>
-
2、修改配置
spring: datasource: driver-class-name: com.mysql.cj.jdbc.Driver url: jdbc:mysql://192.168.137.110:3306/index_test?useSSL=true&useUnicode=true&characterEncoding=utf-8&serverTimezone=Asia/Shanghai username: root password: root -
3、进行测试
@SpringBootTest
@Slf4j
public class BootTest {

    @Autowired
    private JdbcTemplate jdbcTemplate;

    @Test
    public void testJDBCTemplate() {
        Long count = jdbcTemplate.queryForObject("select count(1) from test_user", Long.class);
        log.info("数据条数为:{}", count);
    }
}
(2)自动配置源码解析
自动配置的类:
-
DataSourceAutoConfiguration:数据源自动配置
- @EnableConfigurationProperties(DataSourceProperties.class)绑定数据,prefix = “spring.datasource”
- 数据库连接池配置,自己容器中没有DataSource才会自动配置
- 默认配置好的数据原始Hikari
- 如果项目引入了多种数据源,可以通过spring.datasource.type=com.zaxxer.hikari.HikariDataSource/其他 进行指定。
@Configuration(proxyBeanMethods = false) @Conditional(PooledDataSourceCondition.class) @ConditionalOnMissingBean({ DataSource.class, XADataSource.class }) @Import({ DataSourceConfiguration.Hikari.class, DataSourceConfiguration.Tomcat.class, DataSourceConfiguration.Dbcp2.class, DataSourceConfiguration.OracleUcp.class, DataSourceConfiguration.Generic.class, DataSourceJmxConfiguration.class }) protected static class PooledDataSourceConfiguration { } -
DataSourceTransactionManagerAutoConfiguration:事务的自动配置
-
JdbcTemplateAutoConfiguration:JdbcTemplate自动配置,可以crud操作
(3)使用Druid数据源
https://github.com/alibaba/druid/tree/master/druid-spring-boot-starter
1.1 引入依赖
<dependency>
   <groupId>com.alibaba</groupId>
   <artifactId>druid-spring-boot-starter</artifactId>
   <version>1.2.9</version>
</dependency>
1.2 根据官方文档,修改配置,实现监控功能
spring:
  datasource:
    driver-class-name: com.mysql.cj.jdbc.Driver
    url: jdbc:mysql://192.168.137.110:3306/index_test?useSSL=true&useUnicode=true&characterEncoding=utf-8&serverTimezone=Asia/Shanghai
    username: root
    password: root

    druid:          # http://localhost:8080/druid/index.html
      aop-patterns: 'com.ityj.boot.*'    # 监控Spring Bean
      filters: stat,wall     # druid底层开启功能, stat(SQL监控功能), wall(防火墙功能)

      filter:
        stat:
          enabled: true
          slow-sql-millis: 1000
        wall:
          enabled: true
          config:
            drop-table-allow: false

      stat-view-servlet:    # 配置监控页功能
        enabled: true
        login-username: root
        login-password: root
        reset-enable: true

      web-stat-filter:   # 监控web
        enabled: true
        url-pattern: /*
        exclusions: '*.js,*.gif,*.jpg,*.png,*.css,*.ico,/druid/*'
  aop:
    auto: false
配置spring.aop.auto=false是因为,Spring监控只有在这个条件下才开启。
@Bean
@ConditionalOnProperty(name = "spring.aop.auto",havingValue = "false")
public DefaultAdvisorAutoProxyCreator advisorAutoProxyCreator() {
    DefaultAdvisorAutoProxyCreator advisorAutoProxyCreator = new DefaultAdvisorAutoProxyCreator();
    advisorAutoProxyCreator.setProxyTargetClass(true);
    return advisorAutoProxyCreator;
}
1.3 查看监控测试
http://localhost:8080/druid/index.html
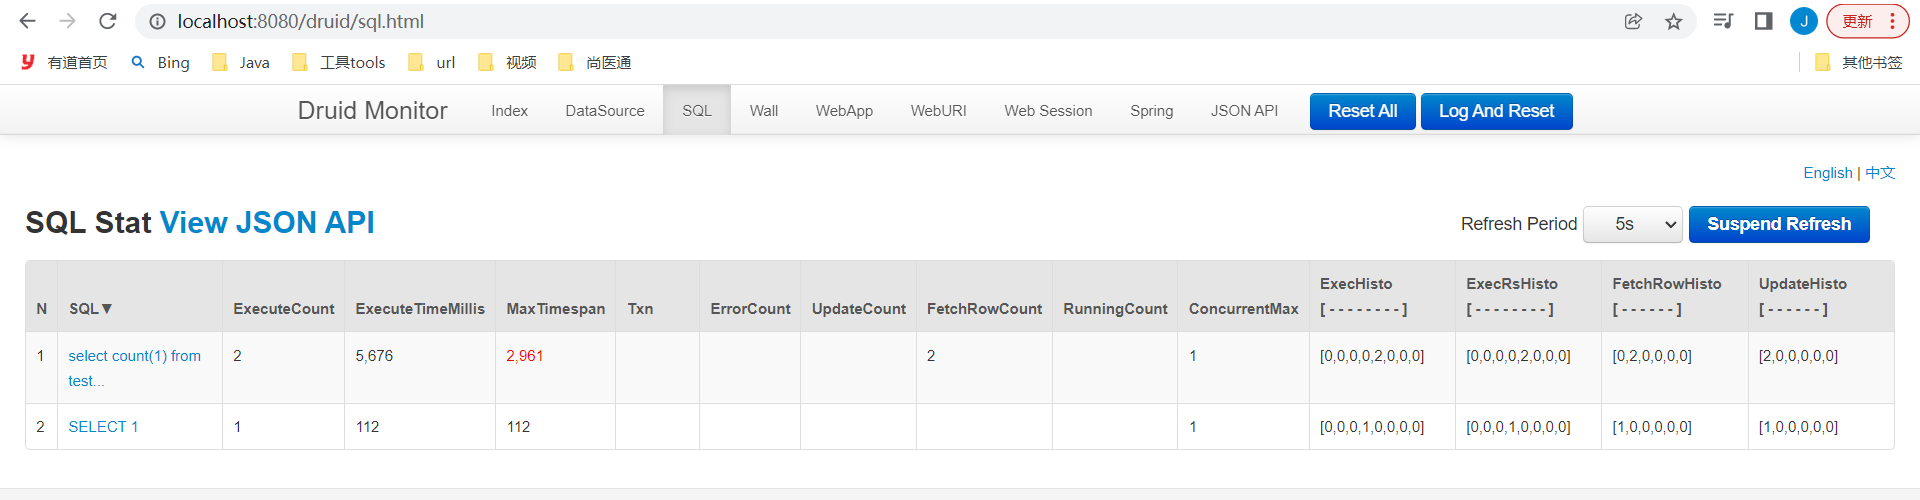
1.4 Druid自动配置源码解析
@Configuration
@ConditionalOnClass(DruidDataSource.class)
@AutoConfigureBefore(DataSourceAutoConfiguration.class)
@EnableConfigurationProperties({DruidStatProperties.class, DataSourceProperties.class})
@Import({DruidSpringAopConfiguration.class,
    DruidStatViewServletConfiguration.class,
    DruidWebStatFilterConfiguration.class,
    DruidFilterConfiguration.class})
public class DruidDataSourceAutoConfigure {}
-
1、@AutoConfigureBefore(DataSourceAutoConfiguration.class),可以看到是在DataSourceAutoConfiguration加载之前处理的,所以会加载DruidDataSource,DataSourceAutoConfiguration中的数据源DataSource都不会进行配置。在引入druid-spring-boot-starter后,项目默认会切换成Druid数据源。
-
2、Druid绑定的配置文件前缀是:spring.datasource.druid和spring.datasource
-
3、导入了四个配置项
- (1)DruidSpringAopConfiguration:aop-patterns -> 监控Spring Bean,注意注册条件
- (2)DruidStatViewServletConfiguration:stat-view-servlet -> 监控页的配置
- (3)DruidWebStatFilterConfiguration:web-stat-filter -> Web监控的配置
- (4)DruidFilterConfiguration:stat,config,encoding,slf4j,log4j,log4j2,commons-log,wall -> 所有Druid自己filter配置
(4)整合Mybatis
https://mybatis.org/mybatis-3/zh/index.html
1.1 功能实现
(1)引入依赖
<dependency>
    <groupId>org.mybatis.spring.boot</groupId>
    <artifactId>mybatis-spring-boot-starter</artifactId>
    <version>2.2.2</version>
</dependency>
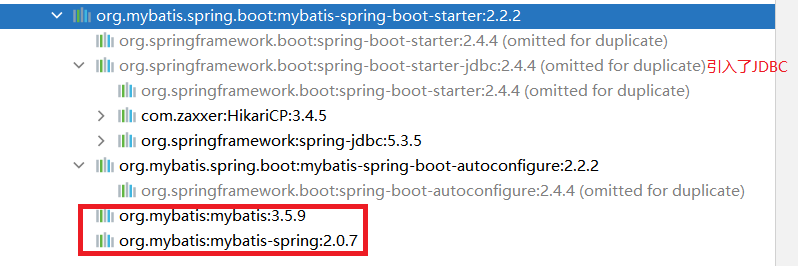
(2)添加配置
mybatis:
  mapper-locations: classpath:mybatis/*.xml
  configuration:
    map-underscore-to-camel-case: true
(3)Dao数据访问层编写
@Mapper
public interface UserMapper {

    User getUserById(Integer id);

}
<?xml version="1.0" encoding="UTF-8" ?>
<!DOCTYPE mapper
        PUBLIC "-//mybatis.org//DTD Mapper 3.0//EN"
        "http://mybatis.org/dtd/mybatis-3-mapper.dtd">
<mapper namespace="com.ityj.boot.mapper.UserMapper">

    <select id="getUserById" resultType="com.ityj.boot.entity.User">
        select * from test_user where id = #{id}
    </select>
</mapper>
(4)service业务层编写
public interface UserService {
    User getUserById(Integer id);
}
@Service
public class UserServiceImpl implements UserService {

    @Autowired
    private UserMapper userMapper;

    @Override
    public User getUserById(Integer id) {
        return userMapper.getUserById(id);
    }
}
(5)Controller编写
@RestController
@Slf4j
public class UserController {

    @Autowired
    private UserService userService;

    @GetMapping("/user/{id}")
    public User getUserById(@PathVariable("id") Integer userId) {
        return userService.getUserById(userId);
    }

}
(6)功能测试

1.2 自动配置源码分析
@ConditionalOnSingleCandidate(DataSource.class)
@EnableConfigurationProperties(MybatisProperties.class)
@AutoConfigureAfter({ DataSourceAutoConfiguration.class, MybatisLanguageDriverAutoConfiguration.class })
public class MybatisAutoConfiguration implements InitializingBean {}
- 1、Mybatis配置文件绑定类是MybatisProperties,可以通过修改配置文件中mybatis.xxx来配置对应功能。
- 2、是在DataSourceAutoConfiguration之后加载的。
- 3、配置好了SqlSessionFactory
- 4、配置好了SqlSessionTemplate,即SqlSession。用于操作数据库
- 5、@Import(AutoConfiguredMapperScannerRegistrar.class)
- 6、Mapper,只要我们的接口写了@Mapper注解,就会被自动扫描
- 7、@MapperScan(“com.ityj.boot.mapper”) ,在对应包里可以不加@Mapper注解也能被扫描到。
(5)整合mybatis-plus
https://www.mybatis-plus.com/guide/
1.1 引入依赖
<dependency>
   <groupId>com.baomidou</groupId>
   <artifactId>mybatis-plus-boot-starter</artifactId>
   <version>3.5.1</version>
</dependency>
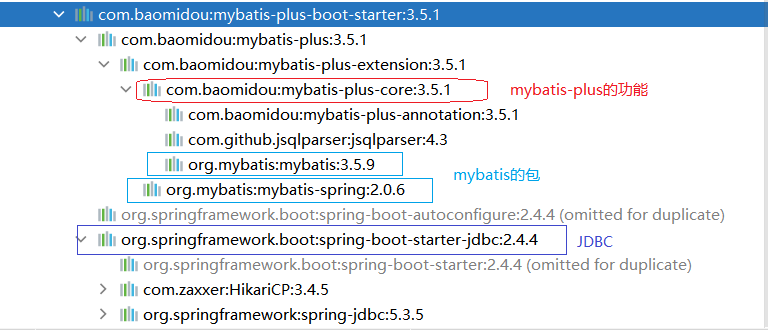
1.2 编写Mapper
public interface UserMapper extends BaseMapper<User> {
}
BaseMapper集成很多对数据库CRUD的基本操作,可以直接继承使用。
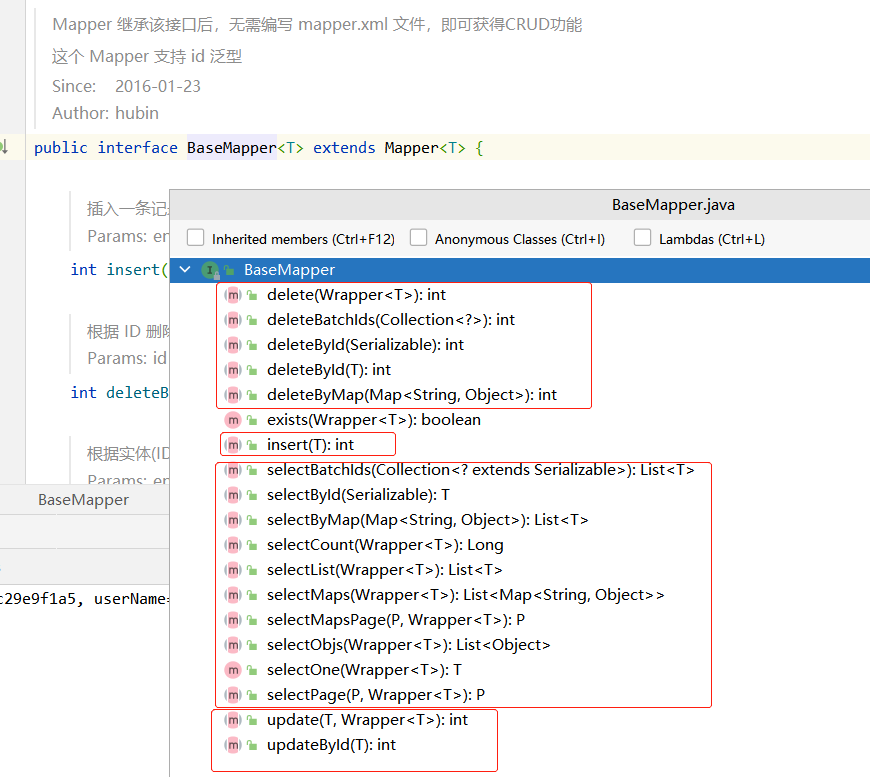
1.3 Service层
(1)接口继承IService
public interface UserService extends IService<User> {
}

(2)实现类继承ServiceImpl
@Service
public class UserServiceImpl extends ServiceImpl<UserMapper, User> implements UserService {

}
1.4 测试
@SpringBootTest
@Slf4j
public class BootTest {

    @Autowired
    private UserMapper userMapper;

    @Test
    public void testMybatisPlus() {
        User user = userMapper.getUserById(53432);
        log.info("User info: {}", user);
    }
}
1.5 自动配置源码解析
@Configuration(proxyBeanMethods = false)
@ConditionalOnClass({SqlSessionFactory.class, SqlSessionFactoryBean.class})
@ConditionalOnSingleCandidate(DataSource.class)
@EnableConfigurationProperties(MybatisPlusProperties.class)
@AutoConfigureAfter({DataSourceAutoConfiguration.class, MybatisPlusLanguageDriverAutoConfiguration.class})
public class MybatisPlusAutoConfiguration implements InitializingBean {}
-
1、绑定的是MybatisPlusProperties,对应配置文件中prefix=mybatis-plus
-
2、mapperLocations配置好了,默认的xml路径为
classpath*:/mapper/**.xml,任意包的类路径下的所有mapper文件夹下的–>所有目录–>所有xx.xml文件。-
classpath*它会搜索所有的 classpath,找到所有符合条件的文件,包括当前项目依赖的jar文件中的配置文件。而classpath不会到当前项目依赖的jar文件中去寻找。
-
private String[] mapperLocations = new String[]{"classpath*:/mapper/**/*.xml"};
- 3、默认支持驼峰规则,无需手动配置
public MybatisConfiguration() {
    super();
    this.mapUnderscoreToCamelCase = true;
    languageRegistry.setDefaultDriverClass(MybatisXMLLanguageDriver.class);
}
- 4、SqlSessionFactory默认配置好了,底层是容器中的DataSource
- 5、SqlSessionTemplate默认配置好了
- 6、会自动扫描@Mapper注解标注的类
1.2 NoSQL
1、Redis使用
(1)引入依赖
<dependency>
   <groupId>org.springframework.boot</groupId>
   <artifactId>spring-boot-starter-data-redis</artifactId>
</dependency>
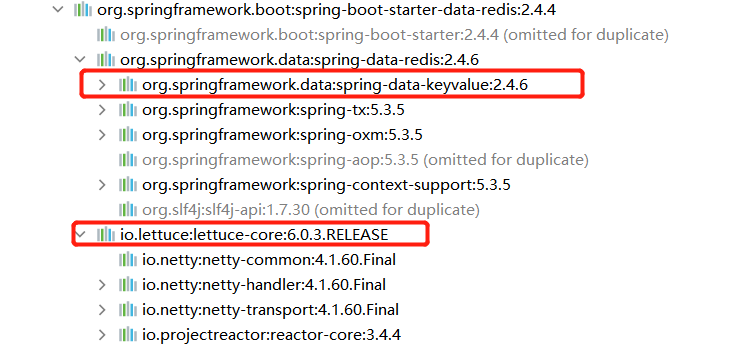
(2)添加配置
spring:
  redis:
    host: 192.168.137.110
    port: 6379
(3)进行测试
@Autowired
private RedisTemplate<String, String> redisTemplate;

@Autowired
private StringRedisTemplate stringRedisTemplate;

@Test
public void testRedisTemplate() {
    ValueOperations<String, String> valueOperations = redisTemplate.opsForValue();
    valueOperations.set("test", Instant.now().toString());
    System.out.println("end.......");

    Object test = valueOperations.get("test");
    System.out.println("test = " + test);
}

@Test
public void testStringRedisTemplate() {
    ValueOperations<String, String> ops = stringRedisTemplate.opsForValue();
    ops.set("key_date", Instant.now().toString());
    System.out.println("end.......");

    Object test = ops.get("key_date");
    System.out.println("key_date = " + test);
}
2、Redis自动配置原理
自动配置类是RedisAutoConfiguration
@Configuration(proxyBeanMethods = false)
@ConditionalOnClass(RedisOperations.class)
@EnableConfigurationProperties(RedisProperties.class)
@Import({ LettuceConnectionConfiguration.class, JedisConnectionConfiguration.class })
public class RedisAutoConfiguration {

   @Bean
   @ConditionalOnMissingBean(name = "redisTemplate")
   @ConditionalOnSingleCandidate(RedisConnectionFactory.class)
   public RedisTemplate<Object, Object> redisTemplate(RedisConnectionFactory redisConnectionFactory) {

   }

   @Bean
   @ConditionalOnMissingBean
   @ConditionalOnSingleCandidate(RedisConnectionFactory.class)
   public StringRedisTemplate stringRedisTemplate(RedisConnectionFactory redisConnectionFactory) {

   }

}
- 1、属性绑定在RedisProperties类中,对应的配置文件前缀prefix = “spring.redis”
- 2、导入了LettuceConnectionConfiguration和JedisConnectionConfiguration两个Conncetor连接源,即两种类型的客户端。
- starter-data-redis默认导入了lettuce-core对应的依赖,所以默认是LettuceConnection
- 3、向容器中注入了RedisTemplate和StringRedisTemplate两个操作数据的组件
3、切换Jedis
(1)导入Jedis客户端的pom依赖。SpringBoot对jedis进行了版本仲裁,无需指明版本
<!--若想要切换成jedis客户端:引入依赖,修改配置redis.client-type=jedis即可-->
<dependency>
   <groupId>redis.clients</groupId>
   <artifactId>jedis</artifactId>
</dependency>
(2)添加配置
spring:
	redis:
  		client-type: jedis
(3)进行测试
因为LettuceConnectionFactory和JedisConnectionFactory都是实现RedisConnectionFactory,所以可以通过RedisConnectionFactory的类型判断当前使用的是哪种客户端。
@Autowired
private RedisConnectionFactory connectionFactory;

@Test
public void testConnector() {
    System.out.println(connectionFactory.getClass());
}
4、拓展
实现统计所有请求访问次数的功能。
可以通过拦截器的preHandle进行处理,配合redis的increment()方法,实现自增操作。
/**
 * 统计所有的请求访问次数,并把结果保存在redis中
 * uri:count
 */
@Component
public class RequestUriCountInterceptor implements HandlerInterceptor {

    @Autowired
    private StringRedisTemplate redisTemplate;

    @Override
    public boolean preHandle(HttpServletRequest request, HttpServletResponse response, Object handler) throws Exception {
        String requestURI = request.getRequestURI();
        redisTemplate.opsForValue().increment(requestURI);
        return true;
    }
}
@Configuration
public class RequestUriCountInterceptorConfig implements WebMvcConfigurer {

    /*
    *   Filter、Interceptor几乎同样的功能,区别是什么?
    *   1、Filter是Servlet的原生组件。好处:脱离Spring也能使用。
    *   2、Interceptor是Spring定义好的接口。好处:可以使用Spring特有的性能,比如Autowired
    *
    * */

    @Autowired
    private RequestUriCountInterceptor requestUriCountInterceptor;

    @Override
    public void addInterceptors(InterceptorRegistry registry) {
        registry.addInterceptor(requestUriCountInterceptor)
                .addPathPatterns("/**")   //拦截所有请求包括静态资源
                .excludePathPatterns("/", "/login", "/css/**", "/js/**", "/fonts/**", "/images/**"); // 放行
        }
}
4、指标监控
1.1 SpringBoot Acutator
https://docs.spring.io/spring-boot/docs/2.4.4/reference/html/production-ready-features.html#production-ready
导入依赖,添加配置即可开启监控功能
<dependency>
   <groupId>org.springframework.boot</groupId>
   <artifactId>spring-boot-starter-actuator</artifactId>
</dependency>
server:
  shutdown: GRACEFUL
spring:
  # shutdown最大等待时间
  lifecycle:
    timeout-per-shutdown-phase: 30s

management:
  endpoints:
    enabled-by-default: true    # 开启所有的指标监控,包括shutdown
    web:
      exposure:
        include: '*'      # http://localhost:8080/actuator 查看所有支持的接口
所有支持的指标监控

1.2 Actuator Endpoint
Endpoint就是指标监控的类型:/actuator/endpointName
(1)常用的Endpoint
1、health健康检查
http://localhost:8080/actuator/health
management:
  endpoint:
    health:
      show-details: always   # 开启健康检查详细信息
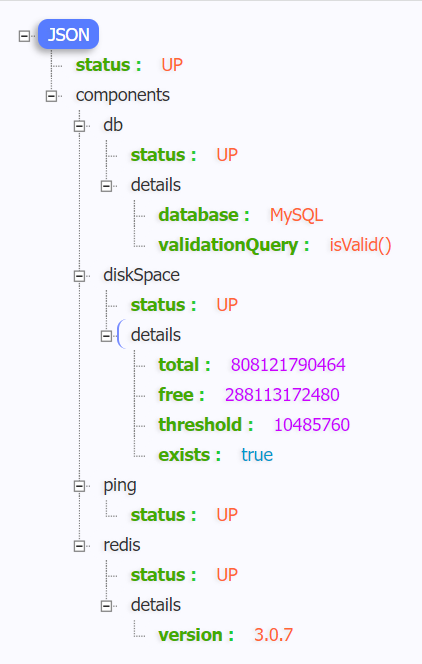
2、shutdown关闭服务
curl -X POST http://localhost:8080/actuator/shutdown接口关闭服务,结合server.shutdown=GRACEFUL和timeout-per-shutdown-phase可以实现优雅退出。
3、metrics运行时指标

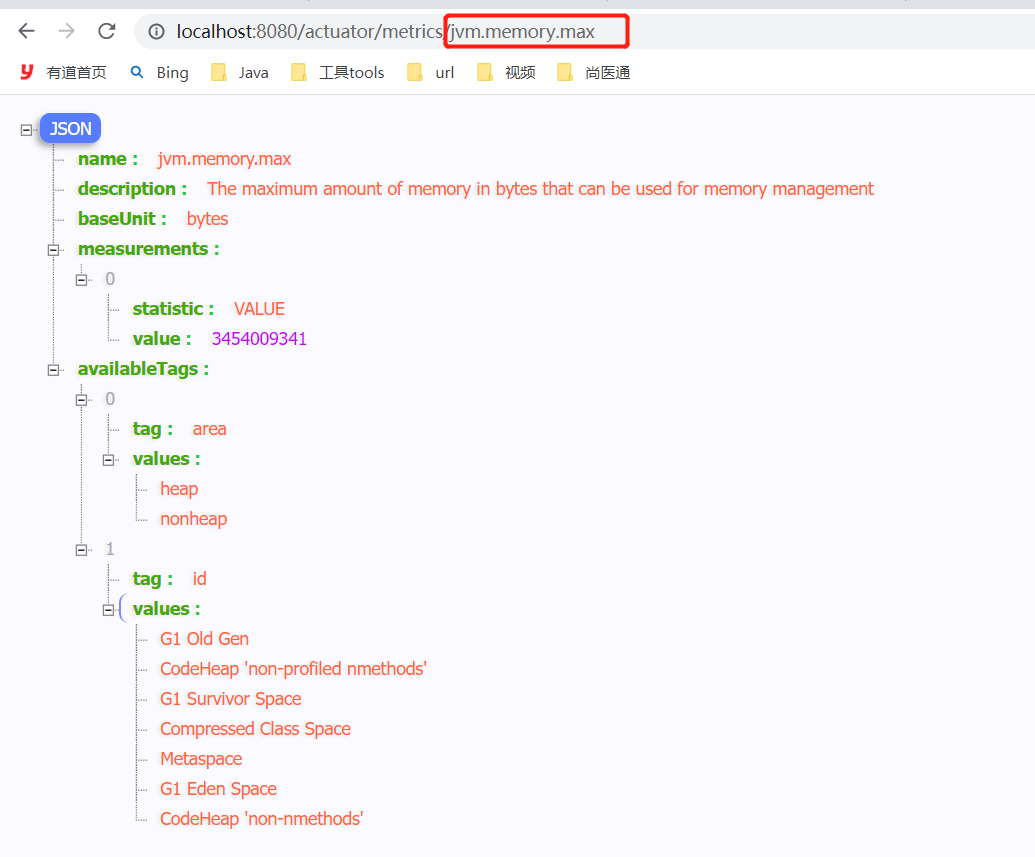
4、loggers日志记录
1.3 结合Spring Boot Admin监控实现
1、新建一个项目,作为BootAdmin的服务端,对外暴露一个端口,让其他的微服务进行注册。
2、其他微服务按照一定规范注册成功后,即可通过BootAdmin的监控页面对运行状况进行实时监控
文档地址https://codecentric.github.io/spring-boot-admin/current/
(1)搭建boot-admin-server(server)
1.1 导入依赖
<dependency>
   <groupId>org.springframework.boot</groupId>
   <artifactId>spring-boot-starter-web</artifactId>
</dependency>
<dependency>
   <groupId>de.codecentric</groupId>
   <artifactId>spring-boot-admin-starter-server</artifactId>
   <version>2.4.4</version>
</dependency>
1.2 设置服务端口
server:
  port: 8181
1.3 启动类添加配置
@EnableAdminServer
@SpringBootApplication
public class SpringBootAdminServerApplication {

   public static void main(String[] args) {
      SpringApplication.run(SpringBootAdminServerApplication.class, args);
   }

}
1.4 启动
访问http://localhost:8181/即可
(2)配置各个微服务(client)
1.1 添加依赖
<dependency>
   <groupId>de.codecentric</groupId>
   <artifactId>spring-boot-admin-starter-client</artifactId>
   <version>2.4.4</version>
</dependency>
已经导入了acutator-starter,无需再手动导入
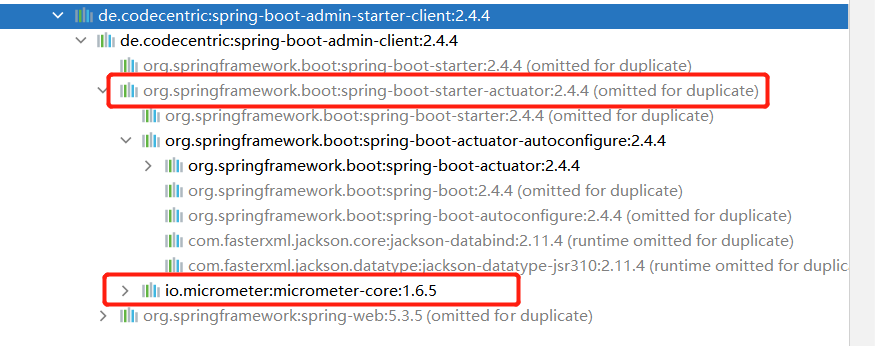
1.2 修改配置
server:
  port: 8080
  shutdown: GRACEFUL
spring:
  # shutdown最大等待时间
  lifecycle:
    timeout-per-shutdown-phase: 30s

  boot:
    admin:
      client:
        url: http://localhost:8181
        instance:
          name: springboot-20220403
          prefer-ip: true

management:
  endpoints:
    enabled-by-default: true    # 开启所有的指标监控,包括shutdown
    web:
      exposure:
        include: '*'      # http://localhost:8080/actuator 查看所有支持的接口
-
(1)首先boot-admin监控是基于actuator,所以各个微服务需要暴露出所需要的endpoints
-
(2)配置好boot-server的远程地址:spring.boot.admin.client.url(当前服务注册的地址)
-
(3)配置好当前instance名称和获取url的方式
/**
 * Name to register with. Defaults to ${spring.application.name}
 */
@Value("${spring.application.name:spring-boot-application}")
private String name = "spring-boot-application";

/**
 * Should the registered urls be built with server.address or with hostname.
 */
private boolean preferIp = false;
1.3 启动项目即可
启动完当前微服务项目,即自动注册到了8181的boot-server中
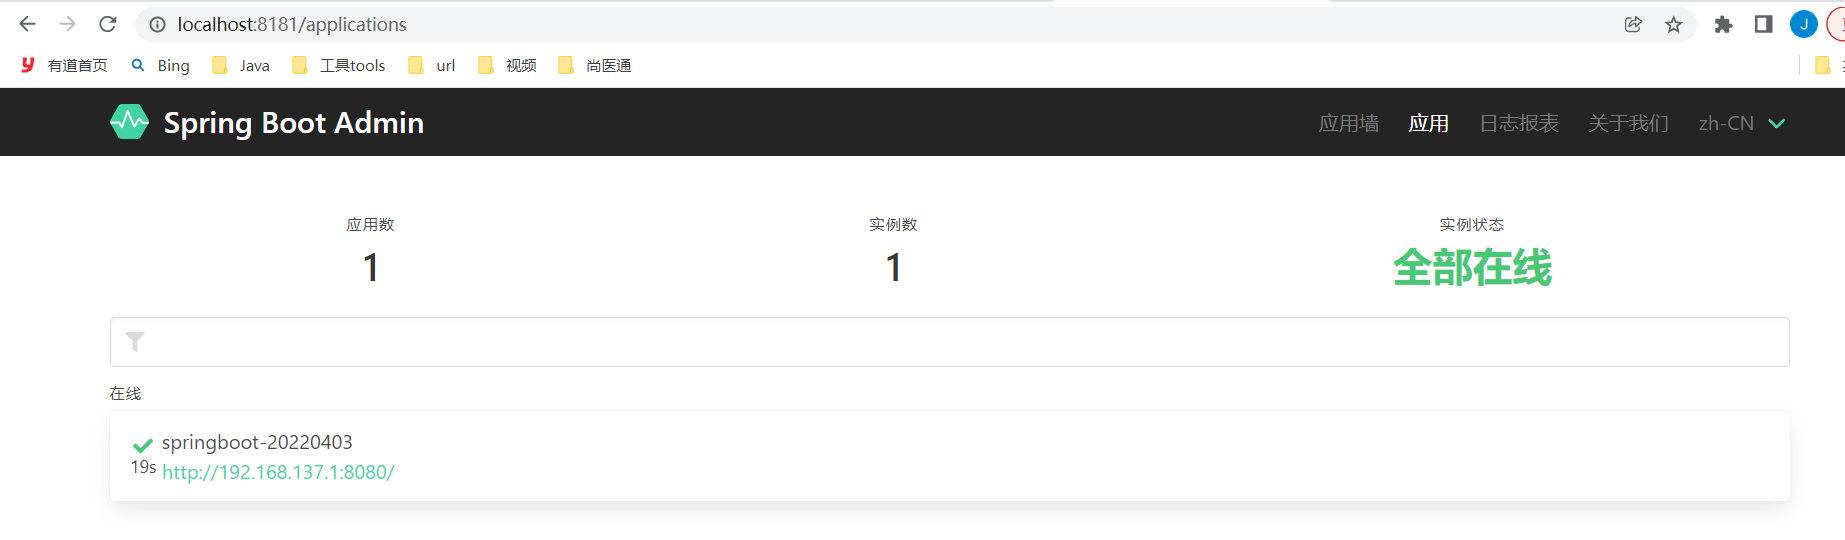
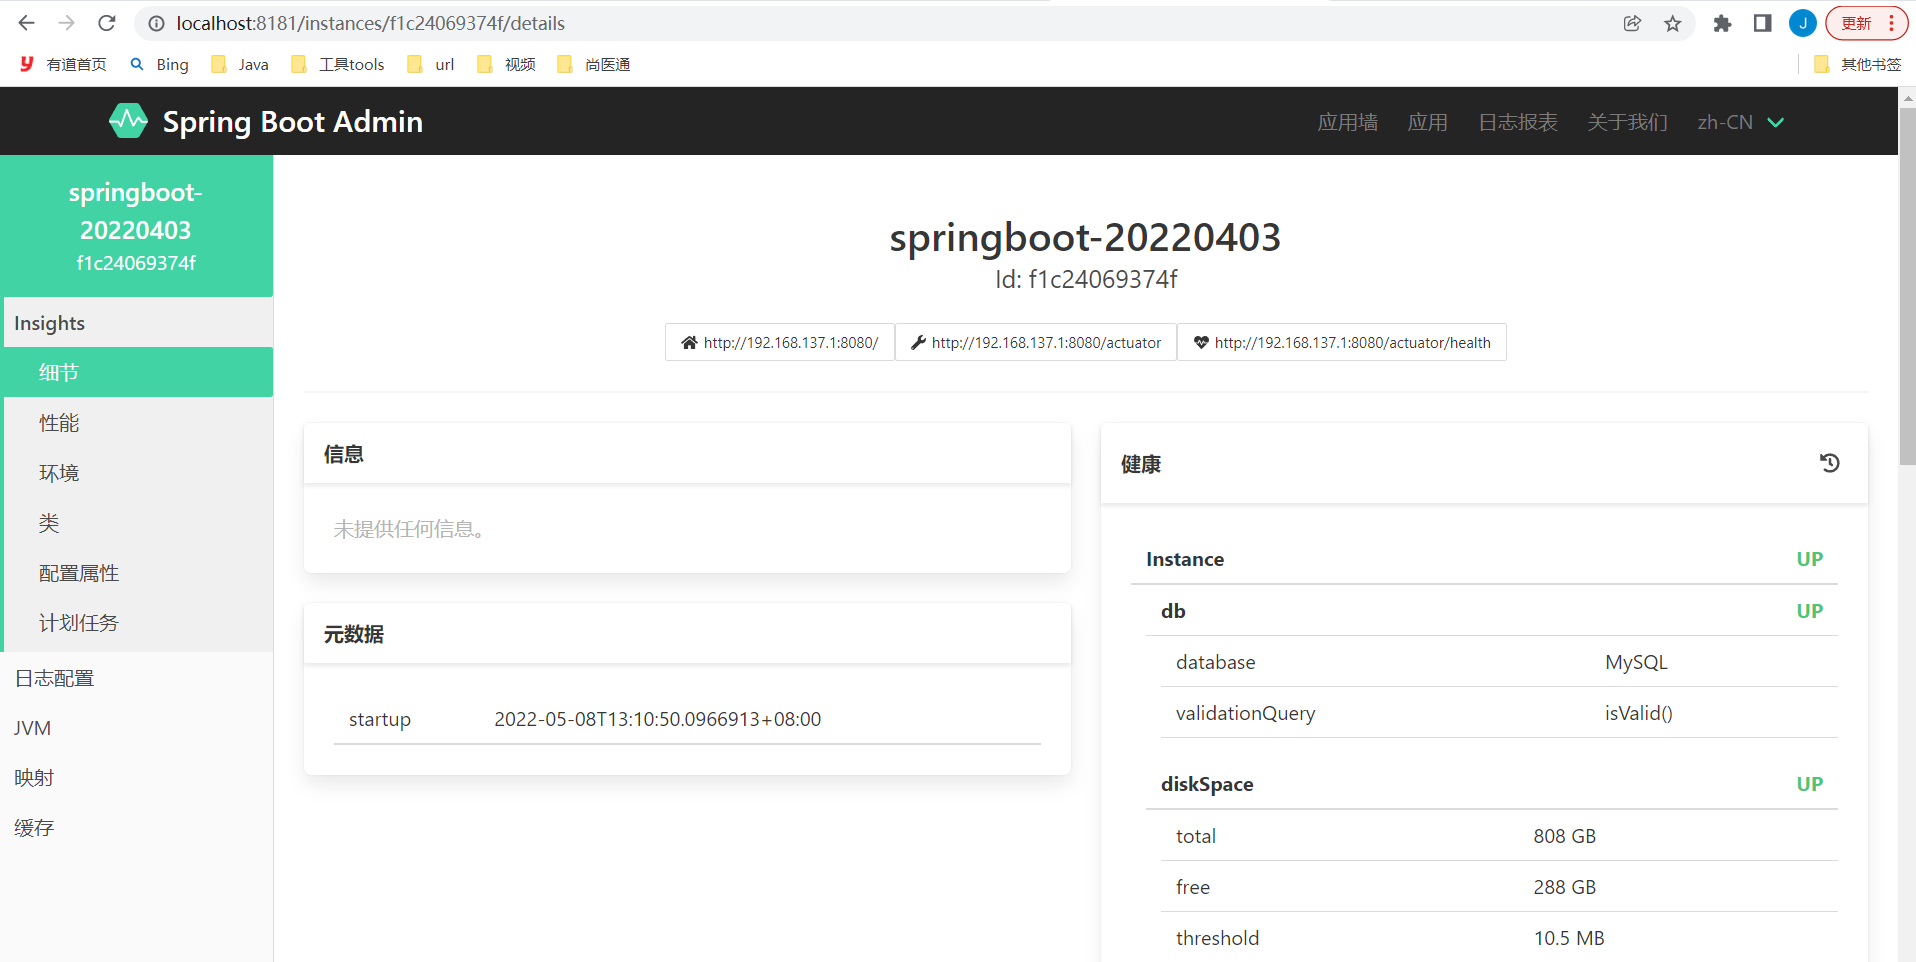
5、原理解析
1、Profile功能
为了方便SpringBoot多环境适配,springboot简化了profile功能
(1)appilcation-env.yml功能
-
1.1 默认配置文件application.yml在任何时候都会加载
-
1.2 制定环境配置文件application-{env}.yml
-
1.3 激活不同环境配置文件的方法:
-
1.3.1 配置文件中激活
-
spring:
  profiles:
    active: sit
-
-
1.3.2 命令行激活
- java -jar xxx.jar --spring.profiles.active=sit --name=Jack
- 命令行可以通过–指定所有配置文件中的属性
-
-
1.4 默认配置文件和指定环境的配置文件会同时生效
-
1.5 同名配置项,profile指定环境的文件优先
(2)@Profile(“sit”) 条件装配功能
可以放在类上或方法上,规定指定环境生效
2、外部化配置
(1)外部配置源
常用:Java属性文件、yaml文件、系统环境变量、命令行参数
-
系统环境变量
获取JAVA_HOME路径
@Value("${JAVA_HOME}")
private String javaHome;

@GetMapping(path = "/system")
public String getSystemVariable() {
    return javaHome;
}
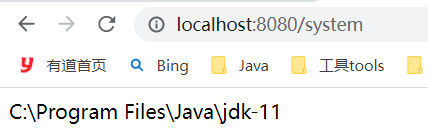
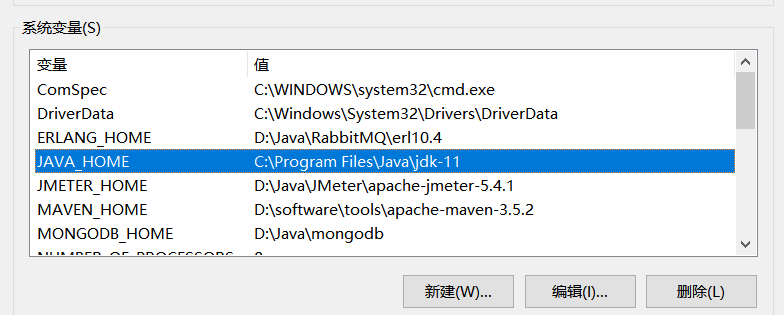
3、SpringBoot原理
(1)SpringBoot启动过程
执行SpringApplication.run(BootApplication.class, args);
1.1 创建SpringApplication
// 通过读取配置文件(spring.factories),保存了一些信息: getSpringFactoriesInstances()
new SpringApplication(primarySources)
-
primarySources --> 主启动类
-
webApplicationType --> 项目的类型: REACTIVE/SERVLET
-
bootstrappers(启动引导器) --> getSpringFactoriesInstances(Bootstrapper.class)
-
initializers --> getSpringFactoriesInstances(ApplicationContextInitializer.class)
-
listeners --> getSpringFactoriesInstances(ApplicationListener.class)
-
mainApplicationClass --> 推断出主程序:main方法

1.2 运行SpringApplication
// 运行run方法,args是通过命令行传入的
return new SpringApplication(primarySources).run(args);
1)]

4、loggers日志记录
1.3 结合Spring Boot Admin监控实现
1、新建一个项目,作为BootAdmin的服务端,对外暴露一个端口,让其他的微服务进行注册。
2、其他微服务按照一定规范注册成功后,即可通过BootAdmin的监控页面对运行状况进行实时监控
文档地址https://codecentric.github.io/spring-boot-admin/current/
(1)搭建boot-admin-server(server)
1.1 导入依赖
<dependency>
   <groupId>org.springframework.boot</groupId>
   <artifactId>spring-boot-starter-web</artifactId>
</dependency>
<dependency>
   <groupId>de.codecentric</groupId>
   <artifactId>spring-boot-admin-starter-server</artifactId>
   <version>2.4.4</version>
</dependency>
1.2 设置服务端口
server:
  port: 8181
1.3 启动类添加配置
@EnableAdminServer
@SpringBootApplication
public class SpringBootAdminServerApplication {

   public static void main(String[] args) {
      SpringApplication.run(SpringBootAdminServerApplication.class, args);
   }

}
1.4 启动
访问http://localhost:8181/即可
(2)配置各个微服务(client)
1.1 添加依赖
<dependency>
   <groupId>de.codecentric</groupId>
   <artifactId>spring-boot-admin-starter-client</artifactId>
   <version>2.4.4</version>
</dependency>
已经导入了acutator-starter,无需再手动导入

1.2 修改配置
server:
  port: 8080
  shutdown: GRACEFUL
spring:
  # shutdown最大等待时间
  lifecycle:
    timeout-per-shutdown-phase: 30s

  boot:
    admin:
      client:
        url: http://localhost:8181
        instance:
          name: springboot-20220403
          prefer-ip: true

management:
  endpoints:
    enabled-by-default: true    # 开启所有的指标监控,包括shutdown
    web:
      exposure:
        include: '*'      # http://localhost:8080/actuator 查看所有支持的接口
-
(1)首先boot-admin监控是基于actuator,所以各个微服务需要暴露出所需要的endpoints
-
(2)配置好boot-server的远程地址:spring.boot.admin.client.url(当前服务注册的地址)
-
(3)配置好当前instance名称和获取url的方式
/**
 * Name to register with. Defaults to ${spring.application.name}
 */
@Value("${spring.application.name:spring-boot-application}")
private String name = "spring-boot-application";

/**
 * Should the registered urls be built with server.address or with hostname.
 */
private boolean preferIp = false;
1.3 启动项目即可
启动完当前微服务项目,即自动注册到了8181的boot-server中


5、原理解析
1、Profile功能
为了方便SpringBoot多环境适配,springboot简化了profile功能
(1)appilcation-env.yml功能
-
1.1 默认配置文件application.yml在任何时候都会加载
-
1.2 制定环境配置文件application-{env}.yml
-
1.3 激活不同环境配置文件的方法:
-
1.3.1 配置文件中激活
-
spring:
  profiles:
    active: sit
-
-
1.3.2 命令行激活
- java -jar xxx.jar --spring.profiles.active=sit --name=Jack
- 命令行可以通过–指定所有配置文件中的属性
-
-
1.4 默认配置文件和指定环境的配置文件会同时生效
-
1.5 同名配置项,profile指定环境的文件优先
(2)@Profile(“sit”) 条件装配功能
可以放在类上或方法上,规定指定环境生效
2、外部化配置
(1)外部配置源
常用:Java属性文件、yaml文件、系统环境变量、命令行参数
-
系统环境变量
获取JAVA_HOME路径
@Value("${JAVA_HOME}")
private String javaHome;

@GetMapping(path = "/system")
public String getSystemVariable() {
    return javaHome;
}


3、SpringBoot原理
(1)SpringBoot启动过程
执行SpringApplication.run(BootApplication.class, args);
1.1 创建SpringApplication
// 通过读取配置文件(spring.factories),保存了一些信息: getSpringFactoriesInstances()
new SpringApplication(primarySources)
-
primarySources --> 主启动类
-
webApplicationType --> 项目的类型: REACTIVE/SERVLET
-
bootstrappers(启动引导器) --> getSpringFactoriesInstances(Bootstrapper.class)
-
initializers --> getSpringFactoriesInstances(ApplicationContextInitializer.class)
-
listeners --> getSpringFactoriesInstances(ApplicationListener.class)
-
mainApplicationClass --> 推断出主程序:main方法

1.2 运行SpringApplication
// 运行run方法,args是通过命令行传入的
return new SpringApplication(primarySources).run(args);


 1万+
1万+


 被折叠的 条评论
为什么被折叠?
被折叠的 条评论
为什么被折叠?
 到【灌水乐园】发言


