


引言:
在一些智慧城市的项目中我们经常看到一些酷炫的扫光效果、各个方向的流动光线、半透明发光的电子围栏等等,给人一种赛博朋克的感觉。那这种酷炫的是怎么实现的呢?本篇文章主要讲一下扫光效果的实现;很明显这种扫光没有办法通过three.js自带的灯光实现,因为没有这些奇形怪状的灯啊,那就只能通过着色器材质实现了。
我们先看实现效果
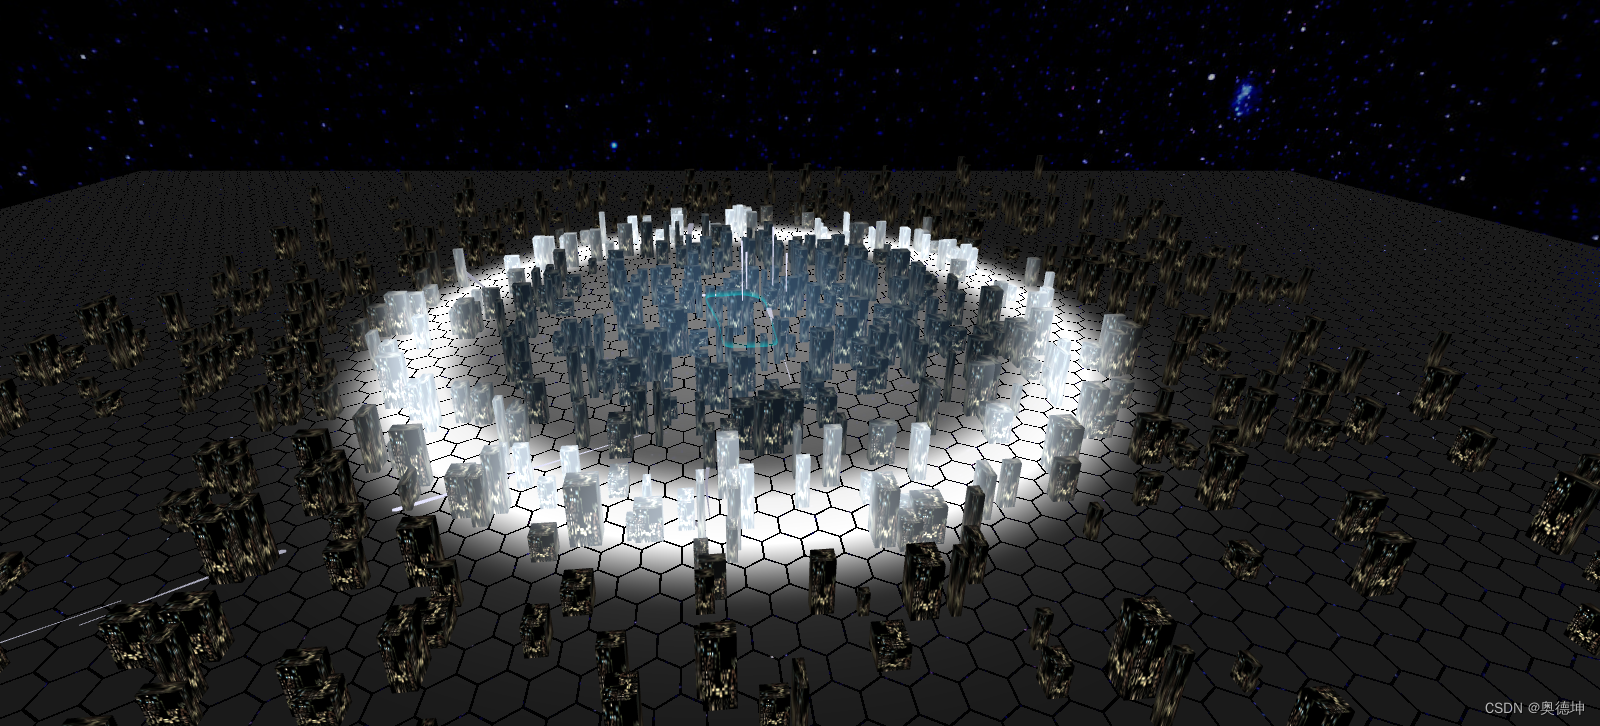
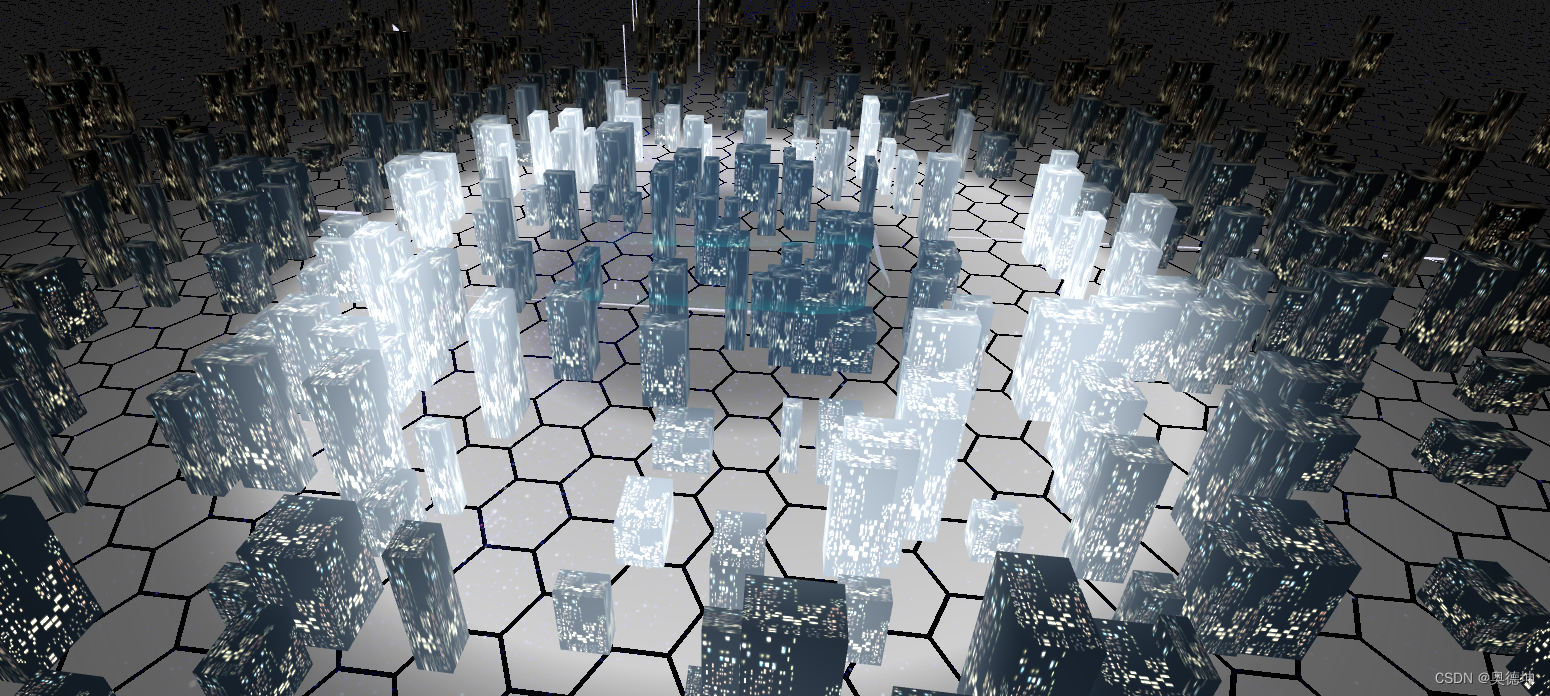
这里直截了两张图,不过扫光全过程也可以想得到,就是光从中心点向外扩散一个具有宽度的圆环,被圆环光扫到的box和地板会被光照亮,我这里为了效果明显一些把光的颜色和强度调的很显眼,实际可以自己的审美调节一下。
实现思路:
问题一:什么东西需要参与扫光效果
我们可以看到主要是场景中的建筑物和地板参与了扫光效果,那就确定了这些物体需要单独写着色器材质
问题二:如何做到灯光同步
我们可以看到扫光的时候,扫光的圆半径不断扩大,到一定的半径后就变成消失了;那这两种材质要如何保持同步呢?
问题三:如何确定那些片元被灯光照到了?
我们在shadertoy等网站看到的一些demo都是通过uv坐标去着色的,我们是否可以通过uv坐标照到被灯光照到的片元或者顶点?如果不行还有没有别的办法
如果把这些疑问都解决了,那答案就会浮出水面了
我们边看代码边分析,场景初始化什么的就不给出来了,都是一样的,先随机生成一些box用来模拟智慧城市里面的建筑物和生成地板
	const getRandom = () => {
		return (-Math.random() * 1500 + 1500) - (Math.random() * 1500)
	}

	// 随机生成box
	for (let i = 0; i < 800; i++) {
		const height = Math.floor(Math.random() * 70 + 30)
		const boxGeo = new THREE.BoxGeometry(Math.floor(Math.random() * 30 + 10),height , Math.floor(Math.random() * 30 + 10))
		const boxMesh = new THREE.Mesh(boxGeo, shaderMat)
		boxMesh.position.copy(new THREE.Vector3(getRandom(), height / 2, getRandom()))
		scene.add(boxMesh)
	}
    // 添加地板
	const goundGeo = new THREE.PlaneGeometry(5000, 5000)
	const ground = new THREE.Mesh(goundGeo, planeMat)
	ground.rotateX(-Math.PI / 2)
	scene.add(ground)
我们先看看这里面的planeMat和shaderMat要如何实现
planeMat
			varying vec2 vUv;
			varying vec4 v_position;
			varying vec3 v_normal;

			uniform float innerCircleWidth;
			uniform float circleWidth;
			uniform vec3 center;
			uniform vec3 color;

            uniform sampler2D texture1;

			void main() {

				float dis = length(v_position.xyz - center);
				vec4 buildingColor = vec4(0.2,0.3,0.4,0.6);
                vec4 textureColor = texture(texture1,vUv);

				vec4 lightColor = vec4(0.2);
				vec3 lightDir = vec3(1.0,1.0,0.5);
				float c = dot(lightDir,v_normal);
                float r = 1.0- smoothstep(50.0,800.0,dis);

				float col = smoothstep(innerCircleWidth-circleWidth,innerCircleWidth,dis) - smoothstep(innerCircleWidth,innerCircleWidth+circleWidth,dis);
				vec4 scanColor = mix(buildingColor * r,vec4(color, 1.0),col);
				scanColor += lightColor*c + vec4(0.05);

				gl_FragColor = scanColor + vec4(textureColor.xyz * 2.5, 1.0);
			}
在代码中我们得到了问题三答案;首先我们在片元着色器接收了来自顶点着色器的v_position,然后通过glsl的length得到了场景中对象片元的世界坐标到中点(可以自定义)的距离。这个是整个过程中最关键,有了这个之后我们就可以用距离方程做很多有趣的东西,比如雷达扩散效果或者结合perlin噪音的随机制作一些波纹等等效果;这里我们主要是做扫光效果;那如果我不想从要这种圆的扩散效果,我想要矩形的从左到右或再从右到左再或者各种奇葩的效果怎么办呢?别怕,只需要通过距离照到要着色的片元,然后进行着色就可以了,一点也不慌
由于纯颜色看起来太单调,我加了一点纹理,也就是夜景夜景效果可以把材质用在box的除了顶部和底部的各个面看起来会更加好看,但由于不是这篇文章的重点就不说了,具体怎么实现,可以去看看文档;如何给不同的面指定不同的材质
里面还模拟了一下,聚光灯(从上往下,距离方程实现)、环境光、和平行光(点乘顶点法线和光的方向,注意向量归一化和点乘后的取值范围,因为背面是照不到的)的效果,环境光让整体有一点亮度,平行光让对象表面不同的明暗对比,更加有立体感,最后是聚光灯主要是突出我们强调的对象,这里就是我们的中心点啦,当然这些都不是我们的重点就展开说了,如果感兴趣后面再出一篇文章单独展开说明
顺便提一点,我为什么用mix而不像写前端代码那样用if else 那些执行代码,那是因为这些自带的glsl函数被称为魔法函数,是具有硬件加速效果的;运行的速度会更快、执行效率更高
shaderMat
			varying vec2 vUv;
			varying vec3 v_position;

			uniform float innerCircleWidth;
			uniform float circleWidth;
			uniform float opacity;
			uniform vec3 center;

			uniform vec3 color;
			uniform vec3 diff;

			bool hex(vec2 p) {
				p.x *= 0.57735*2.0;
				p.y += mod(floor(p.x), 2.0)*0.5;
				p = abs((mod(p, 1.0) - 0.5));
				return abs(max(p.x*1.5 + p.y, p.y*2.0) - 1.0) > 0.05;
		    }

			void main() {

				float dis = length(v_position - center);

				bool h = hex(vUv*100.0);
				float col = smoothstep(innerCircleWidth-circleWidth,innerCircleWidth,dis) - smoothstep(innerCircleWidth,innerCircleWidth+circleWidth,dis);
				vec4 finalColor = 1.0- mix(vec4(0.9),vec4(color, opacity),col);
				float r = 1.0- smoothstep(50.0,1000.0,dis);

				float hh;
				if(h){
					hh = float(h);
					gl_FragColor = finalColor + vec4(hh) * r * 0.6 + (1.0-r) * vec4(vec3(0.001),1.0);
				}else{
					gl_FragColor = vec4(0.0);
				}
			}
地板的材质扫光效果的核心上面一样,也是通过距离方程实现的,上面主要是叠加了扫光、聚光灯和六边形,因为只有扫光的效果看起来有点单调,本来想找一点地板的纹理,但想了一下,我们要的是科技风!柯基峰!科技疯。我就加了六边形的效果,一看就很柯基疯,这不是重点就不展开说了
那说完了我好像没有回到问题二啊,如何同步,别急,别急,我知道你很急,但是你先别急啊
看完完整代码就会明白了,直接上代码
class ScanMat {
  shaderMat: THREE.ShaderMaterial;
  planeMat: THREE.ShaderMaterial;
  updateScan: () => void;

  radius: number;
  width: number;
  constructor(width: number, radius: number) {
    this.radius = radius;
    this.width = width;
    const texture = new THREE.TextureLoader().load('2.png')
    this.shaderMat = new THREE.ShaderMaterial({
      uniforms: {
        innerCircleWidth: {
          value: 0,
        },
        circleWidth: {
          value: width,
        },
        color: {
          value: new THREE.Color(0.8, 0.85, 0.9),
        },
        center: {
          value: new THREE.Vector3(0, 0, 0),
        },
        texture1: {
          value: texture,
        },
      },
      vertexShader: `
			varying vec2 vUv;
			varying vec4 v_position;
			varying vec3 v_normal;

			void main() {
				vUv = uv;
				v_position = modelMatrix * vec4(position, 1.0);
				v_normal = normal;
				gl_Position = projectionMatrix * modelViewMatrix * vec4(position, 1.0);
			}
			`,
      fragmentShader: `
			varying vec2 vUv;
			varying vec4 v_position;
			varying vec3 v_normal;

			uniform float innerCircleWidth;
			uniform float circleWidth;
			uniform vec3 center;
			uniform vec3 color;

      uniform sampler2D texture1;

			void main() {

				float dis = length(v_position.xyz - center);
				vec4 buildingColor = vec4(0.2,0.3,0.4,0.6);
        vec4 textureColor = texture(texture1,vUv);

				vec4 lightColor = vec4(0.2);
				vec3 lightDir = vec3(1.0,1.0,0.5);
				float c = dot(lightDir,v_normal);
        float r = 1.0- smoothstep(50.0,800.0,dis);

				float col = smoothstep(innerCircleWidth-circleWidth,innerCircleWidth,dis) - smoothstep(innerCircleWidth,innerCircleWidth+circleWidth,dis);
				vec4 scanColor = mix(buildingColor * r,vec4(color, 1.0),col);
				scanColor += lightColor*c + vec4(0.05);

				gl_FragColor = scanColor + vec4(textureColor.xyz * 2.5, 1.0);
			}
			`
    });

    this.planeMat = new THREE.ShaderMaterial({
      uniforms: {
        innerCircleWidth: {
          value: 0,
        },
        circleWidth: {
          value: width,
        },
        diff: {
          value: new THREE.Color(0.2, 0.2, 0.2),
        },
        color: {
          value: new THREE.Color(0.8),
        },
        opacity: {
          value: 0.9,
        },
        center: {
          value: new THREE.Vector3(0, 0, 0),
        },
      },
      vertexShader: `
			varying vec2 vUv;
			varying vec3 v_position;
			void main() {
				vUv = uv;
				v_position = position;
				gl_Position = projectionMatrix * modelViewMatrix * vec4(position, 1.0);
			}
			`,
      fragmentShader: `
			varying vec2 vUv;
			varying vec3 v_position;

			uniform float innerCircleWidth;
			uniform float circleWidth;
			uniform float opacity;
			uniform vec3 center;

			uniform vec3 color;
			uniform vec3 diff;

			bool hex(vec2 p) {
				p.x *= 0.57735*2.0;
				p.y += mod(floor(p.x), 2.0)*0.5;
				p = abs((mod(p, 1.0) - 0.5));
				return abs(max(p.x*1.5 + p.y, p.y*2.0) - 1.0) > 0.05;
		    }

			void main() {

				float dis = length(v_position - center);

				bool h = hex(vUv*100.0);
				float col = smoothstep(innerCircleWidth-circleWidth,innerCircleWidth,dis) - smoothstep(innerCircleWidth,innerCircleWidth+circleWidth,dis);
				vec4 finalColor = 1.0- mix(vec4(0.9),vec4(color, opacity),col);
				float r = 1.0- smoothstep(50.0,1000.0,dis);

				float hh;
				if(h){
					hh = float(h);
					gl_FragColor = finalColor + vec4(hh) * r * 0.6 + (1.0-r) * vec4(vec3(0.001),1.0);
				}else{
					gl_FragColor = vec4(0.0);
				}
			}
			`,
      transparent: true,
    });

    this.updateScan = () => {
      this.shaderMat.uniforms.innerCircleWidth.value += 5;
      if (this.shaderMat.uniforms.innerCircleWidth.value > 2000) {
        this.shaderMat.uniforms.innerCircleWidth.value = -this.radius;
      }
      this.planeMat.uniforms.innerCircleWidth.value += 5;
      if (this.planeMat.uniforms.innerCircleWidth.value > 2000) {
        this.planeMat.uniforms.innerCircleWidth.value = -this.radius;
      }
    };
  }
}
最后别忘了在每一帧里调用,update方法,不然灯光是动不起来的,快去自己动手试一下吧


 2105
2105

 被折叠的 条评论
为什么被折叠?
被折叠的 条评论
为什么被折叠?
 到【灌水乐园】发言


