


若需要相应的其他工具的配置,详细请看《hadoop大数据生态圈工具配置与应用》
1、flume安装配置

解压出来,mv更换名字为flume

重命名配置文件并修改

添加如下内容:
export JAVA_HOME=/export/servers/jdk
环境变量,然后使其生效
export FLUME_HOME=/export/servers/flume
export PATH=
P
A
T
H
:
PATH:
PATH:FLUME_HOME/bin
2、初步自定义采集方案测试
[root@hadoop01 conf]# vim netcat-logger.conf
添加如下内容:
# 定义这个agent中各组件的名字
a1.sources = r1
a1.sinks = k1
a1.channels = c1

# 描述和配置source组件:r1
a1.sources.r1.type = netcat
a1.sources.r1.bind = localhost
a1.sources.r1.port = 44444

# 描述和配置sink组件:k1
a1.sinks.k1.type = logger

# 描述和配置channel组件,此处使用是内存缓存的方式
a1.channels.c1.type = memory
a1.channels.c1.capacity = 1000
a1.channels.c1.transactionCapacity = 100

# 描述和配置source  channel   sink之间的连接关系
a1.sources.r1.channels = c1
a1.sinks.k1.channel = c1
[root@hadoop01 conf]# flume-ng agent --conf conf/ --conf-file netcat-logger.conf --name a1 -Dflume.root.logger=INFO,console

若要移除以上问题,在java.library.path后面添加如下内容

成功后显示

另外开启一个窗口测试
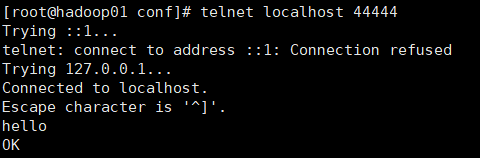


默认body16字节,若超出则无法显示
flume负载均衡测试
[root@hadoop01 conf]# vim exec-avro.conf
添加如下内容:
# 配置Load balancing sink processor一级采集方案
a1.sources = r1
# 用空格分隔配置了2个sink
a1.sinks = k1 k2
a1.channels = c1
# 描述并配置sources组件(数据源类型、采集数据源的应用地址)
a1.sources.r1.channels = c1
a1.sources.r1.type = exec
a1.sources.r1.command = tail -F /root/logs/123.log
# 描述并配置channels
a1.channels.c1.type = memory
a1.channels.c1.capacity = 1000
a1.channels.c1.transactionCapacity = 100
# 设置sink1,由hadoop02上的agent进行采集
a1.sinks.k1.channel = c1
a1.sinks.k1.type = avro
a1.sinks.k1.hostname = hadoop02
a1.sinks.k1.port = 52020
# 设置sink2,由hadoop03上的agent进行采集
a1.sinks.k2.channel = c1
a1.sinks.k2.type = avro
a1.sinks.k2.hostname = hadoop03
a1.sinks.k2.port = 52020
# 配置sink组及处理器策略
a1.sinkgroups = g1
a1.sinkgroups.g1.sinks = k1 k2
a1.sinkgroups.g1.processor.type = load_balance
a1.sinkgroups.g1.processor.backoff = true
a1.sinkgroups.g1.processor.selector = random
a1.sinkgroups.g1.processor.maxTimeOut = 10000
把目录复制到Hadoop02和Hadoop03
配置环境变量使其生效
[root@hadoop02 conf]# vi avro-logger.conf
# 配置Load balancing sink processor二级采集方案的一个sink分支
a1.sources = r1
a1.sinks = k1
a1.channels = c1
# 描述并配置sources组件(数据源类型、采集数据源的应用地址)
a1.sources.r1.type = avro
a1.sources.r1.bind = hadoop02
a1.sources.r1.port = 52020
# 描述并配置sinks组件(采集后的数据流出的类型)
a1.sinks.k1.type = logger
# 描述并配置channels
a1.channels.c1.type = memory
a1.channels.c1.capacity = 1000
a1.channels.c1.transactionCapacity = 100
# 将source和sink通过同一个channel连接绑定
a1.sources.r1.channels = c1
a1.sinks.k1.channel = c1
[root@hadoop03 conf]# vi avro-logger.conf
添加如下内容:
# 配置Load balancing sink processor二级采集方案的一个sink分支
a1.sources = r1
a1.sinks = k1
a1.channels = c1
# 描述并配置sources组件(数据源类型、采集数据源的应用地址)
a1.sources.r1.type = avro
a1.sources.r1.bind = hadoop03
a1.sources.r1.port = 52020
# 描述并配置sinks组件(采集后的数据流出的类型)
a1.sinks.k1.type = logger
# 描述并配置channels
a1.channels.c1.type = memory
a1.channels.c1.capacity = 1000
a1.channels.c1.transactionCapacity = 100
# 将source和sink通过同一个channel连接绑定
a1.sources.r1.channels = c1
a1.sinks.k1.channel = c1
两台都启动
[root@hadoop02 conf]# flume-ng agent --conf conf/ --conf-file avro-logger.conf --name a1 -Dflume.root.logger=INFO,console
[root@hadoop03 conf]# flume-ng agent --conf conf/ --conf-file avro-logger.conf --name a1 -Dflume.root.logger=INFO,console
[root@hadoop01 conf]# flume-ng agent --conf conf/ --conf-file exec-avro.conf --name a1 -Dflume.root.logger=INFO,console


[root@hadoop01 ~]# mkdir /root/logs

[root@hadoop01 ~]# while true; do echo "access access ...">>/root/logs/123.log; sleep 1;done


案例 日志采集
hadoop02和hadoop03写下同样的配置
[root@hadoop02 conf]# vi exec-avro_logCollection.conf
[root@hadoop03 conf]# vi exec-avro_logCollection.conf
# 配置Agent组件
# 用三个source采集不同的日志类型数据
a1.sources = r1 r2 r3
a1.sinks = k1
a1.channels = c1
# 描述并配置第一个sources组件(包括自带的静态拦截器)
a1.sources.r1.type = exec
a1.sources.r1.command = tail -F /root/logs/access.log
a1.sources.r1.interceptors = i1
a1.sources.r1.interceptors.i1.type = static
a1.sources.r1.interceptors.i1.key = type
a1.sources.r1.interceptors.i1.value = access
# 描述并配置第二个sources组件(包括自带的静态拦截器)
a1.sources.r2.type = exec
a1.sources.r2.command = tail -F /root/logs/nginx.log
a1.sources.r2.interceptors = i2
a1.sources.r2.interceptors.i2.type = static
a1.sources.r2.interceptors.i2.key = type
a1.sources.r2.interceptors.i2.value = nginx
# 描述并配置第三个sources组件(包括自带的静态拦截器)
a1.sources.r3.type = exec
a1.sources.r3.command = tail -F /root/logs/web.log
a1.sources.r3.interceptors = i3
a1.sources.r3.interceptors.i3.type = static
a1.sources.r3.interceptors.i3.key = type
a1.sources.r3.interceptors.i3.value = web
# 描述并配置channel
a1.channels.c1.type = memory
a1.channels.c1.capacity = 2000000
a1.channels.c1.transactionCapacity = 100000
# 描述并配置sink
a1.sinks.k1.type = avro
a1.sinks.k1.hostname = hadoop01
a1.sinks.k1.port = 41414
# 将source、sink与channel进行关联绑定
a1.sources.r1.channels = c1
a1.sources.r2.channels = c1
a1.sources.r3.channels = c1
a1.sinks.k1.channel = c1
[root@hadoop01 conf]# vim avro-hdfs_logCollection.conf
# 配置Agent组件
a1.sources = r1
a1.sinks = k1
a1.channels = c1
# 描述并配置sources组件
a1.sources.r1.type = avro
a1.sources.r1.bind = hadoop01
a1.sources.r1.port = 41414
# 描述并配置时间拦截器,用于后续%Y%m%d获取时间
a1.sources.r1.interceptors = i1
a1.sources.r1.interceptors.i1.type = timestamp
# 描述并配置channel
a1.channels.c1.type = memory
a1.channels.c1.capacity = 20000
a1.channels.c1.transactionCapacity = 10000
# 描述并配置sink
a1.sinks.k1.type = hdfs
a1.sinks.k1.hdfs.path = hdfs://hadoop01:9000/source/logs/%{type}/%Y%m%d
a1.sinks.k1.hdfs.filePrefix = events
a1.sinks.k1.hdfs.fileType = DataStream
a1.sinks.k1.hdfs.writeFormat = Text
# 生成的文件不按条数生成
a1.sinks.k1.hdfs.rollCount = 0
# 生成的文件不按时间生成
a1.sinks.k1.hdfs.rollInterval = 0
# 生成的文件按大小生成
a1.sinks.k1.hdfs.rollSize = 10485760
# 批量写入HDFS的个数
a1.sinks.k1.hdfs.batchSize = 20
# Flume操作HDFS的线程数(包括新建、写入等)
a1.sinks.k1.hdfs.threadsPoolSize = 10
# 操作HDFS的超时时间
a1.sinks.k1.hdfs.callTimeout = 30000
# 将source、sink与channel进行关联绑定
a1.sources.r1.channels = c1
a1.sinks.k1.channel = c1
hadoop01启动flume
[root@hadoop01 conf]# flume-ng agent -c conf/ -f avro-hdfs_logCollection.conf --name a1 -Dflume.root.logger=INFO,console
hadoop02 hadoop03启动flume
[root@hadoop02 conf]# flume-ng agent -c conf/ -f exec-avro_logCollection.conf --name a1 -Dflume.root.logger=INFO,console
[root@hadoop03 conf]# flume-ng agent -c conf/ -f exec-avro_logCollection.conf --name a1 -Dflume.root.logger=INFO,console

[root@hadoop02 ~]# mkdir /root/logs
[root@hadoop03 ~]# mkdir /root/logs

[root@hadoop02 ~]# while true; do echo "access access ...">>/root/logs/access.log; sleep 1;done
[root@hadoop02 ~]# while true; do echo "access access ...">>/root/logs/nginx.log; sleep 1;done
[root@hadoop02 ~]# while true; do echo "access access ...">>/root/logs/web.log; sleep 1;done

[root@hadoop03 ~]# while true; do echo "access access ...">>/root/logs/access.log; sleep 1;done
[root@hadoop03 ~]# while true; do echo "access access ...">>/root/logs/nginx.log; sleep 1;done
[root@hadoop03 ~]# while true; do echo "access access ...">>/root/logs/web.log; sleep 1;done


 1870
1870


 被折叠的 条评论
为什么被折叠?
被折叠的 条评论
为什么被折叠?
 到【灌水乐园】发言


