


整体架构流程
论文题目:Camouflaged Object Segmentation with Distraction Minin
论文地址:论文
论文代码地址:https://github.com/Mhaiyang/CVPR2021_PFNet/blob/main/PFNet.py
摘要
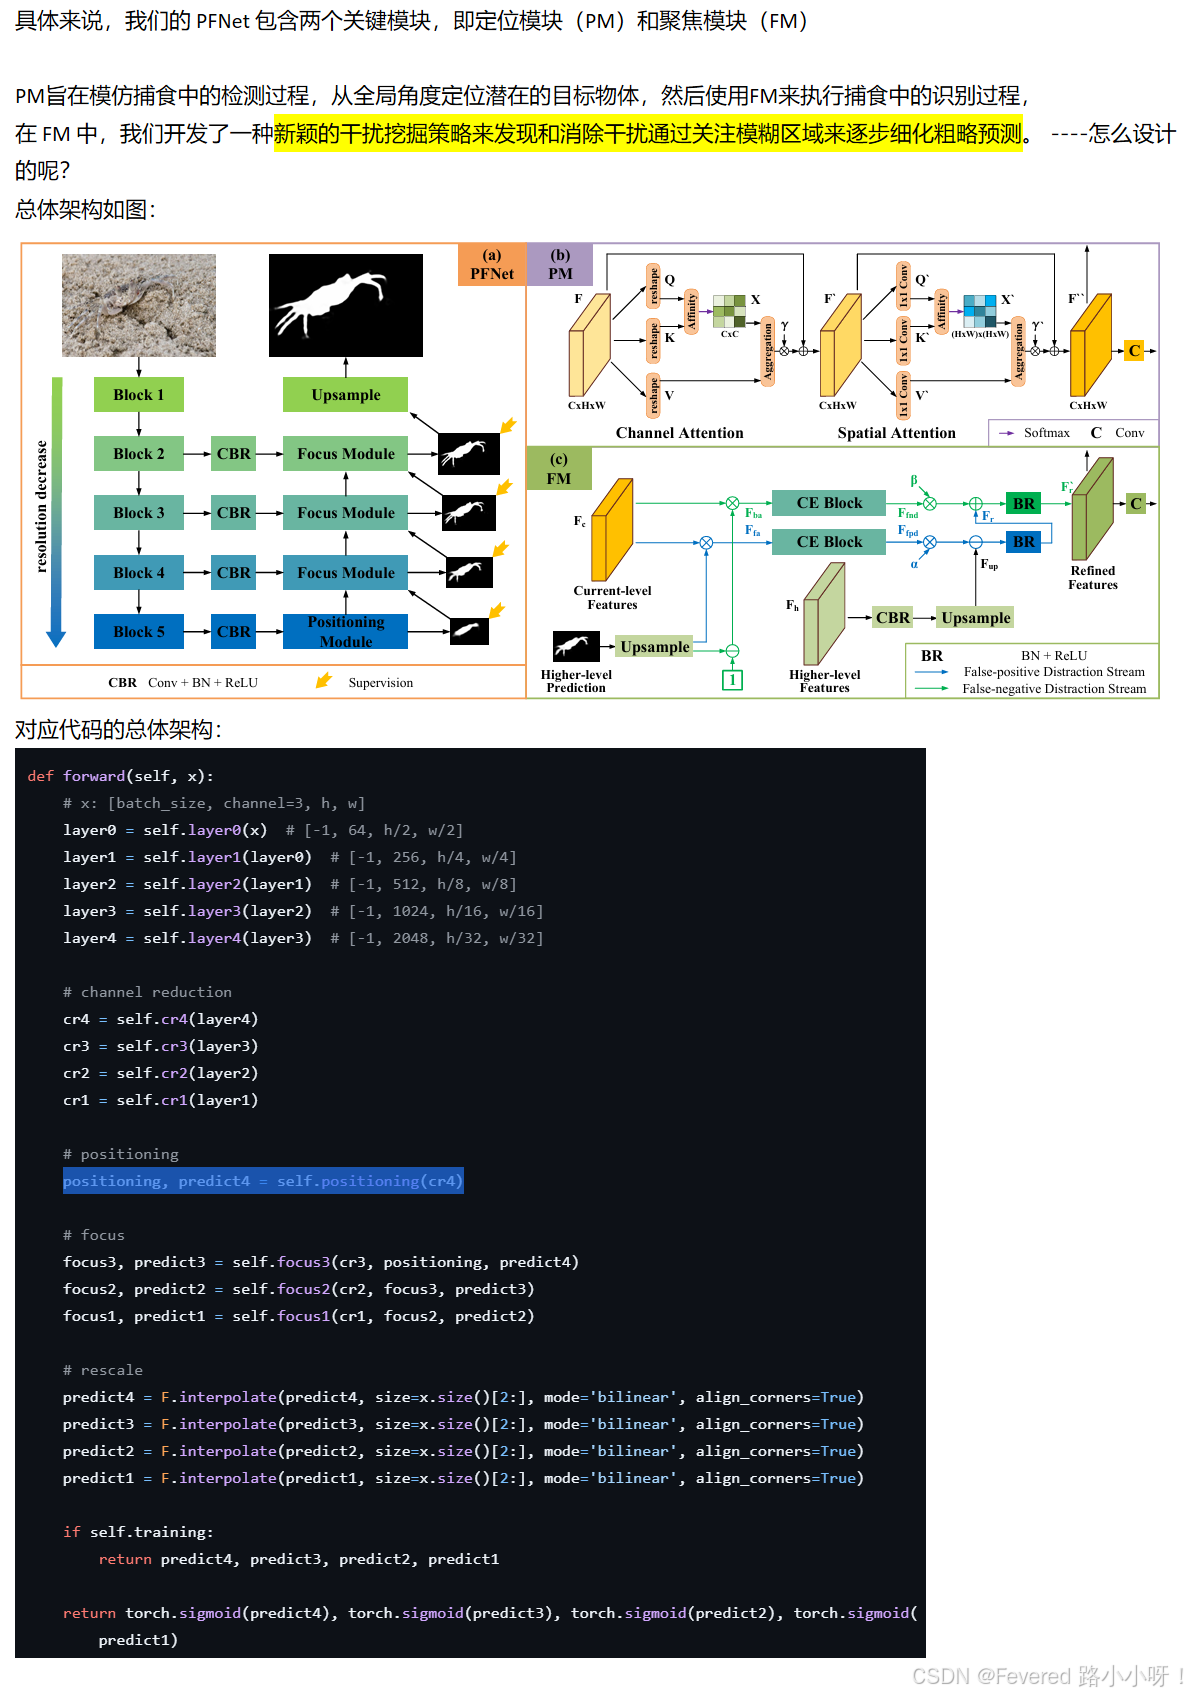
伪装物体分割(COS)旨在识别 “完美 ”融入其周围环境的物体,具有广泛的应用价值。 COS 面临的主要挑战是候选对象与噪声背景之间存在很高的内在相似性。在本文中,我们努力迎接挑战,以实现有效和高效的 COS。为此,我们开发了一个生物启发框架,称为定位和聚焦网络(PFNet),它模仿了自然界中的捕食过程。具体来说,我们的 PFNet 包含两个关键模块,即定位模块(PM)和聚焦模块(FM)。定位模块旨在模仿捕食过程中的检测过程,从全局角度定位潜在的目标对象,而聚焦模块则用于执行捕食过程中的识别过程,通过聚焦模糊区域逐步重新进行粗略预测。值得注意的是,在调频中,我们开发了一种新颖的分心挖掘策略,用于发现和消除分心,以提高估算性能。广泛的实验证明,我们的 PFNet 可以实时运行(72 FPS),在三个具有挑战性的数据集上,在四项标准指标下,PFNet 明显优于 18 种前沿模型
整体架构
先来代码解析:分为4个部分吧 backbone–reduce–pos–focus
• backbone:resnet50 = resnet.resnet50(backbone_path)
• # channel reduction:CBR模块,用于减少通道
• position模块:返回两个参数,positioning, predict4 = self.positioning(cr4)
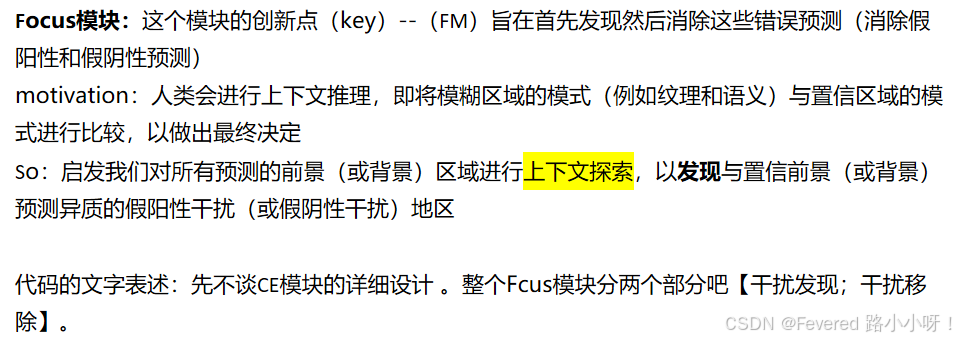
• Focus模块: 文中提到的FM模块
关键探究两个模块:position模块和Focus模块
Positioning模块
`pos模块,返回两个参数,原文中:“PM旨在收获语义增强的高级特征并进一步生成初始分段图”两者都以非局部方式实现,以捕获通道和空间位置方面的远程依赖性,以从全局角度增强最高级别特征的表示。
两个关键模块:通道注意力 和 空间注意力
class Positioning(nn.Module):
    def __init__(self, channel):
        super(Positioning, self).__init__()
        self.channel = channel
        self.cab = CA_Block(self.channel) # 通道注意,压缩w*h
        self.sab = SA_Block(self.channel) # 空间注意,压缩c
        self.map = nn.Conv2d(self.channel, 1, 7, 1, 3) #7*7 卷积核
    def forward(self, x):
        cab = self.cab(x)
        sab = self.sab(cab)
        map = self.map(sab)
        return sab, map
通道注意力
直接上代码,在代码中有注释
#对每个通道赋予不同的重要性
class CA_Block(nn.Module):
    def __init__(self, in_dim):
        super(CA_Block, self).__init__()
        self.chanel_in = in_dim
        self.gamma = nn.Parameter(torch.ones(1))
        self.softmax = nn.Softmax(dim=-1)
    def forward(self, x):
        """
            inputs :
                x : input feature maps (B X C X H X W)
            returns :
                out : channel attentive features
        """
        m_batchsize, C, height, width = x.size()
        proj_query = x.view(m_batchsize, C, -1) #(B,C,H,W)-->(B,C,H*W)
        proj_key = x.view(m_batchsize, C, -1).permute(0, 2, 1) #(B,C,H,W)-->(B,C,H*W)-->(B,H*W,C)
        energy = torch.bmm(proj_query, proj_key) #矩阵乘积-->(B,C,C)
        attention = self.softmax(energy)  #(B,C,C)
        proj_value = x.view(m_batchsize, C, -1)#(B,C,H,W)-->(B,C,H*W)
        out = torch.bmm(attention, proj_value) #(B,C,C)与(B,C,H*W)矩阵乘法==>(B, C, H*W)
        out = out.view(m_batchsize, C, height, width) #恢复(B,C,H,W)
        out = self.gamma * out + x #self.gamma 学习参数,残差思想+x
        return out
‘’’
空间注意力模块
• 每个空间位置的特征加权:SA_Block 通过将输入的空间维度展平成一维 H*W,然后计算空间位置之间的相关性(通过 energy),最终为每个空间位置分配一个权重。
• 加权的空间特征:这些权重通过矩阵乘法应用于每个空间位置的特征,调整每个空间位置的表示,以便捕捉到空间位置之间的依赖关系。
‘’’
class SA_Block(nn.Module):
    def __init__(self, in_dim):
        super(SA_Block, self).__init__()
        self.chanel_in = in_dim
        self.query_conv = nn.Conv2d(in_channels=in_dim, out_channels=in_dim // 8, kernel_size=1)
        self.key_conv = nn.Conv2d(in_channels=in_dim, out_channels=in_dim // 8, kernel_size=1)
        self.value_conv = nn.Conv2d(in_channels=in_dim, out_channels=in_dim, kernel_size=1)
        self.gamma = nn.Parameter(torch.ones(1))
        self.softmax = nn.Softmax(dim=-1)
    def forward(self, x):
        """
            inputs :
                x : input feature maps (B X C X H X W)
            returns :
                out : spatial attentive features
        """
        m_batchsize, C, height, width = x.size() #(B, C, H, W)
        proj_query = self.query_conv(x).view(    #1*1卷积降低通道数,(B, C//8, H, W)
            m_batchsize, -1, width * height).permute(  #(B, C//8, H*W)
                0, 2, 1) #(B, H*W, C//8)
        proj_key = self.key_conv(x).view(   # 1*1卷积,得到(B, C//8, H, W)
            m_batchsize, -1, width * height)  # 降维 (B, C//8, H*W)
        energy = torch.bmm(proj_query, proj_key) #矩阵乘法 (B, H*W, H*W)
        attention = self.softmax(energy) #(B, H*W, H*W)
        proj_value = self.value_conv(x).view(  #经过1*1卷积,(B, C, H, W)
            m_batchsize, -1, width * height)   #(B, C, H, W)--> (B, C, H*W)
        out = torch.bmm(proj_value, attention.permute(0, 2, 1)) #(B, C, H*W)·(B, H*W, H*W)--》(B, C, H*W)
        out = out.view(m_batchsize, C, height, width)
        out = self.gamma * out + x
        return out
# sab==语义增强的高级特征--positoning
# map==初始分段图 ---predict4
“最后,通过对 F′′进行填充为 3 的 7×7 卷积,我们可以得到目标的初始位置图。F′′ 和初始位置图将通过以下聚焦模块(FM)逐步完善”
Focus模块
class Focus(nn.Module):
def __init__(self, channel1, channel2):
super(Focus, self).__init__()
self.channel1 = channel1
self.channel2 = channel2
self.up = nn.Sequential(nn.Conv2d(self.channel2, self.channel1, 7, 1, 3),
nn.BatchNorm2d(self.channel1),
nn.ReLU(),
nn.UpsamplingBilinear2d(scale_factor=2))
self.input_map = nn.Sequential(nn.UpsamplingBilinear2d(scale_factor=2),
nn.Sigmoid())
self.output_map = nn.Conv2d(self.channel1, 1, 7, 1, 3)
self.fp = Context_Exploration_Block(self.channel1)
'''
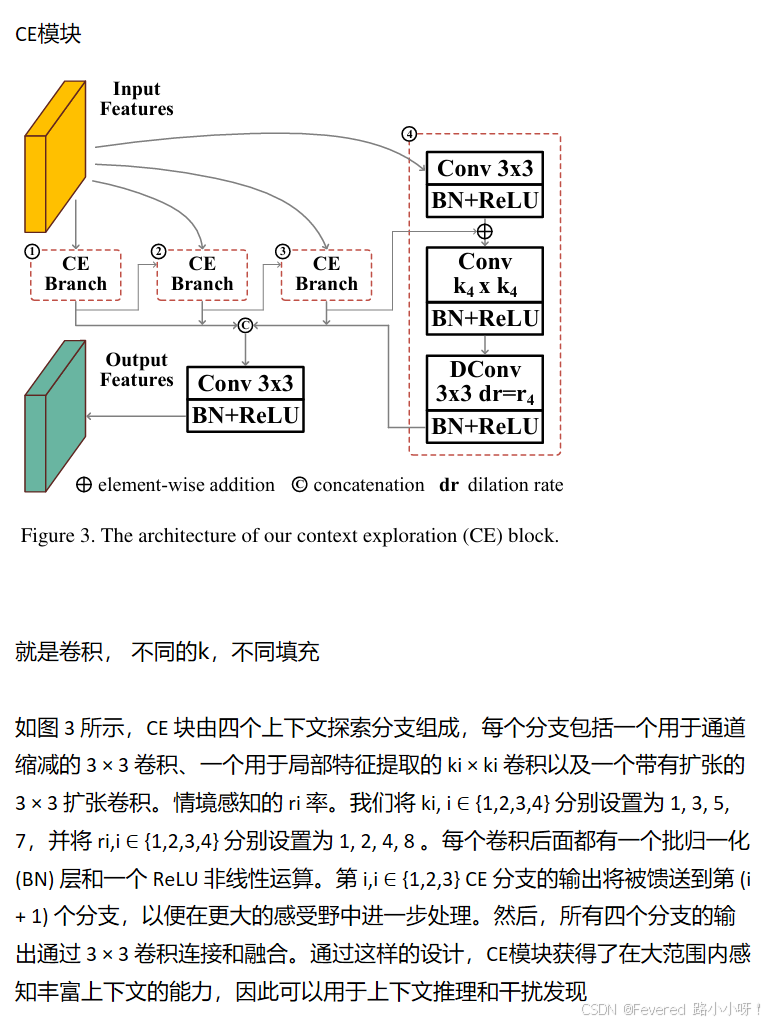
CE 模块由四个文本探索分支组成,
每个分支包括一个用于减少信道的 3 × 3 卷积,
一个用于局部特征提取的 ki × ki 卷积,
以及一个用于上下文感知的 3 × 3 放大卷积(放大率为 ri)。
'''
self.fn = Context_Exploration_Block(self.channel1)
self.alpha = nn.Parameter(torch.ones(1))
self.beta = nn.Parameter(torch.ones(1))
self.bn1 = nn.BatchNorm2d(self.channel1)
self.relu1 = nn.ReLU()
self.bn2 = nn.BatchNorm2d(self.channel1)
self.relu2 = nn.ReLU()
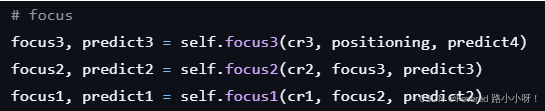
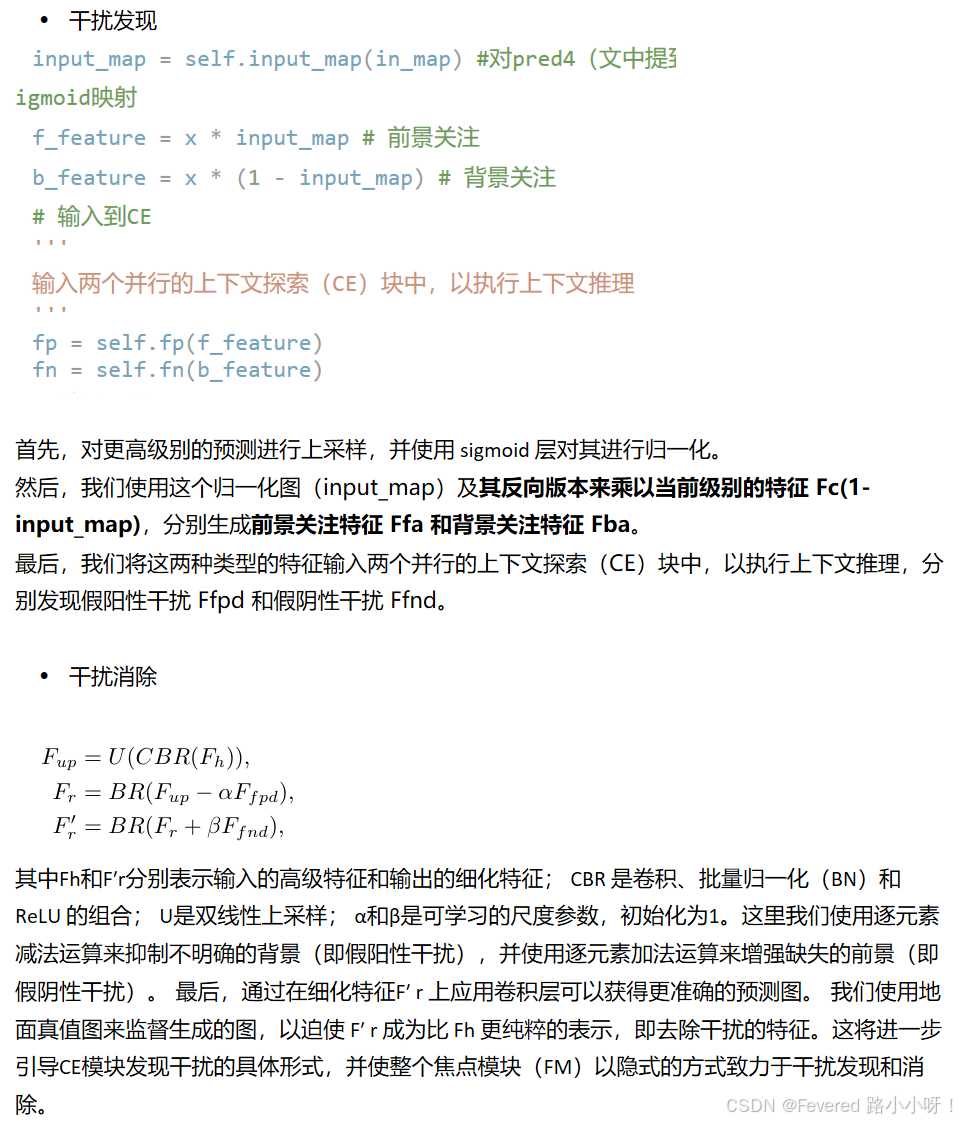
def forward(self, x, y, in_map): #以focus3为例子
# x; current-level features --cr3(reduce的结果)
# y: higher-level features -- positioning(position模块中,经通道-位置模块的结果)
# in_map: higher-level prediction -- pred4 (position中,得到的positioning 经过7核卷积得到的结果)
input_map = self.input_map(in_map) #对pred4(文中提到的更高界别的预测),上采样--sigmoid映射
f_feature = x * input_map # 前景关注
b_feature = x * (1 - input_map) # 背景关注
# 输入到CE
'''
输入两个并行的上下文探索(CE)块中,以执行上下文推理
'''
fp = self.fp(f_feature)
fn = self.fn(b_feature)
# 消除干扰
up = self.up(y) #对positioning使用一个7*7的卷积后,使用UpsamplingBilinear2d 进行上采样(系数2)
refine1 = up - (self.alpha * fp) #使用逐元素减法运算来抑制不明确的背景(即假阳性干扰)
refine1 = self.bn1(refine1)
refine1 = self.relu1(refine1)
refine2 = refine1 + (self.beta * fn) #使用逐元素加法运算来增强缺失的前景(即假阴性干扰)
refine2 = self.bn2(refine2)
refine2 = self.relu2(refine2)
output_map = self.output_map(refine2)
return refine2, output_map
CE模块
class Context_Exploration_Block(nn.Module):
    def __init__(self, input_channels):
        super(Context_Exploration_Block, self).__init__()
        self.input_channels = input_channels
        self.channels_single = int(input_channels / 4)
        self.p1_channel_reduction = nn.Sequential(
            nn.Conv2d(self.input_channels, self.channels_single, 1, 1, 0),
            nn.BatchNorm2d(self.channels_single),
            nn.ReLU())
        self.p2_channel_reduction = nn.Sequential(
            nn.Conv2d(self.input_channels, self.channels_single, 1, 1, 0),
            nn.BatchNorm2d(self.channels_single),
            nn.ReLU())
        self.p3_channel_reduction = nn.Sequential(
            nn.Conv2d(self.input_channels, self.channels_single, 1, 1, 0),
            nn.BatchNorm2d(self.channels_single),
            nn.ReLU())
        self.p4_channel_reduction = nn.Sequential(
            nn.Conv2d(self.input_channels, self.channels_single, 1, 1, 0),
            nn.BatchNorm2d(self.channels_single),
              nn.ReLU())
        self.p1 = nn.Sequential(
            nn.Conv2d(self.channels_single, self.channels_single, 1, 1, 0),
            nn.BatchNorm2d(self.channels_single),
            nn.ReLU())
        self.p1_dc = nn.Sequential(
            nn.Conv2d(self.channels_single, self.channels_single, kernel_size=3, stride=1, padding=1, dilation=1),
            nn.BatchNorm2d(self.channels_single),
            nn.ReLU())
        self.p2 = nn.Sequential(
            nn.Conv2d(self.channels_single, self.channels_single, 3, 1, 1),
            nn.BatchNorm2d(self.channels_single),
            nn.ReLU())
        self.p2_dc = nn.Sequential(
            nn.Conv2d(self.channels_single, self.channels_single, kernel_size=3, stride=1, padding=2, dilation=2),
            nn.BatchNorm2d(self.channels_single),
            nn.ReLU())
        self.p3 = nn.Sequential(
            nn.Conv2d(self.channels_single, self.channels_single, 5, 1, 2),
            nn.BatchNorm2d(self.channels_single),
            nn.ReLU())
        self.p3_dc = nn.Sequential(
            nn.Conv2d(self.channels_single, self.channels_single, kernel_size=3, stride=1, padding=4, dilation=4),
            nn.BatchNorm2d(self.channels_single),
            nn.ReLU())
        self.p4 = nn.Sequential(
            nn.Conv2d(self.channels_single, self.channels_single, 7, 1, 3),
            nn.BatchNorm2d(self.channels_single),
            nn.ReLU())
        self.p4_dc = nn.Sequential(
            nn.Conv2d(self.channels_single, self.channels_single, kernel_size=3, stride=1, padding=8, dilation=8),
            nn.BatchNorm2d(self.channels_single),
            nn.ReLU())
        self.fusion = nn.Sequential(nn.Conv2d(self.input_channels, self.input_channels, 1, 1, 0),
                                    nn.BatchNorm2d(self.input_channels),
                                    nn.ReLU())
    def forward(self, x):
        p1_input = self.p1_channel_reduction(x)
        p1 = self.p1(p1_input)
        p1_dc = self.p1_dc(p1)
        p2_input = self.p2_channel_reduction(x) + p1_dc
        p2 = self.p2(p2_input)
        p2_dc = self.p2_dc(p2)
        p3_input = self.p3_channel_reduction(x) + p2_dc
        p3 = self.p3(p3_input)
        p3_dc = self.p3_dc(p3)
        p4_input = self.p4_channel_reduction(x) + p3_dc
        p4 = self.p4(p4_input)
        p4_dc = self.p4_dc(p4)
        ce = self.fusion(torch.cat((p1_dc, p2_dc, p3_dc, p4_dc), 1))
        return ce


 被折叠的 条评论
为什么被折叠?
被折叠的 条评论
为什么被折叠?
 到【灌水乐园】发言


