


1.控制台上传图片和视频到云存储
在云开发中点击存储后直接把文件或者文件夹拉进去即可。(可以是图片、视频、音频、word、excel、pdf等等)

单击该文件,右边会出现这个文件的下载地址和他在云端的文件id

2.上传图片到云存储
  chooseImg(){
    const that = this;
    wx.chooseImage({
      //选择多少张图片,不写该属性则默认为9
      count: 1,
      //所选图片的尺寸,original原图,compressed压缩图片
      sizeType: ['original', 'compressed'],
      // 选择图片的来源,album相册,camera相机
      sourceType: ['album', 'camera'],
      success (res) {
        console.log(res);
        // tempFilePath可以作为img标签的src属性显示图片
        const tempFilePaths = res.tempFilePaths
        that.uploadImg(tempFilePaths[0],'girl.jpg');
      }
    })
  },
  uploadImg(ImgPath,fileName){
    wx.cloud.uploadFile({
      //文件的云路径
      cloudPath:fileName,
      //文件路径(刚才的临时云文件路径)
      filePath:ImgPath
    })
    .then(res=>{
      console.log('存储成功',res)
    })
    .catch(err=>{
      console.log('存储失败',err)
    })
  }
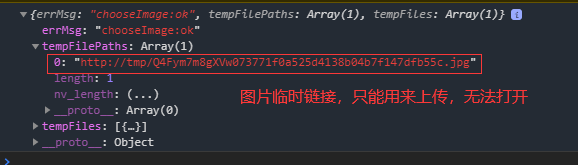
这里,chooseImg()中的res的内容为:
3.调用云存储的图片信息
首先,我们需要把云存储下照片的下载地址或者文件ID的值给到我们数据库的对象。

之后就跟正常调用一样使用就可以了,如下:
在js文件中这么写:
  onLoad(){
    wx.cloud.callFunction({
      name:'getData'
    })
    .then(res =>{
      console.log('请求云函数成功',res);
      this.setData({
        list:res.result.data
      })
    })
    .catch(err=>{
      console.log('请求云函数失败',err)
    })
  },
在wxml文件中这么写:
<view wx:for="{{list}}">
  <view class="item">
    <image src="{{item.img}}" class="img"></image>
    <text>商品名:{{item.name}}</text>
    <text>价格:{{item.price}}</text>
  </view>
</view>
4.上传视频到云存储
其实跟上传图片差不多
  chooseMovie(){
    wx.chooseVideo({
      //album是本地视频,camera是用相机当场拍摄
      sourceType: ['album','camera'],
      // 拍摄最长时长
      maxDuration:60,
      //back是后置摄像头
      camera: 'back',
    })
    .then(res =>{
      this.uploadVideo(res.tempFilePaths[0],'video.mp4');
    })
    .catch(err=>{
      console.log('上传视频失败',err)
    })
  },

  uploadVideo(VideoPath,fileName){
    wx.cloud.uploadFile({
      //文件的云路径
      cloudPath:fileName,
      //文件路径(刚才的临时云文件路径)
      filePath:VideoPath
    })
    .then(res=>{
      console.log('存储成功',res)
    })
    .catch(err=>{
      console.log('存储失败',err)
    })
  }
5.上传其他文件例如word,pdf等
小程序文档搜
wx.chooseMessageFile()


 194
194


 被折叠的 条评论
为什么被折叠?
被折叠的 条评论
为什么被折叠?
 到【灌水乐园】发言


