


PlayBook简介
playbooks是 一个不同于使用Ansible命令行执行方式的模式, playbook是一个非常简单的配置管理和多主机部署系统,不同于任何已经存在的模式,可作为一个适合部署复杂应用程序的基础。Playbook可以定制配置,可以按照指定的操作步骤有序执行 。
注意!!!playbook是通过YAML格式来进行描述定义的。
YAML
YAML是一个可读性高的用来资料序列的格式。YAML参考了多种编程语言,包括:XML,C,Python,Perl等。
YAML的扩展名为.yaml或.yml,例如test.yaml
核心元素
Tasks:任务,由模板定义的操作列表
Variables:变量
Templates:模板,即使用模板语法的文件
Handlers:由特定条件触发的Tasks
Roles:角色

组成
Target section: 定义将要执行 playbook 的远程主机组
Variable section:定义 playbook 运行时需要使用的变量
Task section :定义将要在远程主机上执行的任务列表
Handler section:定义 task 执行完成以后需要调用的任务
将tab键改为空格:
可以参考这这两个配置文件
vim /etc/vimrc (vim效果)
vim /usr/share/vim/vimfiles/template.spec
pwd
vim .vimrc
autocmd FileType yaml setlocal ai ts=2 sw=2 et


YAML的格式
YAML的结构通过空格以类似大纲的缩进排列方式展示,序列中的连续项用 - 加空格代表,map中的键值对用 : 分隔。
结构示例:

1:安装并开启httpd服务
vim /home/devops/ansible/apache/install.yml
---
- hosts: test   ##定义主机或组
  tasks:        ##定义任务
    - name: install apache  ##输入任务名称,并且使用具体模块来执行具体任务
      yum:                  ##此处位置是具体模块
        name: httpd    ##服务为httpd
        state: present  ##安装

    - name: start apache
      service:
        name: httpd
        state: started   ##开启
语法检测:
ansible-playbook apache/install.yml --syntax-check
-C:做测试(并没有真正的跑程序)
ansible-playbook -C apache/install.yml
查看文件的内容
ansible-playbook apache/install.yml --list-hosts查看文件的任务
ansible-playbook apache/install.yml --list-tasks
开始运行:
ansible-playbook apache/install.yml
server2查看:
ps ax | grep httpd
2: 将本地发布文件copy到server2的默认发布目录下, 开启防火墙,设置防火墙策略,进行访问
vim /home/devops/ansible/apache/install.yml
---
- hosts: test
  tasks:
    - name: install apache
      yum:
        name: httpd
        state: present

    - name: start apache
      service:
        name: httpd
        state: started
        enabled: yes   ##加入开机自启
    ##将本地发布文件copy到server2的默认发布目录下,本地必须有index.html文件
    - name: create index.html
      copy:
        src: index.html
        dest: /var/www/html/index.html
    ##开启防火墙
    - name: start firewalld
      service:
        name: firewalld
        state: started
        enabled: yes
    ##设置防火墙策略(在策略中设置允许httpd来进行访问)
    - name: config firewalld
      firewalld:
        service: http
        state: enabled
        permanent: yes   ##永久开启
        immediate: yes   ##立即开启
##进行访问
- hosts: localhost   become: false   tasks:
    - name: test apache
      uri:
        url: http://172.25.78.2
        return_content: yes   ##返回访问的结果
ansible-playbook apache/install.yml
3:端口变更的访问方(1)
将server2apache的主配置文件scp到本地
cd /home/devops/ansible
scp server2:/etc/httpd/conf/httpd.conf apache/
cat hosts
cd apache/
mv httpd.conf httpd.conf.j2 ##模版
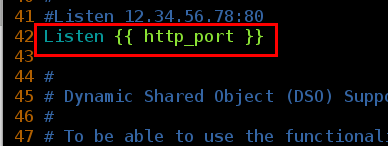
vim httpd.conf.j2
42 Listen {{ http_port }}
vim apache/install.yml--- - hosts: test tasks: - name: install apache yum: name: httpd state: present - name: config apache template: ##此模块可以解析下面的变量 src: httpd.conf.j2 dest: /etc/httpd/conf/httpd.conf notify: restart apache ##触发器 - name: start apache service: name: httpd state: started enabled: yes - name: create index.html copy: src: index.html dest: /var/www/html/index.html - name: start firewalld service: name: firewalld state: started enabled: yes - name: config firewalld firewalld: service: http state: enabled permanent: yes immediate: yes handlers: - name: restart apache service: name: httpd state: restarted - hosts: db become: false tasks: - name: test apache uri: url: 'http://172.25.78.2:{{ http_port }}' return_content: yes
ansible-playbook apache/install.yml
(2): vim hosts 注释#[webserver:vars] #http_port=80 在Playbook中加入变量端口
在(1)的基础上加
vim apache/install.yml1 --- 2 - hosts: test 3 vars: ##加端口 4 - http_port: 80 47 - hosts: db 48 vars: ##此处不加的话会报错 49 - http_port: 80 50 become: false
ansible-playbook apache/install.yml
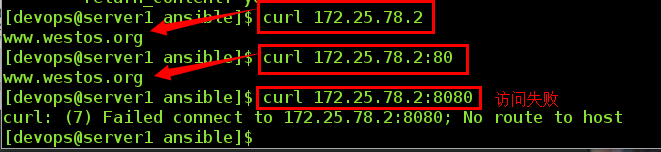
访问:curl 172.25.78.2
curl 172.25.78.2:80
curl 172.25.78.2:8080 ##访问失败
(3)修改文件使8080端口可以访问
在(2)的基础上修改
将46行以后的都删除,无用
vim apache/install.yml3 vars: 4 - http_port: 8080 34 - name: config firewalld 35 firewalld: ##修改36行 36 port: "{{ http_port }}/tcp" ansible-playbook apache/install.yml
ansible-playbook apache/install.yml
再次使用8080端口访问测试成功
curl 172.25.78.2:8080
加入36行以后,只需更改第4行自己想要的端口都可访问
例如将端口改为80进行访问
vim apache/install.yml
4 - http_port: 80
ansible-playbook apache/install.yml
curl 172.25.78.2:80


 388
388


 被折叠的 条评论
为什么被折叠?
被折叠的 条评论
为什么被折叠?
 到【灌水乐园】发言


