


什么是Bean
Spring相当于一个 超级工厂,Bean就相当于工厂里每一个机器。Spring的 Ioc容器生产并管理Bean。因此如果我们想要在项目中使用这个工厂,就需要对Spring的配置文件进行配置。
Spring容器支持XML和Properties两种格式的配置文件,常见是使用前者。
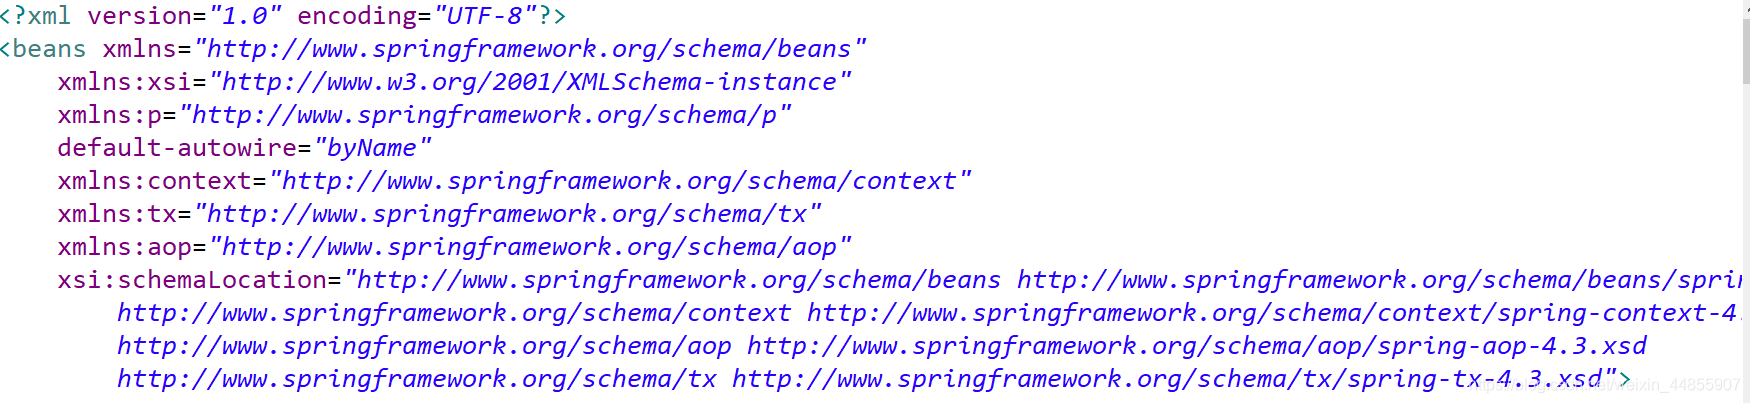
在Spring容器中,XML配置 文件的根元素是< beans>,< beans>中包含多个< bean>,每一个< bean>就定义了一个Bean。
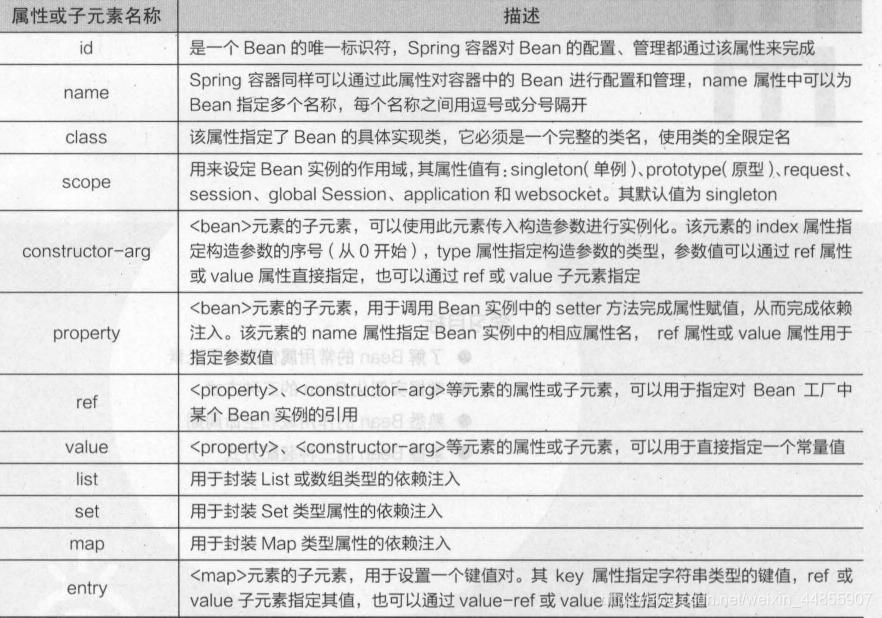
< bean >元素常用属性及子元素
Bean的实例化
Bean的实例化主要通过该Bean对应实现类的无参构造器来。
Course类
package club.johnny.polo;

public class Course {
	private String courseName;
	private int courseHour ;
	public Course() {//此无参构造器必须存在 才能通过构造器实例化该Bean
	}

	public Course(String courseName, int courseHour) {
		this.courseName = courseName;
		this.courseHour = courseHour;
		this.teacher = teacher;
	}

	public String getCourseName() {
		return courseName;
	}
	public void setCourseName(String courseName) {
		this.courseName = courseName;
	}
	public int getCourseHour() {
		return courseHour;
	}
	public void setCourseHour(int courseHour) {
		this.courseHour = courseHour;
	}
}
<?xml version="1.0" encoding="UTF-8" ?>
<beans xmlns="http://www.springframework.org/schema/beans"
	xmlns:xsi="http://www.w3.org/2001/XMLSchema-instance"
	xmlns:context="http://www.springframework.org/schema/context"
	xsi:schemaLocation="http://www.springframework.org/schema/beans
        https://www.springframework.org/schema/beans/spring-beans.xsd
        http://www.springframework.org/schema/context
        https://www.springframework.org/schema/context/spring-context.xsd">
	<bean id="courseDemo" class="club.johnny.polo.Course">
	</bean>
</beans>
Bean 的装配方式
Bean的装配方式也就是注入依赖。依赖注入作用就是在使用Spring 框架创建对象时,动态地将其所依赖的对象注入Bean组件中。
主要有以下三种方式:
一、基于XML配置
二、基于注解(最常用)
三、自动装配
基于XML配置
Spring提供了两种基于XML的装配:设值注入和构造注入。
1、 setter注入:通过setXxx()赋值注入被依赖的实例。通过调用无参的构造器实例化Bean,然后通过反射的方式ByName调用该Bean对象的setter方法实现setter方法的注入。因此设值注入必须满足以下两点要求:
- Bean的实现类必须提供一个默认的无参构造方法
- Bean的实现类必须为需注入的属性 提供setter方法
<bean id="bean的唯一标识" class="实现类" ...>
	<property name="实体类的私有属性名">
	  		....
	</property>
</bean>
2、构造器注入:通过构造方法赋值
<bean id="bean的唯一标识" class="实现类" ...>
	 <constructor-arg value="值" type="实体类的私有属性类型" index="该属性在构造方法的下标索引" name="实体类的私有属性名"></constructor-arg>
	 ....
	 <constructor-arg value="值" type="实体类的私有属性类型" index="该属性在构造方法的下标索引" name="实体类的私有属性名"></constructor-arg>
 </bean>
如果 < constructor-arg >的顺序与构造方法参数的顺序不一致,则需要通过type或者index或name指定。
setter注入
以集合类为例
AllCollection类
package club.johnny.polo;

import java.util.List;
import java.util.Map;
import java.util.Properties;
import java.util.Set;

public class AllCollection {
	private String [] arrayElement;
	private Set<String> setElement;
	private List<String> listElement;
	private Map<String,String> mapElement;
	private Properties propsElement ;
	public Properties getPropsElement() {
		return propsElement;
	}
	public void setPropsElement(Properties propsElement) {
		this.propsElement = propsElement;
	}
	public void setListElement(List<String> listElement) {
		this.listElement = listElement;
	}
	public String[] getArrayElement() {
		return arrayElement;
	}
	public void setArrayElement(String[] arrayElement) {
		this.arrayElement = arrayElement;
	}
	public Set<String> getSetElement() {
		return setElement;
	}
	public void setSetElement(Set<String> setElement) {
		this.setElement = setElement;
	}
	public List getListElement() {
		return listElement;
	}
	public Map<String, String> getMapElement() {
		return mapElement;
	}
	public void setMapElement(Map<String, String> mapElement) {
		this.mapElement = mapElement;
	}
	@Override
	public String toString() {
		// TODO Auto-generated method stub
		String s="";
		for(String as:arrayElement)
			s+=as+" ";
		return "list:" + listElement.toString()+"\nset:"+setElement.toString()+"\nmap:"+ mapElement.toString()+"\narray:"+s+"\npropsElement:"+propsElement.toString();
	}

}
applicationContext.xml配置文件
<?xml version="1.0" encoding="UTF-8" ?>
<beans xmlns="http://www.springframework.org/schema/beans"
	xmlns:xsi="http://www.w3.org/2001/XMLSchema-instance"
	xmlns:context="http://www.springframework.org/schema/context"
	xsi:schemaLocation="http://www.springframework.org/schema/beans
        https://www.springframework.org/schema/beans/spring-beans.xsd
        http://www.springframework.org/schema/context
        https://www.springframework.org/schema/context/spring-context.xsd">
      <bean id="collectionDemo" class="club.johnny.polo.AllCollection">
      		<property name="listElement">
      		<list>
      			<value>苹果</value>
      			<value>香蕉</value>
      			<value>水蜜桃</value>
      		</list>
      		</property>
      		<property name="setElement">
      		<set>
      			<value>苹果2</value>
      			<value>香蕉2</value>
      			<value>水蜜桃2</value>
      		</set>
      		</property>
      		<property name="mapElement">
      		<map>
      			<entry>
      				<key><value>apple</value></key>
      				<value>苹果3</value>
      			</entry>
      			<entry>
      				<key><value>banana</value></key>
      				<value>香蕉3</value>
      			</entry>
      			<entry>
      				<key><value>peach</value></key>
      				<value>水蜜桃3</value>
      			</entry>
      		</map>
      		</property>

      		<property name="arrayElement">
      		<array>
      			<value>苹果4</value>
      			<value>香蕉4</value>
      			<value>水蜜桃4</value>
      		</array>
      		</property>
      		<property name="propsElement">
      		<props>
      			<prop key="apple5">苹果5</prop>
      			<prop key="banana5">香蕉5</prop>
      			<prop key="peach5">水蜜桃5</prop>
      		</props>
      		</property>
      </bean>
</beans>
 注意:
注意:
set、list、数组 各自都有自己的标签 ,但是也可以用< list> 代替以上三种。
构造器注入
Course类
package club.johnny.polo;

public class Course {
	private String courseName;
	private int courseHour ;
	private Teacher teacher ;//授课老师  ,依赖于Teacher
	public Course() {
	}

	public Course(Teacher teacher) {
		this.teacher = teacher;
	}

	public Course(String courseName, int courseHour, Teacher teacher) {
		this.courseName = courseName;
		this.courseHour = courseHour;
		this.teacher = teacher;
	}

	public String getCourseName() {
		return courseName;
	}
	public void setCourseName(String courseName) {
		this.courseName = courseName;
	}
	public int getCourseHour() {
		return courseHour;
	}
	public void setCourseHour(int courseHour) {
		this.courseHour = courseHour;
	}
	public Teacher getTeacher() {
		return teacher;
	}
	public void setTeacher(Teacher teacher) {
		this.teacher = teacher;
	}

	public void showInfo() {
		System.out.println(this.courseName+","+this.courseHour+","+this.teacher.getName());
	}

}
Teacher类
package club.johnny.polo;

public class Teacher {
	private String name;
	private int age ;

	public Teacher() {
	}


	public Teacher(int age) {
		this.age = age;
	}

	public Teacher(String name) {
		this.name = name;
	}

	/*
	public Teacher(String name, int age) {
		this.name = name;
		this.age = age;
	}
	*/
	public String getName() {
		return name;
	}
	public void setName(String name) {
		this.name = name;
	}
	public int getAge() {
		return age;
	}
	public void setAge(int age) {
		this.age = age;
	}

}
test测试类
package club.johnny.test;

import org.springframework.context.ApplicationContext;

import org.springframework.context.support.ClassPathXmlApplicationContext;

import club.johnny.polo.Course;
import club.johnny.polo.AllCollection;

public class Test {
	public static void testConstructor() {
		ApplicationContext context = new ClassPathXmlApplicationContext("applicationContext.xml");
		Course course =(Course) context.getBean("courseDemo");
		course.showInfo();


	}

	public static void main(String[] args) {
		testConstructor();
	}

}
<?xml version="1.0" encoding="UTF-8" ?>
<beans xmlns="http://www.springframework.org/schema/beans"
	xmlns:xsi="http://www.w3.org/2001/XMLSchema-instance"
	xmlns:context="http://www.springframework.org/schema/context"
	xsi:schemaLocation="http://www.springframework.org/schema/beans
        https://www.springframework.org/schema/beans/spring-beans.xsd
        http://www.springframework.org/schema/context
        https://www.springframework.org/schema/context/spring-context.xsd">
        <!-- 构造器 注入 -->
    <bean id="myteacher" class="club.johnny.polo.Teacher">
    	<!-- 通过私有属性名指定 -->
    	<constructor-arg name="name" value="johnnylin"></constructor-arg>
    </bean>
	<bean id="courseDemo" class="club.johnny.polo.Course">
		<!-- 可以严格按照构造器的顺序也可以 -->
		<constructor-arg index="0" value="java语言"></constructor-arg>
		<constructor-arg index="1" value="15"></constructor-arg>
		<constructor-arg name="teacher" ref="myteacher"></constructor-arg>
	</bean>
</beans>
几种特殊值的赋值
给对象类型赋值为null,注意没有子标签< value >
<property name="属性名">
	<null/>
</property>
给属性赋值为 “”
<property name="类的私有属性名" value="">
</property>
或者
<property name="类的私有属性名" >
	<value></value>
</property>
总结:
IOC容器赋值:如果是简单类型(8个基本+String),则使用
< property name="" value="8个基本数据类型"> < /property>
如果是对象类型,ref=“需要引用的id值”,因此实现了 对象与对象之间的依赖关系
<property name="" ref="需要引用的id值""> </property>
基于注解方式
Spring中定义了一系列的注解,常用的有以下:
| 注解 | 作用层/作用 |
|---|---|
| 三层组件 | |
| @Repository | Dao层 |
| @Service | Service层 |
| @Controller | Controller层 |
| @Component | 当不知道该类属于三层的那一层 时,可以使用@Component代替 |
| @AutoWired | 用于对Bean的属性变量、属性的setter方法及构造方法进行标注完成自动装配,默认按Bean的类型进行装配 |
| @Qualifier | 与@AutoWired配合使用,会将默认的按Bean类型装配改为按名装配 |
| @Resource | 与@AutoWired注解功能一致,name参数指定属性名,type参数指定属性类型,默认name,不匹配再type |
Student实体类
package club.johnny.polo;

import org.springframework.context.ApplicationContext;
import org.springframework.context.support.ClassPathXmlApplicationContext;


public class Student {
	private int stuNo ;
	private String stuName ;
	private int stuAge ;
	public int getStuNo() {
		return stuNo;
	}
	public void setStuNo(int stuNo) {
		this.stuNo = stuNo;
	}
	public String getStuName() {
		return stuName;
	}
	public void setStuName(String stuName) {
		this.stuName = stuName;
	}
	public int getStuAge() {
		return stuAge;
	}
	public void setStuAge(int stuAge) {
		this.stuAge = stuAge;
	}

	@Override
	public String toString() {
		return this.stuNo+","+this.stuName+","+this.stuAge;
	}


}
IStudent接口
package club.johnny.dao;

import club.johnny.polo.Student;

public interface IStudentDao {
	public void addStudent(Student student);
}
IStudent接口的实现类StudentDao
package club.johnny.dao.impl;

import org.springframework.stereotype.Repository;

import club.johnny.dao.IStudentDao;
import club.johnny.polo.Student;

//相当于在XML:<bean id="studentDao" class="club.johnny.dao.impl.StudentDaoImpl"></bean>
@Repository("studentDao")
public class StudentDaoImpl implements IStudentDao {

	public void addStudent(Student student) {
		System.out.println("调用dao层,添加学生……");
	}

}
IStudentService 接口
package club.johnny.service;

import club.johnny.polo.Student;

public interface IStudentService {
	public void addStudent(Student student);
}
IStudentService 实现类StudentServiceImpl
package club.johnny.service.impl;

import org.springframework.beans.factory.annotation.Autowired;
import org.springframework.beans.factory.annotation.Qualifier;
import org.springframework.stereotype.Service;

import club.johnny.dao.impl.StudentDaoImpl;
import club.johnny.polo.Student;
import club.johnny.service.IStudentService;

相当于在XML:<bean id="studentService" class="club.johnny.service.impl.StudentServiceImpl"></bean>
@Service("studentService")
public class StudentServiceImpl implements IStudentService{

//	@Resource("studentDao")	与下面两句效果等效

	//相当于<property name="studentDao" ref="studentDao"></property>
//	@Autowired
//	@Qualifier(value="studentDao")	//@Qualifier的value参数指定按值装配
	@Autowired	//@Autowired默认按类型装配
	private StudentDaoImpl studentDao;
	public void addStudent(Student student) {
		this.studentDao.addStudent(student);
		System.out.println("调用service层,添加学生……");

	}

}
<?xml version="1.0" encoding="UTF-8" ?>
<beans xmlns="http://www.springframework.org/schema/beans"
	xmlns:xsi="http://www.w3.org/2001/XMLSchema-instance"
	xmlns:context="http://www.springframework.org/schema/context"
	xsi:schemaLocation="http://www.springframework.org/schema/beans
        https://www.springframework.org/schema/beans/spring-beans.xsd
        http://www.springframework.org/schema/context
        https://www.springframework.org/schema/context/spring-context.xsd">

       <!-- 配置扫描器 -->
       <context:component-scan base-package="club.johnny"></context:component-scan>
</beans>
test测试类
package club.johnny.test;

import org.springframework.context.ApplicationContext;

import org.springframework.context.support.ClassPathXmlApplicationContext;

import club.johnny.polo.Course;
import club.johnny.polo.Student;
import club.johnny.dao.impl.StudentDaoImpl;
import club.johnny.polo.AllCollection;

public class Test {

		public static void testAnnotation() {
		ApplicationContext context = new ClassPathXmlApplicationContext("applicationContext.xml");
		StudentServiceImpl studentService = (StudentServiceImpl)context.getBean("studentService");
		studentService.addStudent(new Student());
	}
	public static void main(String[] args) {
		testAnnotation();
	}

}
结果:

自动装配
在applicationContext.xml文件中
<bean ... class="" autowire="byName|byType|constructor|no" > </bean>
| 属性值 | 含义 |
|---|---|
| byName | 根据名称自动装配,自动寻找容器中其他bean的id值等于该实现类属性的 |
| byType | 根据类型自动装配,自动寻找容器中其他bean的类型值与该实现类属性的类型相同的 |
| constructor | 根据构造函数进行byType自动装配 |
| no | 在默认情况下不使用自动装配,Bean依赖注入必须通过ref实现 |
可以在全局区设置
default-autowire=“byName|byType”


 2158
2158


 被折叠的 条评论
为什么被折叠?
被折叠的 条评论
为什么被折叠?
 到【灌水乐园】发言


