


SpringBoot整合SpringCache
SpringCache整合多种数据源,使用Aop提供业务缓存的使用,使用注解既可以实现简单的应用缓存配置。
1、引入依赖POM
1.1、引入SpringBoot-Cache
//引入SpringCache官方Starter
<dependency>
   <groupId>org.springframework.boot</groupId>
   <artifactId>spring-boot-starter-cache</artifactId>
</dependency>
//使用SpringCache中什么样的数据源就引入什么类型的启动器
1.2、引入第三方的缓存Jar依赖
根据SpringBoot CacheAutoConfiguraton分析可知,其自动配置了很多缓存的数据源:
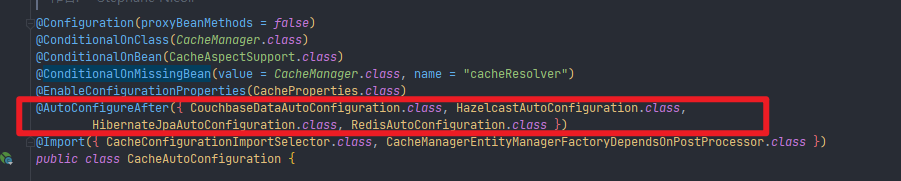
而这些数据自动配置类,在导入响应的Jar依赖之后会自动配置,这里使用Redis作为缓存中间件。
//父工程为SpringBoot自动管理依赖版本
<dependency>
  <groupId>org.springframework.boot</groupId>
  <artifactId>spring-boot-starter-data-redis</artifactId>
</dependency>
在自动配置类中可以发现绑定了许多的属性配置文件,也就是对于SpringCache的配置可以用“spring.cache”开头的属性进行配置。

进入到RedisAutoConfiguration.class 中可以发现其绑定了有关Redis的配置在

因此可以在配置文件中配置有关Redis的配置项目以“spring.redis”前缀进行匹配。
2、编写配置
2.1、配置原理
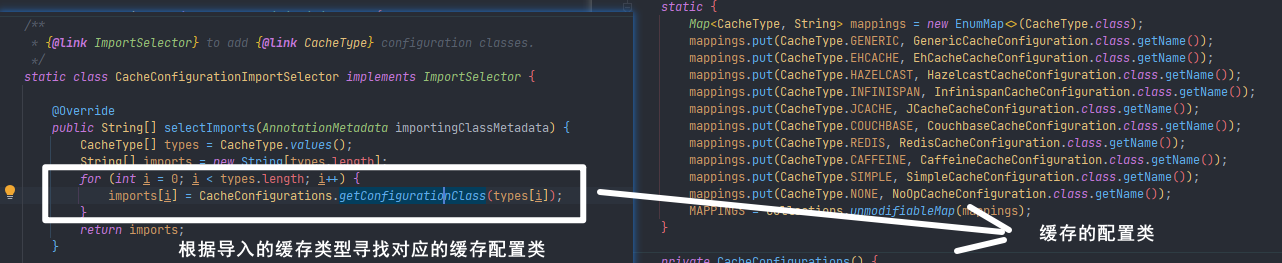
在SpringCache自动配置类中还会注入一个配置 CacheConfigurationImportSelector缓存配置自动选择:器会根据导入的缓存进行选择性自动配置。
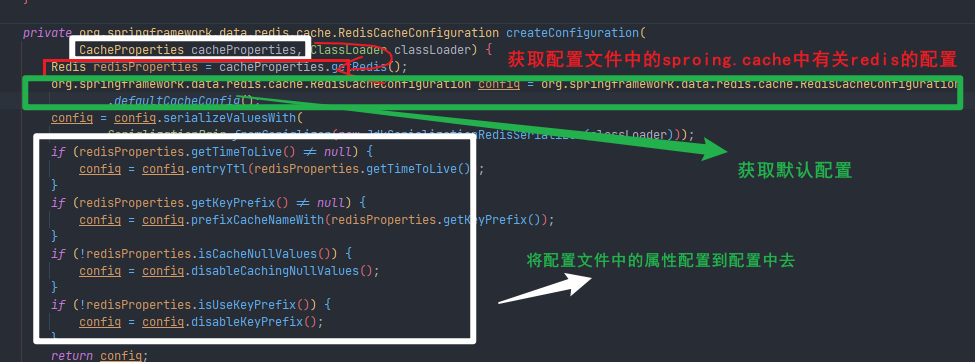
进入RedisCacheConfiguration.class配置类中,可以发现其默认使用Redisd的默认配置,并且将我们在配置类中配置的有关Redisd的配置导入到了这个RedisCacheConfiguration中(配置类中的属性,在CacheAutoConfiguraton已经注入到容器之中)
2.2、配置方式—注入配置类
2.2.1、配置application.yaml
sping:
  #配置SpringCache
  cache:
    type: redis
    redis:
      time-to-live: 3600000
      #      缓存前缀
      #      key-prefix: CACHE_
      #      开启缓存前缀,不指定缓存前缀->缓存名称::自主生成key值 指定了前缀 前缀+缓存名称::自主生成key值
      use-key-prefix: true
      #      缓存空值是否开启--解决缓存穿透(redis中没有key值)
      cache-null-values: true
  #    引入redis配置
  redis:
    host: localhost
    port: 6379
2.2.1、老版本
1、高版本在缓存自动配置类已经注入了配置文件绑定类
2、老版本在这个配置类中开启@EnableConfigurationProperties将CacheProperties.class注入容器,获取配置文件中配置
@EnableCaching
@Configuration
public class MyRedisCacheConfig {
    /**
     * 注入一个 RedisCacheConfiguration 链式调用(旧版写法)
     */
    @Bean
    RedisCacheConfiguration redisCacheConfiguration(CacheProperties cacheProperties) {
        RedisCacheConfiguration redisCacheConfiguration = RedisCacheConfiguration.defaultCacheConfig();
        //链式调用,每次要覆盖原来的
        redisCacheConfiguration =
                redisCacheConfiguration.serializeKeysWith(RedisSerializationContext.SerializationPair.fromSerializer(new StringRedisSerializer())).serializeValuesWith(RedisSerializationContext.SerializationPair.fromSerializer(new GenericFastJsonRedisSerializer()));
        //获取有关redis的配置getRedis()
        CacheProperties.Redis redisProperties = cacheProperties.getRedis();
        //获取配置文件中的值参考RedisCacheConfiguration写法
        if (redisProperties.getTimeToLive() != null) {
            redisCacheConfiguration = redisCacheConfiguration.entryTtl(redisProperties.getTimeToLive());
        }

        if (redisProperties.getKeyPrefix() != null) {
            redisCacheConfiguration = redisCacheConfiguration.prefixCacheNameWith(redisProperties.getKeyPrefix());
        }

        if (!redisProperties.isCacheNullValues()) {
            redisCacheConfiguration = redisCacheConfiguration.disableCachingNullValues();
        }

        if (!redisProperties.isUseKeyPrefix()) {
            redisCacheConfiguration = redisCacheConfiguration.disableKeyPrefix();
        }
        return redisCacheConfiguration;
    }
}
2.2.2、新版本
完全控制redis cache configuration 针对每个cacheName进行配置
    /**
     * 参考地址:https://www.baeldung.com/spring-boot-redis-cache
     * @return RedisCacheManagerBuilderCustomizer
     */
    @Bean
    public RedisCacheManagerBuilderCustomizer redisCacheManagerBuilderCustomizer() {
        return (builder) -> builder
                .withCacheConfiguration("itemCache",
                        RedisCacheConfiguration.defaultCacheConfig().entryTtl(Duration.ofMinutes(10)))
                .withCacheConfiguration("customerCache",
                        RedisCacheConfiguration.defaultCacheConfig().entryTtl(Duration.ofMinutes(5)));
    }
3、使用注解缓存
- 使用缓存:
1、每一个需要缓存数据都需要指定放到哪个缓存分区下【缓存分区(按照业务划分)】
2、表示当前方法结果需要缓存,缓存中存在,方法不会进行调用,没有就会调用方法,最后将方法结果存入缓存
3、默认行为
- 1、缓存中存在,方法不调用
- 2、默认生成key category::SimpleKey [] _—>缓存名称(value)::自主生成key值(key)
- 3、缓存的值(不配置使用Java默认序列化器序列化)
4、默认时间为-1用不过期 TTL=-1
自定义
1、指定生成缓存使用的key值,使用key属性设置,接受一个SPEL表达式 参考https://docs.spring.io/spring-framework/docs/current/reference/html/integration.html#cache-annotations-cacheable
2、指定缓存的数据的TTL 再配置文件中设置 spring.cache.redis.time-to-live 单位是ms
3、自定义序列化!!多个系统之间数据交互使用JSON 自定义缓存管理器
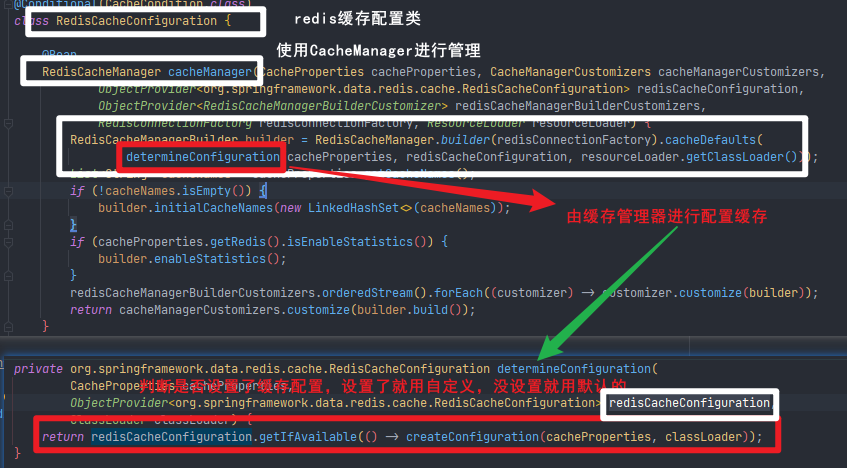
缓存自动配置导入RedisCacheConfiguration -> redisCacheManager(determineConfiguration(决定每个缓存使用怎样的配置)->判断redisCacheConfiguration是不是空的,空的就使用默认的)
//使用FastJson进行序列化反序列化
redisCacheConfiguration =              redisCacheConfiguration.serializeKeysWith(RedisSerializationContext.SerializationPair.fromSerializer(new StringRedisSerializer())).serializeValuesWith(RedisSerializationContext.SerializationPair.fromSerializer(new GenericFastJsonRedisSerializer()));
-
@Cacheable 触发将数据保存到缓存
@Cacheable(value = "category", key = "#root.methodName", sync = true)
//value:使用的缓存分区名称
//key:使用存储的缓存名称key值(#root为spel表达式)
//sync;表示增加同步锁(本地)在查询的时候会先查询缓存,缓存中没有的时候会去数据库中查询——>其将这个过程进行加锁
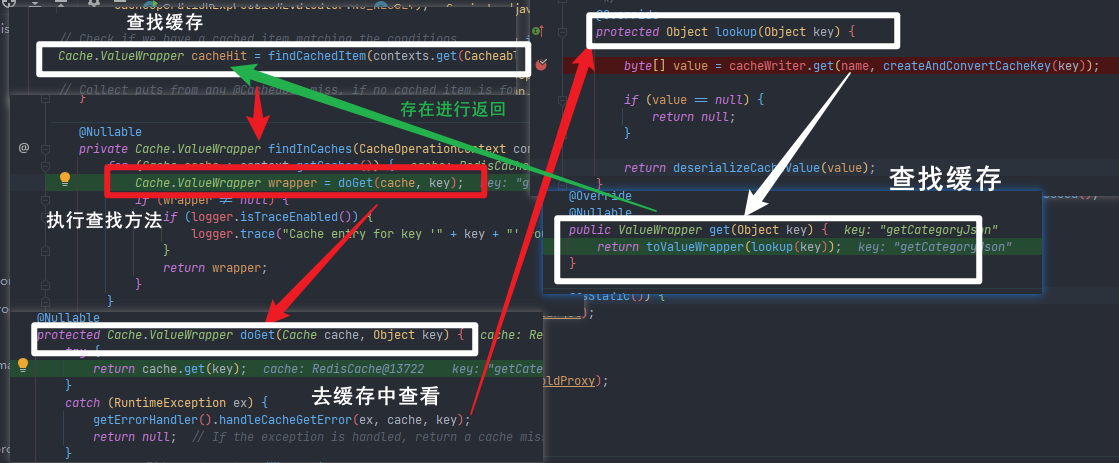
查找原理:
-
缓存不存在
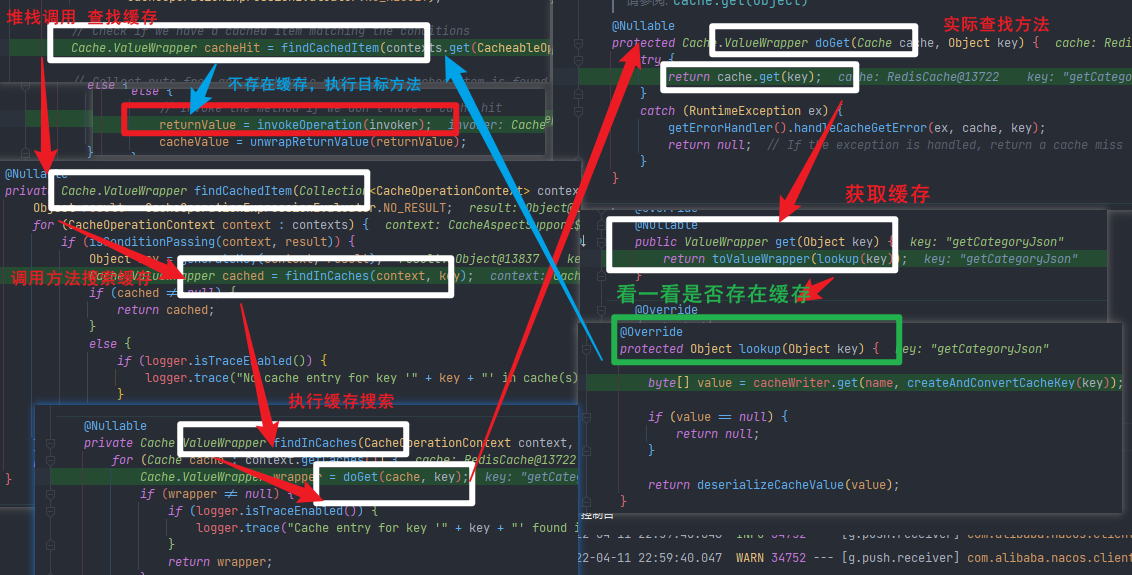
-
缓存存在
-
开启同步Sync
-
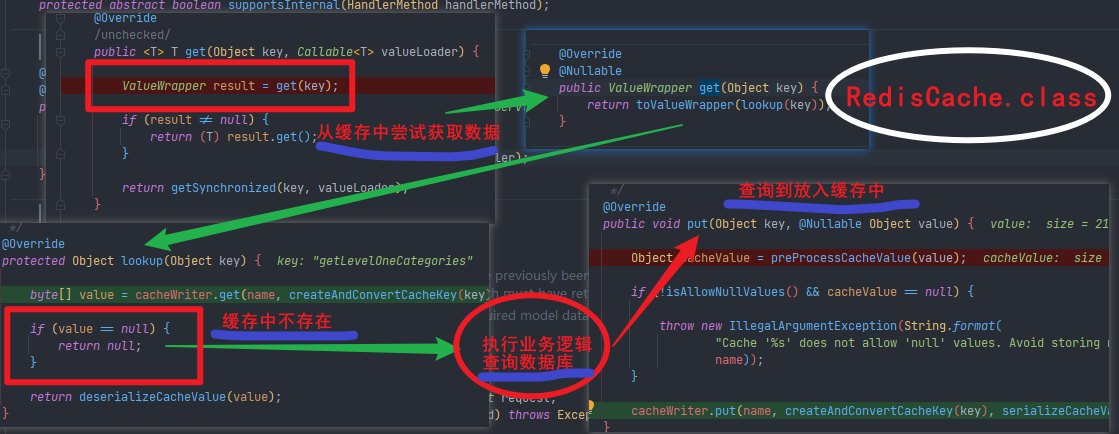
缓存中不存在(会使用同步方法
getSynchronized进行查询,这个方法中会调用查询数据库,之后put设置到缓存中)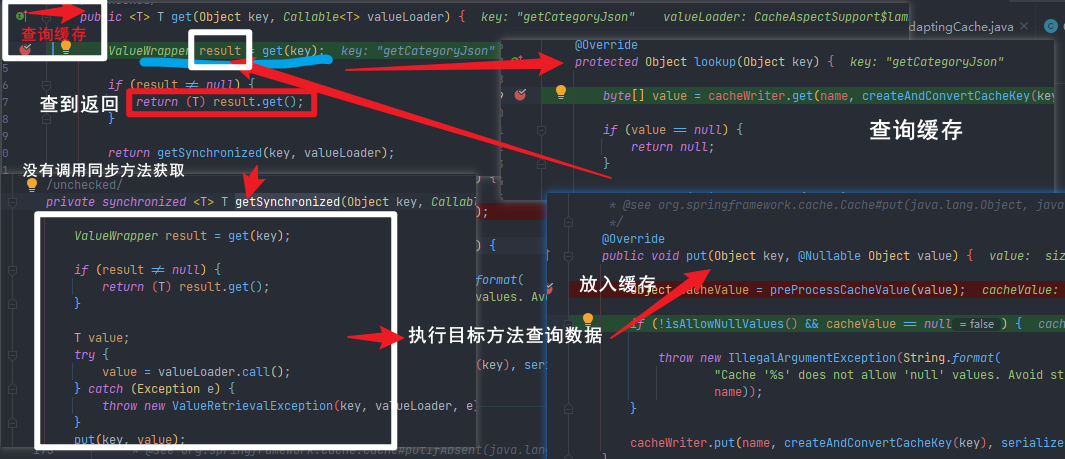
-
缓存中存在(直接取,取不加锁)
-
-
@CacheEvict 触发缓存删除
@CacheEvict(value = {"缓存分区名称"}, key = "'删除的Key值(字符串使用''括起来)'") @CacheEvict(value = "缓存分区名称",allEntries = true) //allEntries删除全部缓存信息 -
@CachePut 更新缓存信息,并且不会影响方法执行
-
@Caching 组合多个缓存操作,比如又更新又删除,又将这个缓存移到其他的里面
@Caching(evict = { @CacheEvict(value = {"缓存分区"}, key = "'缓存Key'"), @CacheEvict(value = {"缓存分区"}, key = "'缓存key'") }) -
@CacheConfig 在类级别共享缓存相同配置
4、开启缓存
@EnableCaching //开启缓存注解
@Configuration //配置类
public class MyRedisCacheConfig {
}
5、SpringCache总结
- 读模式
- 缓存穿透(null)----> use-key-prefix: true (允许设置空值解决) ✔️
- 缓存击穿 sync功能解决 ✔️
- 缓存雪崩 time-to-live: 3600000(设置过期时间解决)✔️
- 写模式(缓存与数据库强一致)❌(均需要手动实现)
- 读写加锁 ❌
- 使用Canal(中间件感知到MySql更新去更新数据库 ----> 伪装为一个mysql slave欺骗mysql master给自己推送中继日志,从而实现增量获取事件的功能)❌
- 读多写多(直接去数据库)❌
1、读多写少,及时性,一致性要求不高的数据
2、实时性要求高,加缓存,必须特殊设计!
6、备注–常用注解参数

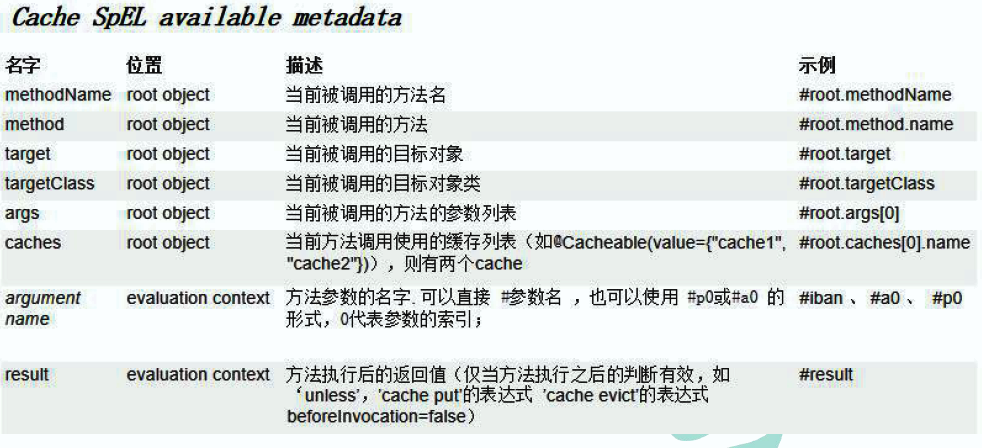
7、备注–常用SPEL表达式
slave欺骗mysql master给自己推送中继日志,从而实现增量获取事件的功能)❌
3. 读多写多(直接去数据库)❌
1、读多写少,及时性,一致性要求不高的数据
2、实时性要求高,加缓存,必须特殊设计!
6、备注–常用注解参数
[外链图片转存中…(img-r8dei7Cn-1663526688534)]
7、备注–常用SPEL表达式
[外链图片转存中…(img-I2uZmcG6-1663526688534)]


 1988
1988


 被折叠的 条评论
为什么被折叠?
被折叠的 条评论
为什么被折叠?
 到【灌水乐园】发言


