


文章目录
Maven学习
自动下载jar包 + 内置tomcat服务器
maven基础回顾
Maven是一个项目管理工具
依赖管理:maven对项目中jar包放置在电脑的仓库中,项目内部只需要放置jar包的坐标
仓库的种类:
	本地仓库,远程仓库【私服】(公司自带的jar包库,局域网获取jar包) 中央仓库
仓库之间的关系:
    Maven在启动的时候会通过pom文件中jar坐标去本地仓库寻找对应的jar包,如果找不到,就通过网络去中央仓库下载jar包到本地仓库中,如果不让我们上网,就需要远程仓库,通过局域网去下载jar包。
一键构建:maven自身集成了tomcat插件,可以对项目进行编译

Maven常用命令:
Clean,complie,test,package,install,deploy
Maven三套生命周期:
清理生命周期,默认生命周期,站点生命周期
Maven工程导入jar包冲突
解决jar包冲突的方式一:
第一声明原则:哪个jar包的坐标在靠上的位置,这个jar包就是先声明的
先声明的jar包可以优先加入项目中
解决jar包冲突的方式二:
直接依赖:项目中直接导入的jar包就是直接依赖
传递依赖:项目中没有直接导入的jar包,是由其他的直接依赖的jar包传递进来的
(导入spring-context会把spring的其他jar也导入)
直接依赖的包比传递依赖的包先声明
解决jar包冲突的方式三:
加入排除代码 <exclusions
<dependency>
  <groupId>org.springframework</groupId>
  <artifactId>spring-beans</artifactId>
  <version>4.3.30.RELEASE</version>
  <exclusions>
    <exclusion>
      <groupId>org.springframework</groupId>
      <artifactId>spring-core</artifactId>
    </exclusion>
  </exclusions>
</dependency>
锁定jar包的版本
<!-- 锁定jar包版本 -->
<dependencyManagement>
复制一份dependence进来
</dependencyManagement>
Maven内置的tomcat执行

Maven启动tomcat失败
在pom.xml中添加如下代码,即可解决。
<plugin>
  <groupId>org.apache.maven.plugins</groupId>
  <artifactId>maven-compiler-plugin</artifactId>
  <version>3.8.0</version>
  <configuration>
    <source>1.8</source>
    <target>1.8</target>
  </configuration>
</plugin>
这样就可以不用配置tomcat,直接访问浏览器即可
Maven工程拆分和聚合的思想
传统的ssm框架项目,每个项目都需要一套jar包
如果是maven工程的ssm项目,我们只需要一套jar包
例如dao层查询数据库,对于用户和管理员两个不同项目的操作是一样的,我们就只需要一个dao类,重用代码的好处就是如果修改维护,只需要修改一处代码即可。
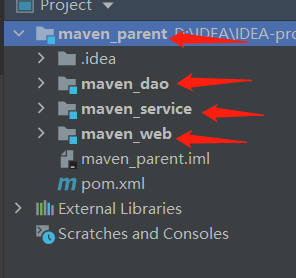
父子工程创建
1建立一个maven父工程,不需要骨架,在pom.xml内部导入jar包,
这个就是所有项目的jar包文件
2在这个maven父工程下面建立多个子工程,就可以复用父工程的pom.xml里面的jar包
工程和模块的关系
工程和模块的区别:
    工程不等于完整的项目,模块不等于完整的项目
    一个完整的项目看的是代码,完整的代码,就是一个项目

    工程天生只能使用自己内部资源,是个独立的,后天可以和其他项目的资源都可以使用
  模块天生是属于父工程的,不是独立的,模块一旦创建完成,所有父工程的资源都能使用

    父子工程,子模块天生继承父工程,可以使用父工程所有的资源
    子模块之间天生是没有任何关系

父子工程之间不用建立关系,继承关系是先天的,不需要手动建立
	平级之间的引用叫做依赖,依赖不是先天的,是需要后台建立的
模块之间的互相连接
在模块下的pom.xml引入对方的模块名称,不能互相依赖,会出错
<dependencies>
    <dependency>
        <groupId>org.example</groupId>
        <artifactId>maven_dao</artifactId>
        <version>1.0-SNAPSHOT</version>
    </dependency>
</dependencies>
启动方式
1选中父工程的maven内的tomcat
2自己建立tomcat启动工程
私服
公司的远程仓库
私服的安装与启动
- 1下载私服的文件包
- 2利用cmd命令调用nexus.bat install 下载私服
Nexus.bat start 就打开了私服的连接线程 - 3在nexus.properties文件里面找访问私服的url
- 4浏览器输入url就可以访问私服
ssm项目分离实现
建立parent项目,在pom.xml中加入所有的jar包
配置Dao层

java程序只需要引入dao层的东西,也就是bean对象和dao接口
资源文件需要引入接口dao类的映射文件,还有配置数据源,Mybatis创建代理对象的配置文件,也就是applicationContext.xml文件,不过我们不需要里面的spring 的配置信息,可以把spring的配置信息删除。
<?xml version="1.0" encoding="UTF-8"?>
<beans xmlns="http://www.springframework.org/schema/beans"
       xmlns:xsi="http://www.w3.org/2001/XMLSchema-instance"
       xmlns:context="http://www.springframework.org/schema/context"
       xmlns:aop="http://www.springframework.org/schema/aop"
       xmlns:tx="http://www.springframework.org/schema/tx"
       xmlns:mvc="http://www.springframework.org/schema/mvc"
       xsi:schemaLocation="http://www.springframework.org/schema/beans
			    http://www.springframework.org/schema/beans/spring-beans.xsd
			    http://www.springframework.org/schema/context
			    http://www.springframework.org/schema/context/spring-context.xsd
			    http://www.springframework.org/schema/aop
			    http://www.springframework.org/schema/aop/spring-aop.xsd
			    http://www.springframework.org/schema/tx
			    http://www.springframework.org/schema/tx/spring-tx.xsd
			    http://www.springframework.org/schema/mvc
			    http://www.springframework.org/schema/mvc/spring-mvc.xsd">

    <!--dao层配置文件开始-->
    <!--配置连接池-->
    <bean id="dataSource" class="com.alibaba.druid.pool.DruidDataSource">
        <property name="driverClassName" value="com.mysql.jdbc.Driver"/>
        <property name="url" value="jdbc:mysql:///maven?serverTimezone=UTC"/>
        <property name="username" value="root"/>
        <property name="password" value="yuan"/>
    </bean>
    <!--配置SqlSession工厂 生成sqlsession的类-->
    <bean id="sqlSessionFactory" class="org.mybatis.spring.SqlSessionFactoryBean">
        <property name="dataSource" ref="dataSource"></property>
    </bean>

    <!--扫描接口包路径,生成包下所有接口的代理对象,并且放入spring容器中-->
    <bean class="org.mybatis.spring.mapper.MapperScannerConfigurer">
        <property name="basePackage" value="com.yuan.ssm.dao"/>
    </bean>
    <!--dao层配置文件结束-->

</beans>
配置Service层

资源文件需要引入spring的配置文件,里面可以删除dao层的配置文件,注意在resources下的地址要和dao项目一致,最重要的是
在service项目加入dao项目的依赖
在service项目的pom.xml内
 <dependencies>
        <dependency>
            <groupId>org.example</groupId>
            <artifactId>maven_dao</artifactId>
            <version>1.0-SNAPSHOT</version>
        </dependency>
    </dependencies>
配置Web层
前面两个是配置的java层面的,不需要webapp的骨架,这个是需要跟页面交互的,所以我们建立的时候需要加入webapp的骨架

这里就是springmvc框架的使用,所以我们需要加入的东西比较多
引入web.xml配置文件
引入springmvc的配置文件
java方面加入Controller处理类
jsp页面文件
同时我们要完善好applicationContext类,新建一个空的applicationContext.xml,在里面引入dao层和service层的代码即可
<?xml version="1.0" encoding="UTF-8"?>
<beans xmlns="http://www.springframework.org/schema/beans"
       xmlns:xsi="http://www.w3.org/2001/XMLSchema-instance"
       xmlns:context="http://www.springframework.org/schema/context"
       xmlns:aop="http://www.springframework.org/schema/aop"
       xmlns:tx="http://www.springframework.org/schema/tx"
       xmlns:mvc="http://www.springframework.org/schema/mvc"
       xsi:schemaLocation="http://www.springframework.org/schema/beans
			    http://www.springframework.org/schema/beans/spring-beans.xsd
			    http://www.springframework.org/schema/context
			    http://www.springframework.org/schema/context/spring-context.xsd
			    http://www.springframework.org/schema/aop
			    http://www.springframework.org/schema/aop/spring-aop.xsd
			    http://www.springframework.org/schema/tx
			    http://www.springframework.org/schema/tx/spring-tx.xsd
			    http://www.springframework.org/schema/mvc
			    http://www.springframework.org/schema/mvc/spring-mvc.xsd">

    <import resource="classpath:spring/applicationContext-dao.xml"></import>
    <import resource="classpath:spring/applicationContext-service.xml"></import>

    </beans>
最后,在web的pom.xml中加入对service的依赖
  <dependencies>
    <dependency>
      <groupId>org.example</groupId>
      <artifactId>maven_service</artifactId>
      <version>1.0-SNAPSHOT</version>
    </dependency>
  </dependencies>


 647
647


 被折叠的 条评论
为什么被折叠?
被折叠的 条评论
为什么被折叠?
 到【灌水乐园】发言


