


1.创建一幅图并且添加节点和边
理论
'''创建一幅图'''
import networkx as nx
G = nx.Graph()  #创建一幅空图
H = nx.Graph([(0, 1), (1, 2), (2, 3)]) #边创建图边添加边
M = nx.DiGraph(H)  #利用已有图来创建新图
'''如何给图添加节点和边'''
import networkx as nx
G=nx.Graph()  #创建一个没有节点和边的空图空图

'''给图添加节点'''
G.add_node(1)
G.add_node('H')  #添加节点H
G.add_node(H) 等价于 G.add_nodes_from(H)
G.add_nodes_from([2, 3])


'''给图添加边'''
G.add_edge(1, 2)
G.add_edges_from([(1,2),(2,3)])
G.add_edges_from( H.edges());  #此时H是一幅图

'''删除节点和边'''
Graph.remove_node(1)
Graph.remove_nodes_from(['b','c','d','e'])
Graph.remove_edge(1, 2)
Graph.remove_edges_from([(1,2),(2,3)])

'''或者也可以删除图中所有节点和边'''
G.clear()
添加边的注意点:
G = nx.Graph()
H = nx.path_graph(10) #返回由10个节点挨个连接的无向图
G.add_nodes_from(H) #也可以是 G.add_node(H)
G.add_node(H) #也可以是G.add_nodes_from(H)
G.add_edges_from(H.edges()) #不能写作G.add_edges_from(H)
另外,稍微注意一下:
G.add_node("spam")     # adds node "spam"
G.add_nodes_from("spam") #adds 4 nodes: 's', 'p', 'a', 'm'
例题
import networkx as nx
G = nx.Graph();
G.add_edge(1, 2)
H = nx.DiGraph(G)
print(list(H.edges()))
>>>[(1, 2), (2, 1)]
import networkx as nx
H = nx.Graph([(0, 1), (1, 2), (2, 3)])
print(list(H.edges()))
>>>[(0, 1), (1, 2), (2, 3)]
我们添加新的节点/边,并且NetworkX会自动的忽略那些重复的内容
G.add_edges_from([(1, 2), (1, 3)])
G.add_node(1)
G.add_edge(1, 2)
G.add_node("spam")
G.add_nodes_from("spam")
G.add_edge(3, 'm')

>>> G.number_of_nodes()
8
>>> G.number_of_edges()
3
>>> list(G.nodes)
['a', 1, 2, 3, 'spam', 'm', 'p', 's']
>>> list(G.edges)
[(1, 2), (1, 3), (3, 'm')]
>>> list(G.adj[1])  #G.adj[1]) 以列表的形式展示1的邻居
[2, 3]
>>> G.degree[1]   #G.degree[1]展示1的度
2
>>> G.remove_node(2)
>>> G.remove_nodes_from("spam")
>>> list(G.nodes)
[1, 3, 'spam']
>>> G.remove_edge(1, 3)
2.访问有权重的边和节点邻居
务必记住的三样:
FG.adj.items()
FG.adj[1]
FG.edges[1,2]
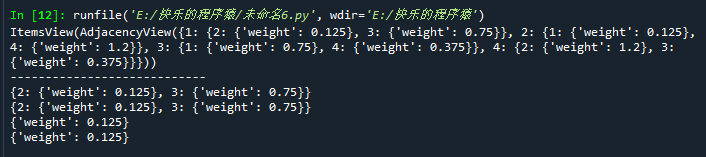
import networkx as nx
FG = nx.Graph()
FG.add_weighted_edges_from([(1, 2, 0.125), (1, 3, 0.75), (2, 4, 1.2), (3, 4, 0.375)])
print(FG.adj.items())
print('----------------------------')
print(FG.adj[1])
print(FG[1])#等同于FG.adj[1]
print(FG.edges[1,2])
print(FG[1][2])#等同于FG.edges[1,2]
如果边缘已经存在,您可以使用下标符号来获取/设置边的属性。
>>> G.add_edge(1, 3)
>>> G[1][3]['color'] = "blue"
>>> G.edges[1, 2]['color'] = "red"
所有(节点,邻接节点)的快速查询都是使用 G.adjacency()或G.adj.items()完成的。请注意,对于无向图,邻接迭代会将每个边看两次。
>>> FG = nx.Graph()
>>> FG.add_weighted_edges_from([(1, 2, 0.125), (1, 3, 0.75), (2, 4, 1.2), (3, 4, 0.375)])
>>> for n, nbrs in FG.adj.items():  #FG.adj.items()下面有详细的解释
...    for nbr, eattr in nbrs.items():
...        wt = eattr['weight']
...        if wt < 0.5: print('(%d, %d, %.3f)' % (n, nbr, wt))
(1, 2, 0.125)
(2, 1, 0.125)
(3, 4, 0.375)
(4, 3, 0.375)
关于FG.adj.items()
import networkx as nx
FG = nx.Graph()
FG.add_weighted_edges_from([(1, 2, 0.125), (1, 3, 0.75), (2, 4, 1.2), (3, 4, 0.375)])
print(FG.adj.items())
for n,nbrs in FG.adj.items():
    print(n)
    print(nbrs)

也可以用第二种快速输出的方式:
>>> import networkx as nx
>>> FG = nx.Graph()
>>> FG.add_weighted_edges_from([(1, 2, 0.125), (1, 3, 0.75), (2, 4, 1.2), (3, 4, 0.375)])
>>> for (u, v, wt) in FG.edges.data('weight'):
...     if wt < 0.5: print('(%d, %d, %.3f)' % (u, v, wt))
(1, 2, 0.125)
(3, 4, 0.375)
3.将属性添加到图形,节点和边
图形属性
创建新图形时分配图形属性
>>> G = nx.Graph(day="Friday")
>>> G.graph
{'day': 'Friday'}

或者也可以修改属性
>>> G.graph['day'] = "Monday"
>>> G.graph
{'day': 'Monday'}
节点属性
添加节点属性使用add_node(),add_nodes_from()或G.nodes
>>> G.add_nodes_from([3], time='2pm')
>>> G.add_node(1, time='5pm')
>>> G.nodes[1]
{'time': '5pm'}
>>> G.nodes[1]['room'] = 714
>>> G.nodes.data()
NodeDataView({1: {'room': 714, 'time': '5pm'}, 3: {'time': '2pm'}})

边属性
使用add_edge(),add_edges_from()或标符号。
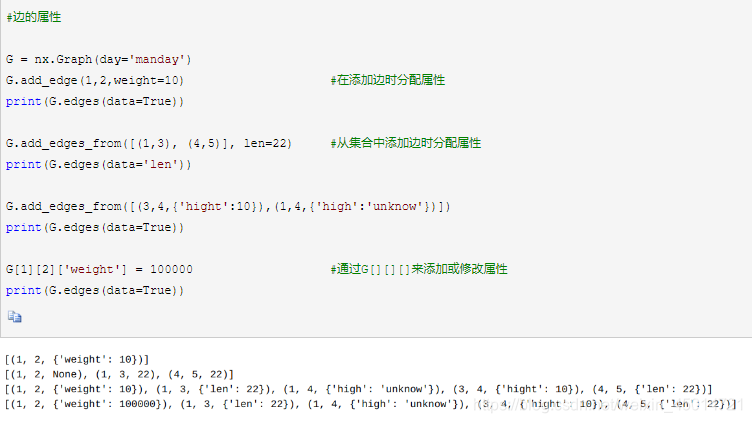
#添加
>>> G.add_edge(1, 2, weight=4.7 )
>>> G.add_edges_from([(3, 4), (4, 5)], color='red')
>>> G.add_edges_from([(1, 2, {'color': 'blue'}), (2, 3, {'weight': 8})])
#修改
>>> G[1][2]['weight'] = 4.7
>>> G.edges[3, 4]['weight'] = 4.2
4.出入度
①有向图
DiGraph.out_degree()出度
>>> G = nx.DiGraph()
>>> nx.add_path(G, [0, 1, 2, 3]) #(生成一条0-1-2-3的路径)
>>> G.out_degree(0) # node 0 with degree 1
1
>>> list(G.out_degree([0, 1, 2]))
[(0, 1), (1, 1), (2, 1)]
DiGraph.in_degree()入度
DiGraph.degree()度
>>> G = nx.DiGraph()   # or MultiDiGraph
>>> nx.add_path(G, [0, 1, 2, 3])
>>> G.degree(0) # node 0 with degree 1
1
>>> list(G.degree([0, 1, 2]))
[(0, 1), (1, 2), (2, 2)]
DG.out_degree(1, weight=‘weight’)节点1的出度的权重
DG.degree(1, weight=‘weight’) 节点1的权重和
>>> DG = nx.DiGraph()
>>> DG.add_weighted_edges_from([(1, 2, 0.5), (3, 1, 0.75)])
>>> DG.out_degree(1, weight='weight')
0.5
>>> DG.degree(1, weight='weight') #节点1的权重和
1.25
>>> MG.add_weighted_edges_from([(1, 2, 0.5), (1, 3, 0.75), (2, 3, 0.5)])
>>> dict(MG.degree(weight='weight'))
{1: 1.25, 2: 1, 3: 1.25}
一些算法仅适用于有向图,而其他算法不适用于有向图。如果你想把一个有向图作为无向的进行一些测量,你应该使用Graph.to_undirected()或者用它来转换它
>>> H = nx.Graph(G) # convert G to undirected graph
②普通无向图的度
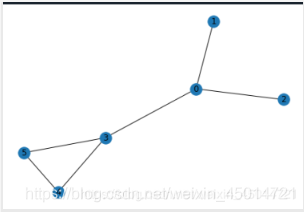
import networkx as nx
G = nx.graph_atlas(100)
nx.draw(G, with_labels=True)
print(G.degree(0))  #返回某个节点的度
print(G.degree())  #返回度
print(nx.degree(G))
print(nx.degree_histogram(G)) #返回图中所有节点的度分布序列(度为0有0个,度为1有2个,度为2有2个,度为3有2个)

5.补充:networkx经常涉及的字典列表知识
字典与列表的相互转换
print("***********************************")
print("不带括号的字典转列表")
dit = {'name':'zxf','age':'22','gender':'male','address':'shanghai'}
lst = list(dit) #这仅仅是把键转换为列表
print(lst)  # ['name', 'age', 'gender', 'address']
lst2 = list(dit.values())
print(lst2)  # ['zxf', '22', 'male', 'shanghai']
lst3=list(dit.items())
print(lst3)#[('name', 'zxf'), ('age', '22'), ('gender', 'male'), ('address', 'shanghai')]

print("***********************************")
print("带括号的字典转列表")
dit1={(1,2),(3,4),(5,6),(7,8)}#不存在键值对,这其实不属于正规的字典
lst1=list(dit1)
print(lst1)  #[(1, 2), (3, 4), (5, 6), (7, 8)]

dit2=dict(lst1)
print(dit2)  #{1: 2, 3: 4, 5: 6, 7: 8}

print(list(dit2)) #[1, 3, 5, 7]
print(list(dit2.values()))#[2, 4, 6, 8]
print(list(dit2.items())) #[(1, 2), (3, 4), (5, 6), (7, 8)]

print("***********************************")
print("带括号的列表转字典")
lst3=[(1, 2), (3, 4), (5, 6), (7, 8)]
dit3=dict(lst3)
print(dit3) #{1: 2, 3: 4, 5: 6, 7: 8}

print("***********************************")
print("不带括号的列表转字典")
a = ['a1','a2','a3','a4']
b = ['b1','b2','b3']
d = zip(a,b)
print(d)  #输出结果为<zip object at 0x102FAF80>像这种键-值对应的,肯定用字典输出才行
print(dict(d))  #{'a1': 'b1', 'a2': 'b2', 'a3': 'b3'}

print("***********************************")
总之,
列表转字典,这个列表必须是具有“键-值”特性[(1, 2)],否则不能转
字典转列表,你必须考虑好是转字典的键 还是 转列表的值 还是 转列表的键+值


 750
750


 被折叠的 条评论
为什么被折叠?
被折叠的 条评论
为什么被折叠?
 到【灌水乐园】发言


