


本文目录
平台的选择:极链AI云
优势特点:与很多平台不同,按小时计费;服务器GPU类型多样,选择多,数量多;有短期的暑期优惠和长期的学生优惠可以选择,非常的实惠!!!
贴一个极链AI云的官网:https://cloud.videojj.com
本文引用的github相关
AdelaiDet toolkit 地址:点这里跳转AdelaiDet
Detectron2 地址:点这里跳转Detectron2
机器环境选择
一定要:
python = 3.8; pytorch = 1.8; cuda = 11.1!!!!!
python = 3.8; pytorch = 1.8; cuda = 11.1!!!!!
python = 3.8; pytorch = 1.8; cuda = 11.1!!!!!
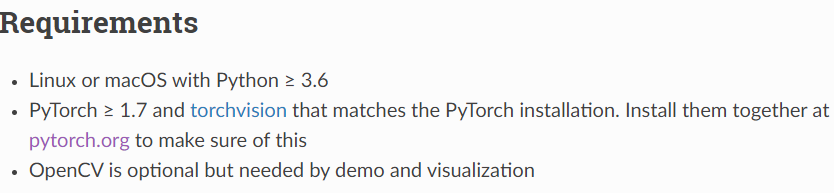
Detectron2官方使用文档给出的Requirements(随便贴一下,实践中建议参照上文的配置,低版本会有很多奇怪bug):
安装配置Detectron2
cd root # 在root文件夹下执行,可以选择自己想要执行的文件夹位置。
git clone https://github.com/facebookresearch/detectron2.git
pip install -e detectron2
验证Detectron2部署安装
利用filezilla传输文件,点击这里跳转极链AI云平台的filezilla使用文档
传入demo/input 想要测试的图片,注意文件夹路径,如果需要改变文件名和路径名,在demo语句中也需要改变。
运行:
python demo.py --config-file ../configs/COCO-InstanceSegmentation/mask_rcnn_R_50_FPN_3x.yaml --input input/*.jpg --output output --opts MODEL.WEIGHTS detectron2://COCO-InstanceSegmentation/mask_rcnn_R_50_FPN_3x/137849600/model_final_f10217.pkl
安装配置 AdelaiDet 工具包:
运行以下命令执行安装:
git clone https://github.com/aim-uofa/AdelaiDet.git
cd AdelaiDet
python setup.py build develop
测试使用 AdelaiDet:
运行下列代码,先下载预训练权重模型,然后运行demo下的demo.py,需要传入–input后的文件,和指定输出地址。
wget https://cloudstor.aarnet.edu.au/plus/s/glqFc13cCoEyHYy/download -O fcos_R_50_1x.pth

python demo/demo.py --config-file configs/FCOS-Detection/R_50_1x.yaml --input 1.jpg --output output --opts MODEL.WEIGHTS fcos_R_50_1x.pth
测试Demo结果
由于使用的是FCOS去进行Demo测试,测试结果效果也较好。
原图1:

Demo运行后效果1:

原图2:

Demo运行效果2:

小结
整体的运行配置还算简单流畅,极链AI云平台帮忙节省了显卡配置和环境的搭建,相对来说较为方便,demo的效果也十分惊艳。


 705
705


 被折叠的 条评论
为什么被折叠?
被折叠的 条评论
为什么被折叠?
 到【灌水乐园】发言


