


参照文章九、PyQt5多线程编程_pyqt多线程_Lvcx的博客-CSDN博客,在Qt Designer中创建一个主要包含两个TextEdit控件和一个PushButton控件的窗口,计完成后保存为.ui文件,并使用PyUIC工具将其转换为.py文件。
与参考文章不同的是,此处新建一个main.py将UI与逻辑代码分离开发,写一个主程序入口用于加载画面,并给后续的触发事件程序提供入口,同时将创建兔子乌龟线程对象、将线程信号连接到槽函数及开始两个线程都集中写到一个方法中。
在main.py文件中,分别通过继承QThread类定义兔子线程类和乌龟线程类,通过自定义信号分别发射兔子和乌龟的比赛动态。然后在创建定义的两个线程类对象,通过start()方法启动。
主函数代码如下:
import sys
from PyQt5.QtGui import QTextCursor
from PyQt5.QtWidgets import QApplication, QMainWindow
from demoui import Ui_MainWindow
from PyQt5.QtCore import QThread, pyqtSignal


class ThreadRab(QThread):  # 创建兔子线程类
    update_date = pyqtSignal(str)  # 自定义信号,用来发射兔子比赛动态

    def __init__(self):
        super(ThreadRab, self).__init__()

    # 重写run()方法,业务逻辑部分
    def run(self):
        for i in range(1, 150):
            QThread.msleep(60)  # 线程休眠0.06秒,模拟兔子在跑步
            self.update_date.emit("\n兔子跑了" + str(i) + "0米")  # 显示兔子的跑步距离
            if i == 9:
                self.update_date.emit("\n兔子在睡觉")  # 当跑了90米时开始睡觉
                QThread.sleep(2)  # 休眠2秒
            if i == 149:
                self.update_date.emit("\n兔子到达终点")  # 显示兔子到达了终点


class ThreadTor(QThread):  # 创建乌龟线程类
    sinOut = pyqtSignal(str)  # 自定义信号,用来发射乌龟比赛动态

    def __init__(self):
        super(ThreadTor, self).__init__()

    # 重写run()方法,业务逻辑部分
    def run(self):
        for i in range(1, 150):
            QThread.msleep(120)  # 线程休眠0.12秒,模拟乌龟在跑步
            self.sinOut.emit("\n乌龟跑了" + str(i) + "0米")
            if i == 149:
                self.sinOut.emit("\n乌龟到达终点")


class DemoWindow(QMainWindow, Ui_MainWindow):   # 样板界面
    def __init__(self, parent=None):
        super(DemoWindow, self).__init__(parent)
        self.initui()

    def initui(self):
        """
        初始化界面,绑定槽函数
        :return:
        """
        self.setupUi(self)
        self.setWindowTitle('样例')
        self.pushButton.clicked.connect(self.click_rab_tor)

    def click_rab_tor(self):
        self.rab = ThreadRab()  # 创建兔子线程对象
        self.rab.update_date.connect(self.show_rab)  # 将线程信号连接到槽函数
        self.rab.start()  # 启动兔子线程

        self.tor = ThreadTor()  # 创建乌龟线程对象
        self.tor.sinOut.connect(self.show_tor)  # 将线程信号连接到槽函数
        self.tor.start()  # 启动乌龟线程

    def show_rab(self, display_newstr):
        self.textEdit.setPlainText(self.textEdit.toPlainText() + display_newstr)
        self.textEdit.moveCursor(QTextCursor.End)  # 移动光标到底部

    def show_tor(self, display_newstr):
        self.textEdit_2.setPlainText(self.textEdit_2.toPlainText() + display_newstr)
        self.textEdit_2.moveCursor(QTextCursor.End)  # 移动光标到底部


if __name__ == '__main__':
    app = QApplication(sys.argv)
    demoui = DemoWindow()
    demoui.show()
    sys.exit(app.exec_())
直接运行主函数,运行情况如下:

附:UI界面布局的对应代码demoui.py文件如下:
# -*- coding: utf-8 -*-

# Form implementation generated from reading ui file 'demoui.ui'
#
# Created by: PyQt5 UI code generator 5.15.4
#
# WARNING: Any manual changes made to this file will be lost when pyuic5 is
# run again.  Do not edit this file unless you know what you are doing.


from PyQt5 import QtCore, QtGui, QtWidgets


class Ui_MainWindow(object):
    def setupUi(self, MainWindow):
        MainWindow.setObjectName("MainWindow")
        MainWindow.resize(990, 709)
        self.centralwidget = QtWidgets.QWidget(MainWindow)
        self.centralwidget.setObjectName("centralwidget")
        self.label = QtWidgets.QLabel(self.centralwidget)
        self.label.setGeometry(QtCore.QRect(370, 80, 231, 21))
        self.label.setText("")
        self.label.setObjectName("label")
        self.groupBox_2 = QtWidgets.QGroupBox(self.centralwidget)
        self.groupBox_2.setGeometry(QtCore.QRect(160, 70, 691, 531))
        self.groupBox_2.setObjectName("groupBox_2")
        self.pushButton = QtWidgets.QPushButton(self.groupBox_2)
        self.pushButton.setGeometry(QtCore.QRect(270, 490, 151, 28))
        self.pushButton.setStyleSheet("font: 10pt \"Agency FB\";")
        self.pushButton.setObjectName("pushButton")
        self.textEdit = QtWidgets.QTextEdit(self.groupBox_2)
        self.textEdit.setGeometry(QtCore.QRect(14, 42, 331, 431))
        self.textEdit.setObjectName("textEdit")
        self.textEdit_2 = QtWidgets.QTextEdit(self.groupBox_2)
        self.textEdit_2.setGeometry(QtCore.QRect(354, 42, 321, 431))
        self.textEdit_2.setObjectName("textEdit_2")
        self.label_7 = QtWidgets.QLabel(self.groupBox_2)
        self.label_7.setGeometry(QtCore.QRect(462, 20, 101, 16))
        self.label_7.setObjectName("label_7")
        self.label_6 = QtWidgets.QLabel(self.groupBox_2)
        self.label_6.setGeometry(QtCore.QRect(116, 22, 111, 16))
        self.label_6.setObjectName("label_6")
        MainWindow.setCentralWidget(self.centralwidget)
        self.menubar = QtWidgets.QMenuBar(MainWindow)
        self.menubar.setGeometry(QtCore.QRect(0, 0, 990, 26))
        self.menubar.setObjectName("menubar")
        MainWindow.setMenuBar(self.menubar)
        self.statusbar = QtWidgets.QStatusBar(MainWindow)
        self.statusbar.setObjectName("statusbar")
        MainWindow.setStatusBar(self.statusbar)

        self.retranslateUi(MainWindow)
        QtCore.QMetaObject.connectSlotsByName(MainWindow)

    def retranslateUi(self, MainWindow):
        _translate = QtCore.QCoreApplication.translate
        MainWindow.setWindowTitle(_translate("MainWindow", "MainWindow"))
        self.groupBox_2.setTitle(_translate("MainWindow", "多线程"))
        self.pushButton.setToolTip(_translate("MainWindow", "<html><head/><body><p><br/></p></body></html>"))
        self.pushButton.setText(_translate("MainWindow", "开始比赛"))
        self.label_7.setText(_translate("MainWindow", "<html><head/><body><p><span style=\" font-size:10pt;\">乌龟比赛记录</span></p></body></html>"))
        self.label_6.setText(_translate("MainWindow", "<html><head/><body><p><span style=\" font-size:10pt;\">兔子比赛记录</span></p></body></html>"))
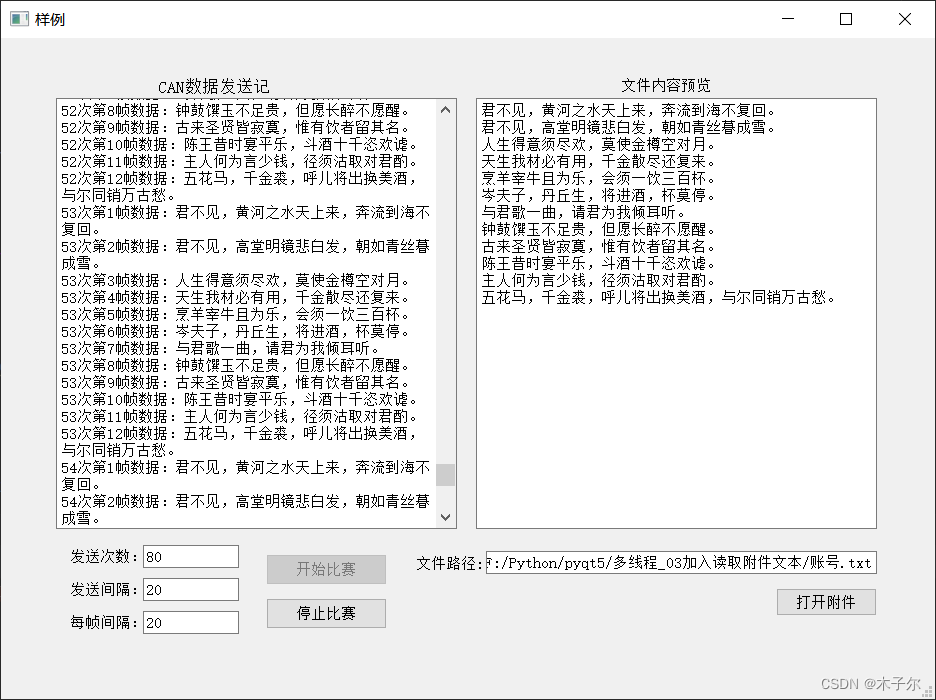
多线程加入参数设置与信息提示后:
import sys
from PyQt5.QtGui import QTextCursor
from PyQt5.QtWidgets import QApplication, QMainWindow, QMessageBox
import demoui
from demoui import Ui_MainWindow
from PyQt5.QtCore import QThread, pyqtSignal
from PyQt5.QtWidgets import QFileDialog


class ThreadCan(QThread):
    update_data = pyqtSignal(str)
    update_data_message = pyqtSignal(str, str)

    def __init__(self):
        super(ThreadCan, self).__init__()

    # 重写run()方法,业务逻辑部分
    def run(self):
        global canDataAll_singular_info, canDataAll
        self.started.emit()
        try:
            dw.get_parameter()
            canDataAll = can_datas.split('\n')
            count = 0
            while count < send_times:
                count = count + 1
                for i in range(len(canDataAll)):
                    QThread.msleep(EachframeInterval)
                    canDataAll_singular = canDataAll[i]
                    canDataAll_singular_info = '\n%d次第%d帧数据:%s' % (count, (i + 1), canDataAll_singular)
                    if count == 1 and i == 0:
                        self.update_data.emit('%d次第%d帧数据:%s' % (count, (i + 1), canDataAll_singular))
                    else:
                        self.update_data.emit(canDataAll_singular_info)
                QThread.msleep(send_interval)
            self.update_data_message.emit('提示', '数据已发送完毕!')
            self.finished.emit()
        except:
            self.update_data_message.emit('警告', '请检查所选附件及参数\n设置是否正确!')


# 样板界面
class DemoWindow(QMainWindow, Ui_MainWindow):
    def __init__(self, parent=None):
        super(DemoWindow, self).__init__(parent)
        self.initui()

    def initui(self):
        """
        初始化界面,绑定槽函数
        :return:
        """
        self.setupUi(self)
        self.setWindowTitle('样例')
        self.pushButton_3.clicked.connect(self.click_sendcan)
        self.pushButton_3.clicked.connect(lambda: self.textEdit.clear())
        self.pushButton_4.clicked.connect(self.stop_thread)  # 停止线程
        self.pushButton_5.clicked.connect(self.readtxt)  # 选取文件

    def get_parameter(self):
        global send_times, send_interval, EachframeInterval
        send_times = int(self.lineEdit.text())
        send_interval = int(self.lineEdit_2.text())
        EachframeInterval = int(self.lineEdit_3.text())

    def click_sendcan(self):
        self.sendcantxt = ThreadCan()  # 创建线程对象
        self.sendcantxt.update_data.connect(self.show_cantxt)  # 将线程信号连接到槽函数
        self.sendcantxt.update_data_message.connect(self.message_manage)
        self.sendcantxt.started.connect(lambda: self.pushButton_3.setDisabled(True))
        self.sendcantxt.finished.connect(lambda: self.pushButton_3.setDisabled(False))
        self.sendcantxt.start()  # 启动线程


    def show_cantxt(self, display_newstr):
        self.textEdit.setPlainText(self.textEdit.toPlainText() + display_newstr)
        self.textEdit.moveCursor(QTextCursor.End)  # 移动光标到底部
        QApplication.processEvents()

    # 停止线程
    def stop_thread(self):
        self.sendcantxt.terminate()
        self.pushButton_3.setEnabled(True)  # 线程运行完成之后,将按钮恢复可点击状态

    def message_manage(self, level, tips):
        if level == '提示':
            QMessageBox.information(self, level, tips, QMessageBox.Yes)
        elif level == '警告':
            QMessageBox.warning(self, level, tips, QMessageBox.Yes)
        else:
            pass


    def readtxt(self):
        global can_datas
        try:
            filepath, filetype = demoui.QtWidgets.QFileDialog.getOpenFileName(self, '选取附件', './', 'Txt(*.txt)')
            self.lineEdit_4.setText(filepath)
            with open(filepath, 'r', encoding='utf-8') as file:
                can_datas = file.read()
                self.textEdit_2.setText(can_datas)
            return can_datas
        except:
            pass


if __name__ == '__main__':
    app = QApplication(sys.argv)
    dw = DemoWindow()  # 实例化注册页面
    dw.show()
    sys.exit(app.exec_())
运行结果截图:


 1426
1426


 被折叠的 条评论
为什么被折叠?
被折叠的 条评论
为什么被折叠?
 到【灌水乐园】发言


