


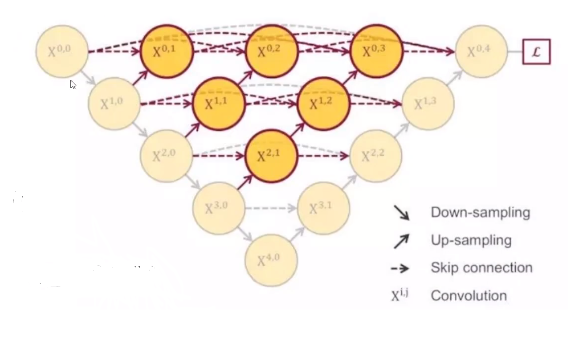
U-net++
声明:本文只提供代码部分。
声明:内容为题主学习时的疑问,仅供初学者参考。
python: 3.10
U-net++结构图
遇到的问题
1. albumentations包安装的问题
最开始的问题是找不到源,试了好多个命令都没用。最后通过github找到了解决办法。
使用的aniconda的命令。
conda install -c conda-forge albumentations
2. AttributeError: module ‘albumentations.augmentations.transforms’ has no attribute ‘RandomRotate90’
只需重新impor talbumentations即可。具体办法参见该链接第二个问题
3. torch没安cuda
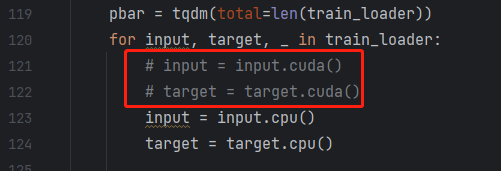
如果已经安装了cuda可以忽略,题主没有GPU因此需要使用CPU训练。
解决办法: 将代码train和val代码里面的所有的.cuda()更改成.cpu(),这样就在CPU上跑起来了。
代码解读(主要解决py语法问题)
首先找到train.py的入口main函数,如图所示打断点。

1.读取配置文件
跳进这个函数。

def parse_args():
    parser = argparse.ArgumentParser()

    parser.add_argument('--name', default=None,
                        help='model name: (default: arch+timestamp)') # 指定网络的名字,就是U-net++
    parser.add_argument('--epochs', default=100, type=int, metavar='N',
                        help='number of total epochs to run')# 指定迭代次数
    parser.add_argument('-b', '--batch_size', default=8, type=int,
                        metavar='N', help='mini-batch size (default: 16)')#指定batch_size

    # model
    parser.add_argument('--arch', '-a', metavar='ARCH', default='NestedUNet',
                        choices=ARCH_NAMES,
                        help='model architecture: ' +
                        ' | '.join(ARCH_NAMES) +
                        ' (default: NestedUNet)')  # 指定网络架构
    parser.add_argument('--deep_supervision', default=False, type=str2bool)
    parser.add_argument('--input_channels', default=3, type=int,
                        help='input channels')
    parser.add_argument('--num_classes', default=1, type=int,
                        help='number of classes')
    parser.add_argument('--input_w', default=96, type=int,
                        help='image width')
    parser.add_argument('--input_h', default=96, type=int,
                        help='image height')

    # loss
    parser.add_argument('--loss', default='BCEDiceLoss',
                        choices=LOSS_NAMES,
                        help='loss: ' +
                        ' | '.join(LOSS_NAMES) +
                        ' (default: BCEDiceLoss)')
    config = parser.parse_args()

    return config
这段代码的作用是为了配置模型、损失函数、数据、优化器的各种参数,给每个参数定义一个名字,给一个默认值。
比如: parser.add_argument('--epochs', default=100, type=int, metavar='N', help='number of total epochs to run')# 指定迭代次数
这个的作用是,添加一个epochs(迭代次数)参数,默认值是100,数据类型为int,help:相当与一个说明语句。
这样定义好参数后,便于后续统一管理和了解参数情况。并且py提供的这个argparse类,会根据自己定义的参数生成说明文档(因为参数是自己定义的,传参有误我们也得知道哪里错了),报错也能知道是哪里错了。
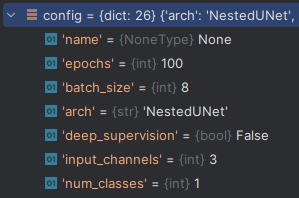
最后的cofig相当于一个字典结构。
2.os.makedirs()
209行的含义是给’name’的值命名,%s%s为占位符,用来存放%连接的名字。

209行运行前后对比:

210行运行结果为:
在该path下创建一个目录,exist_ok=True的含义是:若目录存在也不会报错。
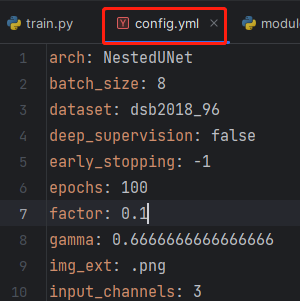
3.yaml.dump()

就是打开该path的文件,然后将config字典的内容存到该文件中。部分结果如下:
4.losses._dict_()

在该项目中,有一个losses.py这个文件,里面有相应的类实现。首先losses.dict[xxx]是从losses.py这个文件里扫描xxx这个类,并返回相应的属性值。即创建了一个相应的criterion对象。
5.cudnn.benchmark
cudnn.benchmark = True
大部分情况下,设置这个 flag 可以让内置的 cuDNN 的 auto-tuner 自动寻找最适合当前配置的高效算法,来达到优化运行效率的问题。
此代码为GPU的优化选项,详情参考。
6.filter()
params = filter(lambda p: p.requires_grad, model.parameters())
filter()有过滤的功能,其中第一个参数为True(表示需要梯度更新),第二个参数会返回该模型的所有可学习的参数,并过滤出仅仅需要梯度优化的参数。将这些参数以列表的形式赋给params。
7.glob+basename+splitext

261行的代码:
glob()获取指定路径下符合特定条件的文件路径列表。join()这个函数就是拼接好文件路径。最后将所有符合条件的文件路径返回给img_ids。
262行的代码:
首先是遍历261行获取好的文件路径,basename是获取p路径的基本名称,即将路径中的目录部分去除,只保留文件名部分。splitext()函数将文件名和扩展名分开,并返回。[0]的含义是取文件名赋值给img_ids。
最终img_ids只包含文件名(不包括路径与扩展名)。
8. train_test_split()

将img_ids(文件名)按0.2的比例分成训练集和测试集。
详细解释
9. Compose()
数据增强部分代码(注释在下面)。
    train_transform = Compose([
        # transforms.RandomRotate90(),
        # transforms.Flip(),
        albu.RandomRotate90(),
        albu.Flip(),
        OneOf([
            transforms.HueSaturationValue(),  #随机改变输入图像的色调、饱和度和值
            transforms.RandomBrightness(),    #随机改变亮度
            transforms.RandomContrast(),      #随机改变输入图像的对比度
        ], p=1),#按照归一化的概率选择执行哪一个
        # transforms.Resize(config['input_h'], config['input_w']),
        albu.Resize(config['input_h'], config['input_w']),   # 采用缩放的形式将图像变到期望大小
        transforms.Normalize(),
    ])

 #验证集就不增强了
    val_transform = Compose([
        # transforms.Resize(config['input_h'], config['input_w']),
        albu.Resize(config['input_h'], config['input_w']),
        transforms.Normalize(),
    ])
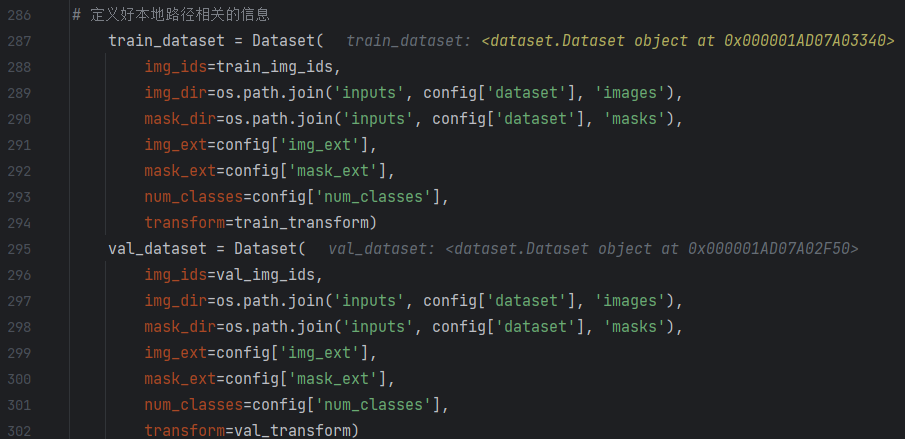
10. Dateset()
定义好本地路径相关的信息。
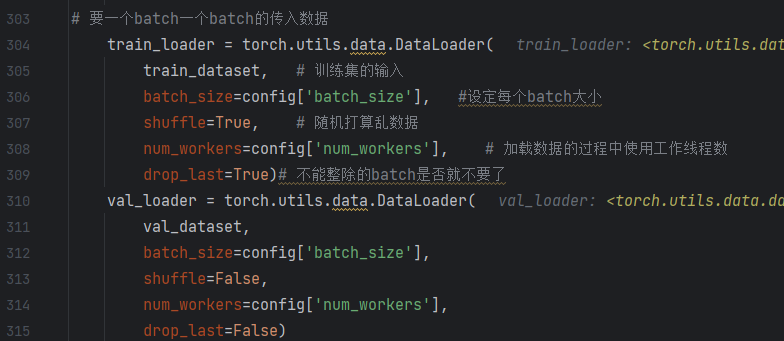
11. DataLoader()
创建一个用于训练数据的数据加载器。
代码注释如下:
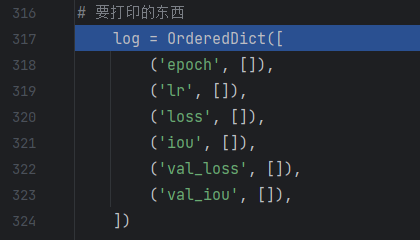
12.OrderedDict()
该函数会定义一个有序字典,方便后续打印。
13.train()
将字典,训练集,模型,损失函数,优化器都传进去。

13.1 AverageMeter()


13.2 tqdm()
创建一个进度条。总共为train_loader的长度。

13.3 获取数据
通过train_loader获取输入数据和目标值。

13.4 model()开始训练

13.4.1 前向传播
从此NestedUNet模型中的,forward开始运行:
class VGGBlock(nn.Module):
    def __init__(self, in_channels, middle_channels, out_channels):  # 3,32,32
        super().__init__()
        self.relu = nn.ReLU(inplace=True)
        self.conv1 = nn.Conv2d(in_channels, middle_channels, 3, padding=1)   # 输入是3,输出是32
        self.bn1 = nn.BatchNorm2d(middle_channels)
        self.conv2 = nn.Conv2d(middle_channels, out_channels, 3, padding=1)
        self.bn2 = nn.BatchNorm2d(out_channels)

    def forward(self, x):
        out = self.conv1(x)
        out = self.bn1(out)
        out = self.relu(out)

        out = self.conv2(out)
        out = self.bn2(out)
        out = self.relu(out)

        return out


class UNet(nn.Module):
    def __init__(self, num_classes, input_channels=3, **kwargs):
        super().__init__()

        nb_filter = [32, 64, 128, 256, 512]

        self.pool = nn.MaxPool2d(2, 2)
        self.up = nn.Upsample(scale_factor=2, mode='bilinear', align_corners=True)#scale_factor:放大的倍数  插值

        self.conv0_0 = VGGBlock(input_channels, nb_filter[0], nb_filter[0])
        self.conv1_0 = VGGBlock(nb_filter[0], nb_filter[1], nb_filter[1])
        self.conv2_0 = VGGBlock(nb_filter[1], nb_filter[2], nb_filter[2])
        self.conv3_0 = VGGBlock(nb_filter[2], nb_filter[3], nb_filter[3])
        self.conv4_0 = VGGBlock(nb_filter[3], nb_filter[4], nb_filter[4])

        self.conv3_1 = VGGBlock(nb_filter[3]+nb_filter[4], nb_filter[3], nb_filter[3])
        self.conv2_2 = VGGBlock(nb_filter[2]+nb_filter[3], nb_filter[2], nb_filter[2])
        self.conv1_3 = VGGBlock(nb_filter[1]+nb_filter[2], nb_filter[1], nb_filter[1])
        self.conv0_4 = VGGBlock(nb_filter[0]+nb_filter[1], nb_filter[0], nb_filter[0])

        self.final = nn.Conv2d(nb_filter[0], num_classes, kernel_size=1)


    def forward(self, input):
        x0_0 = self.conv0_0(input)
        x1_0 = self.conv1_0(self.pool(x0_0))
        x2_0 = self.conv2_0(self.pool(x1_0))
        x3_0 = self.conv3_0(self.pool(x2_0))
        x4_0 = self.conv4_0(self.pool(x3_0))

        x3_1 = self.conv3_1(torch.cat([x3_0, self.up(x4_0)], 1))
        x2_2 = self.conv2_2(torch.cat([x2_0, self.up(x3_1)], 1))
        x1_3 = self.conv1_3(torch.cat([x1_0, self.up(x2_2)], 1))
        x0_4 = self.conv0_4(torch.cat([x0_0, self.up(x1_3)], 1))

        output = self.final(x0_4)
        return output


class NestedUNet(nn.Module):
    def __init__(self, num_classes, input_channels=3, deep_supervision=False, **kwargs):
        super().__init__()

        nb_filter = [32, 64, 128, 256, 512]

        self.deep_supervision = deep_supervision

        self.pool = nn.MaxPool2d(2, 2)
        self.up = nn.Upsample(scale_factor=2, mode='bilinear', align_corners=True)

        self.conv0_0 = VGGBlock(input_channels, nb_filter[0], nb_filter[0]) #3,32,32  输入3,中间32,输出32(特征图个数)
        self.conv1_0 = VGGBlock(nb_filter[0], nb_filter[1], nb_filter[1])  # 32,64,64
        self.conv2_0 = VGGBlock(nb_filter[1], nb_filter[2], nb_filter[2])
        self.conv3_0 = VGGBlock(nb_filter[2], nb_filter[3], nb_filter[3])
        self.conv4_0 = VGGBlock(nb_filter[3], nb_filter[4], nb_filter[4])

        self.conv0_1 = VGGBlock(nb_filter[0]+nb_filter[1], nb_filter[0], nb_filter[0])
        self.conv1_1 = VGGBlock(nb_filter[1]+nb_filter[2], nb_filter[1], nb_filter[1])
        self.conv2_1 = VGGBlock(nb_filter[2]+nb_filter[3], nb_filter[2], nb_filter[2])
        self.conv3_1 = VGGBlock(nb_filter[3]+nb_filter[4], nb_filter[3], nb_filter[3])

        self.conv0_2 = VGGBlock(nb_filter[0]*2+nb_filter[1], nb_filter[0], nb_filter[0])
        self.conv1_2 = VGGBlock(nb_filter[1]*2+nb_filter[2], nb_filter[1], nb_filter[1])
        self.conv2_2 = VGGBlock(nb_filter[2]*2+nb_filter[3], nb_filter[2], nb_filter[2])

        self.conv0_3 = VGGBlock(nb_filter[0]*3+nb_filter[1], nb_filter[0], nb_filter[0])
        self.conv1_3 = VGGBlock(nb_filter[1]*3+nb_filter[2], nb_filter[1], nb_filter[1])

        self.conv0_4 = VGGBlock(nb_filter[0]*4+nb_filter[1], nb_filter[0], nb_filter[0])

        if self.deep_supervision:
            self.final1 = nn.Conv2d(nb_filter[0], num_classes, kernel_size=1)
            self.final2 = nn.Conv2d(nb_filter[0], num_classes, kernel_size=1)
            self.final3 = nn.Conv2d(nb_filter[0], num_classes, kernel_size=1)
            self.final4 = nn.Conv2d(nb_filter[0], num_classes, kernel_size=1)
        else:
            self.final = nn.Conv2d(nb_filter[0], num_classes, kernel_size=1)


    def forward(self, input):
        print('input:',input.shape)
        x0_0 = self.conv0_0(input) # 8,32,96,96
        print('x0_0:',x0_0.shape)
        x1_0 = self.conv1_0(self.pool(x0_0))    # 下采样
        print('x1_0:',x1_0.shape)
        x0_1 = self.conv0_1(torch.cat([x0_0, self.up(x1_0)], 1))#00和10维度不一样,因此要将x1_0升维、拼接完之后为8,96,96,96再执行卷积,8,32,96,96
        print('x0_1:',x0_1.shape)

        x2_0 = self.conv2_0(self.pool(x1_0))
        print('x2_0:',x2_0.shape)
        x1_1 = self.conv1_1(torch.cat([x1_0, self.up(x2_0)], 1)) # x2_0up后(8,128,48,48),拼接后(8,192,48,48),卷积后(8,64,48,48)
        print('x1_1:',x1_1.shape)
        x0_2 = self.conv0_2(torch.cat([x0_0, x0_1, self.up(x1_1)], 1))
        print('x0_2:',x0_2.shape)

        x3_0 = self.conv3_0(self.pool(x2_0))
        print('x3_0:',x3_0.shape)
        x2_1 = self.conv2_1(torch.cat([x2_0, self.up(x3_0)], 1))
        print('x2_1:',x2_1.shape)
        x1_2 = self.conv1_2(torch.cat([x1_0, x1_1, self.up(x2_1)], 1))
        print('x1_2:',x1_2.shape)
        x0_3 = self.conv0_3(torch.cat([x0_0, x0_1, x0_2, self.up(x1_2)], 1))
        print('x0_3:',x0_3.shape)
        x4_0 = self.conv4_0(self.pool(x3_0))
        print('x4_0:',x4_0.shape)
        x3_1 = self.conv3_1(torch.cat([x3_0, self.up(x4_0)], 1))
        print('x3_1:',x3_1.shape)
        x2_2 = self.conv2_2(torch.cat([x2_0, x2_1, self.up(x3_1)], 1))
        print('x2_2:',x2_2.shape)
        x1_3 = self.conv1_3(torch.cat([x1_0, x1_1, x1_2, self.up(x2_2)], 1))
        print('x1_3:',x1_3.shape)
        x0_4 = self.conv0_4(torch.cat([x0_0, x0_1, x0_2, x0_3, self.up(x1_3)], 1))
        print('x0_4:',x0_4.shape)    #(8,32,96,96)

        if self.deep_supervision:
            output1 = self.final1(x0_1)
            output2 = self.final2(x0_2)
            output3 = self.final3(x0_3)
            output4 = self.final4(x0_4)
            return [output1, output2, output3, output4]

        else:
            output = self.final(x0_4)
            return output  #(8,1,96,96)
网络流程图如下所示:

13.5 criterion()
进入损失函数。

class BCEDiceLoss(nn.Module):
    def __init__(self):
        super().__init__()

    def forward(self, input, target):
        bce = F.binary_cross_entropy_with_logits(input, target)
        smooth = 1e-5    # 平滑因子,防止分母为0
        input = torch.sigmoid(input)    #  将输入的对数几率转化为概率值。
        num = target.size(0)
        input = input.view(num, -1)    # 将input转化为2维张量。
        target = target.view(num, -1)
        intersection = (input * target)   #input是概率,target是0/1,因此计算结果是预测的每个样本的正样本像素的概率。
        dice = (2. * intersection.sum(1) + smooth) / (input.sum(1) + target.sum(1) + smooth) # 预测结果和真实标签之间的相似度
        dice = 1 - dice.sum() / num   # 计算了平均Dice系数,并将其减去1,以得到Dice损失
        return 0.5 * bce + dice
13.6 iou_score()
计算iou,交并比。
def iou_score(output, target):
    smooth = 1e-5  # 平滑值

    if torch.is_tensor(output):
        output = torch.sigmoid(output).data.cpu().numpy()
    if torch.is_tensor(target):
        target = target.data.cpu().numpy()
    output_ = output > 0.5   # 预测值大于0.5为True
    target_ = target > 0.5  # 目标值大于0.5为True
    intersection = (output_ & target_).sum()   # 交集
    union = (output_ | target_).sum()          # 并集

    return (intersection + smooth) / (union + smooth)  # iou
13.7 方向传播,梯度优化

13.8 更新进度条

validate() 和train类似跳过
14. scheduler.step()
因为本文使用的余弦退火LR学习率更新方式,调度器通过余弦函数来调整学习率。


 925
925


 被折叠的 条评论
为什么被折叠?
被折叠的 条评论
为什么被折叠?
 到【灌水乐园】发言


