


 本文详细介绍了Vue3中如何实现过渡和动画效果,包括使用CSS类名、内联样式以及`transition`标签。内容涵盖基础的CSS过渡、动画效果,以及利用`transition`标签实现单元素组件的过渡,包括多种过渡模式、动态组件切换和列表过渡。此外,还讨论了状态过渡,如数字变化的渐变效果。通过实例代码,展示了如何在Vue3中优雅地处理过渡和动画效果。
Vue3 过渡与动画
1. 使用 Vue 实现基础的 CSS 过渡与动画效果
过渡与动画的差别
-
过渡:元素状态缓慢改变的过程
-
动画:一个元素运动的情况
1.1 vue 实现动画效果
用 class 类名实现动画效果
先写一个动画样式
  <style>
    @keyframes leftToRight {
      from {
        transform: translateX(-100px);
      }
      to {
        transform: translateX(0);
      }
    }

    .animation {
      animation: leftToRight 3s;
    }
  </style>
然后点击按钮,消除类名或者重新展示类名来实现动画重复播放的效果。
const app = Vue.createApp({
  data() {
    return {
      animate: {
        animation: false
      }
    }
  },
  methods: {
    handleClick() {
      this.animate.animation = !this.animate.animation
    }
  },
  template: `
    <div>
      <div :class="animate">hello world</div>
      <button @click="handleClick">切换</button>
    </div>
  `
})

app.mount("#root")
1.2 vue 实现过渡效果
用 class 实现过渡效果
现在要实现过渡效果,使得背景色三秒缓慢改变。
渐变样式:
  <style>
    .transition {
      transition: 3s background-color ease;
    }

    .blue {
      background: blue;
    }

    .green {
      background: green;
    }
  </style>
实现过渡效果:
const app = Vue.createApp({
  data() {
    return {
      animate: {
        transition: true,
        blue: true,
        green: false,
      }
    }
  },
  methods: {
    handleClick() {
      this.animate.blue = !this.animate.blue;
      this.animate.green = !this.animate.green;
    }
  },
  template: `
    <div>
      <div :class="animate">hello world</div>
      <button @click="handleClick">切换</button>
    </div>
  `
})

app.mount("#root")
</script>
看代码就知道是如何展现的了,和正常的 css 其实差不多,融入了一些 vue 的语法而已。
用 style 实现过渡效果
就是把 class 的样式写在行内。现在只需要一个 transition 类。
  <style>
    .transition {
      transition: 3s background-color ease;
    }
  </style>
然后触发点击事件的时候,样式对象的值进行修改即可。
const app = Vue.createApp({
  data() {
    return {
      styleObj: {
        background: "blue"
      }
    }
  },
  methods: {
    handleClick() {
      if (this.styleObj.background === "blue") {
        this.styleObj.background = "green"
      } else {
        this.styleObj.background = "blue"
      }
    }
  },
  template: `
    <div>
      <div class="transition" :style="styleObj">hello world</div>
      <button @click="handleClick">切换</button>
    </div>
  `
})
2. 使用 transition 标签实现单元素组件的过渡效果
2.1 transition 配合 class 实现过渡效果
vue 的 transition 可以很方便地实现入场出场过渡。
实现入场离开过渡所需要的条件:
- 条件渲染 (使用
v-if) - 条件展示 (使用
v-show) - 动态组件
- 组件根节点
实现过程:
- 用 transition 包裹需要动画的标签
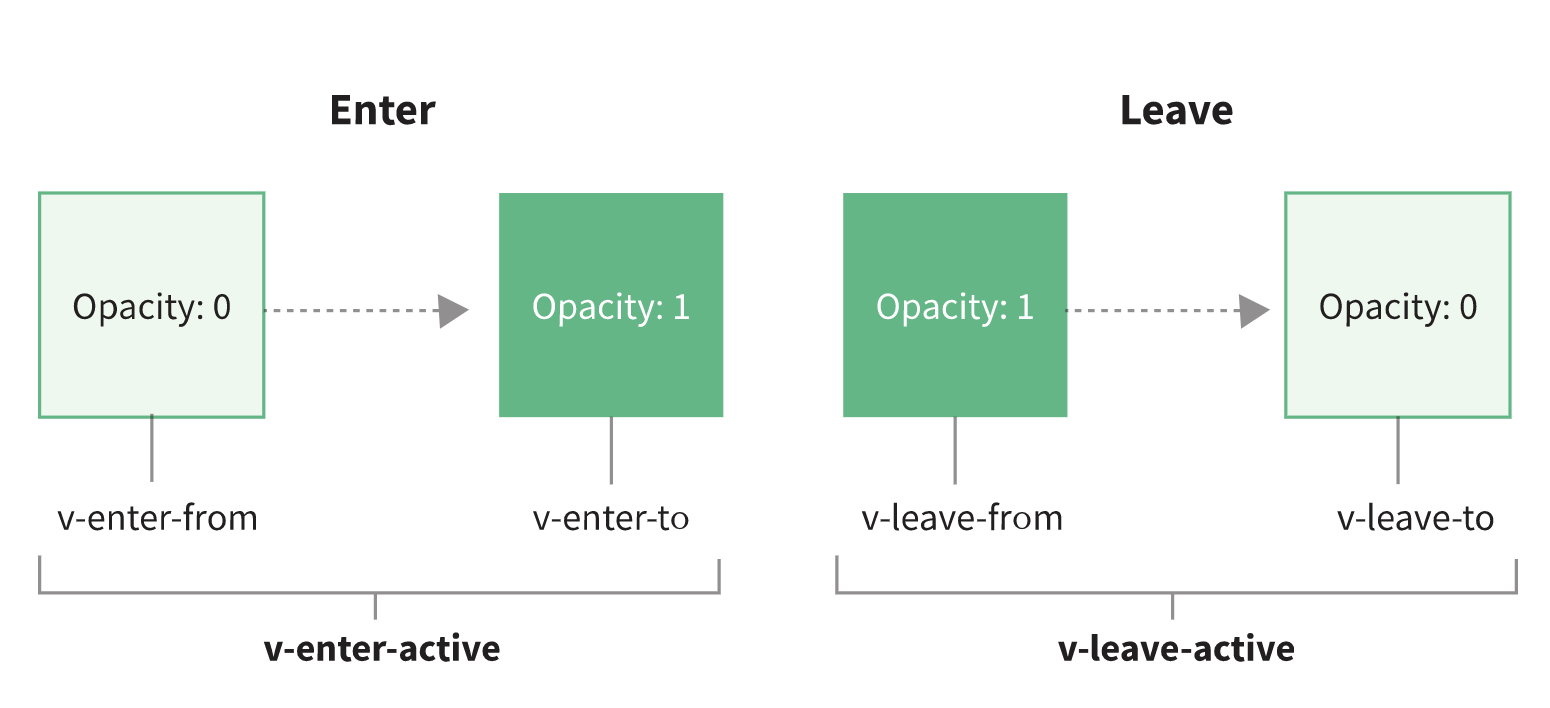
- 入场效果:写 v-enter-from, v-enter-active, v-enter-to 三个类名。from 和 to 里写动画起始和结束的状态,active 里写动画效果。
- 离开效果:写 v-leave-from, v-leave-active, v-leave-to 三个类名
  <style>
    .v-enter-from {
      opacity: 0;
    }
    .v-enter-active {
      transition: opacity 3s ease-out;
    }
    .v-enter-to {
      opacity: 1;
    }
    .v-leave-from {
      opacity: 1;
    }
    .v-leave-active {
      transition: opacity 3s ease-out;
    }
    .v-leave-to {
      opacity: 0;
    }
  </style>
// js
const app = Vue.createApp({
  data() {
    return {
      show: false
    }
  },
  methods: {
    handleClick() {
      this.show = !this.show;
    }
  },
  template: `
    <div>
      <transition>
        <div v-if="show">hello world</div>
      </transition>
      <button @click="handleClick">切换</button>
    </div>
  `
})

app.mount("#root")
上面的 css 写法可以继续优化,改成下面的形式:
  <style>
    .v-enter-from {
      opacity: 0;
    }
    .v-enter-active,
    .v-leave-active {
      transition: opacity 3s ease-out;
    }
    .v-leave-to {
      opacity: 0;
    }
  </style>
原因在于,出场的最终状态的 opacity 肯定是 1 的。
2.2 transition 配合 class 实现动画效果
和上面的实现方式是一样的,且写起来更简单。
  <style>
    @keyframes shake {
      from {
        transform: translateX(-100px);
      }
      to {
        transform: translateX(50px);
      }
    }
    .v-enter-active,
    .v-leave-active {
      animation: shake 3s;
    }
  </style>
const app = Vue.createApp({
  data() {
    return {
      show: false
    }
  },
  methods: {
    handleClick() {
      this.show = !this.show;
    }
  },
  template: `
    <div>
      <transition>
        <div v-if="show">hello world</div>
      </transition>
      <button @click="handleClick">切换</button>
    </div>
  `
})

app.mount("#root")
上面的 v-enter-from, v-enter-active, v-enter-to 都是固定写法,但是如果有多个不同的过渡或动画效果起冲突了,那咋办?
这里就需要重新命名了,且重新命名可以增加可读性。
重命名就是在 transition 标签上填写 name 属性:
  <transition name="fade">
    <p v-if="show">hello</p>
  </transition>
.fade-enter-active,
.fade-leave-active {
  transition: opacity 0.5s ease;
}

.fade-enter-from,
.fade-leave-to {
  opacity: 0;
}
2.3 transition 自定义过渡 class 类名
我们可以通过以下 attribute 来自定义过渡类名,改完后,例如原本的入场时状态的类名是 v-enter-from,通过 enter-from-class 的类名定义后,入场时的状态类名就是自己定义的类名。
enter-from-classenter-active-classenter-to-classleave-from-classleave-active-classleave-to-class
它们的优先级高于普通的类名,当希望将其它第三方 CSS 动画库与 Vue 的过渡系统相结合时十分有用,比如 Animate.css。
<link
  href="https://cdnjs.cloudflare.com/ajax/libs/animate.css/4.1.0/animate.min.css"
  rel="stylesheet"
  type="text/css"
/>

<div id="demo">
  <button @click="show = !show">
    Toggle render
  </button>

  <transition
    name="custom-classes-transition"
    enter-active-class="animate__animated animate__tada"
    leave-active-class="animate__animated animate__bounceOutRight"
  >
    <p v-if="show">hello</p>
  </transition>
</div>
2.4 显式指定过渡和动画时间
有时用的过渡效果是对的,但是持续时间有特定的要求,因此 transition 上可以指定持续时间。
<transition :duration="1000">...</transition>
你也可以分别指定进入和离开的持续时间:
<transition :duration="{ enter: 500, leave: 800 }">...</transition>
2.5 同时使用过渡和动画
vue 文档里解释:
Vue 为了知道过渡何时完成,必须设置相应的事件监听器。它可以是 transitionend 或 animationend,这取决于给元素应用的 CSS 规则。如果你只使用了其中一种,Vue 能自动识别其正确类型。
但是,在一些场景中,你需要给同一个元素同时设置两种过渡动效,比如有一个通过 Vue 触发的 CSS 动画,并且在悬停时结合一个 CSS 过渡。在这种情况中,你就需要使用 type attribute 并设置 animation 或 transition 来显式声明你需要 Vue 监听的类型。
说的土一点,动画和过渡哪个占主体,例如持续时间由哪个为主,就让 type 设置为哪个。
2.6 用 JS 实现动画效果
也可以通过 js 实现动画效果,注意的是,css 实现动画效果需要通过属性名关闭。
<transition
  @before-enter="beforeEnter"
  @enter="enter"
  @after-enter="afterEnter"
  @enter-cancelled="enterCancelled"
  @before-leave="beforeLeave"
  @leave="leave"
  @after-leave="afterLeave"
  @leave-cancelled="leaveCancelled"
  :css="false"
>
  <!-- ... -->
</transition>
// ...
methods: {
  // --------
  // 进入时
  // --------

  beforeEnter(el) {
    // ...
  },
  // 当与 CSS 结合使用时
  // 回调函数 done 是可选的
  enter(el, done) {
    // ...
    done()
  },
  afterEnter(el) {
    // ...
  },
  enterCancelled(el) {
    // ...
  },

  // --------
  // 离开时
  // --------

  beforeLeave(el) {
    // ...
  },
  // 当与 CSS 结合使用时
  // 回调函数 done 是可选的
  leave(el, done) {
    // ...
    done()
  },
  afterLeave(el) {
    // ...
  },
  // leaveCancelled 只用于 v-show 中
  leaveCancelled(el) {
    // ...
  }
}
用 JS 来实现动画效果适用于那些用 JS 实现动画效果的 JS 库,自己正常使用的时候还是用 CSS 会好一些。
当只用 JavaScript 过渡的时候,在 enter 和 leave 钩子中必须使用 done 进行回调。否则,它们将被同步调用,过渡会立即完成。
3. transition 实现多个元素多个元素的切换效果
多个单组件间可以通过 v-if/v-else 来完成元素之间的过渡。
<transition>
  <table v-if="items.length > 0">
    <!-- ... -->
  </table>
  <p v-else>Sorry, no items found.</p>
</transition>
但是有时候需要的是这个效果,原本的组件消失后,要展示的效果再展现,具有先后顺序,而不是消失和显示过渡效果同时进行。
这时需要时候过渡模式:
in-out: 新元素先进行进入过渡,完成之后当前元素过渡离开。out-in: 当前元素先进行离开过渡,完成之后新元素过渡进入。
<transition name="fade" mode="out-in">
  <!-- ... the buttons ... -->
</transition>
out-in 是最常用的过渡模式。
如果初次进入页面渲染的时候想要看到动画,添加
appear属性名即可。
4. transition 实现多个组件的切换效果
要实现点击按钮来进行渐变 hello 和 bye 的效果,代码如下,和上面的写法差不多,使用 v-if 和 v-else 组合。
  <style>
    .v-enter-from,
    .v-leave-to {
      opacity: 0;
    }
    .v-enter-active,
    .v-leave-active {
      transition: opacity 0.5s ease;
    }
  </style>
const ComponentA = {
  template: `<div>hello world</div>`
}

const ComponentB = {
  template: `<div>bye world</div>`
}

const app = Vue.createApp({
  data() {
    return {
      show: true
    }
  },
  components: {
    "component-a": ComponentA,
    "component-b": ComponentB,
  },
  methods: {
    handleClick() {
      this.show = !this.show;
    }
  },
  template: `
  <div>
    <transition mode="out-in">
      <component-a v-if="show" />
      <component-b v-else />
    </transition>
    <button @click="handleClick">切换</button>
  </div>
`
})

app.mount("#root")
既然是组件切换了,使用动态组件切换也是可行的。
const app = Vue.createApp({
  data() {
    return {
      component: "component-a"
    }
  },
  components: {
    "component-a": ComponentA,
    "component-b": ComponentB,
  },
  methods: {
    handleClick() {
      this.component = this.component === "component-a" ? "component-b" : "component-a"
    }
  },
  template: `
  <div>
    <transition mode="out-in">
      <component :is="component" />
    </transition>
    <button @click="handleClick">切换</button>
  </div>
`
})
5. 列表过渡
如果里边的列表要有过渡效果,使用 transition-group包裹来实现动画效果。这样在列表添加删除的时候就会有相应的动画。除了常规的过渡效果使用的 class 以外,v-move 用来决定除了操作的列表项以外的其他的元素的动画效果。
  <style>
    .list-item {
      /* inline 的元素要变成 inline-block,否则动画不显示 */
      display: inline-block;
      margin-right: 10px;
    }
    /* 新增的列表项的过渡效果 */
    .v-enter-from {
      opacity: 0;
      transform: translateY(30px);
    }
    .v-enter-active {
      transition: all 0.5s ease-in;
    }
    .v-ease-to {
      opacity: 1;
      transform: translateY(0px);
    }
    /* 其他列表项移动时的过渡效果 */
    .v-move {
      transition: all 0.5s ease-in;
    }
  </style>
const app = Vue.createApp({
  data() {
    return {
      list: [1, 2, 3]
    }
  },
  methods: {
    handleClick() {
      this.list.unshift(this.list.length + 1)
    }
  },
  template: `
  <div>
    <transition-group>
      <span class="list-item" v-for="item in list" :key="item">
        {{ item }}
      </span>
    </transition-group>
    <button @click="handleClick">增加</button>
  </div>
`
})
6. 状态过渡
比如一个数,从 1 到 100,也可以有那种像汽车加油门的感觉,数字缓慢爬到 100,而非从 1 直接跳到 100。
如果要自己实现的话,这是如下代码:
  const app = Vue.createApp({
    data() {
      return {
        number: 1,
        animateNumber: 1,
      }
    },
    methods: {
      handleClick() {
        // 确定要增长到的数
        this.number = 100
        if (this.animateNumber < this.number) {
          // 使用 setInterval 来促成渐变效果
          const animation = setInterval(() => {
            this.animateNumber += 1
            if (this.animateNumber >= this.number) {
              clearInterval(animation)
            }
          }, 10)
        }
      }
    },
    template: `
  <div>
    <span>{{ animateNumber }}</span>
    <button @click="handleClick">增加</button>
  </div>
`
  })


 798
798

 被折叠的 条评论
为什么被折叠?
被折叠的 条评论
为什么被折叠?
 到【灌水乐园】发言


