


将说明如何利用REST的方式使用防火墙。
1.Single tenant操作示例
以下说明如何建立一个如下所示的拓璞,并且对交换器s1进行路由的增加和删除。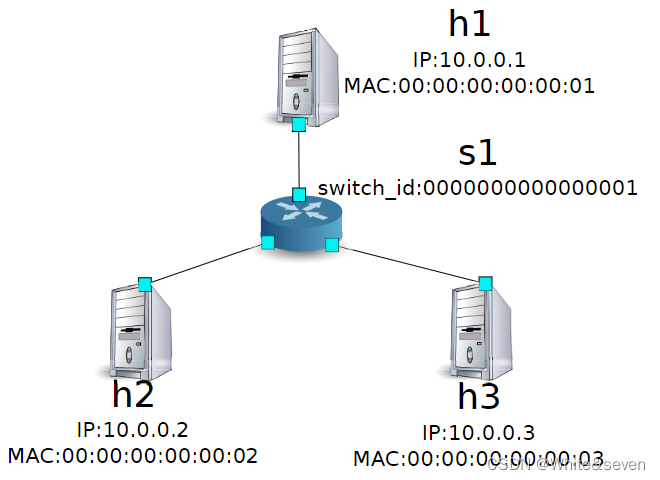
1.环境搭建
首先在mininet上:
sudo mn --topo single,3 --mac --switch ovsk --controller remote -x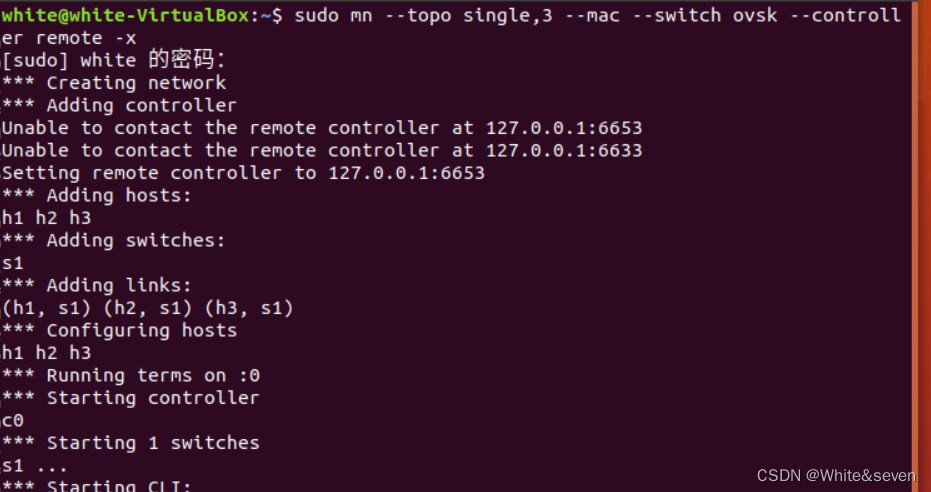 接着建立一个新的xterm用来操作Controller。
mininet> xterm c0
mininet>
将OpenFlow的版本设定为1.3:switch: s1 (root):
ovs-vsctl set Bridge s1 protocols = OpenFlow13最后在控制Controller的xterm上启动rest_firewall。
controller: c0(root):
ryu-manager rest_firewall.py Ryu和交换器中间的联机已经完成后,会出现下面的信息。 controller: c0 (root):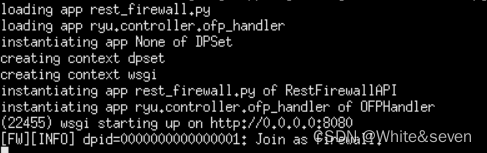
2.改变初始状态
防火墙启动后,在初始状态下全部的网络都会处于无法联机的状态。接下来我们要下指令使其生效,并开放网络的联机。
curl -X PUT http://localhost:8080/firewall/module/enable/0000000000000001
curl http://localhost:8080/firewall/module /status
确认可以从h1向h2执行ping指令。但是存取的权限规则并没有被设定,所以目前是处于无法连通的状态。
此时我们用h1主机去ping h2:ping 10.0.0.2
可以在c0交换机中看到: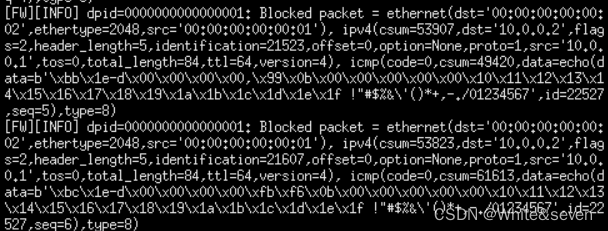
3.新增规则
增加h1和h2之间允许ping发送的规则。不论是从哪个方向都需要加入。接下来新增规则,规则的编号会自动编码。
| 来源 | 目的 | 通讯设定 | 连接状态 | 规则ID |
| 10.0.0.1/32 | 10.0.0.2/32 | ICMP | 通过 | 1 |
| 10.0.0.2/32 | 10.0.0.1/32 | ICMP | 通过 | 2 |
Node: c0 (root):
curl -X POST -d '{" nw_src ": "10.0.0.1/32" , " nw_dst ": "10.0.0.2/32" , " nw_proto ": "ICMP "}' http :// localhost :8080/ firewall /rules /0000000000000001

curl -X POST -d '{" nw_src ": "10.0.0.2/32" , " nw_dst ": "10.0.0.1/32" , " nw_proto ": "ICMP "}' http :// localhost :8080/ firewall /rules /0000000000000001

新增加的规则做为Flow Entry被注册到交换器中。switch: s1 (root):
ovs - ofctl -O openflow13 dump - flows s1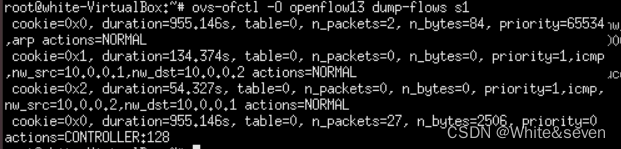
可以发现h1可以ping通h2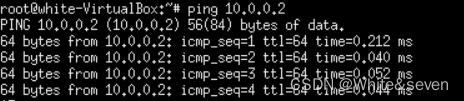
接着h2和h3之间,新增加规则允许包含ping的所有ipv4封包通过。
| 来源 | 目的 | 通讯设定 | 连接状态 | 规则ID |
| 10.0.0.2/32 | 10.0.0.3/32 | any | 通过 | 3 |
| 10.0.0.3/32 | 10.0.0.2/32 | any | 通过 | 4 |
curl -X POST -d '{" nw_src ": "10.0.0.3/32" , " nw_dst ": "10.0.0.2/32"}' http :// localhost :8080/ firewall /rules /0000000000000001

curl -X POST -d '{" nw_src ": "10.0.0.2/32" , " nw_dst ": "10.0.0.3/32"}' http :// localhost :8080/ firewall /rules /0000000000000001

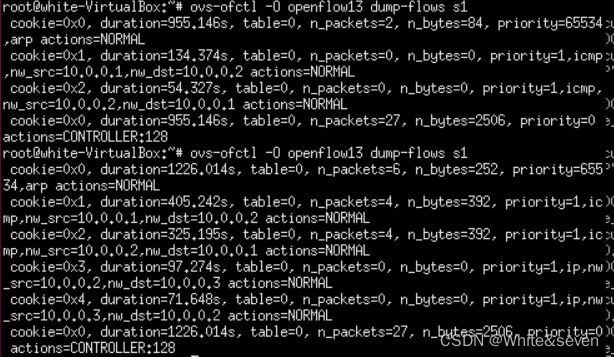
新增的规则作为Flow Entry被注册到交换器当中。switch: s1 (root):
可以设定规则的优先权。新增阻断h2和h3之间的ping(ICMP)封包规则。优先权的预设值设定为大于1的值。
| 来源 | 目的 | 通讯设定 | 连接状态 | 规则ID/优先级 |
| 10.0.0.2/32 | 10.0.0.3/32 | ICMP | 中断 | 5/10 |
| 10.0.0.3/32 | 10.0.0.2/32 | ICMP | 中断 | 6/10 |


新增的规则做为Flow Entry注册到交换器当中。switch: s1(root):

4.确认规则
确认已经设定完成的规则。Node: c0(root):
curl http :// localhost :8080/ firewall /rules /0000000000000001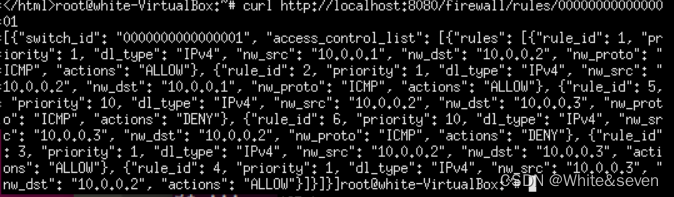

可以发现h3是无法pingh1和h2的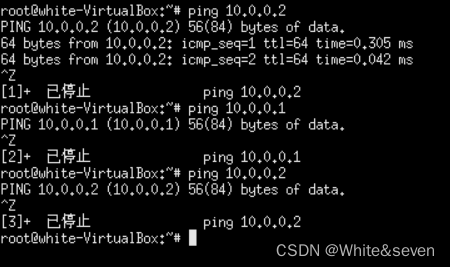
从h1发送到h2非ping的封包会被防火墙所阻挡。例如从h1发送到h2的wget指令就会被阻挡下来并记录在记录档(log)中。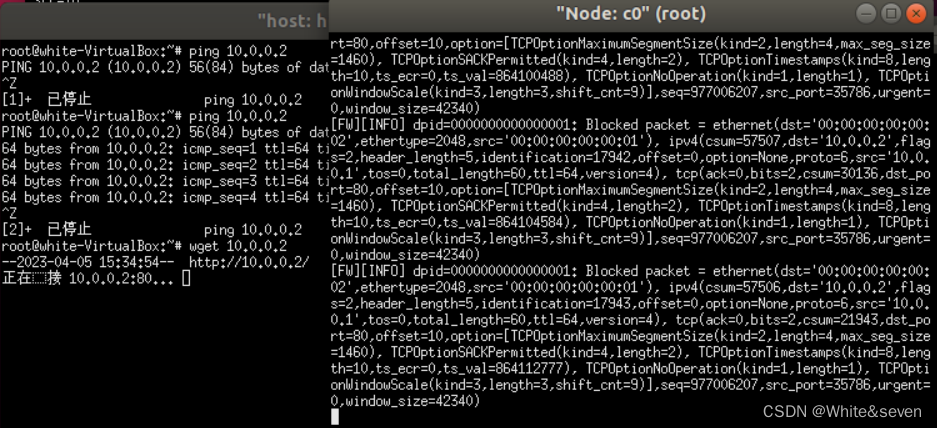
h2和h3之间除了ping以外的封包则允许被通过。例如从h2向h3发送ssh指令,记录档(log)中并不会出现封包被阻挡的记录(如果ssh是发送到h3以外的地点,则ssh的联机将会失败。

5.删除规则
删除``rule_id:5''和``rule_id:6''的规则。Node: c0(root):


现在的规则如下图: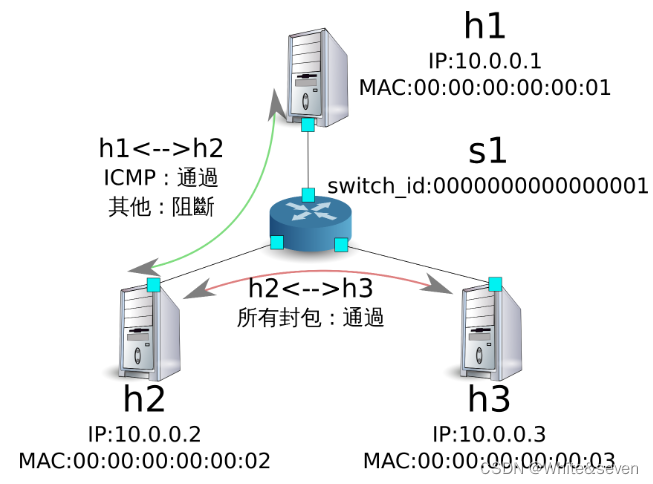
经实际确认。h2和h3之间的ping(ICMP)阻挡联机的规则删除后,ping指令现在可以被正常执行并进行通信。

2.Multi tenant操作示例
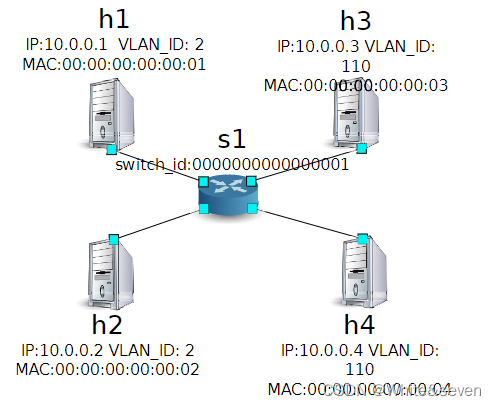
接下来这个例子将建立拓璞并使用VLAN来对tenants进行处理,还有像是路由或是位址对于交换器s1对的新增或删除,以及每一个连接埠之间的连通做验证。
1.环境搭建
下面的例子使用Single-tenant,在Mininet上进行环境的建置,另外开启一个xterm做为控制Controller的方法,请注意与之前相比这边需要多一台host。
sudo mn --topo single ,4 --mac --switch ovsk --controller remote -x接下来到每一个host的界面中设定VLAN ID。
host: h1:
ip addr del 10.0.0.1/8 dev h1-eth0
ip link add link h1-eth0 name h1-eth0.2 type vlan id 2
ip addr add 10.0.0.1/8 dev h1-eth0.2
ip link set dev h1-eth0.2 up

host: h2:
ip addr del 10.0.0.2/8 dev h2-eth0
ip link add link h2-eth0 name h2-eth0.2 type vlan id 2
ip addr add 10.0.0.2/8 dev h2-eth0.2
ip link set dev h2-eth0.2 up

host: h3:
ip addr del 10.0.0.3/8 dev h3-eth0
ip link add link h3-eth0 name h3-eth0.110 type vlan id 110
ip addr add 10.0.0.3/8 dev h3-eth0.110
ip link set dev h3-eth0.110 up

host: h4:
ip addr del 10.0.0.4/8 dev h4-eth0
ip link add link h4-eth0 name h4-eth0.100 type vlan id 110
ip addr add 10.0.0.4/8 dev h4-eth0.110
ip link set dev h4-eth0.110 up

接着将使用的OpenFlow版本设定为1.3。

switch: s1 (root):
ovs-vsctl set Bridge s1 protocols = OpenFlow13

最后,从controller的xterm画面中启动rest_firewall。controller: c0(root):
ryu-manager rest_firewall
2.变更初始状态
启动防火墙。Node: c0 (root):
curl -X PUT http://localhost:8080/firewall/module/enable/0000000000000001

curl http://localhost:8080/firewall/module/status
![]()
3.新增规则
新增允许使用VLAN_ID = 2向10.0.0.0/8发送ping信息(ICMP封包)的规则到交换器中,设定双向的规则是必要的。
| 优先级 | VLAN ID | 来源 | 目的 | 通讯设定 | 连接状态 | 规则ID |
| 1 | 2 | 10.0.0.0/8 | ANY | ICMP | 通过 | 1 |
| 1 | 2 | ANY | 10.0.0.0/8 | ICMP | 通过 | 2 |
curl -X POST -d '{"nw_src":"10.0.0.0/8","nw_proto":"ICMP"}'http ://localhost/8080/firewall/rules/0000000000000001/2

curl -X POST -d '{"nw_dst":"10.0.0.0/8","nw_proto":"ICMP"}'http ://localhost/8080/firewall/rules/0000000000000001/2

4.规则确认
确认已经设定的规则。Node: c0(root):
curl http://localhost :8080/firewall/rules/0000000000000001/all 让我们确认一下实际状况。在VLAN_ID = 2的情况下,从h1发送的ping在h2也同样是VLAN_ID = 2的情况下,你会发现他是连通的,因为我们刚才已经把规则加入。 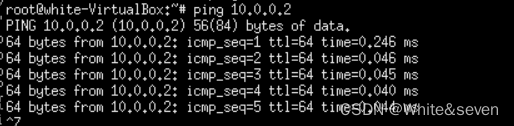
VLAN_ID = 110的情况下h3和h4之间,由于规则没有被加入,所以ping封包被阻挡。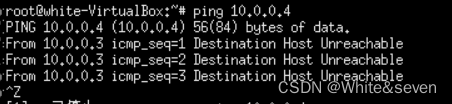
封包被阻断的时候会被记录在记录档(log)之中。controller: c0(root):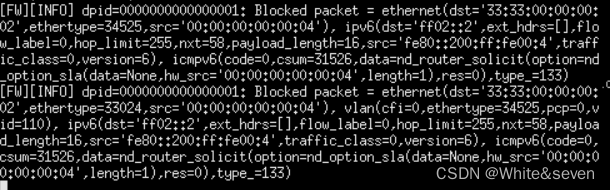
3.REST API 列表
1.取得交换器的防火墙状态
| 方法 | GET |
| URL | /firewall/module/status |
2变更交换器的防火墙状态
| 方法 | PUT |
| URL | /firewall/module/{ op }/{ switch } -- op : [ ``enable'' | ``disable'' ] -- switch : [ ``all'' | 交換器 ID ] |
| 备注 | 交換器的初始狀均为 ``disable'' |
3.取得全部规则
| 方法 | GUT |
| URL | /firewall/rules/{ switch }[/{ vlan }] -- switch : [ ``all'' | 交換器 ID ] -- vlan: [ ``all'' | VLAN ID ] |
| 备注 | VLAN ID 的指定可选择加或不加 |
4.新增规则
| 方法 | POST |
| URL | /firewall/rules/{ switch }[/{ vlan }] -- switch : [ ``all'' | 交換器 ID ] -- vlan : [ ``all'' | VLAN ID ] |
| 资料 | priority :[ 0 - 65535 ] in_port :[ 0 - 65535 ] dl_src :''<xx:xx:xx:xx:xx:xx>'' dl_dst :''<xx:xx:xx:xx:xx:xx>'' dl_type :[ ``ARP'' | ``IPv4'' ] nw_src :''<xxx.xxx.xxx.xxx/xx>'' nw_dst :''<xxx.xxx.xxx.xxx/xx''> nw_proto '':[ ``TCP'' | ``UDP'' | ``ICMP'' ] tp_src :[ 0 - 65535 ] tp_dst :[ 0 - 65535 ] actions : [ ``ALLOW'' | ``DENY'' ] |
| 备注 | 注册成功的规则会自动产生规则ID,并注明在响应的信息中。指定VLAN ID为可附加之选项。 |
5.删除规则
| 方法 | DELETE |
| URL | /firewall/rules/{ switch }[/{ vlan }] -- switch : [ ``all'' | 交換器 ID ] -- vlan : [ ``all'' | VLAN ID ] |
| 资料 | rule_id : [ ``all'' | 1 - ... ] |
| 备注 | 指定VLAN ID为可附加之选项。 |
6.取得交换器的记录档
| 方法 | GET |
| URL | /firewall/log/status |
7.变更交换器记录档的状态
| 方法 | PUT |
| URL | /firewall/log/{ op }/{ switch } -- op: [ ``enable'' | ``disable'' ] -- switch: [ ``all'' | 交換器 ID ] |
| 备注 | 设定每一个交换器的初始状态为“启用” |


 1215
1215


 被折叠的 条评论
为什么被折叠?
被折叠的 条评论
为什么被折叠?
 到【灌水乐园】发言


