


1 为什么要整这一出
神经网络需要数据传入才能进行训练等操作,那怎样才能把图片以及目标检测标注信息整合成神经网络正规输入的格式呢?
回答: pytorch 的数据加载到模型的操作顺序是这样的:
① 创建一个 Dataset 对象
② 创建一个 DataLoader 对象
③ 循环这个 DataLoader 对象,将img, label加载到模型中进行训练
整之前,先了解一些Dataset 和 DataLoader 的基础知识。
2 基础知识
代码中经常看到这两行,那Dataset和DataLoader是什么玩意?
from torch.utils.data.dataset import Dataset
from torch.utils.data import DataLoader
2.1 Dataset
Dataset是一个包装类,用来将数据包装为Dataset类,然后传入DataLoader中。
当用户想要加载自定义的数据时,只需要继承这个类,并且覆写其中的两个方法即可:
__len__:实现len(dataset),返回整个数据集的大小。__getitem__:用来获取一些索引的数据,使dataset[i]返回数据集中第i个样本。
不覆写这两个方法会直接返回错误。
简单看一眼,有点感觉就行,继续往下。
class YoloDataset(Dataset):
    def __init__(self, annotation_lines, input_shape, num_classes, train):
        super(YoloDataset, self).__init__()
        ...

    def __len__(self):
        ...

    def __getitem__(self, index):
        ...
2.2 DataLoader
DataLoader将自定义的Dataset根据batch size大小、是否shuffle等封装成一个Batch Size大小的Tensor,用于后面的训练。
- dataloader本质上是一个可迭代对象,使用iter()访问,不能使用next()访问;
- 使用 iter(dataloader) 返回的是一个迭代器,然后可以使用next访问;
- 一般使用
for inputs, labels in dataloaders进行可迭代对象的访问;
DataLoader参数介绍:
class torch.utils.data.DataLoader(
 dataset,
 batch_size=1,
 shuffle=False,
 sampler=None,
 batch_sampler=None,
 num_workers=0,
 collate_fn=None,    # <function default_collate>
 pin_memory=False,
 drop_last=False,
 timeout=0,
 worker_init_fn=None)
部分关键参数含义:
- batch_size:每个batch的大小
- shuffle:在每个epoch开始的时候,是否对数据进行重新排序
- num_workers:加载数据的时候使用几个子进程,0意味着所有的数据都会被load进主进程。(默认为0)
- collate_fn:如何取样本,可以自己定义函数来准确地实现想要的功能
- drop_last:告诉如何处理数据集长度除以batch_size 余下的数据。True就抛弃,否则保留
3 Dataset与DataLoader综合使用
最朴实的情况:
dataset = MyDataset()
dataloader = DataLoader(dataset)
num_epoches = 100
for epoch in range(num_epoches):
    for img, label in dataloader:
        ....
在YOLOv3中的操作示例:
        train_dataset  = YoloDataset(train_lines, input_shape, num_classes, train=True)
        val_dataset    = YoloDataset(val_lines, input_shape, num_classes, train=False)
        # gen常写为train_loader
        gen            = DataLoader(train_dataset, shuffle=True, batch_size=batch_size, num_workers=num_workers, pin_memory=True,
                                    drop_last=True, collate_fn=yolo_dataset_collate)
        # gen_val常写为val_loader
        gen_val        = DataLoader(val_dataset  , shuffle=True, batch_size=batch_size, num_workers=num_workers, pin_memory=True,
                                    drop_last=True, collate_fn=yolo_dataset_collate)

        for iteration, batch in enumerate(gen):
            images, targets = batch[0], batch[1]
            ...
那重写的Dataset内部是怎么操作的呢?它的输入又是什么意思呢?
4 YoloDataset的实际使用
目标检测训练时会使用一些数据增强手段,包括:
1. 裁剪(需改变bbox)
2. 平移(需改变bbox)
3. 改变亮度
4. 加噪声
5. 旋转角度(需要改变bbox)
6. 镜像(需要改变bbox)
7. cutout
...
整个学习过程中,存在两个问题:
-
问题1: 输出GT box的[中心点x,中心点y,宽w,高h,cls_num],其中坐标点位置以及box宽和高是归一化(0~1)的吗?
回答: 看网络,YOLO需要归一化,SSD不需要归一化,原因是:网络中使用的定位损失函数有区别。 -
问题2: 在网络训练过程中,所谓的图像缩放、扭曲、翻转,色域变换等数据增强技术,都是在输入图像上变换吗?有没有增加训练数据量?
回答: 数据增强不是数据扩充。每一个epoch取出原数据后,样本有一定概率使用数据增强技术,这样导致每一次训练的图片其实有一些区别,并不完全相同。总结,确实是在输入图像上变换的,没有增加训练数据量。
直接看代码:
import cv2
import numpy as np
from PIL import Image
from torch.utils.data.dataset import Dataset
from torch.utils.data import DataLoader
#---------------------------------------------------------#
# 将图像转换成RGB图像,防止灰度图在预测时报错。
# 代码仅仅支持RGB图像的预测,所有其它类型的图像都会转化成RGB
# .convert('RGB')的使用与理解,可见https://blog.csdn.net/weixin_45377629/article/details/124000751?spm=1001.2014.3001.5501
#---------------------------------------------------------#
def cvtColor(image):
if len(np.shape(image)) == 3 and np.shape(image)[2] == 3:
return image
else:
image = image.convert('RGB')
return image
# -------------------------#
# 归一化
# --------------------------#
def preprocess_input(image):
image /= 255.0
return image
class YoloDataset(Dataset):
def __init__(self, annotation_lines, input_shape, num_classes, train):
super(YoloDataset, self).__init__()
# ---------------------------------------------------#
# annotation_lines[index]:图片路径 目标1的xmin,ymin,xmax,ymax,class_num 目标2的xmin,ymin,xmax,ymax,class_num ...
# ---------------------------------------------------#
self.annotation_lines = annotation_lines
self.input_shape = input_shape # [416, 416] 【高,宽】
self.num_classes = num_classes # 20
self.length = len(self.annotation_lines) # self.annotation_lines是个list
# ---------------------------------------------------#
# self.train是bool型,用来确定是否进行数据增强,
# train时增强,val时不增强
# ---------------------------------------------------#
self.train = train
def __len__(self):
return self.length
def __getitem__(self, index):
# ---------------------------------------------------#
# 这一步保证index不超过length,
# 不然self.annotation_lines[index]取不到值
# ---------------------------------------------------#
index = index % self.length
# ---------------------------------------------------#
# 训练时进行数据的随机增强
# 验证时不进行数据的随机增强
# ---------------------------------------------------#
image, box = self.get_random_data(self.annotation_lines[index], self.input_shape[0:2], random=self.train)
# ---------------------------------------------#
# 把图片数据image转成CHW格式,float32类型数据,并归一化
# ---------------------------------------------#
image = np.transpose(preprocess_input(np.array(image, dtype=np.float32)), (2, 0, 1))
box = np.array(box, dtype=np.float32)
if len(box) != 0:
# 左上点和右下点坐标x 归一化
box[:, [0, 2]] = box[:, [0, 2]] / self.input_shape[1]
# 左上点和右下点坐标y 归一化
box[:, [1, 3]] = box[:, [1, 3]] / self.input_shape[0]
# box位置信息从[xmin,ymin,xmax,ymax,cls_num]到[xmin,ymin,宽w,高h,cls_num]
box[:, 2:4] = box[:, 2:4] - box[:, 0:2]
# box位置信息从[xmin,ymin,宽w,高h,cls_num]到[中心点x,中心点y,宽w,高h,cls_num]
box[:, 0:2] = box[:, 0:2] + box[:, 2:4] / 2
return image, box
# 下面get_random_data函数中要用到这个函数
def rand(self, a=0, b=1):
# ----------------------------------------------------------#
# np.random.rand()返回一个或一组服从“0~1”均匀分布的随机样本值。
# 随机样本取值范围是[0,1),不包括1
# ----------------------------------------------------------#
return np.random.rand() * (b - a) + a
def get_random_data(self, annotation_line, input_shape, jitter=.3, hue=.1, sat=1.5, val=1.5, random=True):
# ----------------------------------------------------------#
# annotation_line是字符串,路径、各标签信息之间 空格 隔开
# 进过split(),line是list,每个元素是str
# ----------------------------------------------------------#
line = annotation_line.split()
# ------------------------------#
# 读取图像并转换成RGB图像
# line[0]是路径
# ------------------------------#
image = Image.open(line[0])
image = cvtColor(image)
# ------------------------------#
# 获得图像的高宽与目标高宽
# ------------------------------#
iw, ih = image.size # 原图的宽和高,Image读取图片,img.size返回图片宽和高,详见https://blog.csdn.net/weixin_45377629/article/details/124000751?spm=1001.2014.3001.5501
h, w = input_shape # input_shape:[416, 416]
# ----------------------------------------------------------#
# 获得预测框
# 二维数组,里面每一维,一个bbox的标签
# 内部操作:str->int 一个bbox的标签成list,再np转,再套个列表,再转
# ----------------------------------------------------------#
box = np.array([np.array(list(map(int, box.split(',')))) for box in line[1:]])
# ----------------------------------#
# 不进行数据增强,也就是测试的时候
# random为False
# ----------------------------------#
if not random:
# -------------------------------------------#
# 获取缩放参数
# 可参考https://www.jianshu.com/p/2ae3a497f5f4
# -------------------------------------------#
scale = min(w / iw, h / ih)
nw = int(iw * scale)
nh = int(ih * scale)
dx = (w - nw) // 2
dy = (h - nh) // 2
# --------------------------------------------------------------#
# 原image等比例缩放后,新建一个期待大小的灰度图,如416x416,
# 把缩放后的image,贴在灰图上,从(dx,dy)那儿贴,也就是左上顶点对齐(dx,dy)
# 就像给图像加灰条的感觉
# --------------------------------------------------------------#
image = image.resize((nw, nh), Image.BICUBIC)
new_image = Image.new('RGB', (w, h), (128, 128, 128))
new_image.paste(image, (dx, dy))
image_data = np.array(new_image, np.float32)
# ---------------------------------#
# 对真实框进行调整
# ---------------------------------#
if len(box) > 0:
np.random.shuffle(box) # 用来打乱真实框的顺序
# -----------------------------------------------#
# box是二维数组,里面一个元素:[xmin,ymin,xmax,ymax,class_num]
# 若 b = array([[1, 2, 3], [4, 5, 6]])
# 则 b[:,[0,2]]: array([[1, 3], [4, 6]])
# b[:,0:2]: array([[1, 2], [4, 5]])
# b[:,0:2]<0: array([[False, False], [False, False]])
# b[:,0:2][b[:,0:2]<2]=0,则b=array([[0, 2, 3], [4, 5, 6]])
# b[:,1]-b[:,0]:array([2, 1]),array对应位置相减,得到一个array
# b[np.array([True, False])]:array([[0, 2, 3]])
# -----------------------------------------------#
# 对标签的xmin和xmax进行变换,到resize后图片里的位置
box[:, [0, 2]] = box[:, [0, 2]] * nw / iw + dx
# 对标签的ymin和ymax进行变换,到resize后图片里的位置
box[:, [1, 3]] = box[:, [1, 3]] * nh / ih + dy
# 出界了就整到边界上去
# xmin和ymin小于0,就置为0
box[:, 0:2][box[:, 0:2] < 0] = 0
# xmax和ymax大于w和h,就置为w和h
box[:, 2][box[:, 2] > w] = w
box[:, 3][box[:, 3] > h] = h
box_w = box[:, 2] - box[:, 0] # 得到框的宽
box_h = box[:, 3] - box[:, 1] # 得到框的高
# -------------------------------------------------#
# np.logical_and逻辑与,都是True,才为True。宽个高不大于1像素,就舍弃
# np.logical_and(box_w > 1, box_h > 1)得到一个array,
# 类似于array([False, False], dtype=bool)
# 初始:box[[GT框1信息], [GT框2信息], [GT框3信息]]
# 经过:box[np.array([True, False, True])]
# 结果:box[[GT框1信息], [GT框3信息]]
# -------------------------------------------------#
box = box[np.logical_and(box_w > 1, box_h > 1)] # discard invalid box
return image_data, box # np.array的图片数据、有效的np.array的标签数据
# -----------------------------------------------------------------------#
# 下面都是 数据增强技术
# 所谓的图像缩放、扭曲、翻转,色域变换等,都是在输入图像上变换,没有增加训练数据量
# -----------------------------------------------------------------------#
# 对图像进行缩放并且进行长和宽的扭曲
# ------------------------------------------#
new_ar = w / h * self.rand(1 - jitter, 1 + jitter) / self.rand(1 - jitter, 1 + jitter)
scale = self.rand(.25, 2)
if new_ar < 1:
nh = int(scale * h)
nw = int(nh * new_ar)
else:
nw = int(scale * w)
nh = int(nw / new_ar)
image = image.resize((nw, nh), Image.BICUBIC)
# ------------------------------------------#
# 将图像多余的部分加上灰条
# ------------------------------------------#
dx = int(self.rand(0, w - nw))
dy = int(self.rand(0, h - nh))
new_image = Image.new('RGB', (w, h), (128, 128, 128))
new_image.paste(image, (dx, dy))
image = new_image
# ------------------------------------------#
# 翻转图像
# ------------------------------------------#
flip = self.rand() < .5
if flip: image = image.transpose(Image.FLIP_LEFT_RIGHT)
image_data = np.array(image, np.uint8)
#---------------------------------#
# 对图像进行色域变换
# 计算色域变换的参数
#---------------------------------#
r = np.random.uniform(-1, 1, 3) * [hue, sat, val] + 1
#---------------------------------#
# 将图像转到HSV上
#---------------------------------#
hue, sat, val = cv2.split(cv2.cvtColor(image_data, cv2.COLOR_RGB2HSV))
dtype = image_data.dtype
#---------------------------------#
# 应用变换
#---------------------------------#
x = np.arange(0, 256, dtype=r.dtype)
lut_hue = ((x * r[0]) % 180).astype(dtype)
lut_sat = np.clip(x * r[1], 0, 255).astype(dtype)
lut_val = np.clip(x * r[2], 0, 255).astype(dtype)
image_data = cv2.merge((cv2.LUT(hue, lut_hue), cv2.LUT(sat, lut_sat), cv2.LUT(val, lut_val)))
image_data = cv2.cvtColor(image_data, cv2.COLOR_HSV2RGB)
#---------------------------------#
# 对真实框进行调整
#---------------------------------#
if len(box)>0:
np.random.shuffle(box)
box[:, [0,2]] = box[:, [0,2]]*nw/iw + dx
box[:, [1,3]] = box[:, [1,3]]*nh/ih + dy
if flip: box[:, [0,2]] = w - box[:, [2,0]]
box[:, 0:2][box[:, 0:2]<0] = 0
box[:, 2][box[:, 2]>w] = w
box[:, 3][box[:, 3]>h] = h
box_w = box[:, 2] - box[:, 0]
box_h = box[:, 3] - box[:, 1]
box = box[np.logical_and(box_w>1, box_h>1)]
return image_data, box
# DataLoader中collate_fn使用
def yolo_dataset_collate(batch):
images = []
bboxes = []
for img, box in batch:
images.append(img)
bboxes.append(box)
images = np.array(images)
return images, bboxes
if __name__ == '__main__':
# ------------------------------------------------------#
# 数据集中类别个数,以voc为例,20类
# ------------------------------------------------------#
num_classes = 20
# ------------------------------------------------------#
# 输入的shape大小,一定要是32的倍数
# ------------------------------------------------------#
input_shape = [416, 416]
num_workers = 0
batch_size = 64
# ----------------------------------------------------#
# 获得图片路径和标签
# 图片路径 目标1的xmin,ymin,xmax,ymax,class_num 目标2的xmin,ymin,xmax,ymax,class_num ...
# D:\VOCdevkit/VOC2007/JPEGImages/000005.jpg 263,211,324,339,8 165,264,253,372,8 241,194,295,299,8
# D:\VOCdevkit/VOC2007/JPEGImages/000007.jpg 141,50,500,330,6
# 2007_train.txt和2007_val.txt怎么得到的,之后再聊
# ----------------------------------------------------#
train_annotation_path = '2007_train.txt'
val_annotation_path = '2007_val.txt'
# ------------------------------------------------------------------#
# 读取数据集对应的txt
# train_lines是一个list,里面每个元素是一个str,每个str内有图片路径和标签信息,以 空格 分开
# 每个元素的最后是 换行符\n
# ------------------------------------------------------------------#
with open(train_annotation_path) as f:
train_lines = f.readlines()
with open(val_annotation_path) as f:
val_lines = f.readlines()
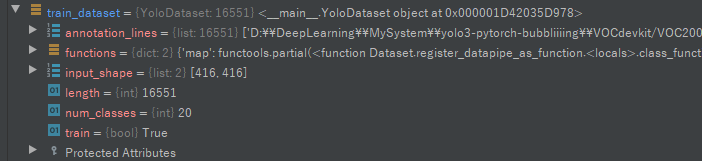
train_dataset = YoloDataset(train_lines, input_shape, num_classes, train=True)
val_dataset = YoloDataset(val_lines, input_shape, num_classes, train=False)
# gen就是常规的train_loader
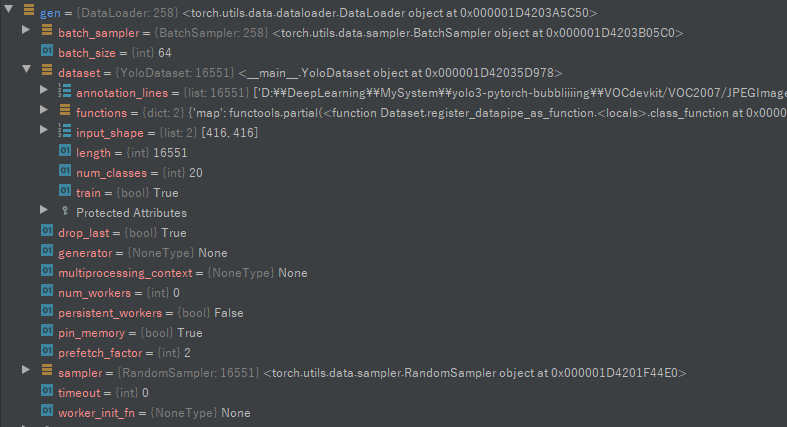
gen = DataLoader(train_dataset, shuffle=True, batch_size=batch_size, num_workers=num_workers, pin_memory=True,
drop_last=True, collate_fn=yolo_dataset_collate)
# gen_val就是常规的val_loader
gen_val = DataLoader(val_dataset, shuffle=True, batch_size=batch_size, num_workers=num_workers, pin_memory=True,
drop_last=True, collate_fn=yolo_dataset_collate)
for iteration, batch in enumerate(gen):
images, targets = batch[0], batch[1]
调试时train_dataset和gen的结果:
5 感谢链接
https://blog.csdn.net/weixin_44791964?type=blog


 8188
8188


 被折叠的 条评论
为什么被折叠?
被折叠的 条评论
为什么被折叠?
 到【灌水乐园】发言


