


1. 参考文章
sonarqube、gitlab、gitlab-runner集成,实现代码push后立即扫描代码生成报告
linux操作系统安装git并与gitlab通过SSH方式互通
2. 安装GitLab
2.1 下载及安装
# 安装gitlab
yum -y install https://mirrors.bfsu.edu.cn/gitlab-ce/yum/el7/gitlab-ce-15.8.3-ce.0.el7.x86_64.rpm
gitlab-ctl reconfigure
gitlab-ctl restart
# 查看gitlab安装情况
 systemctl status gitlab-runsvdir.service
# 防火墙开启并开放80端口
systemctl enable firewalld
systemctl start firewalld
firewall-cmd --permanent --zone=public --add-port=80/tcp
systemctl reload firewalld
访问gitlab
http:..*
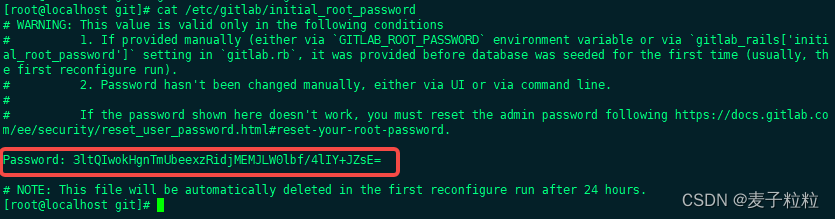
2.2 获取密码
cat /etc/gitlab/initial_root_password
2.3 修改gitlab的路径地址
cd /opt/gitlab/embedded/service/gitlab-rails/config
vi gitlab.yml
# 保存退出
:wq
# 重启gitlab
gitlab-ctl restart

3. gitlab通过SSH获取数据
3.1 配置git的用户
# 配置用户和名称
git config --global user.name "用户名称"
git config --global user.email "邮箱"
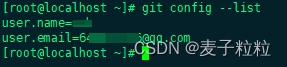
# 验证配置的是否成功
git config --list
3.2 生成公钥和私钥
# 生成公钥和私钥,输入命令后三次回车即可
ssh-keygen -t rsa -C "刚刚配置的邮箱"
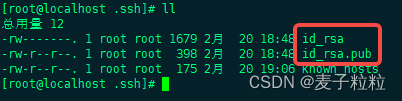
# 进入秘钥存储的路径。私钥:id_rsa,公钥:id_rsa.pub
cd ~/.ssh/
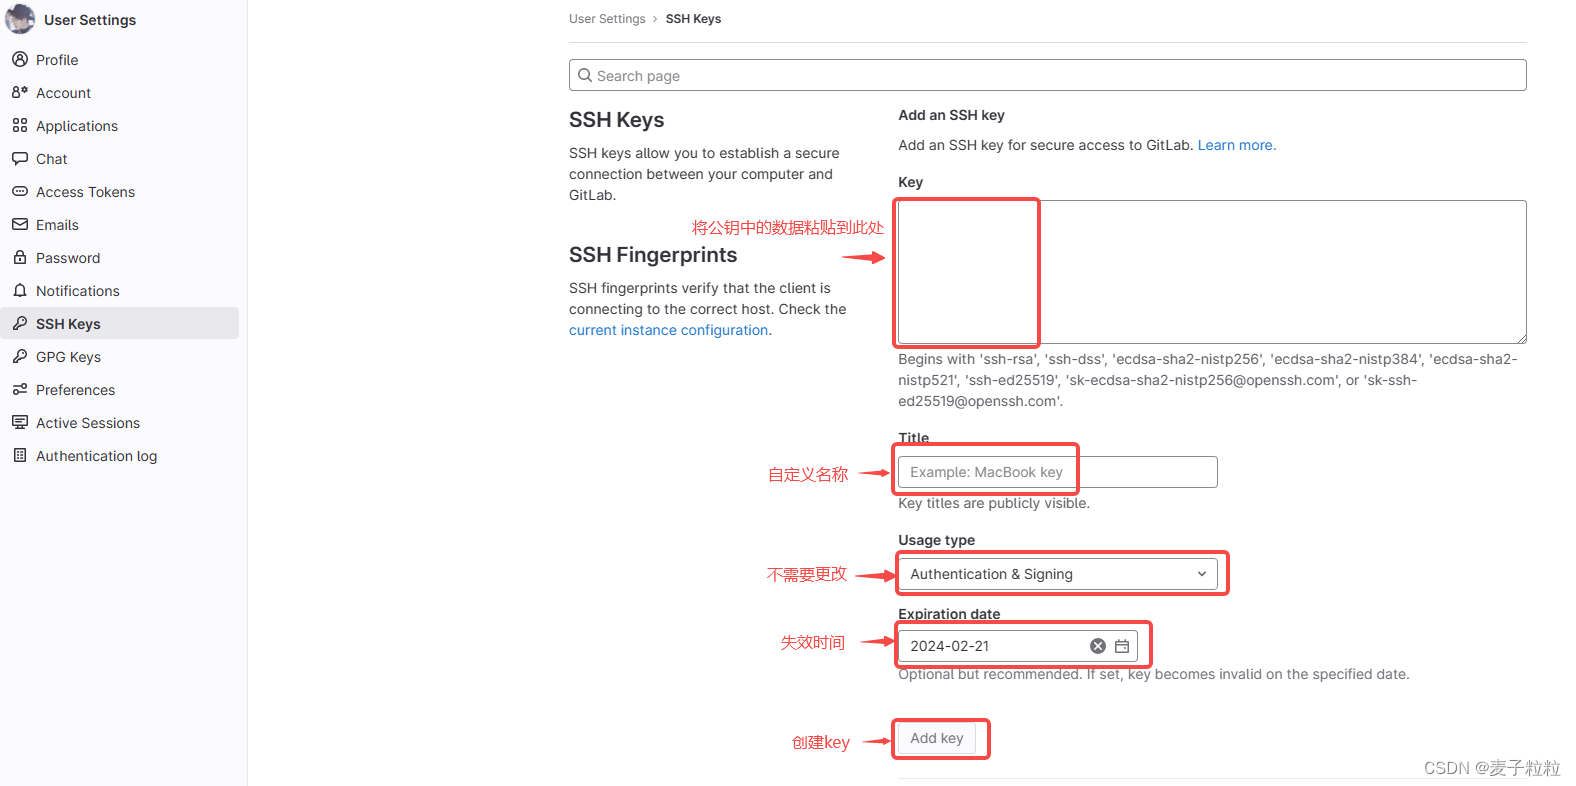
注意:公钥中的ssh-rsa以及最后的邮箱全部都复制且不要多换行符。

3.4 GitLab中配置SSH Keys
3.5 验证互通性
ssh -T git@gitlabIP
看到Welcome to GitLab, @root!,成功

4. 安装gitlab-runner
4.1 下载及安装
# 下载并安装
yum -y install https://mirrors.tuna.tsinghua.edu.cn/gitlab-runner/yum/el7/gitlab-runner-15.1.0-1.x86_64.rpm
# 启动和重启
systemctl start gitlab-runner
systemctl restart gitlab-runner
# 检查是否启动成功
systemctl status gitlab-runner
4.2 注册
[root@localhost]# gitlab-runner register
Enter the GitLab instance URL (for example, https://gitlab.com/):
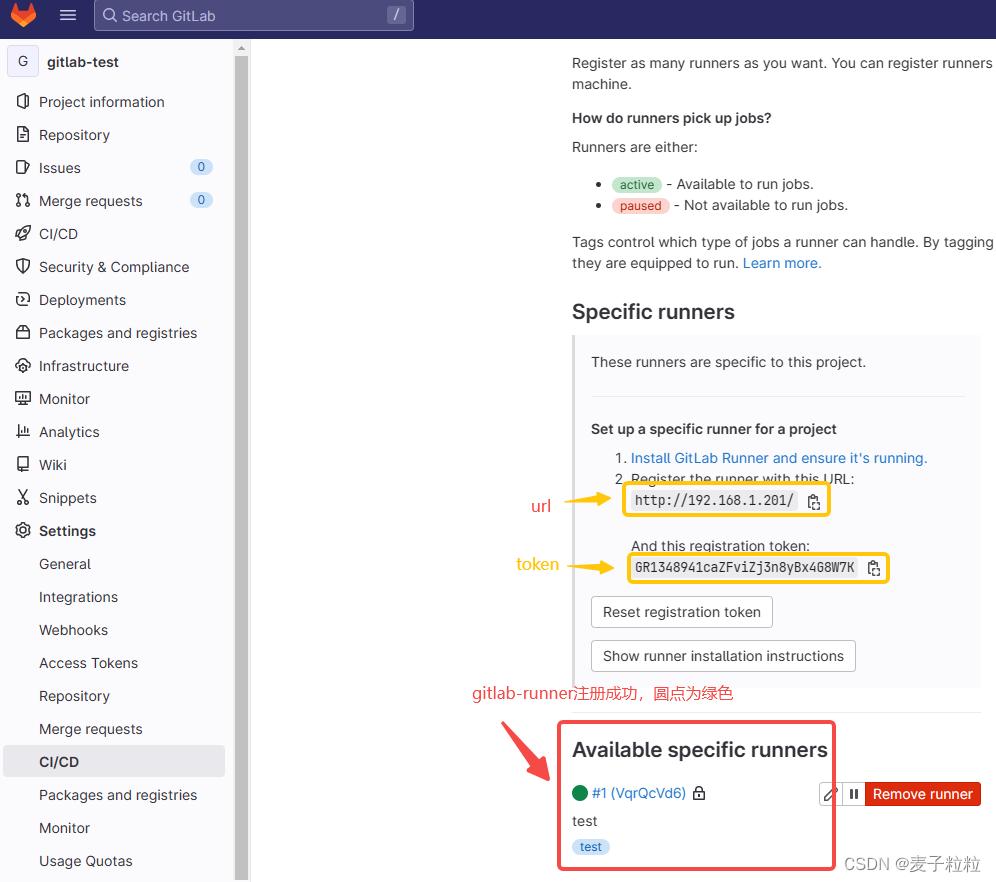
http://*.*.*.*:9000 # 填写gitlab项目的 settings > CI/CD > Runners > Specific runners 中的URL
Enter the registration token:
********* # gitlab 项目的 settings > CI/CD > Runners > Specific runners 中的token
Enter a description for the runner:
[root@localhost]: test #自定义内容
Enter tags for the runner (comma-separated):
test # tag标签,自定义名称
Enter optional maintenance note for the runner:
Registering runner... succeeded runner=GR1348941__11TxU_
Enter an executor: custom, parallels, ssh, docker+machine, docker-ssh+machine, kubernetes, docker, docker-ssh, shell, virtualbox:
ssh # 注册executor的方式,这里选ssh,试了docker+machine,docker,parallels,shell都没有成功
Enter the SSH server address (for example, my.server.com):
*.*.*.* # gitlab的地址
Enter the SSH server port (for example, 22):
22 # 默认端口为22
Enter the SSH user (for example, root):
root # 用户名称
Enter the SSH password (for example, docker.io):
123456 # 用户密码
Enter the path to the SSH identity file (for example, /home/user/.ssh/id_rsa):
/root/.ssh/id_rsa # ssh秘钥的存储位置
Runner registered successfully. Feel free to start it, but if it's running already the config should be automatically reloaded!
4.3 idea的根目录中编写.gitl-ci.yml文件
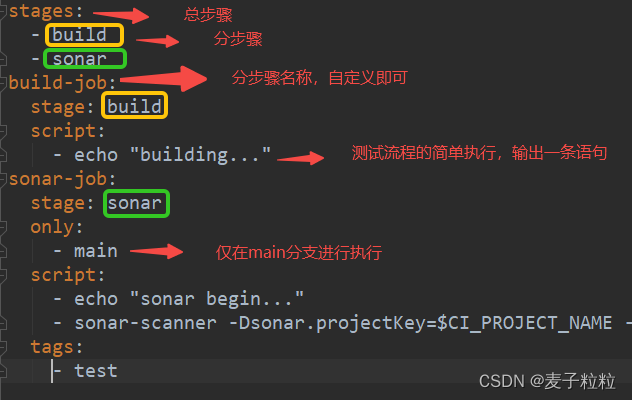
stages:
  - build
  - sonar
build-job:
  stage: build
  script:
    - echo "building..."
sonar-job:
  stage: sonar
  only:
    - main
  script:
    - echo "sonar begin..."
    - sonar-scanner -Dsonar.projectKey=$CI_PROJECT_NAME -Dsonar.host.url=http://*.*.*.*:9000/sonarqube/ -Dsonar.login=admin -Dsonar.password=admin -Dsonar.sources=.  -Dsonar.java.binaries=. -Dsonar.java.source=11 -Dsonar.analysis.CI_COMMIT_REF_NAME=$CI_COMMIT_REF_NAME
  tags:
    - test
项目中的CI/CD下的Editor与.gitl-ci.yml文件中的内容一致。
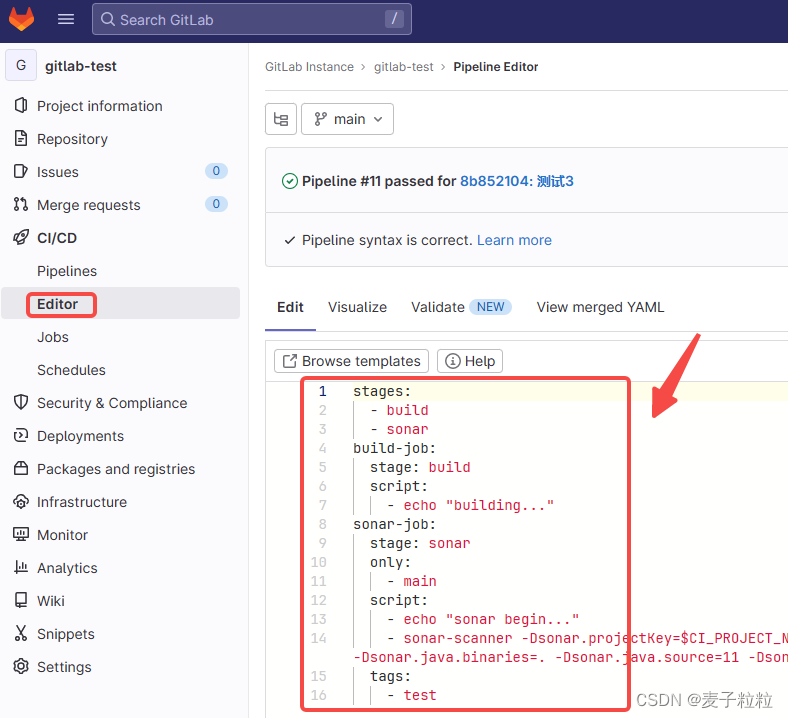
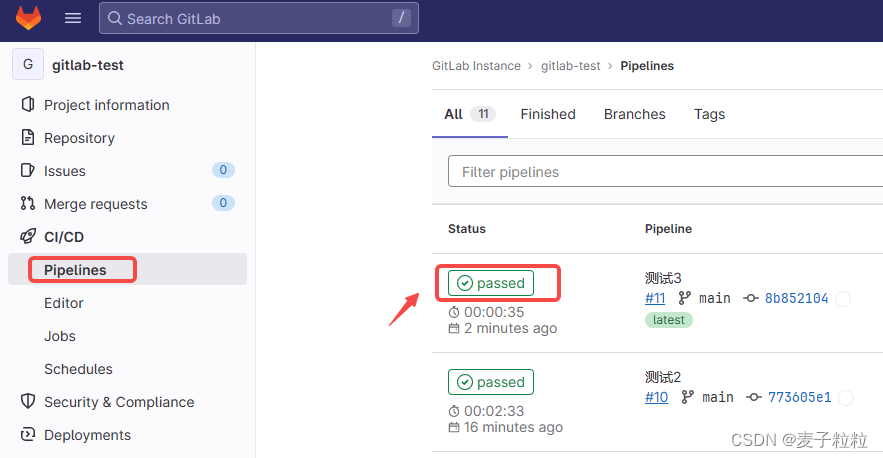
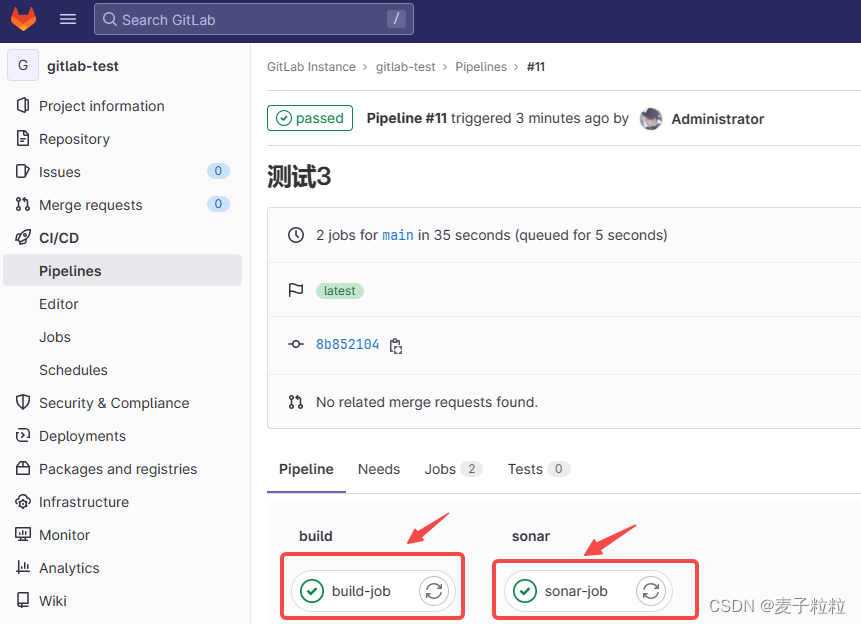
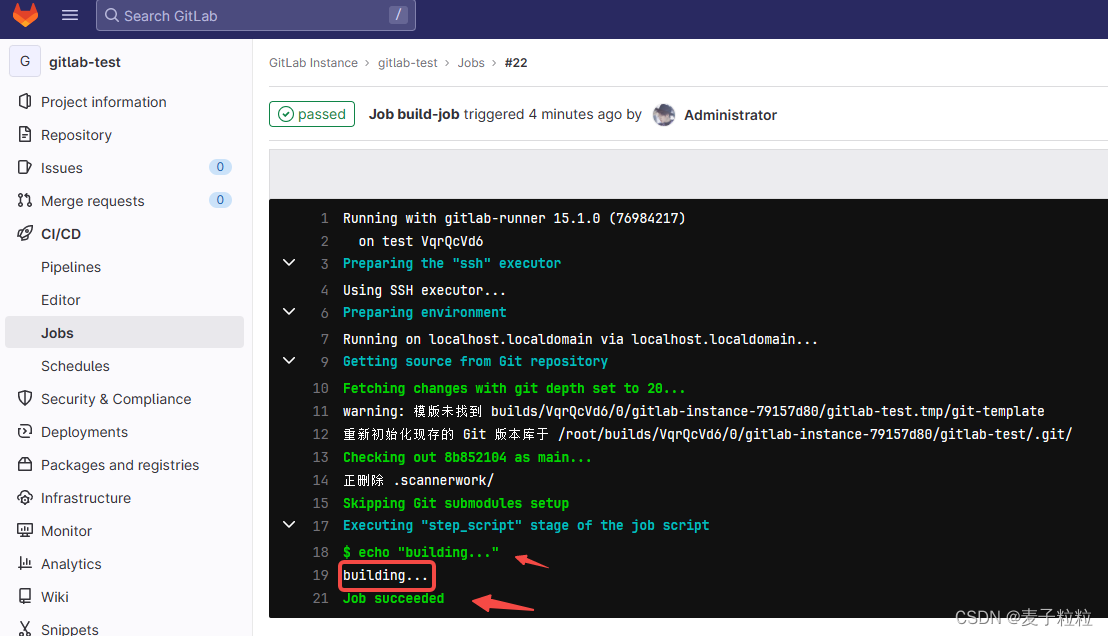
查看执行的详细情况
5. 安装sonar-scanner
# 创建文件夹
mkdir /usr/sonar-scanner
# 通过wget现在包
wget https://binaries.sonarsource.com/Distribution/sonar-scanner-cli/sonar-scanner-cli-4.0.0.1744-linux.zip
# 解压
unzip sonar-scanner-4.0.0.1744-linux.zip
# 修改配置
vim /etc/profile
# 将SONAR_RUNNER_HOME添加到PATH中
export SONAR_RUNNER_HOME=/usr/sonar-scanner/sonar-scanner-4.0.0.1744-linux
export PATH=/usr/local/git/bin:$JAVA_HOME/bin:$SONAR_RUNNER_HOME/bin:$PATH
source /etc/profile
# 验证是否成功
sonar-scanner --version
6. sonarqube的配置
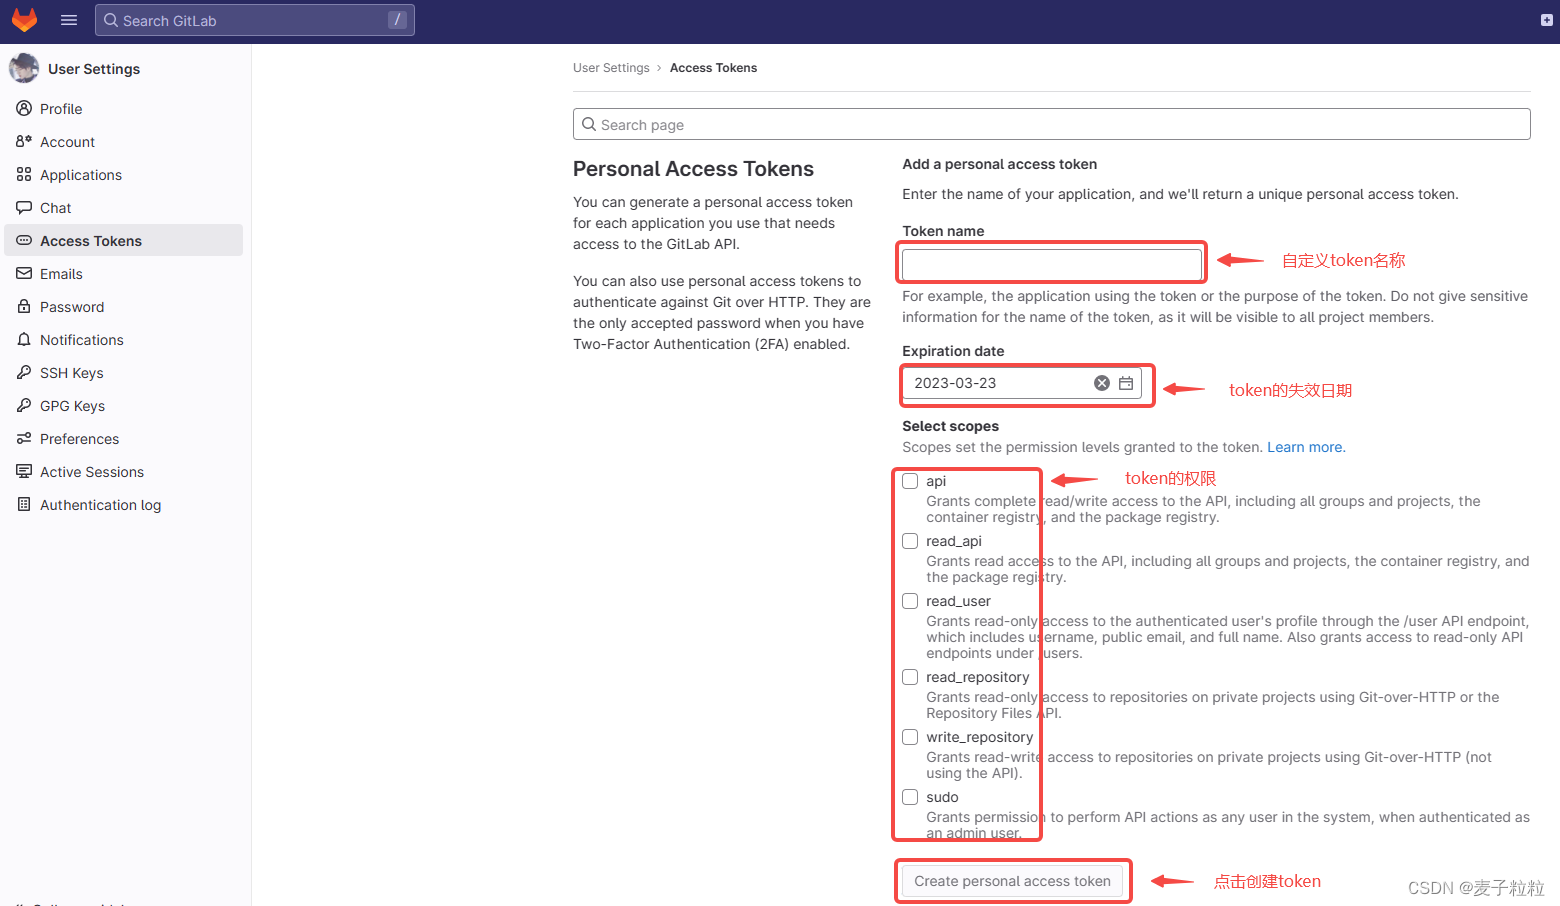
6.1 在GitLab中获取到User Token
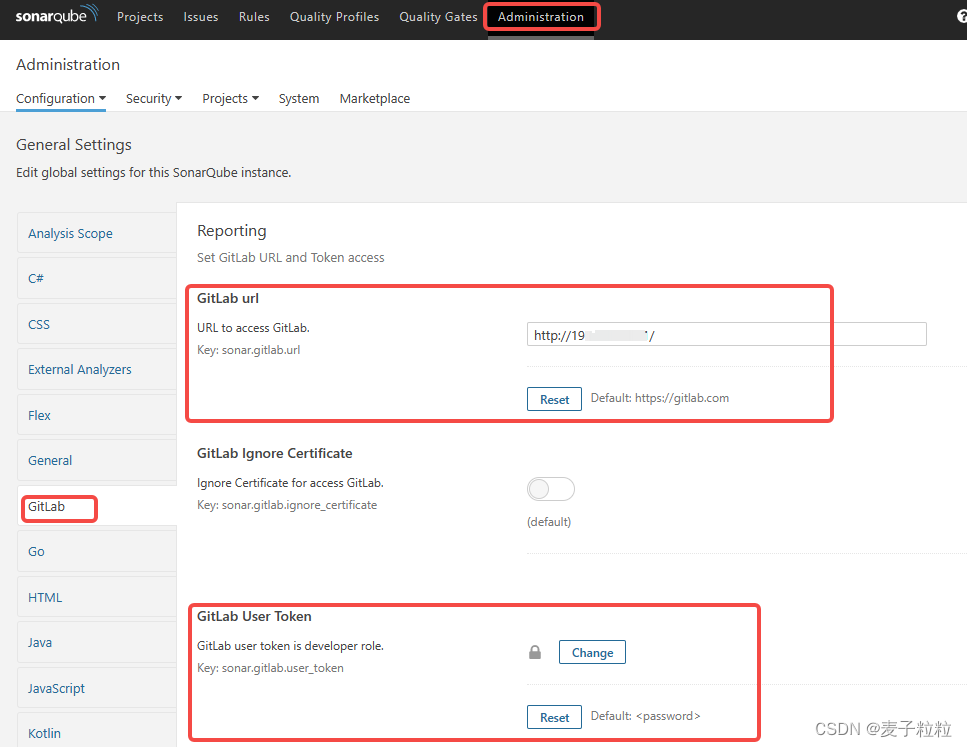
6.2 sonarqube配置GitLab的路径及UserToken
url:GitLab的路径,无端口
UserToken:从GitLab获取的用户 Accese Token
问题处理
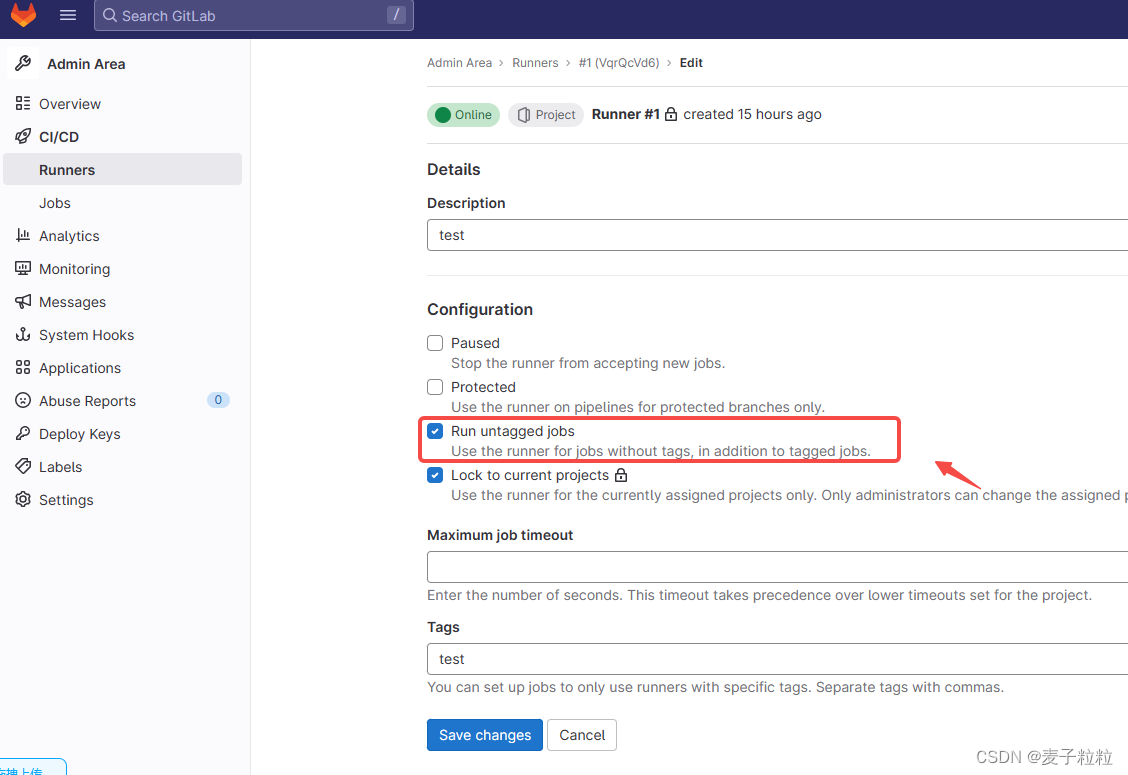
a. doesn‘t have any runners online assigned
详细报错:This job is stuck, because the project doesn‘t have any runners online assigned to it.
runner安装成功却报错没有可用的runners,可以将runners的Run untagged jobs选中。
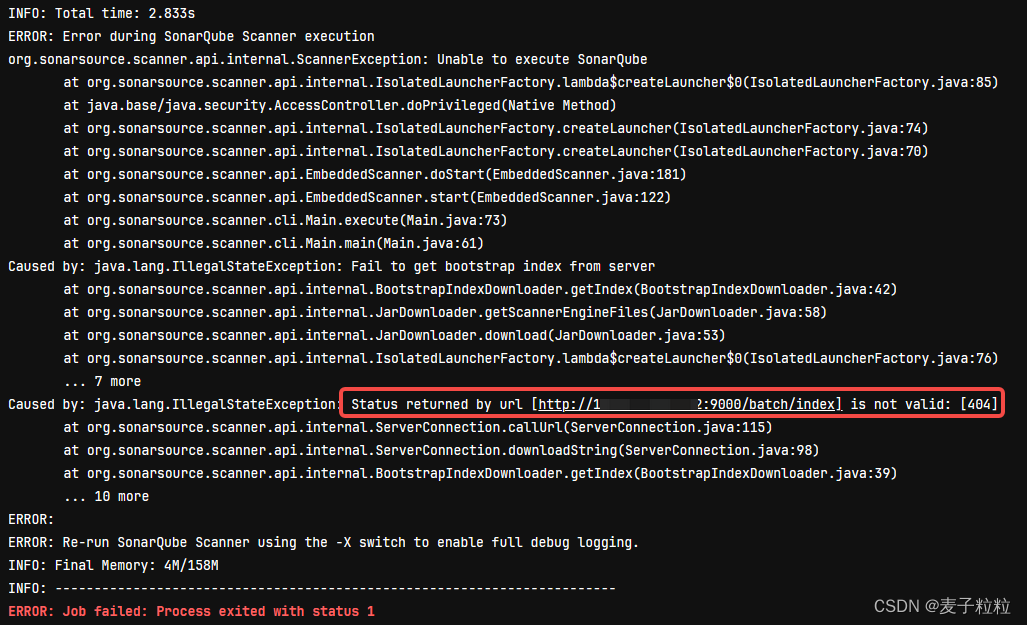
b. [http://...:9000/batch/index] is not valid
详细报错:Status returned by url [http://...:9000/batch/index] is not valid: [404]
报错后,调用了http://...:9000/batch/index地址,确实访问不到。
尝试了一下路径进行访问,http://...:9000/sonarqube/batch/index,成功。


 4253
4253


 被折叠的 条评论
为什么被折叠?
被折叠的 条评论
为什么被折叠?
 到【灌水乐园】发言


