


实验中相应服务的安装步骤略
准备相关服务器,并实现各个服务器的DNS解析
[root@ubuntu2204 ~]#cat /etc/bind/hailin.org.zone
$TTL 1D
@ IN SOA master admin (
1 ; serial
1D ; refresh
1H ; retry
1W ; expire
3H ) ; minimum
NS master
master A 10.0.0.201
gitlab A 10.0.0.179
jenkins A 10.0.0.171
harbor A 10.0.0.201
sonarqube A 10.0.0.178
安装 GitLab 和准备项目
安装Gitlab ,安装步骤略,并准备JAVA项目
#可以从gitee码云导入项目代码
https://gitee.com/lbtooth/spring-boot-helloworld.git
#生成如下项目仓库路径
http://gitlab.hailin.org/example/spring-boot-helloworld.git

安装 Harbor 并配置 Jenkins 连接Harbor
安装略
创建名为example的项目

在 Jenkins 服务器安装Docker,并配置连接 Harbor
#在jenkins服务器安装Docker
[root@jenkins ~]#apt update && apt install docker.io
[root@jenkins ~]#vim /etc/docker/daemon.json
{
"registry-mirrors": ["https://si7y70hh.mirror.aliyuncs.com"],
"insecure-registries": ["harbor.hailin.org"]
}
[root@jenkins ~]#systemctl restart docker
[root@jenkins ~]#docker info
Client:
Context: default
Debug Mode: false
Server:
Containers: 0
Running: 0
Paused: 0
Stopped: 0
Images: 3
Server Version: 20.10.21
Storage Driver: overlay2
Backing Filesystem: extfs
Supports d_type: true
Native Overlay Diff: true
userxattr: false
Logging Driver: json-file
Cgroup Driver: systemd
Cgroup Version: 2
Plugins:
Volume: local
Network: bridge host ipvlan macvlan null overlay
Log: awslogs fluentd gcplogs gelf journald json-file local logentries splunk syslog
Swarm: inactive
Runtimes: io.containerd.runc.v2 io.containerd.runtime.v1.linux runc
Default Runtime: runc
Init Binary: docker-init
containerd version:
runc version:
init version:
Security Options:
apparmor
seccomp
Profile: default
cgroupns
Kernel Version: 5.15.0-60-generic
Operating System: Ubuntu 22.04.1 LTS
OSType: linux
Architecture: x86_64
CPUs: 4
Total Memory: 3.799GiB
Name: jenkins
ID: 5SU7:WISV:KNTZ:LJ7Y:VCTM:6K7Y:VX2V:SS4U:SDDE:32SX:OMWT:HUEL
Docker Root Dir: /var/lib/docker
Debug Mode: false
Registry: https://index.docker.io/v1/
Labels:
Experimental: false
Insecure Registries:
127.0.0.0/8
Registry Mirrors:
https://si7y70hh.mirror.aliyuncs.com
Live Restore Enabled: false
#测试登录harbor,登录后可在/root/.docker/config.json下存储登录信息
[root@jenkins sonarqube-scanner]#docker login harbor.hailin.org
Authenticating with existing credentials...
WARNING! Your password will be stored unencrypted in /root/.docker/config.json.
Configure a credential helper to remove this warning. See
https://docs.docker.com/engine/reference/commandline/login/#credentials-store
Login Succeeded
[root@jenkins ~]#cat /root/.docker/config.json
{
"auths": {
"10.0.0.201": {
"auth": "YWRtaW46MTIzNDU2"
},
"harbor.hailin.org": {
"auth": "YWRtaW46MTIzNDU2"
}
}
}
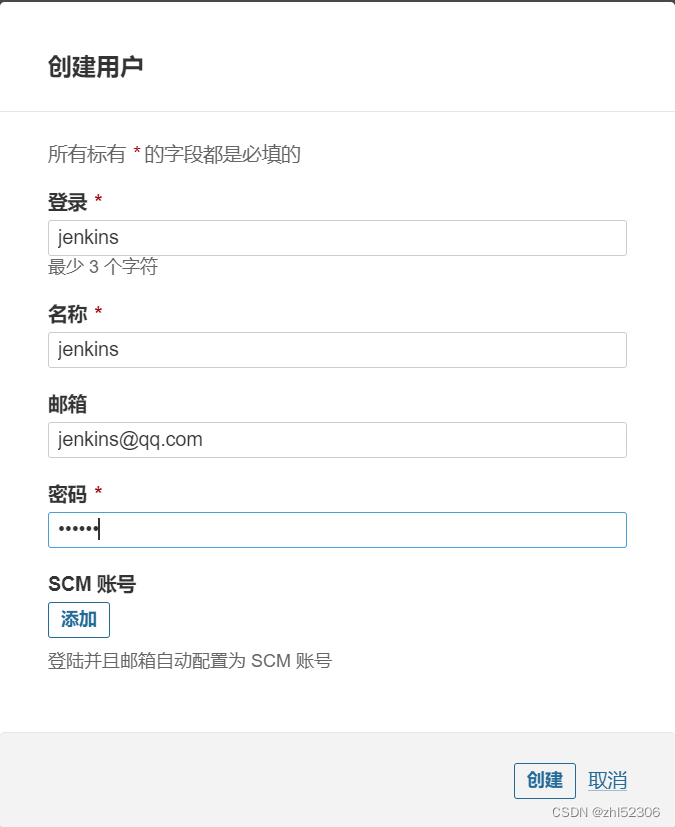
安装Jenkins并安装相关插件
安装Jenkins步骤略
安装相关插件和软件:
#GitLab
#pipeline
#企业微信通知插件Qy Wechat Notification


在 Jenkins 创建凭据连接 Harbor

在 Jenkins 安装Maven 工具
[root@jenkins ~]#apt update;apt install maven -y
#优化编译环境,提升编译速度
[root@jenkins ~]#vim /etc/maven/settings.xml
.......................
<mirror>
<id>nexus-aliyun</id>
<mirrorOf>*</mirrorOf>
<name>Nexus aliyun</name>
<url>http://maven.aliyun.com/nexus/content/groups/public</url>
</mirror>
</mirrors>
........................
#查看Maven信息,记录执行结果供后续与Jenkins对接使用
[root@jenkins ~]#mvn -version
Apache Maven 3.6.3
Maven home: /usr/share/maven
Java version: 11.0.17, vendor: Ubuntu, runtime: /usr/lib/jvm/java-11-openjdk-amd64
Default locale: zh_CN, platform encoding: UTF-8
OS name: "linux", version: "5.15.0-60-generic", arch: "amd64", family: "unix"
在Jenkins是配置Maven环境
Mange Jenkins --- Global Tool configuration -- Maven
根据上面的 mvn -version 命令结果,填写 MAVEN_HOME 的路径


在 Jenkins 创建连接 GitLab 的凭据

在 Jenkins上修改 Docker 的 socket 文件权限
默认Jenkins以Jenkins用户启动,无法访问Docker,构建时会提示如下错误:

解决方式
#other用户无docker任何权限,所以导致jenkins权限启动的jenkins服务无权限访问Docker
[root@jenkins ~]#ll /var/run/docker.sock
srw-rw---- 1 root docker 0 2月 1322:15 /var/run/docker.sock=
[root@jenkins ~]#id jenkins
用户id=109(jenkins) 组id=113(jenkins) 组=113(jenkins)
#解决方式一,将jenkins账号添加至docker组
[root@ubuntu2204 ~]#usermod -G docker jenkins
[root@ubuntu2204 ~]#id jenkins
用户id=113(jenkins) 组id=118(jenkins) 组=118(jenkins),119(docker)
[root@ubuntu2204 ~]#systemctl restart jenkins
#解决方式二,修改jenkins以root权限启动
[root@jenkins ~]#vim /lib/systemd/system/jenkins.service
.................
#User=jenkins
User=root
#Group=jenkins
Group=root
.................
安装 SonarQube 并创建用户和令牌
安装 Sonarqueb Server步骤略, ,并在 Sonarqube 创建用户并授权


更新令牌,用于后续与jenkins对接


记录令牌用于后续使用,此token 只能复制一次
squ_791bc70e1771a1d52a10b8b3cbb6d430111e3037

给与新建用户相应权限,这里给用户分配置"执行分析"和"置备项目"权限

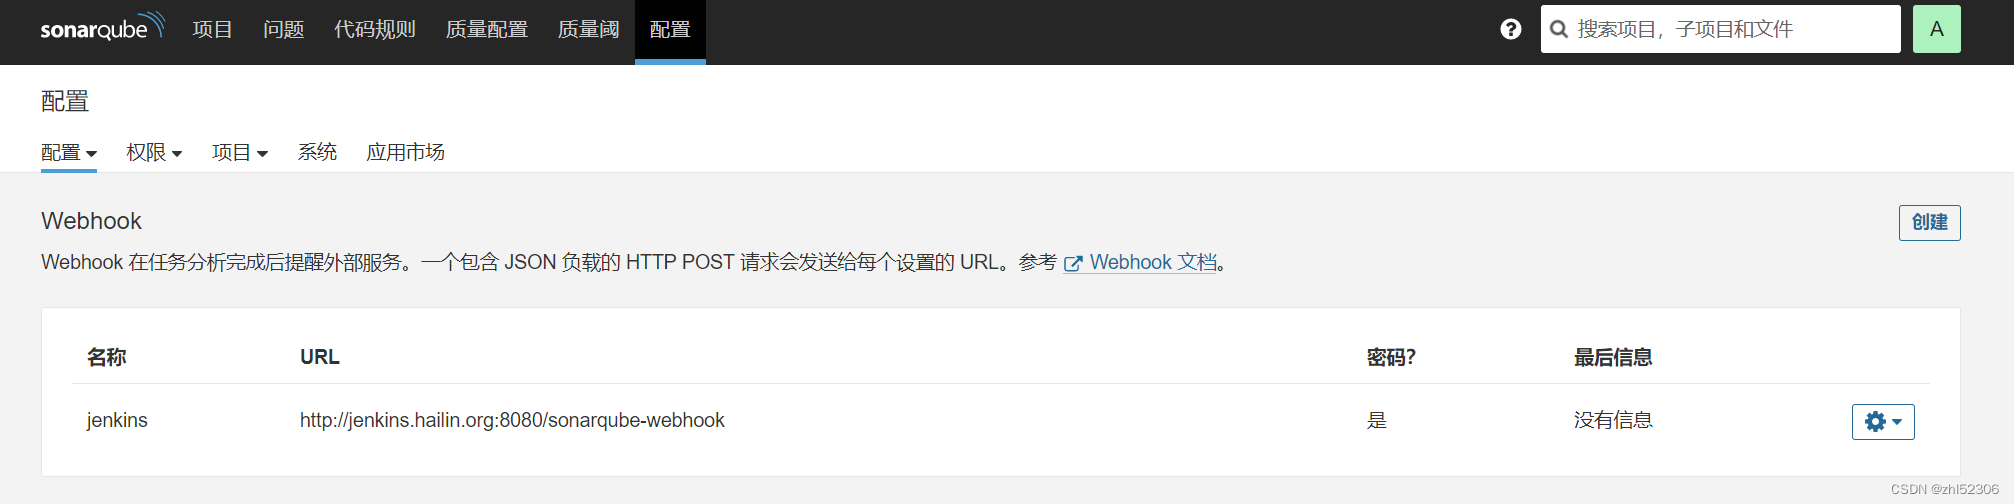
在 SonarQube 添加 Jenkins 的回调接口
在SonarQube上添加webhook(网络调用),以便于Jenkins通过SonarQube Quality Gate插件调用其"质量阈"信息,决定是否继续执行下面的构建步骤
配置 --- 网络调用 webhook --- 创建


输入名称和下面 Jenkins的URL地址注意: 密码防止攻击使用, 可以随意输入注意:此处的密码没有复杂度和长度要求,但建议使用符合安全的密码
http://jenkins.hailin.org:8080/sonarqube-webhook
#使用openssl生成secret,长度3的倍数
[root@jenkins ~]#openssl rand -base64 21
kzwrC4L+TkUDXSTpBZKzIcRQxn5T

Jenkins安装SonarQube Scanner 插件
Jenkins—系统管理--插件管理
安装插件 SonarQube Scanner


创建Jenkins访问 Sonarqube的令牌凭据
用前面小节生成的Sonarqube令牌,在Jenkins 创建凭据
secret:squ_791bc70e1771a1d52a10b8b3cbb6d430111e3037
ID:sonarqube-jenkins-token


在 Jenkins 上配置系统的 SonarQube 服务器信息
Manage Jenkins -- Configure System
注意:Name名称区分大小写
注意:http://sonarqube.hailin.org:9000 地址最后不能加/
否则会报错误 hudson.remoting.ProxyException: net.sf.json.JSONException: Invalid JSON String


注意:地址后面别有空格或者/,否则会导致异常

在 Jenkins 上安装 SonarQube Scanner
[root@jenkins ~]#cd /usr/local/src
[root@jenkins ~]#wget https://binaries.sonarsource.com/Distribution/sonar-scanner-cli/sonar-scanner-cli-4.8.0.2856-linux.zip
[root@jenkins src]#ls
sonar-scanner-cli-4.8.0.2856-linux.zip
[root@jenkins src]#unzip sonar-scanner-cli-4.8.0.2856-linux.zip
[root@jenkins src]#ln -s /usr/local/src/sonar-scanner-4.8.0.2856-linux/ /usr/local/sonar-scanner
[root@jenkins src]#ln -s /usr/local/sonar-scanner/bin/sonar-scanner /usr/bin/
#配置sonar-scanner连接sonarqube服务器
[root@jenkins src]#vim /usr/local/sonar-scanner/conf/sonar-scanner.properties
#指向sonarqube服务器的地址和端口
sonar.host.url=http://sonarqube.hailin.org:9000
sonar.sourceEncoding=UTF-8
[root@jenkins ~]#sonar-scanner -v
INFO: Scanner configuration file: /usr/local/src/sonar-scanner-4.8.0.2856-linux/conf/sonar-scanner.properties
INFO: Project root configuration file: NONE
INFO: SonarScanner 4.8.0.2856
INFO: Java 11.0.17 Eclipse Adoptium (64-bit)
INFO: Linux 5.15.0-60-generic amd64
准备微信机器人
注册企业微信添加WebHook机器


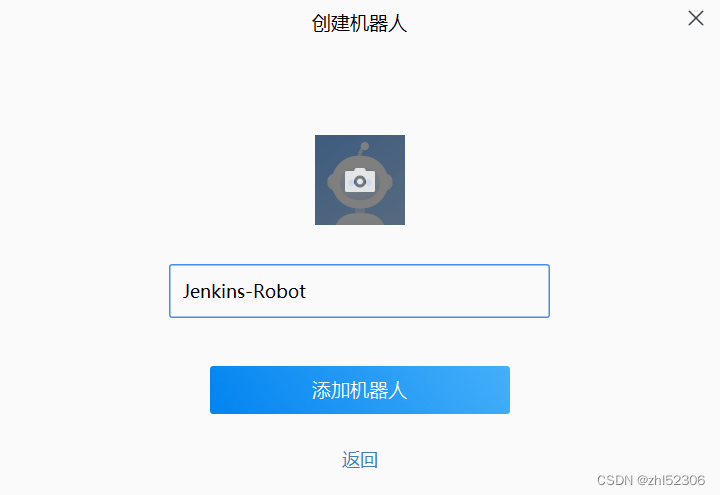

#复制创建机器人生成的webhook地址,用于后续jenkins的对接
https://qyapi.weixin.qq.com/cgi-bin/webhook/send?key=3ec91b6e-d5fc-46dd-8464-12fc730b6c9f
准备Pipeline部署脚本
pipeline {
agent any
tools {
maven 'maven-3.6.3'
}
environment {
codeRepo="http://gitlab.hailin.org/example/spring-boot-helloworld.git"
harborServer='harbor.hailin.org'
projectName='spring-boot-helloworld'
imageUrl="${harborServer}/example/${projectName}"
imageTag="${BUILD_ID}"
}
stages {
stage('Source') {
steps {
git branch: 'main', credentialsId: 'gitlab-zhao', url: "${codeRepo}"
}
}
stage('Build') {
steps {
sh'mvn -B -DskipTests clean package'
}
}
stage('Test') {
steps {
sh'mvn test'
}
}
stage("SonarQube Analysis") {
steps {
withSonarQubeEnv('SonarQube-Server') {
sh'mvn sonar:sonar'
}
}
}
stage("Quality Gate") {
steps {
timeout(time: 30, unit: 'MINUTES') {
waitForQualityGate abortPipeline: true
}
}
}
stage('Build Docker Image') {
steps {
sh'docker image build . -t "${imageUrl}:${imageTag}"'
// input(message: '镜像已经构建完成,是否要推送?')
}
}
stage('Push Docker Image') {
steps {
withCredentials([usernamePassword(credentialsId: 'harbor-user-credential', passwordVariable: 'harborPassword', usernameVariable: 'harborUserName')]) {
sh"docker login -u ${env.harborUserName} -p ${env.harborPassword} ${harborServer}"
sh"docker image push ${imageUrl}:${imageTag}"
}
}
}
}
post{
success{
qyWechatNotification failNotify: true, webhookUrl: 'https://qyapi.weixin.qq.com/cgi-bin/webhook/send?key=3ec91b6e-d5fc-46dd-8464-12fc730b6c9f'
}
failure{
qyWechatNotification failNotify: true, webhookUrl: 'https://qyapi.weixin.qq.com/cgi-bin/webhook/send?key=3ec91b6e-d5fc-46dd-8464-12fc730b6c9f'
}
}
}
创建任务使用 Pipeline Script
根据前面的相应配置创建Pipeline风格的任务
直接使用Pipeline Script
任务名:pipeline-sonarqube-docker-spring-boot-helloWorld


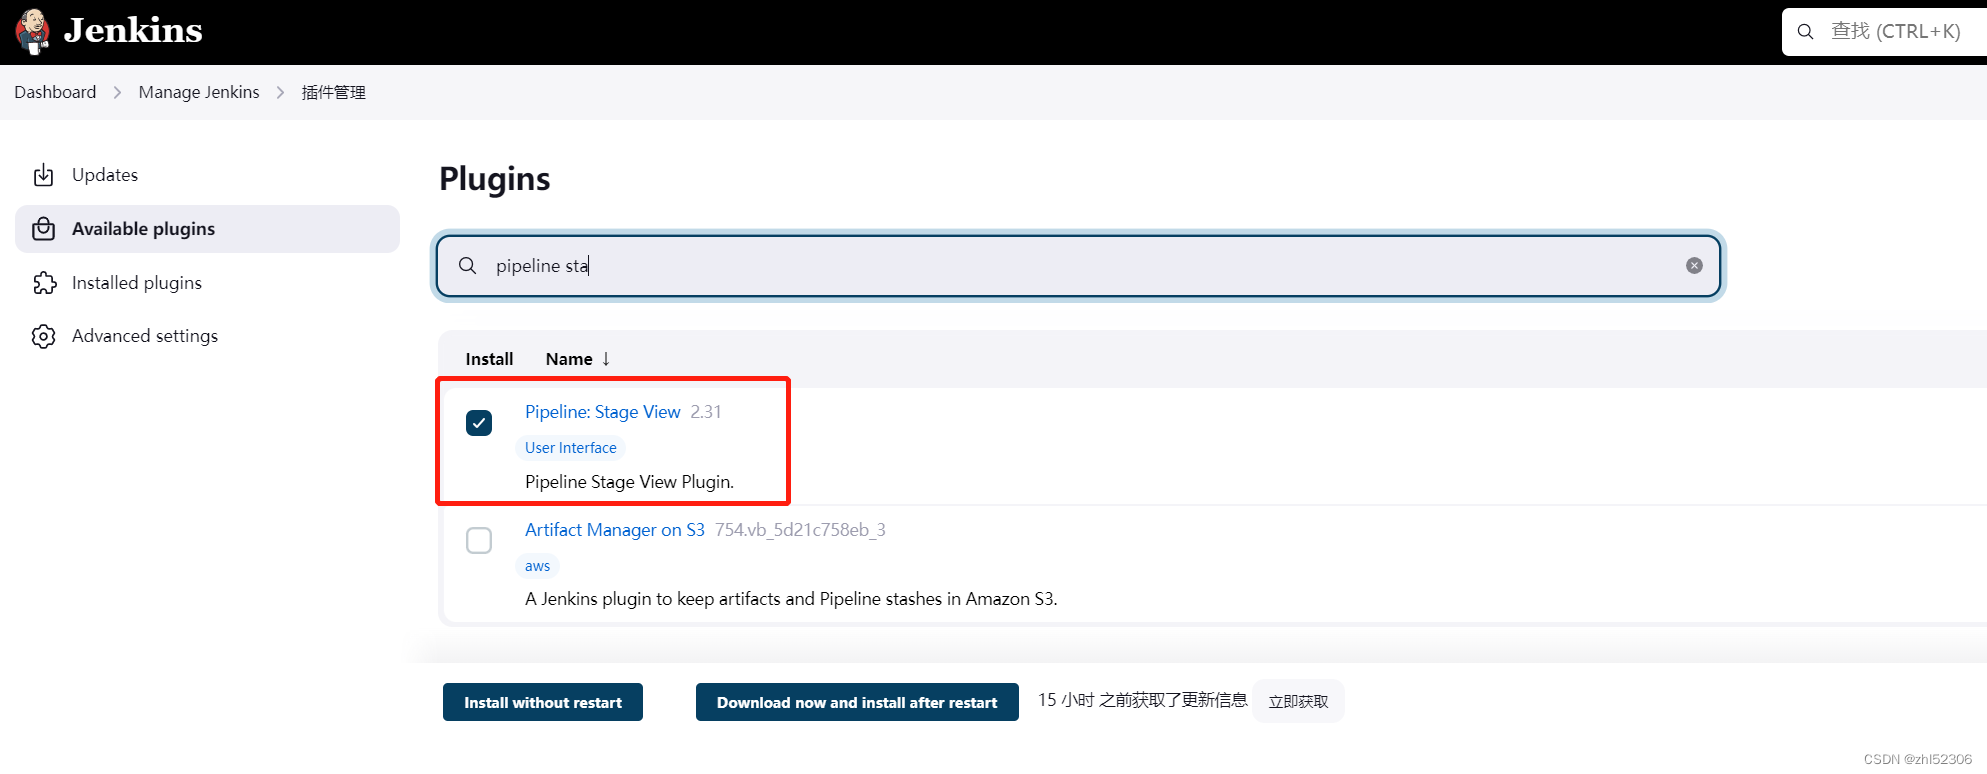
安装Pipeline Stage View 插件实现阶段化视图

执行构建验证结果

增加自动触发功能
Jenkins项目中配置自动出发构建功能

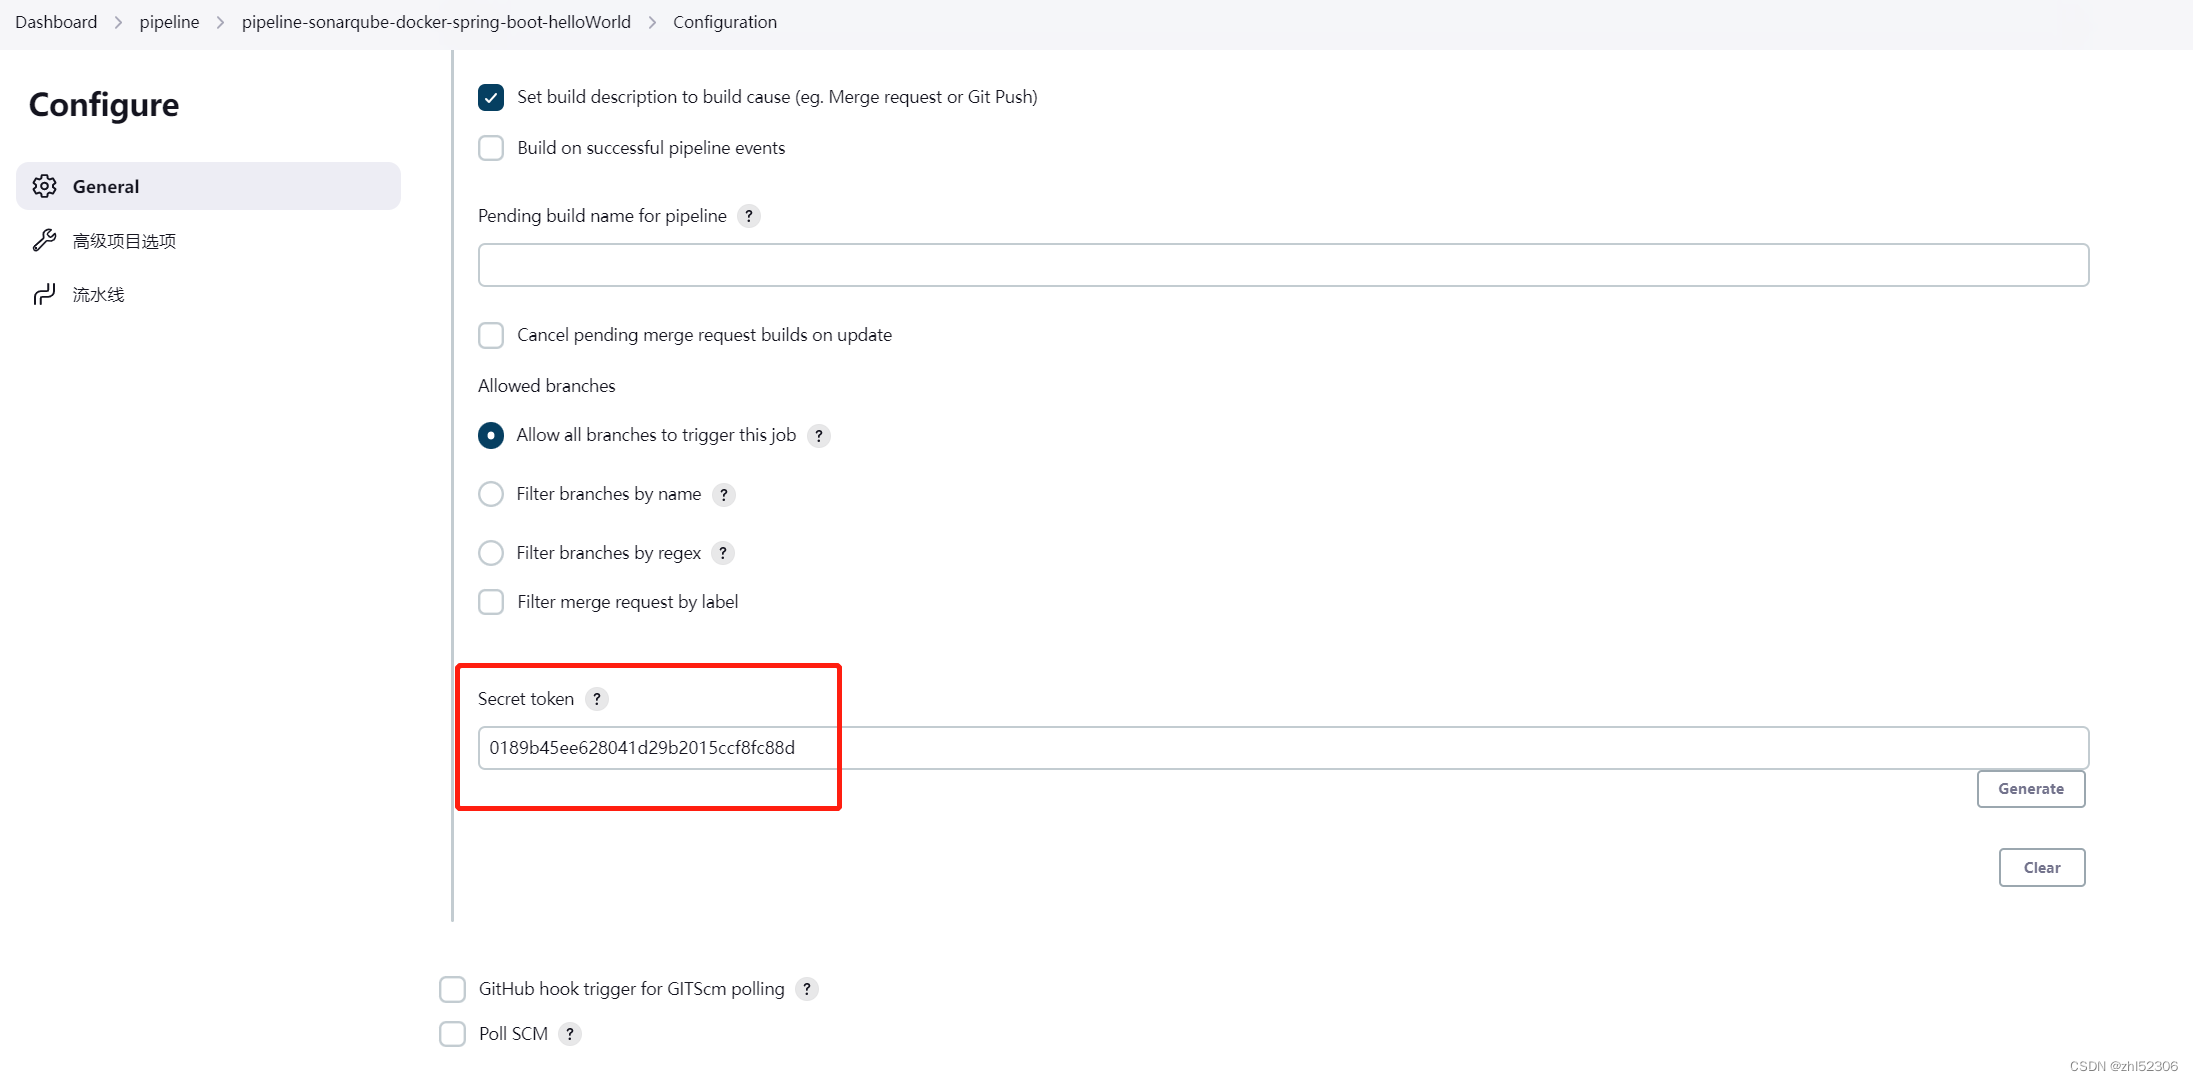
url地址:http://10.0.0.171:8080/project/pipeline-sonarqube-docker-spring-boot-helloWorld
token:0189b45ee628041d29b2015ccf8fc88d
Gitlab上设置webhook


测试推送事件


调整代码实现代码自动上传执行构建
#开发设备上调整代码
[root@SonarQube-Server spring-boot-helloworld]#ls
deploy Jenkinsfile pom.xml sonar-project.properties
Dockerfile LICENSE README.md src
[root@SonarQube-Server spring-boot-helloworld]#vim src/
main/ test/
[root@SonarQube-Server spring-boot-helloworld]#vim sonar-project.properties
[root@SonarQube-Server spring-boot-helloworld]#git commit -m 'modify sonar-project.properties'
位于分支 main
您的分支与上游分支 'origin/main' 一致。
尚未暂存以备提交的变更:
(使用 "git add <文件>..." 更新要提交的内容)
(使用 "git restore <文件>..." 丢弃工作区的改动)
修改: sonar-project.properties
修改尚未加入提交(使用 "git add" 和/或 "git commit -a")
[root@SonarQube-Server spring-boot-helloworld]#git add .
[root@SonarQube-Server spring-boot-helloworld]#git commit -m 'modify sonar-project.properties'
[main e9b8191] modify sonar-project.properties
1 file changed, 1 insertion(+), 1 deletion(-)
[root@SonarQube-Server spring-boot-helloworld]#git push
Username for 'http://gitlab.hailin.org': zhao
Password for 'http://zhao@gitlab.hailin.org':
枚举对象中: 5, 完成.
对象计数中: 100% (5/5), 完成.
使用 2 个线程进行压缩
压缩对象中: 100% (3/3), 完成.
写入对象中: 100% (3/3), 321 字节 | 321.00 KiB/s, 完成.
总共 3(差异 2),复用 0(差异 0),包复用 0
To http://gitlab.hailin.org/example/spring-boot-helloworld.git
d69bcfc..e9b8191 main -> main


 1189
1189


 被折叠的 条评论
为什么被折叠?
被折叠的 条评论
为什么被折叠?
 到【灌水乐园】发言


