


1 bird简介
bird实际是BIRD Internet Routing Daemon'的简称,它是在网络里跑着动态路由协议(支持IPV4 IPV6)的一种程序。相比较于其他的一些路由软件而言(routed (RIP only), GateD (non-free), Zebra and MRTD),bird的特性更多,配置更简便。
根据官方文档,bird支持特性如下:
- both IPv4 and IPv6 protocols
- multiple routing tables
- the Border Gateway Protocol (BGPv4)
- the Routing Information Protocol (RIPv2, RIPng)
- the Open Shortest Path First protocol (OSPFv2, OSPFv3)
- the Babel Routing Protocol
- the Router Advertisements for IPv6 hosts
- a virtual protocol for exchange of routes between different routing tables on a single host
- a command-line interface allowing on-line control and inspection of status of the daemon
- soft reconfiguration (no need to use complex online commands to change the configuration, just edit the configuration file and notify BIRD to re-read it and it will smoothly switch itself to the new configuration, not disturbing routing protocols unless they are affected by the configuration changes)
- a powerful language for route filtering
bird1.*的版本在配置IPV4与IPV6时候是单独配置,bird2.*的版本在1.*版本基础之上又进行了进一步的扩展。
2 bird安装
官方文档给出的安装步骤如下:(需要提前安装相关依赖包、编译软件GNU development tools GCC, binutils, m4, make and Perl)
./configure
make
make install
vi /usr/local/etc/bird.conf
bird
实际安装过程如下,由于centos采用的是最小安装,所以需要装许多相关的依赖包:
先安装相关依赖包:
yum install -y make gcc* m4 flex* binutils bison ncurses* readline-devel git perl*
git init
tar -xvf bird-2.0.8.tar.gz
cd bird-2.0.8/
./configure --prefix=/usr/src
make && make install
由于源码安装时指定了安装路径是在/usr/src里,简便起见,做如下软链接以方便使用:
ln -s /usr/src/sbin/bird /usr/sbin/
ln -s /usr/src/sbin/birdc /usr/sbin/
3 bird配置
3.1 bird命令参数说明
[root@vm1 ~]# bird -h
Usage: bird [--version] [--help] [-c <config-file>] [OPTIONS]

Options:
  -c <config-file>     Use given configuration file instead of /usr/src/etc/bird.conf #指定bird配置文件,默认是安装路径/etc/bird.conf
  -d                   Enable debug messages and run bird in foreground #在前端启动bird并使能debug信息
  -D <debug-file>      Log debug messages to given file instead of stderr #指定debug信息到指定的文件而不是标准错误输出stderr
  -f                   Run bird in foreground #在前端启动bird
  -g <group>           Use given group ID
  -h, --help           Display this information
  -l                   Look for a configuration file and a control socket
                       in the current working directory
  -p                   Test configuration file and exit without start
  -P <pid-file>        Create a PID file with given filename
  -R                   Apply graceful restart recovery after start
  -s <control-socket>  Use given filename for a control socket
  -u <user>            Drop privileges and use given user ID
  --version            Display version of BIRD
通过bird,进行启动。下面通过例子来说bird.conf配置文件,这也是bird里主要会配置的文件。两台主机之间配置ospf p2p类型的ospf peer,并各自引入静态路由,设置ospf为一类外部路由并将metric值设置为10。
3.1.1 例1 ospf建立P2P邻居并引入所有静态路由(E1)
bird.conf文件如下:
log syslog all;
router id 10.10.1.10;
debug protocols all;
debug protocols { events, states };
protocol device {
}
protocol kernel {
	ipv4 {			# Connect protocol to IPv4 table by channel
	      export all;	# Export to protocol. default is export none
	};
}
protocol kernel {
	ipv6 { export all; };
}
protocol static {
	ipv4;			# Again, IPv4 channel with default options
        route 10.20.0.0/24 via 172.20.0.1;
}
protocol ospf v2 {
  	ipv4 {
		import all;
		export filter {
			 if source = RTS_STATIC then {
				ospf_metric1 = 10;
				accept;
			}
			reject;
		};
	};
	area 0 {
		interface "enp0s9" {
			type pointopoint;       # Detected by default
			cost 1;		        # Interface metric
			hello 3;		# Default hello perid 10 is too long
                        dead 5;
		};
	};
}
另一侧:
[root@vm2 ~]# grep -v "^#" /usr/src/etc/bird.conf | grep -v "^$"
log syslog all;
router id 10.10.1.11;
debug protocols all;
debug protocols { events, states };
protocol device {
}
protocol kernel {
ipv4 { # Connect protocol to IPv4 table by channel
export all; # Export to protocol. default is export none
};
}
protocol kernel {
ipv6 { export all; };
}
protocol static {
ipv4; # Again, IPv4 channel with default options
route 10.30.0.0/24 via 172.20.0.1;
}
protocol ospf v2 {
ipv4 {
import all;
export filter {
if source = RTS_STATIC then {
ospf_metric1 = 10;
accept;
}
reject;
};
};
area 0 {
interface "enp0s9" {
type pointopoint; # Detected by default
cost 1; # Interface metric
hello 3; # Default hello perid 10 is too long
dead 5;
};
};
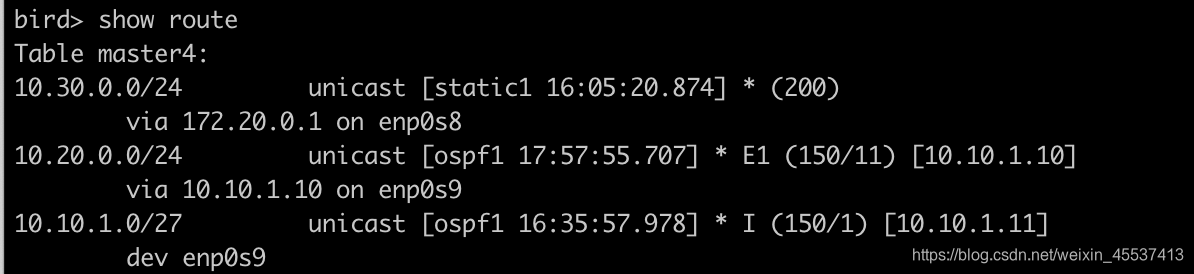
}查看ospf邻居建立正常,路由学习正常:

此外,可以看一下birdc里命令行的相关命令:
bird> ?
quit                                           Quit the client
exit                                           Exit the client
help                                           Description of the help system
show ...                                       Show status information
dump ...                                       Dump debugging information
eval <expr>                                    Evaluate an expression
echo ...                                       Control echoing of log messages
disable (<protocol> | "<pattern>" | all) [message]  Disable protocol
enable (<protocol> | "<pattern>" | all) [message]  Enable protocol
restart (<protocol> | "<pattern>" | all) [message]  Restart protocol
reload <protocol> | "<pattern>" | all          Reload protocol
debug ...                                      Control protocol debugging via BIRD logs
mrtdump ...                                    Control protocol debugging via MRTdump files
restrict                                       Restrict current CLI session to safe commands
configure ...                                  Reload configuration
down                                           Shut the daemon down
graceful restart                               Shut the daemon down for graceful restart
3.1.2 在例1上优化引入路由
在host1上定义了2条路由,只引入其中一条/24路由,其他路由都不引入。
[root@vm1 ~]# grep -v "^$"  /usr/src/etc/bird.conf | grep -v "^#"
log syslog all;
router id 10.10.1.10;
debug protocols all;
debug protocols { events, states };
protocol device {
}
protocol kernel {
	ipv4 {			# Connect protocol to IPv4 table by channel
	      export all;	# Export to protocol. default is export none
	};
}
protocol kernel {
	ipv6 { export all; };
}
protocol static {
	ipv4;			# Again, IPv4 channel with default options
        route 10.20.0.0/24 via 172.20.0.1;
	    route 10.40.0.0/24 via 172.20.0.1;
}
function net_len_too_long(){
    case net.type {
        NET_IP4: return net.len > 24; # IPv4 CIDR 大于 /24 为太长
        else: print "net_len_too_long: unexpected net.type ", net.type, " ", net;return false;
    }
}
function ospf_export() {
    if net_len_too_long() then return false;
    if source != RTS_STATIC then return false;
    if net !~ [10.0.0.0/11{11,24}] then return false;
    return true;
}
protocol ospf v2 {
  	ipv4 {
		import all;
		export filter {
			if !ospf_export() then reject;
			ospf_metric1 = 10;
			accept;
		};
	};
	area 0 {
		interface "enp0s9" {
			type pointopoint;       # Detected by default
			cost 1;		        # Interface metric
			hello 3;		# Default hello perid 10 is too long
            dead 5;
		};
	};
}
在host2上进行路由信息查看:
3.2 bird日志信息打印
日常我们需要对网络内的ospf/bgp的邻居日志信息进行记录,因此需要在bird.conf文件里配置日志记录信息,有几种配置手段(1、在全局上配置;2、针对每个协议进行配置),但感觉全局配置就足够使用了。
[root@vm1 log]# grep -v "^$"  /usr/src/etc/bird.conf | grep -v "^#"
log "/var/log/bird.log" all;
测试一下ospf邻居震荡的情况: 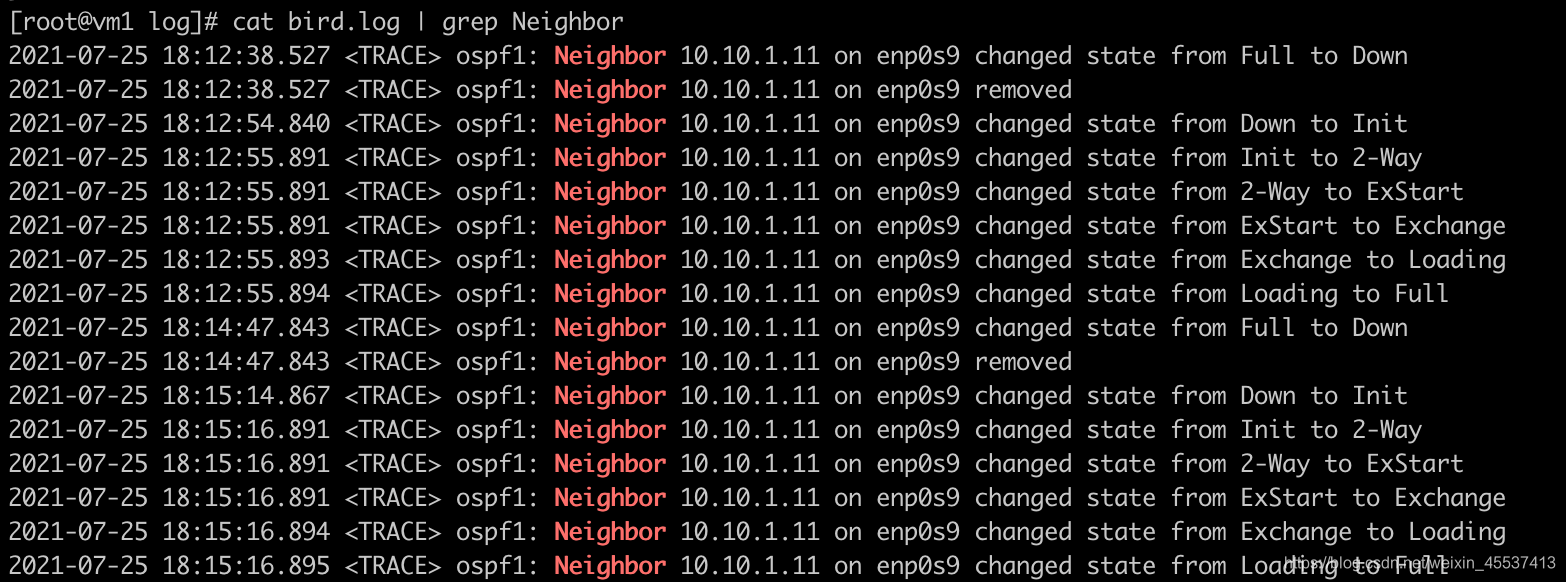
4 参考文献
官网:https://bird.network.cz/?get_doc&v=20&f=bird-6.html#ss6.8


 2189
2189

 被折叠的 条评论
为什么被折叠?
被折叠的 条评论
为什么被折叠?
 到【灌水乐园】发言


