


为了使用便利的circuitpython社区提供的大量模块, 在Raspberry Pi Pico上安装 CricuitPython, 在
Installing CircuitPython | Getting Started with Raspberry Pi Pico and CircuitPython | Adafruit Learning System https://learn.adafruit.com/getting-started-with-raspberry-pi-pico-circuitpython/circuitpython下载 绿色按钮链接的 uf2文件, 按住 bootSel按钮,插入USB数据线, 将下载的文件拖放到出现的移动存储中, 它会自动重启, 然后显示多了一个U盘. 这里就可以通过拖放文件实现程序的加载. 我们的Raspberry Pi Pico上就安装好了CricuitPython, 打个比方就相当于给这个单片机安装了操作系统.
这里需要注意的是, CricuitPython没有中断和多线程功能, 也没有Pico中特有的可编程GPIO功能, 如果需要这些则必须重新安装PIco原来的 Micropython系统.
CricuitPython官方推荐的Python编辑器是最新版的Mu, 也可以使用 Thonny编辑器.
在Mu中选择

模式中选择 RP2040这个选项. 点击REPL可以实时执行交互命令, 和普通的Python差别不大.
在编辑区可以编写Python程序,然后点击运行, 那么结果将显示在REPL窗口.
编辑区的文件可以保存在Pico中, 要查看Pico中的文件需要关闭 REPL 功能.
1. 先加载 board 使用板载资源
import board
dir(board)
加载包以后查看其属性, 可以用help(?)来查看其属性. 这里列出的都是可用的板载资源及其属性.
['__class__', '__name__', 'A0', 'A1', 'A2', 'A3', 'GP0', 'GP1', 'GP10', 'GP11', 'GP12', 'GP13', 'GP14', 'GP15', 'GP16', 'GP17', 'GP18', 'GP19', 'GP2', 'GP20', 'GP21', 'GP22', 'GP23', 'GP24', 'GP25', 'GP26', 'GP26_A0', 'GP27', 'GP27_A1', 'GP28', 'GP28_A2', 'GP3', 'GP4', 'GP5', 'GP6', 'GP7', 'GP8', 'GP9', 'LED', 'SMPS_MODE', 'VBUS_SENSE', 'VOLTAGE_MONITOR', 'board_id']这个是官方 提供的程序查看各个引脚的功能
"""CircuitPython Essentials Pin Map Script"""
import microcontroller
import board

board_pins = []
for pin in dir(microcontroller.pin):
    if isinstance(getattr(microcontroller.pin, pin), microcontroller.Pin):
        pins = []
        for alias in dir(board):
            if getattr(board, alias) is getattr(microcontroller.pin, pin):
                pins.append("board.{}".format(alias))
        if len(pins) > 0:
            board_pins.append(" ".join(pins))
for pins in sorted(board_pins):
    print(pins)
2. 可用模块
help("modules")可用查询可用的模块都有哪些.
__main__          bitops            microcontroller   storage
_bleio            board             micropython       struct
_eve              builtins          msgpack           supervisor
adafruit_bus_device                 busio             neopixel_write    synthio
adafruit_pixelbuf collections       onewireio         sys
aesio             countio           os                terminalio
alarm             digitalio         pulseio           time
analogio          displayio         pwmio             touchio
array             errno             qrio              traceback
atexit            fontio            rainbowio         ulab
audiobusio        framebufferio     random            usb_cdc
audiocore         gc                re                usb_hid
audiomixer        getpass           rgbmatrix         usb_midi
audiomp3          imagecapture      rotaryio          vectorio
audiopwmio        io                rp2pio            watchdog
binascii          json              rtc
bitbangio         keypad            sdcardio
bitmaptools       math              sharpdisplay
Plus any modules on the filesystem
3. 万物起源点个灯
'''Example for Pico. Turns on the built-in LED.'''
import board
import digitalio

led = digitalio.DigitalInOut(board.LED)
led.direction = digitalio.Direction.OUTPUT

while True:
    led.value = not led.value
    time.sleep(0.5)
板载的绿灯开始闪烁. 这里我们没有指定板载灯的引脚号, 查引脚图可知这是GPIO25.
也可以点亮其它的LED灯, 接线时别忘记限流电阻, 一般地220Ω就足够了.
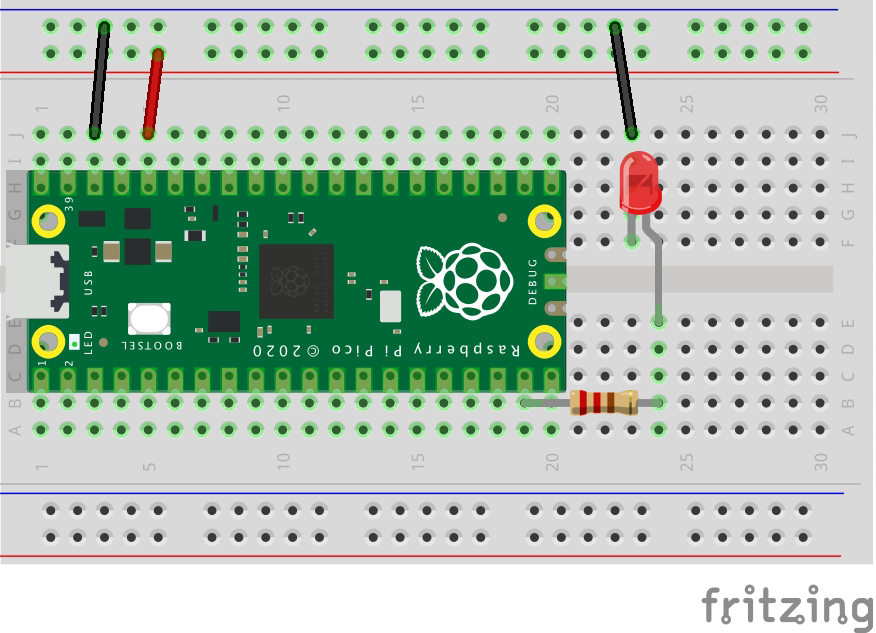
这是官网的一个示例图和程序
'''
LED example for Pico. Blinks external LED on and off.

REQUIRED HARDWARE:
* LED on pin GP14.
'''
import time
import board
import digitalio

led = digitalio.DigitalInOut(board.GP14)
led.direction = digitalio.Direction.OUTPUT

while True:
    led.value = True
    time.sleep(0.5)
    led.value = False
    time.sleep(0.5)
可以看用按键控制LED的亮灭

这个也是官网下载的示例
'''
Button and LED example for Pico. Turns on LED when button is pressed.

REQUIRED HARDWARE:
* Button switch on pin GP13.
* LED on pin GP14.
'''
import board
import digitalio

led = digitalio.DigitalInOut(board.GP14)
led.direction = digitalio.Direction.OUTPUT
button = digitalio.DigitalInOut(board.GP13)
button.switch_to_input(pull=digitalio.Pull.DOWN)

while True:
    led.value = button.value
注意这里对于按键引脚采用了下拉电阻, 当按下按键后它变成高电压, 则点亮LED


 357
357


 被折叠的 条评论
为什么被折叠?
被折叠的 条评论
为什么被折叠?
 到【灌水乐园】发言


