


单元测试
1.添加测试类
test包新建SpringBootTests。
package com.gerrard.community;

import com.gerrard.community.entity.DiscussPost;
import com.gerrard.community.service.DiscussPostService;
import org.junit.*;
import org.junit.runner.RunWith;
import org.springframework.beans.factory.annotation.Autowired;
import org.springframework.boot.test.context.SpringBootTest;
import org.springframework.test.context.ContextConfiguration;
import org.springframework.test.context.junit4.SpringRunner;

import java.util.Date;

@RunWith(SpringRunner.class)
@SpringBootTest
@ContextConfiguration(classes = CommunityApplication.class)
public class SpringBootTests {

    @Autowired
    private DiscussPostService discussPostService;

    private DiscussPost data;

    @BeforeClass
    public static void beforeClass(){
        System.out.println("beforeClass");
    }

    @AfterClass
    public static void afterClass(){
        System.out.println("afterClass");
    }
    @Before
    public void before(){
        System.out.println("before");

        // 初始化测试数据
        data = new DiscussPost();
        data.setUserId(111);
        data.setTitle("Test Title");
        data.setContent("Test Content");
        data.setCreateTime(new Date());
        discussPostService.addDiscussPost(data);
    }

    @After
    public void after() {
        System.out.println("after");

        // 删除测试数据
        discussPostService.updateStatus(data.getId(), 2);
    }

    @Test
    public void test1() {
        System.out.println("test1");
    }

    @Test
    public void test2() {
        System.out.println("test2");
    }


    @Test
    public void testFindById(){
        DiscussPost post=discussPostService.findDiscussPostById(data.getId());
        Assert.assertNotNull(post);
        Assert.assertEquals(data.getTitle(),post.getTitle());
        Assert.assertEquals(data.getContent(),post.getContent());
    }

    @Test
    public void testUpdateScore() {
        int rows = discussPostService.updateScore(data.getId(), 2000.00);
        Assert.assertEquals(1, rows);

        DiscussPost post = discussPostService.findDiscussPostById(data.getId());
        Assert.assertEquals(2000.00, post.getScore(), 2);
    }
}
两点注意:
1.测试数据不要影响到正式业务数据,即用即删。
2.@BeforeClass和 @Before的区别。
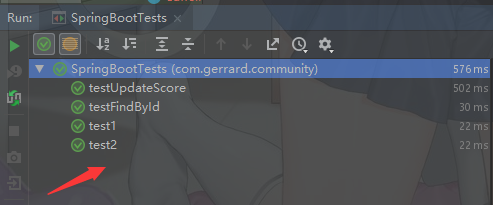
2.测试结果


 480
480


 被折叠的 条评论
为什么被折叠?
被折叠的 条评论
为什么被折叠?
 到【灌水乐园】发言


