快速入门
1、在web.xml中配置核心控制器:一个 Servlet
<!DOCTYPE web-app PUBLIC
 "-//Sun Microsystems, Inc.//DTD Web Application 2.3//EN"
 "http://java.sun.com/dtd/web-app_2_3.dtd" >
<web-app>
	<!-- 配置 spring mvc 的核心控制器 -->
	<servlet>
		<servlet-name>SpringMVCDispatcherServlet</servlet-name>
		<servlet-class>org.springframework.web.servlet.DispatcherServlet</servlet-class>

		<!-- 配置初始化参数,用于读取 SpringMVC 的配置文件 -->
		<init-param>
			<param-name>contextConfigLocation</param-name>
			<param-value>classpath:SpringMVC.xml</param-value>
		</init-param>

		<!-- 配置 servlet 的对象的创建时间点:应用加载时创建。
			取值只能是非 0 正整数,表示启动顺序 -->
		<load-on-startup>1</load-on-startup>
	</servlet>
	<servlet-mapping>
		<servlet-name>SpringMVCDispatcherServlet</servlet-name>
		<url-pattern>/</url-pattern>
	</servlet-mapping>

	<!--配置解决中文乱码的过滤器-->
	<filter>
		<filter-name>characterEncodingFilter</filter-name>
		<filter-class>org.springframework.web.filter.CharacterEncodingFilter</filter-class>
		<init-param>
			<param-name>encoding</param-name>
			<param-value>UTF-8</param-value>
		</init-param>
	</filter>
	<filter-mapping>
		<filter-name>characterEncodingFilter</filter-name>
		<url-pattern> / * </url-pattern>
	</filter-mapping>
</web-app>
2、创建 spring mvc 的配置文件 (解决中文乱码问题)
<?xml version="1.0" encoding="UTF-8"?>
<beans xmlns="http://www.springframework.org/schema/beans"
xmlns:mvc="http://www.springframework.org/schema/mvc"
xmlns:context="http://www.springframework.org/schema/context"
xmlns:xsi="http://www.w3.org/2001/XMLSchema-instance"
xsi:schemaLocation="
http://www.springframework.org/schema/beans
http://www.springframework.org/schema/beans/spring-beans.xsd
http://www.springframework.org/schema/mvc
http://www.springframework.org/schema/mvc/spring-mvc.xsd
http://www.springframework.org/schema/context
http://www.springframework.org/schema/context/spring-context.xsd">
<!-- 配置创建 spring 容器要扫描的包 -->
<context:component-scan base-package="com.itheima"></context:component-scan>
<!--配置自定义类型转换器-->
<bean id="conversionService" class="org.springframework.context.support.ConversionServiceFactoryBean">
<property name="converters">
<set>
<bean class="cn.itcast.utils.StringToDateConverter"/>
</set>
</property>
</bean>
<!-- 配置视图解析器 -->
<bean>
class="org.springframework.web.servlet.view.InternalResourceViewResolver">
<property name="prefix" value="/WEB-INF/pages/"></property>
<property name="suffix" value=".jsp"></property>
</bean>
<!-- 开启SpringMVC框架注解的支持 -->
<mvc:annotation-driven conversion-service="conversionService"/>
</beans>
public class StringToDateConverter implements Converter<String,Date>{
public Date convert(String source) {
if(source == null){
throw new RuntimeException("请您传入数据");
}
DateFormat df = new SimpleDateFormat("yyyy-MM-dd");
try {
return df.parse(source);
} catch (Exception e) {
throw new RuntimeException("数据类型转换出现错误");
}
}
}
3、编写控制器并使用注解配置就可以使用了
@Controller("helloController")
public class HelloController {
@RequestMapping("/hello")
public String sayHello() {
System.out.println("HelloController 的 sayHello 方法执行了。。。。");
return "success";
}
}
@RequestMapping注解
作用
用于建立请求 URL 和处理请求方法之间的对应关系。属性
value:用于指定请求的 URL。它和 path 属性的作用是一样的。
method:用于指定请求的方式。
params:用于指定限制请求参数的条件。它支持简单的表达式。
		要求请求参数的 key 和 value 必须和配置的一模一样。
例如:
	params = {"accountName"},表示请求参数必须有 accountName
	params = {"moeny!100"},表示请求参数中 money 不能是 100。
	headers:用于指定限制请求消息头的条件。
注意:
	以上四个属性只要出现 2 个或以上时,他们的关系是与的关系。
@RequestMapping(value="/saveAccount",method=RequestMethod.POST)
public String saveAccount() {
System.out.println("保存了账户");
return "success";
}
@RequestMapping(value="/removeAccount",params= {"accountName","money>100"})
public String removeAccount() {
System.out.println("删除了账户");
return "success";
}
参数绑定
· 支持的数据类型主要有三种
包括基本类型和 String 类型
包括实体类,以及关联的实体类
包括 List 结构和 Map 结构的集合(包括数组)
· 使用要求
如果是基本类型或者 String 类型:
要求我们的参数名称必须和控制器中方法的形参名称保持一致。(严格区分大小写)
如果是 POJO 类型,或者它的关联对象:
要求表单中参数名称和 POJO 类的属性名称保持一致。并且控制器方法的参数类型是 POJO 类型。
如果是集合类型,有两种方式:
第一种:
要求集合类型的请求参数必须在 POJO 中。在表单中请求参数名称要和 POJO 中集合属性名称相同。
给 List 集合中的元素赋值,使用下标。
例如:< input type=“text” name=“accounts[1].money” >
给 Map 集合中的元素赋值,使用键值对。
例如:< input type=“text” name=“accountMap[‘one’].name” >
第二种:
接收的请求参数是 json 格式数据。需要借助一个注解实现。
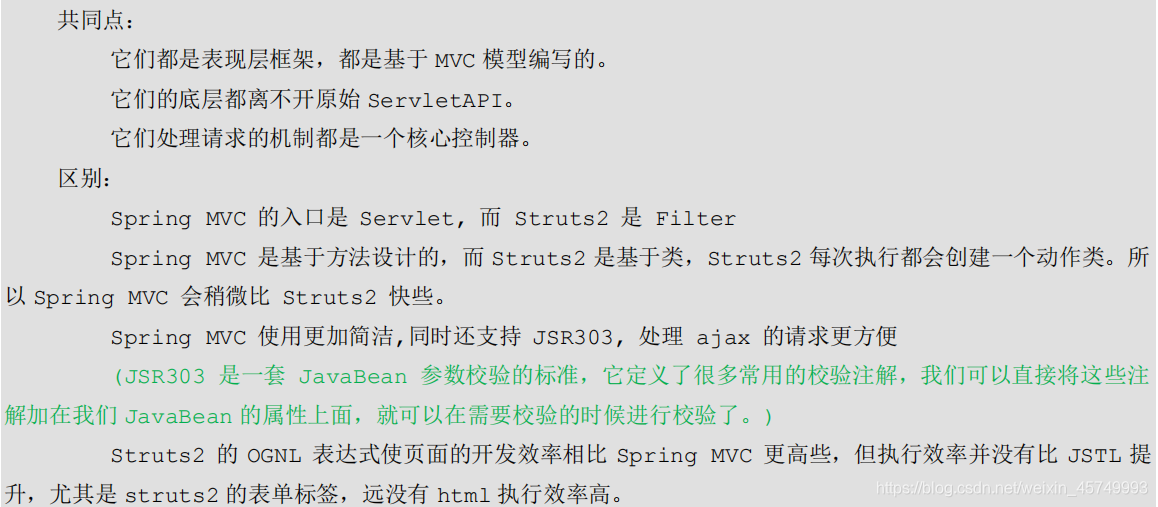
题外话:SpringMVC 和 Struts2 的优略分析


 203
203


 被折叠的 条评论
为什么被折叠?
被折叠的 条评论
为什么被折叠?
 到【灌水乐园】发言


