


桥接模式【常用】
Demo案例-手机操作问题
需求
现在对不同手机类型的不同品牌实现操作编程(比如:开机、关机、上网,打电话等),如图:

传统方案解决手机操作问题分析
传统方法对应的类图
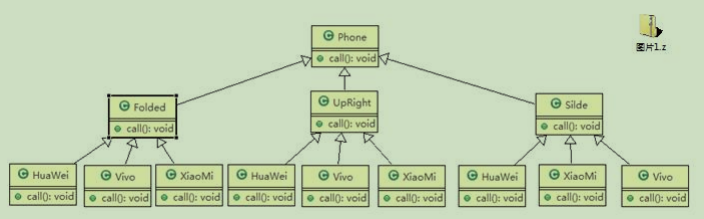
- 扩展性问题(类爆炸),如果我们再增加手机的样式(旋转式),就需要增加各个品牌手机的类,同样如果我们增加一个手机品牌,也要在各个手机样式类下增加。
- 违反了单一职责原则,当我们增加手机样式时,要同时增加所有品牌的手机,这样增加了代码维护成本.
解决方案-使用桥接模式
Bridge 模式基于类的最小设计原则,通过使用封装、聚合及继承等行为让不同的类承担不同的职责。它的主要特点是把抽象(Abstraction)与行为实现(Implementation)分离开来,从而可以保持各部分的独立性以及应对他们的功能扩展
使用桥接模式的代码
Brand【接口】
//接口
public interface Brand {
   void open();
   void close();
   void call();
}
Phone【抽象类】
public abstract class Phone {

   //组合品牌
   private Brand brand;

   //构造器
   public Phone(Brand brand) {
      super();
      this.brand = brand;
   }

   protected void open() {
      this.brand.open();
   }
   protected void close() {
      brand.close();
   }
   protected void call() {
      brand.call();
   }

}
Vivo
public class Vivo implements Brand {

   @Override
   public void open() {
      // TODO Auto-generated method stub
      System.out.println(" Vivo手机开机 ");
   }

   @Override
   public void close() {
      // TODO Auto-generated method stub
      System.out.println(" Vivo手机关机 ");
   }

   @Override
   public void call() {
      // TODO Auto-generated method stub
      System.out.println(" Vivo手机打电话 ");
   }

}
XiaoMi
public class XiaoMi implements Brand {

   @Override
   public void open() {
      // TODO Auto-generated method stub
      System.out.println(" 小米手机开机 ");
   }

   @Override
   public void close() {
      // TODO Auto-generated method stub
      System.out.println(" 小米手机关机 ");
   }

   @Override
   public void call() {
      // TODO Auto-generated method stub
      System.out.println(" 小米手机打电话 ");
   }

}
FoldedPhone
/折叠式手机类,继承 抽象类 Phone
public class FoldedPhone extends Phone {

   //构造器
   public FoldedPhone(Brand brand) {
      super(brand);
   }

   public void open() {
      super.open();
      System.out.println(" 折叠样式手机 ");
   }

   public void close() {
      super.close();
      System.out.println(" 折叠样式手机 ");
   }

   public void call() {
      super.call();
      System.out.println(" 折叠样式手机 ");
   }
}
UpRightPhone
public class UpRightPhone extends Phone {

      //构造器
      public UpRightPhone(Brand brand) {
         super(brand);
      }

      public void open() {
         super.open();
         System.out.println(" 直立样式手机 ");
      }

      public void close() {
         super.close();
         System.out.println(" 直立样式手机 ");
      }

      public void call() {
         super.call();
         System.out.println(" 直立样式手机 ");
      }
}
Client
public class Client {

   public static void main(String[] args) {

      //获取折叠式手机 (样式 + 品牌 )

      Phone phone1 = new FoldedPhone(new XiaoMi());

      phone1.open();
      phone1.call();
      phone1.close();

      System.out.println("=======================");

      Phone phone2 = new FoldedPhone(new Vivo());

      phone2.open();
      phone2.call();
      phone2.close();

      System.out.println("==============");

      UpRightPhone phone3 = new UpRightPhone(new XiaoMi());

      phone3.open();
      phone3.call();
      phone3.close();

      System.out.println("==============");

      UpRightPhone phone4 = new UpRightPhone(new Vivo());

      phone4.open();
      phone4.call();
      phone4.close();
   }

}
这种简单的demo例子可能比较好理解桥接模式,下面来看看原理和实际应用
![[外链图片转存失败,源站可能有防盗链机制,建议将图片保存下来直接上传(img-IYN4j8cV-1629305229695)(C:\Users\1\AppData\Roaming\Typora\typora-user-images\image-20210818220358830.png)]](https://img-blog.csdnimg.cn/8dc75700feee4bb9b4d8e1896f288d51.png?x-oss-process=image/watermark,type_ZmFuZ3poZW5naGVpdGk,shadow_10,text_aHR0cHM6Ly9ibG9nLmNzZG4ubmV0L3dlaXhpbl80NTc3NjM0OQ==,size_16,color_FFFFFF,t_70)
桥接模式的原理解析
- 桥接模式,也叫作桥梁模式,英文是Bridge Design Pattern。这个模式可以说是 23 种设计模式中最难理解的模式之一了。我查阅了比较多的书籍和资料之后发现,对于这个模式有两种不同的理解方式。
- 当然,这其中“最纯正”的理解方式,当属 GoF 的《设计模式》一书中对桥接模式的定义。毕竟,这 23 种经典的设计模式,最初就是由这本书总结出来的。在 GoF 的《设计模式》一书中,桥接模式是这么定义的:“Decouple an abstraction from its implementation so that the two can vary independently。”翻译成中文就是:“将抽象和实现解耦,让它们可以独立变化。”
- 关于桥接模式,很多书籍、资料中,还有另外一种理解方式:“一个类存在两个(或多个)独立变化的维度,我们通过组合的方式,让这两个(或多个)维度可以独立进行扩展。”通过组合关系来替代继承关系,避免继承层次的指数级爆炸。这种理解方式非常类似于,我们之前讲过的“组合优于继承”设计原则,所以,这里我就不多解释了。我们重点看下 GoF 的理解方式
- GoF 给出的定义非常的简短,单凭这一句话,估计没几个人能看懂是什么意思。所以,我们通过 JDBC 驱动的例子来解释一下。JDBC 驱动是桥接模式的经典应用。我们先来看一下,如何利用 JDBC 驱动来查询数据库。具体的代码如下所示:
  Class.forName("com.mysql.jdbc.Driver"); // 加载及注册JDBC驱动程序
    String url = "jdbc:mysql://localhost:3306/sample_db?user=root&password=your_password";
    Connection con = DriverManager.getConnection(url);
    Statement stmt = con.createStatement();
    String query = "select * from test";
    ResultSet rs = stmt.executeQuery(query);
    while (rs.next()) {
      rs.getString(1);
      rs.getInt(2);
    }
- 如果我们想要把 MySQL 数据库换成 Oracle 数据库,只需要把第一行代码中的 com.mysql.jdbc.Driver 换成 oracle.jdbc.driver.OracleDriver 就可以了。当然,也有更灵活的实现方式,我们可以把需要加载的 Driver 类写到配置文件中,当程序启动的时候,自动从配置文件中加载,这样在切换数据库的时候,我们都不需要修改代码,只需要修改配置文件就可以了。
- 不管是改代码还是改配置,在项目中,从一个数据库切换到另一种数据库,都只需要改动很少的代码,或者完全不需要改动代码,那如此优雅的数据库切换是如何实现的呢?
- 源码之下无秘密。
package com.mysql.jdbc;
import java.sql.SQLException;

public class Driver extends NonRegisteringDriver implements java.sql.Driver {
  static {
    try {
      java.sql.DriverManager.registerDriver(new Driver());
    } catch (SQLException E) {
      throw new RuntimeException("Can't register driver!");
    }
  }

  /**
   * Construct a new driver and register it with DriverManager
   * @throws SQLException if a database error occurs.
   */
  public Driver() throws SQLException {
  // Required for Class.forName().newInstance()
  }
}
结合 com.mysql.jdbc.Driver 的代码实现,我们可以发现,当执行 Class.forName(“com.mysql.jdbc.Driver”) 这条语句的时候,实际上做了两件事情
- 要求JVM查找并加载Dirver类
- 同时类加载阶段加载(验证,解析,初始化)链接 初始化,在初始化阶段会对Clnit执行,在此处也就是将Driver(驱动)注册到DriverManager类中。
DriverManager 类是干什么用的。具体的代码如下所示。当我们把具体的 Driver 实现类(比如,com.mysql.jdbc.Driver)注册到 DriverManager 之后,后续所有对 JDBC 接口的调用,都会委派到对具体的 Driver 实现类来执行。而 Driver 实现类都实现了相同的接口(java.sql.Driver ),这也是可以灵活切换 Driver 的原因。
public class DriverManager {
  private static final  CopyOnWriteArrayList<DriverInfo> registeredDrivers =  = new CopyOnWriteArrayList();

  // ...
  static {
    loadInitialDrivers();
    println("JDBC DriverManager initialized");
  }

  // ...
  public static synchronized void registerDriver(java.sql.Driver driver) throws SQLException {
    if (driver != null) {
      registeredDrivers.addIfAbsent(new DriverInfo(driver));
    } else {
      throw new NullPointerException();
    }
  }

  public static Connection getConnection(String url, String user, String password)
      throws SQLException {
    java.util.Properties info = new java.util.Properties();
    if (user != null) {
      info.put("user", user);
    }
    if (password != null) {
      info.put("password", password);
    }

    return (getConnection(url, info, Reflection.getCallerClass()));
  }
  // ...
}
桥接模式的定义是“将抽象和实现解耦,让它们可以独立变化”。那弄懂定义中“抽象”和“实现”两个概念,就是理解桥接模式的关键。那在 JDBC 这个例子中,什么是“抽象”?什么是“实现”呢?
实际上,JDBC 本身就相当于“抽象”。注意,这里所说的“抽象”,指的并非“抽象类”或“接口”,而是跟具体的数据库无关的、被抽象出来的一套“类库”。具体的 Driver(比如,com.mysql.jdbc.Driver)就相当于“实现”。注意,这里所说的“实现”,也并非指“接口的实现类”,而是跟具体数据库相关的一套“类库”。JDBC 和 Driver 独立开发,通过对象之间的组合关系,组装在一起。JDBC 的所有逻辑操作,最终都委托给 Driver 来执行。
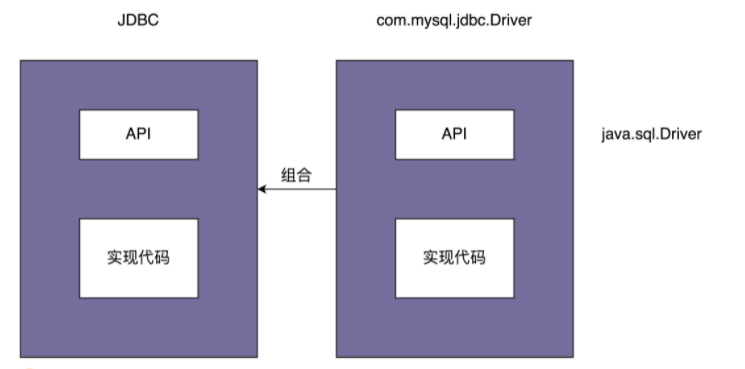
![[外链图片转存失败,源站可能有防盗链机制,建议将图片保存下来直接上传(img-1ceFs0zN-1629305187744)(C:\Users\1\AppData\Roaming\Typora\typora-user-images\image-20210818231921168.png)]](https://img-blog.csdnimg.cn/914f54353c35465883cfe61802b54b8f.png?x-oss-process=image/watermark,type_ZmFuZ3poZW5naGVpdGk,shadow_10,text_aHR0cHM6Ly9ibG9nLmNzZG4ubmV0L3dlaXhpbl80NTc3NjM0OQ==,size_16,color_FFFFFF,t_70)
标准的桥接模式的话,在DriverMagemer下还有几个子类。但是JDBC的实现并没有
桥接模式的应用举例
根据不同的告警规则,触发不同类型的告警。告警支持多种通知渠道,包括:邮件、短信、微信、自动语音电话。通知的紧急程度有多种类型,包括:SEVERE(严重)、URGENCY(紧急)、NORMAL(普通)、TRIVIAL(无关紧要)。不同的紧急程度对应不同的通知渠道。比如,SERVE(严重)级别的消息会通过“自动语音电话”告知相关人员。
public enum NotificationEmergencyLevel {
  SEVERE,
  URGENCY,
  NORMAL,
  TRIVIAL
}

public class Notification {
  private List<String> emailAddresses;
  private List<String> telephones;
  private List<String> wechatIds;

  public Notification() {}

  public void setEmailAddress(List<String> emailAddress) {
    this.emailAddresses = emailAddress;
  }

  public void setTelephones(List<String> telephones) {
    this.telephones = telephones;
  }

  public void setWechatIds(List<String> wechatIds) {
    this.wechatIds = wechatIds;
  }

  public void notify(NotificationEmergencyLevel level, String message) {
    if (level.equals(NotificationEmergencyLevel.SEVERE)) {
      // ...自动语音电话
    } else if (level.equals(NotificationEmergencyLevel.URGENCY)) {
      // ...发微信
    } else if (level.equals(NotificationEmergencyLevel.NORMAL)) {
      // ...发邮件
    } else if (level.equals(NotificationEmergencyLevel.TRIVIAL)) {
      // ...发邮件
    }
  }
}

// 在API监控告警的例子中,我们如下方式来使用Notification类:
public class ErrorAlertHandler extends AlertHandler {
  public ErrorAlertHandler(AlertRule rule, Notification notification) {
    super(rule, notification);
  }

  @Override
  public void check(ApiStatInfo apiStatInfo) {
    if (apiStatInfo.getErrorCount()
        > rule.getMatchedRule(apiStatInfo.getApi()).getMaxErrorCount()) {
      notification.notify(NotificationEmergencyLevel.SEVERE, "...");
    }
  }
}
上述实现的问题:
如果要增添通知类型,如添加一个qq通知,此时就要去修改代码,不符合开闭原则
因此我们就可以利用桥接模式的原则:将抽象从实现中抽取出来,让它们可以独立变化。再通过组合的方式,实现桥接。
对应该例子,我们将不同渠道的发送逻辑剥离出来,形成独立的消息发送类(MsgSender 相关类)。
其中,Notification 类相当于抽象,MsgSender 类相当于实现,两者可以独立开发,通过组合关系(也就是桥梁)任意组合在一起。
所谓任意组合的意思就是,不同紧急程度的消息和发送渠道之间的对应关系,不是在代码中固定写死的,我们可以动态地去指定(比如,通过读取配置来获取对应关系)。
public interface MsgSender {
  void send(String message);
}

public class TelephoneMsgSender implements MsgSender {
  private List<String> telephones;

  public TelephoneMsgSender(List<String> telephones) {
    this.telephones = telephones;
  }

  @Override
  public void send(String message) {
    // ...
  }
}

public class EmailMsgSender implements MsgSender {
  // 与TelephoneMsgSender代码结构类似,所以省略...
}

public class WechatMsgSender implements MsgSender {
  // 与TelephoneMsgSender代码结构类似,所以省略...
}

public abstract class Notification {
  protected MsgSender msgSender;

  public Notification(MsgSender msgSender) {
    this.msgSender = msgSender;
  }

  public abstract void notify(String message);
}

public class SevereNotification extends Notification {
  public SevereNotification(MsgSender msgSender) {
    super(msgSender);
  }

  @Override
  public void notify(String message) {
    msgSender.send(message);
  }
}

public class UrgencyNotification extends Notification {
  // 与SevereNotification代码结构类似,所以省略...
}

public class NormalNotification extends Notification {
  // 与SevereNotification代码结构类似,所以省略...
}

public class TrivialNotification extends Notification {
  // 与SevereNotification代码结构类似,所以省略...
}
桥接模式的注意事项和细节
- 实现了抽象和实现部分的分离,从而极大的提供了系统的灵活性,让抽象部分和实现部分独立开来,这有助于系统进行分层设计,从而产生更好的结构化系统。
- 对于系统的高层部分,只需要知道抽象部分和实现部分的接口就可以了,其它的部分由具体业务来完成。
- 桥接模式替代多层继承方案,可以减少子类的个数,降低系统的管理和维护成本
- 桥接模式的引入增加了系统的理解和设计难度,由于聚合关联关系建立在抽象层,要求开发者针对抽象进行设计和编程
- 桥接模式要求正确识别出系统中两个独立变化的维度(抽象、和实现),因此其使用范围有一定的局限性,即需要有这样的应用场景。
桥接模式的注意事项和细节
- 实现了抽象和实现部分的分离,从而极大的提供了系统的灵活性,让抽象部分和实现部分独立开来,这有助于系统进行分层设计,从而产生更好的结构化系统。
- 对于系统的高层部分,只需要知道抽象部分和实现部分的接口就可以了,其它的部分由具体业务来完成。
- 桥接模式替代多层继承方案,可以减少子类的个数,降低系统的管理和维护成本
- 桥接模式的引入增加了系统的理解和设计难度,由于聚合关联关系建立在抽象层,要求开发者针对抽象进行设计和编程
- 桥接模式要求正确识别出系统中两个独立变化的维度(抽象、和实现),因此其使用范围有一定的局限性,即需要有这样的应用场景。


 1万+
1万+


 被折叠的 条评论
为什么被折叠?
被折叠的 条评论
为什么被折叠?
 到【灌水乐园】发言


