


redis分布式锁的分为三种
- 1) 不可重入Redis分布式锁:
- 原理:利用setnx的互斥性;利用ex避免死锁(设置过期时间);释放锁时判断线程标识
- 缺陷:不可重入,无法重试,锁超时失效
- 2)可重入的Redis分布式锁:
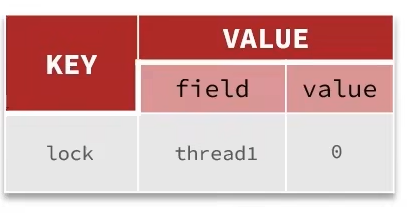
- 原理:利用hash结构,记录线程标示和重入次数;利用watchDog延续锁时间;利用信号量控制锁重试等待
- 缺陷:redis宕机引起锁失效问题
- 3)Redisson的multiLock:
- 原理:多个独立的Redis节点,必须在所有节点都获取重入锁,才能算获取锁成功
- 缺陷:运维成本高,实现复杂
redis分布式锁存在的问题:

不可重入的Redis分布式锁:
这种方法说白了就是自己去实现一个分布式锁,而且实现起来也没不难,并且也已经适用于大部分的场合中了。
首先我们应该先创建一个接口,用来规范化
public interface ILock {
    /**
     * 尝试获取锁
     * @param timeoutSec   锁持有的超时时间,过期后自动释放
     * @return true 代表获取锁成功,false 代表获取锁失败
     */
    boolean tryLock(long timeoutSec);

    /**
     * 释放锁
     */
    void unlock();
}
接着我们创建一个SimpleRedisLock来实现这个接口。
package com.hmdp.utils;

import cn.hutool.core.lang.UUID;
import lombok.Builder;
import org.springframework.core.io.ClassPathResource;
import org.springframework.data.redis.core.StringRedisTemplate;
import org.springframework.data.redis.core.script.DefaultRedisScript;
import org.springframework.data.redis.core.script.RedisScript;
import org.yaml.snakeyaml.events.Event;

import javax.annotation.Resource;
import java.util.Collections;
import java.util.concurrent.TimeUnit;

/**
 * @author
 * @create 2022-12-01 16:18
 */
public class SimpleRedisLock implements ILock{

    // 调用者传入的key名称
    private String name;
    // redis调用模板
    private StringRedisTemplate stringRedisTemplate;
    // key的统一前缀
    private static final String KEY_PREFIX = "lock:";
    // 线程标识id的前缀
    private static final String ID_PREFIX = UUID.randomUUID().toString(true)+"-";
    // 提前将redis script脚本转换为RedisScript类
    private static final DefaultRedisScript<Long> UNLOCK_SCRIPT;
    static {
        // 先实例化再调用里面可以通过资源位置拿到脚本的方法,再通过资源名拿到资源
        UNLOCK_SCRIPT = new DefaultRedisScript<>();
        UNLOCK_SCRIPT.setLocation(new ClassPathResource("unlock.lua"));
        UNLOCK_SCRIPT.setResultType(Long.class);
    }

    public SimpleRedisLock(String name, StringRedisTemplate stringRedisTemplate) {
        this.name = name;
        this.stringRedisTemplate = stringRedisTemplate;
    }

    @Override
    public boolean tryLock(long timeoutSec) {
        // 获取线程标识
        String threadId = ID_PREFIX + Thread.currentThread().getId();
        // 获取锁
        Boolean success = stringRedisTemplate.opsForValue().setIfAbsent(KEY_PREFIX + name, threadId, timeoutSec, TimeUnit.SECONDS);

        return Boolean.TRUE.equals(success);
    }

    @Override
    public void unlock() {
        // 调用lua脚本
        stringRedisTemplate.execute(UNLOCK_SCRIPT,
                // 因为我们这里是个字符串,而参数是需要一个List 所以这里我们使用Collections中的方法来使其(字符串)转化为一个list
                Collections.singletonList(KEY_PREFIX + name),
                ID_PREFIX + Thread.currentThread().getId());

    }
    /*@Override
    public void unlock() {
        // 获取线程标识
        String threadId = ID_PREFIX + Thread.currentThread().getId();
        //获取锁中的标识
        String id = stringRedisTemplate.opsForValue().get(KEY_PREFIX + name);
        // 判断标识是否一致
        if (threadId.equals(id)){
            // 释放锁
            stringRedisTemplate.delete(KEY_PREFIX + name);
        }
    }*/
}
tryLock方法就是我们进行尝试获取锁的方法,而在我们调用这个方法的时候,我们需要先提前先new一个SimpleRedisLock接着使用构造方法将所需的key名称和RedisTemplate设置进去,然后才使用tryLock方法尝试获取锁
使用示例:
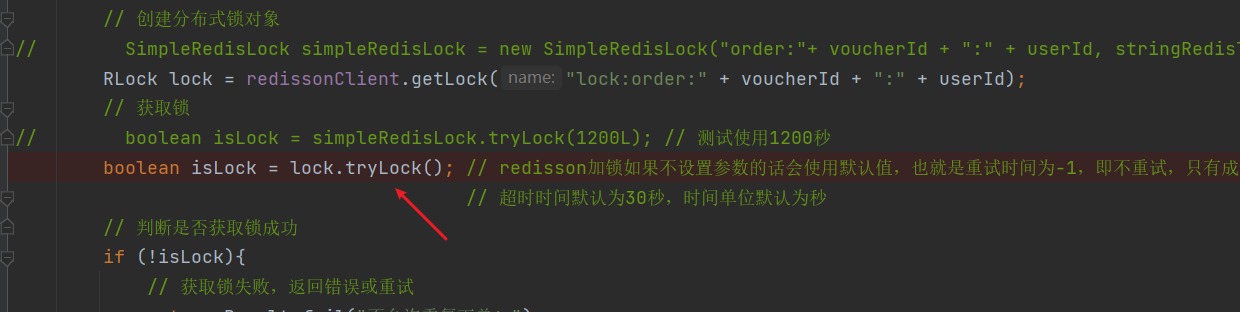
	// 创建分布式锁对象
    SimpleRedisLock simpleRedisLock = new SimpleRedisLock("order:"+ voucherId + ":" + userId, stringRedisTemplate);
    // 获取锁
    boolean isLock = simpleRedisLock.tryLock(1200L); // 测试使用1200秒
	// 判断是否获取锁成功
    if (!isLock){
       // 获取锁失败,返回错误或重试
       return Result.fail("不允许重复下单!");
    }
	// 获取成功
	try {
        //  业务处理
        IVoucherOrderService proxy = (IVoucherOrderService) AopContext.currentProxy();
        return proxy.createVoucherOrder(voucherId);
    } finally {
        // 释放锁
		simpleRedisLock.unlock();
    }
unlock方法是用于释放锁,目的就是当我们执行完业务之后可以将锁进行释放,然后再这个过程中,因为我们获取线程标示和进行判断线程标示最后删除这个动作是分离的,在一些极端的情况下,在gc进行垃圾回收的过程中,有可能在判断锁标示后产生阻塞,这时就会导致出现删除的锁可能是别人的,所以我们需要确保原子性,要么一起成功,要么都失败。所以这里我们使用lua脚本来实现。保证unlock方法的原子性。
可重入的Redis分布式锁:
这种锁我们一般使用redisson来实现,因为redisson已经为我们封装好了这种锁,可以实现重入锁,等待重试,以及防止超时释放机制。是很成熟的第三方工具。
接下来我们就通过解析源码来分析这个锁的实现方法,首先重入机制就是利用hash结构,记录线程标示和重入次数,下面的这个结构展示了如何存储获取锁的次数,达到可重入的效果。
使用案例:
下面就是源码了!
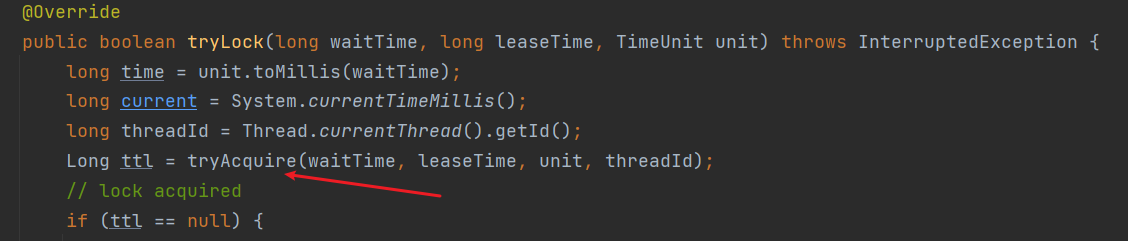
public boolean tryLock(long waitTime, long leaseTime, TimeUnit unit) throws InterruptedException {
   		// 将时间转换为毫秒
        long time = unit.toMillis(waitTime);
    	// 获取当前的时间,为了接下来可以判断等待重试时间是否过期
        long current = System.currentTimeMillis();
    	// 获取当前线程的标示
        long threadId = Thread.currentThread().getId();
    	// 执行尝试获取锁的方法,成功会返回null,失败的话会返回超时时间
        Long ttl = tryAcquire(waitTime, leaseTime, unit, threadId);
        // lock acquired 获取锁成功
        if (ttl == null) {
            return true;
        }

        // 获取锁失败,分为设置等待重试时间和未设置等待重试时间

    	// 获取当前的时间,减去尝试获取锁前的时间(也就是尝试获取锁所消耗的时间),在将等待时间减去这段时间,看看等待时间是否还有剩余,如果还有那么就会继续执行,否则直接返回false告知获取锁失败。
        time -= System.currentTimeMillis() - current;
        if (time <= 0) {
            acquireFailed(waitTime, unit, threadId);
            return false;
        }
        // 还有剩余等待重试时间,继续执行
    	// 再次记录当前时间
        current = System.currentTimeMillis();
    	// 订阅信息,这里redisson官方使用了订阅发布的机制,这样重试就不会是无限制的重复重试,平白消耗cpu性能,而是使用去订阅释放锁的信号,只有接收到释放锁的信息才会进行重试,保证了不会过多消耗性能。
        CompletableFuture<RedissonLockEntry> subscribeFuture = subscribe(threadId);
        try {
            // 这里的订阅信息也设置了超时时间。
            subscribeFuture.get(time, TimeUnit.MILLISECONDS);
        } catch (TimeoutException e) {
            // 超时无法获取订阅锁
            if (!subscribeFuture.completeExceptionally(new RedisTimeoutException(
                    "Unable to acquire subscription lock after " + time + "ms. " +
                            "Try to increase 'subscriptionsPerConnection' and/or 'subscriptionConnectionPoolSize' parameters."))) {
                subscribeFuture.whenComplete((res, ex) -> {
                    if (ex == null) {
                        // 取消订阅
                        unsubscribe(res, threadId);
                    }
                });
            }
            acquireFailed(waitTime, unit, threadId);
            // 无法获取锁
            return false;
        } catch (ExecutionException e) {
            // 出现异常,无法获取锁
            acquireFailed(waitTime, unit, threadId);
            return false;
        }

    	//  接收到订阅的释放信号
        try {
            time -= System.currentTimeMillis() - current;
            // 再次判断时间,看是否超时,也就是判断等待订阅这段时间是否等待重试时间已经超时了
            if (time <= 0) {
                acquireFailed(waitTime, unit, threadId);
                return false;
            }
        	// 循环尝试获取锁
            while (true) {
                long currentTime = System.currentTimeMillis();
                ttl = tryAcquire(waitTime, leaseTime, unit, threadId);
                // lock acquired
                // 成功重新获取到锁
                if (ttl == null) {
                    return true;
                }
				// 重试后依旧没有获取到锁,继续对比时间看看等待重试时间是否超时
                time -= System.currentTimeMillis() - currentTime;
                if (time <= 0) {
                    // 超时直接返回false,获取锁失败
                    acquireFailed(waitTime, unit, threadId);
                    return false;
                }
				// 此处和上面同理,即使上面依旧没有获取到锁,但当还有等待时间的话会继续等待,
                // 同理这里的等待也是通过订阅信息进行等待。
                // waiting for message
                currentTime = System.currentTimeMillis();
                // 这里的tryAcquire方法是采用了信号量的方式进行,同时也是可以设置超时时间,
                // 当剩余的ttl小于等待时间,那么说明在
                // 等待时间中这个锁就会超时释放,那么直接设置超时时间为ttl的即可
                if (ttl >= 0 && ttl < time) {
                    commandExecutor.getNow(subscribeFuture).getLatch().tryAcquire(ttl, TimeUnit.MILLISECONDS);
                } else {
                  //反之则设置等待时间time为超时时间。
                    commandExecutor.getNow(subscribeFuture).getLatch().tryAcquire(time, TimeUnit.MILLISECONDS);
                }
				// 如果等待时间依旧还是充足的,那么就会继续循环、判断时间、然后重试获取锁。
                time -= System.currentTimeMillis() - currentTime;
                if (time <= 0) {
                    acquireFailed(waitTime, unit, threadId);
                    return false;
                }
            }
        } finally {
            // 最后取消订阅
            unsubscribe(commandExecutor.getNow(subscribeFuture), threadId);
        }
//        return get(tryLockAsync(waitTime, leaseTime, unit));
    }
以上就重试机制的主要流程,接下来就是解析尝试获取锁的流程。
让我们点进去跟随源码分析

// 上面的方法
private <T> RFuture<Long> tryAcquireAsync(long waitTime, long leaseTime, TimeUnit unit, long threadId) {

    RFuture<Long> ttlRemainingFuture;
    // 如果是自己设置了超时释放时间,那么就会走这个逻辑
    if (leaseTime > 0) {
        ttlRemainingFuture = tryLockInnerAsync(waitTime, leaseTime, unit, threadId, RedisCommands.EVAL_LONG);
    } else {
        // 反之,则会走默认设置看门狗时间的默认逻辑
        ttlRemainingFuture = tryLockInnerAsync(waitTime, internalLockLeaseTime,
                TimeUnit.MILLISECONDS, threadId, RedisCommands.EVAL_LONG);
    }
    CompletionStage<Long> f = ttlRemainingFuture.thenApply(ttlRemaining -> {
        // lock acquired
        if (ttlRemaining == null) {
            // 等于null说明获取锁成功,但是接下来会再一次判断是否有自己设置超时释放时间
            if (leaseTime > 0) {
                // 如果是自己设置的那么直接将时间转换成毫秒并设置给internalLockLeaseTime
                internalLockLeaseTime = unit.toMillis(leaseTime);
            } else {
                // 否则则会进行看门狗机制防止超时释放
                scheduleExpirationRenewal(threadId);
            }
        }
        // ttl未来的结果,也就是要么是返回null,要么是返回剩余等待时间
        return ttlRemaining;
    });
    // 包装的结果
    return new CompletableFutureWrapper<>(f);
}
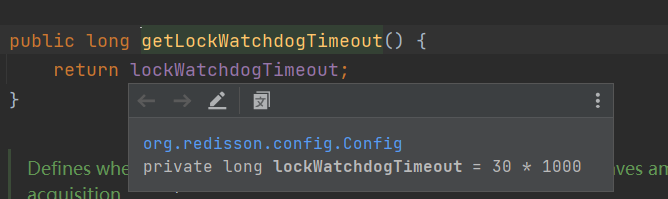
看门狗超时时间,默认30秒,(推荐使用默认的,有看门狗机制,可以防止因为超时释放导致的业务未执行完就把锁释放了)

所以接下来我们就再来跟踪一下scheduleExpirationRenewal这个方法
protected void scheduleExpirationRenewal(long threadId) {
    ExpirationEntry entry = new ExpirationEntry();
    // 这里很巧妙使用了putIfAbsent也就是说如果这个map中有这个线程那么就不用重新实例化一个ExpirationEntry
    ExpirationEntry oldEntry = EXPIRATION_RENEWAL_MAP.putIfAbsent(getEntryName(), entry);
    if (oldEntry != null) {
        // 说明已经存在
        oldEntry.addThreadId(threadId);
    } else {
        // 新的ExpirationEntry
        entry.addThreadId(threadId);
        try {
            //执行续约操作(看门狗机制)
            renewExpiration();
        } finally {
            // 如果线程被打断了(出现异常)
            if (Thread.currentThread().isInterrupted()) {
                // 取消到期续订
                cancelExpirationRenewal(threadId);
            }
        }
    }
}
继续分析 renewExpiration(执行续约操作)
private void renewExpiration() {
ExpirationEntry ee = EXPIRATION_RENEWAL_MAP.get(getEntryName());
if (ee == null) {
return;
}
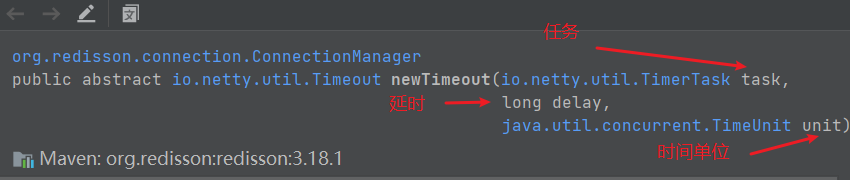
Timeout task = commandExecutor.getConnectionManager().newTimeout(new TimerTask() {
@Override
public void run(Timeout timeout) throws Exception {
// 正常逻辑判断
ExpirationEntry ent = EXPIRATION_RENEWAL_MAP.get(getEntryName());
if (ent == null) {
return;
}
Long threadId = ent.getFirstThreadId();
if (threadId == null) {
return;
}
// 重点就在这,前面一切都是为了这个方法铺垫,解析看下方
CompletionStage<Boolean> future = renewExpirationAsync(threadId);
future.whenComplete((res, e) -> {
if (e != null) {
log.error("Can't update lock " + getRawName() + " expiration", e);
EXPIRATION_RENEWAL_MAP.remove(getEntryName());
return;
}
if (res) {
// 有返回值也就是return 1
// reschedule itself
renewExpiration();
} else {
// 没有返回值也就是return 0,就取消续期
cancelExpirationRenewal(null);
}
});
}
}, internalLockLeaseTime / 3, TimeUnit.MILLISECONDS);// 说明在30/3也就是10秒后执行该任务。
// 设置超时执行,设置续期任务
ee.setTimeout(task);
}
newTimeout的所需参数如下:
renewExpirationAsync的解析:
protected CompletionStage<Boolean> renewExpirationAsync(long threadId) {
    // 判断这个线程是否存在,存在的话那么就给他重新设置过期时间,默认30秒。否则return 0
    return evalWriteAsync(getRawName(), LongCodec.INSTANCE, RedisCommands.EVAL_BOOLEAN,
            "if (redis.call('hexists', KEYS[1], ARGV[2]) == 1) then " +
                    "redis.call('pexpire', KEYS[1], ARGV[1]); " +
                    "return 1; " +
                    "end; " +
                    "return 0;",
            Collections.singletonList(getRawName()),
            internalLockLeaseTime, getLockName(threadId));
}
也就是说每当10秒后就设置过期时间为30秒。这就是看门狗机制,业务不会因为超时释放而导致安全问题
说完延期,接下来就是取消续期了
cancelExpirationRenewal
protected void cancelExpirationRenewal(Long threadId) {
    //正常逻辑判断
    ExpirationEntry task = EXPIRATION_RENEWAL_MAP.get(getEntryName());
    if (task == null) {
        return;
    }

    if (threadId != null) {
        // 移除线程
        task.removeThreadId(threadId);
    }

    if (threadId == null || task.hasNoThreads()) {
        // 查看是否有超时执行,也就是续期任务
        Timeout timeout = task.getTimeout();
        if (timeout != null) {
            // 取消任务
            timeout.cancel();
        }
        // 从map中移除该条目(实体(对象))
        EXPIRATION_RENEWAL_MAP.remove(getEntryName());
    }
}
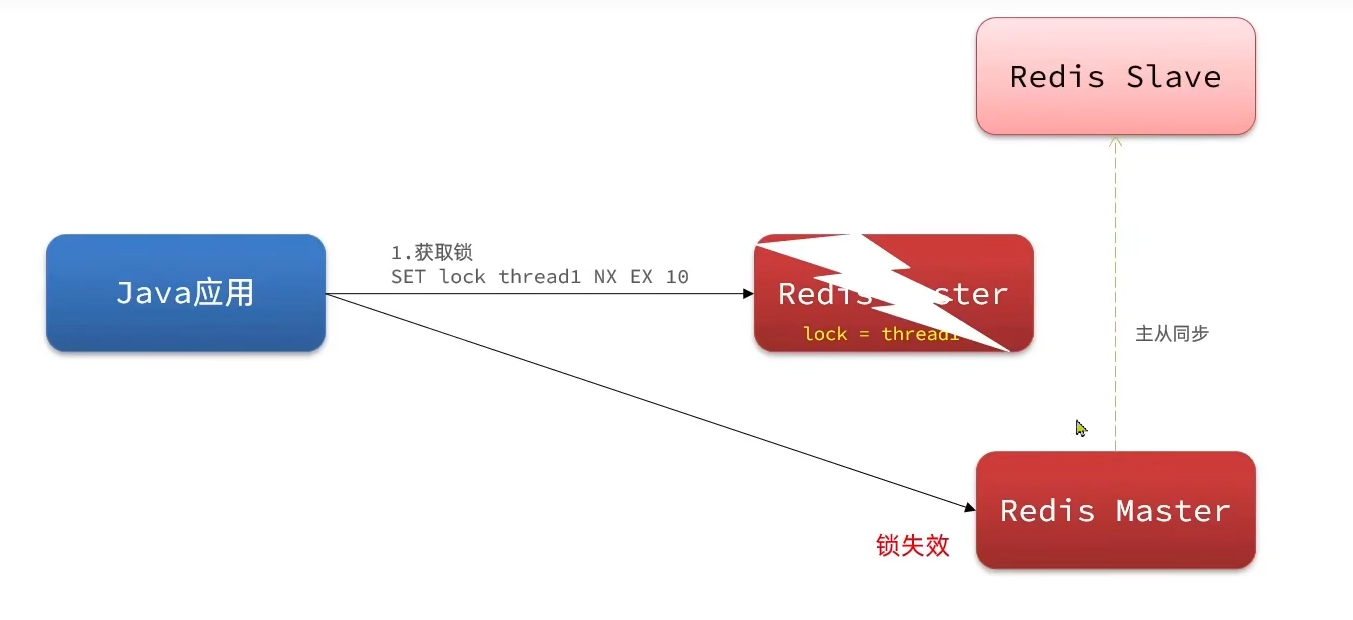
可以发现现在我们的分布式锁已经拥有了可重入和等待重试,解决了超时释放等问题,而同时我们一般在生产环境中都会使用集群模式部署,这样能保证我们的高可用,可是同时也存在着主从一致性问题,所以redis会在主节点和从节点之间进行同步,但是在某些极端情况下,当我们在主节点设置了一个锁,在锁还没同步到从节点的时候,主节点发生了宕机或是其他行为导致断开连接,这时哨兵会发现这一异常行为并在剩余的节点中进行选举出一个新的主节点,可是这时这个主节点是没有带这个锁的,这就会导致锁失效,其他线程来获取锁也能获取成功,这时就会出现并发的安全问题。
Redisson的multiLock:
为了解决上面所描述的主从一致性问题,所以我们将使用联锁(multiLock)来解决这个问题。正是因为主从关系导致了一致性问题,那么我们就简单粗暴直接不要使用主从关系,而且大家都是独立的节点,只有当所有节点都上锁成功或者都获取到锁,才算上锁成功,获取锁成功。

当然独立开来的节点为了保证高可用也可以设立从节点。

接下来就用测试类来进行演示
首先我们需要在RedissonConfig中配置
package com.hmdp.config;

import org.redisson.Redisson;
import org.redisson.api.RedissonClient;
import org.redisson.config.Config;
import org.springframework.context.annotation.Bean;
import org.springframework.context.annotation.Configuration;

/**
 * @author
 * @create 2022-12-14 16:14
 */
@Configuration
public class RedissonConfig {
    @Bean
    public RedissonClient redissonClient(){
        // 配置
        Config config = new Config();
        config.useSingleServer().setAddress("redis://127.0.0.1:6379");// 也可以设置密码
        // 创建RedissonClient对象
        return Redisson.create(config);
    }

    @Bean
    public RedissonClient redissonClient1(){
        // 配置
        Config config = new Config();
        config.useSingleServer().setAddress("redis://119.3.252.227:6379").setPassword("xxx");// 也可以设置密码
        // 创建RedissonClient对象
        return Redisson.create(config);
    }
}
这样我们的redis客户端配置就完成了。接下来就是在测试类中引用。
package com.hmdp;

import lombok.extern.slf4j.Slf4j;


import org.junit.jupiter.api.BeforeEach;
import org.junit.jupiter.api.Test;
import org.redisson.api.RLock;
import org.redisson.api.RedissonClient;
import org.springframework.boot.test.context.SpringBootTest;

import javax.annotation.Resource;
import java.util.concurrent.TimeUnit;

/**
 * @author
 * @create 2022-12-15 21:06
 */
@SpringBootTest
@Slf4j
public class RedissonTest {
    @Resource
    private RedissonClient redissonClient;

    @Resource
    private RedissonClient redissonClient1;

    private RLock lock;

    // 在每一个测试执行前调用
    @BeforeEach
    void setUp(){
        RLock lock1 = redissonClient.getLock("order");
        RLock lock2 = redissonClient1.getLock("order");

        // 创建联锁 multiLock
        // 这里会遍历所有的lock都获取成功才算获取成功
        lock = redissonClient.getMultiLock(lock1, lock2);

    }

    @Test
    void method1() throws InterruptedException {
        // 尝试获取锁
        boolean isLock = lock.tryLock(1L, TimeUnit.SECONDS);
        if (!isLock){
            log.error("获取锁失败 。。。。 1");
            return;
        }
        try {
            log.info("获取锁成功 。。。。 1");
            method2();
            log.info("开始执行业务 。。。 1");
        }finally {
            log.warn("准备释放锁 。。。。 1");
            lock.unlock();
        }

    }

    @Test
    void method2(){
        // 尝试获取锁
        boolean isLock = lock.tryLock();
        if (!isLock){
            log.error("获取锁失败 。。。。 2");
            return;
        }
        try {
            log.info("获取锁成功 。。。。 2");
            log.info("开始执行业务 。。。 2");
        }finally {
            log.warn("准备释放锁 。。。。 2");
            lock.unlock();
        }
    }
}
我们需要做的就是创建联锁,并把需要的锁给放进联锁中即可。
public RLock getMultiLock(RLock... locks) {
    return new RedissonMultiLock(locks);
}
final List<RLock> locks = new ArrayList<>(); // 定义locks

public RedissonMultiLock(RLock... locks) {
    if (locks.length == 0) {
        throw new IllegalArgumentException("Lock objects are not defined");
    }
    this.locks.addAll(Arrays.asList(locks));
}
接下来我们就分析一下tryLock(RedissonMultiLock)的源码。
public boolean tryLock(long waitTime, TimeUnit unit) throws InterruptedException {
    // 调用另一个tryLock的方法
    return tryLock(waitTime, -1, unit);
}
继续点进去分析
public boolean tryLock(long waitTime, long leaseTime, TimeUnit unit) throws InterruptedException {
//        try {
//            return tryLockAsync(waitTime, leaseTime, unit).get();
//        } catch (ExecutionException e) {
//            throw new IllegalStateException(e);
//        }
        long newLeaseTime = -1;
    	// 首先先判断是否自己设置了超时释放的时间
        if (leaseTime > 0) {
            // 如果设置了,并且还设置了等待重试时间,那么就将超时时间改为等待时间的两倍,防止
            // 还没等待重试,锁就已经释放。
            if (waitTime > 0) {
                newLeaseTime = unit.toMillis(waitTime)*2;
            } else {
                // 如果没有设置等待重试时间,那么说明不想等待重试,那么释放时间就按自己设置的即可
                newLeaseTime = unit.toMillis(leaseTime);
            }
        }

        long time = System.currentTimeMillis();
    	// 定义剩余时间
        long remainTime = -1;
    	// 如果设置了等待时间
        if (waitTime > 0) {
            // 那么就把等待时间赋值给剩余时间
            remainTime = unit.toMillis(waitTime);
        }
    	// 计算锁等待的时间,这里和剩余时间相等。
        long lockWaitTime = calcLockWaitTime(remainTime);
        // 定义失败锁的限制。
        int failedLocksLimit = failedLocksLimit();
    	// 定义尝试获取到的锁的list。这里的locks来自上面定义的locks
        List<RLock> acquiredLocks = new ArrayList<>(locks.size());
    	// 遍历locks,让每一个lock都去获取锁
        for (ListIterator<RLock> iterator = locks.listIterator(); iterator.hasNext();) {
            RLock lock = iterator.next();
            boolean lockAcquired;
            try {
                // 如果等待重试时间和超时释放时间都没设置
                if (waitTime <= 0 && leaseTime <= 0) {
                    // 那么就是使用无参的尝试获取锁方法
                    lockAcquired = lock.tryLock();
                } else {
                    // 比对两个时间,选出最小的设置为等待重试时间
                    long awaitTime = Math.min(lockWaitTime, remainTime);
                    lockAcquired = lock.tryLock(awaitTime, newLeaseTime, TimeUnit.MILLISECONDS);
                }
            } catch (RedisResponseTimeoutException e) {
                // 解锁
                unlockInner(Arrays.asList(lock));
                lockAcquired = false;
            } catch (Exception e) {
                lockAcquired = false;
            }

            // 如果获取锁成功,就把lock添加进获取锁成功的list中
            if (lockAcquired) {
                acquiredLocks.add(lock);
            } else {
                // 获取失败的话,会去比对来获取锁的list和获取成功的list,如果都成功了那么就会跳出循环,相当于是再次判断
                if (locks.size() - acquiredLocks.size() == failedLocksLimit()) {
                    break;
                }
				// 因为failedLocksLimit 就是等于0的,所以这个逻辑是一定会走的
                if (failedLocksLimit == 0) {
                    // 将所有获取成功到的locks都释放锁,因为联锁只要有一个锁没成功那么就都不成功
                    unlockInner(acquiredLocks);
                    // 如果没设置重试时间,那么就是直接返回false或者true就行
                    if (waitTime <= 0) {
                        return false;
                    }
                    // 如果有设置重试时间的话那么就会将获取成功的锁清除
                    failedLocksLimit = failedLocksLimit();
                    acquiredLocks.clear();
                    // reset iterator
                   	// 重置迭代器,将locks重头开始遍历
                    while (iterator.hasPrevious()) {
                        iterator.previous();
                    }
                } else {
                    failedLocksLimit--;
                }
            }
            // 判断剩余时间
            if (remainTime > 0) {
                remainTime -= System.currentTimeMillis() - time;
                time = System.currentTimeMillis();
                if (remainTime <= 0) {
                    // 如果剩余时间小于0,那么就把获取锁成功的锁全部释放
                    unlockInner(acquiredLocks);
                    return false;
                }
            }
        }
		// 跳出循环后,如果是自己设置了超时释放时间的话,那么将全部锁的时间进行续期,因为大家获取锁的时间都不一致所以可以防止有的锁提前释放,而没有自己设置超时释放时间的线程则会通过看门狗机制自动续期
        if (leaseTime > 0) {
            acquiredLocks.stream()
                    .map(l -> (RedissonBaseLock) l)
                    .map(l -> l.expireAsync(unit.toMillis(leaseTime), TimeUnit.MILLISECONDS))
                    .forEach(f -> f.toCompletableFuture().join());
        }

        return true;
    }


 352
352


 被折叠的 条评论
为什么被折叠?
被折叠的 条评论
为什么被折叠?
 到【灌水乐园】发言


