


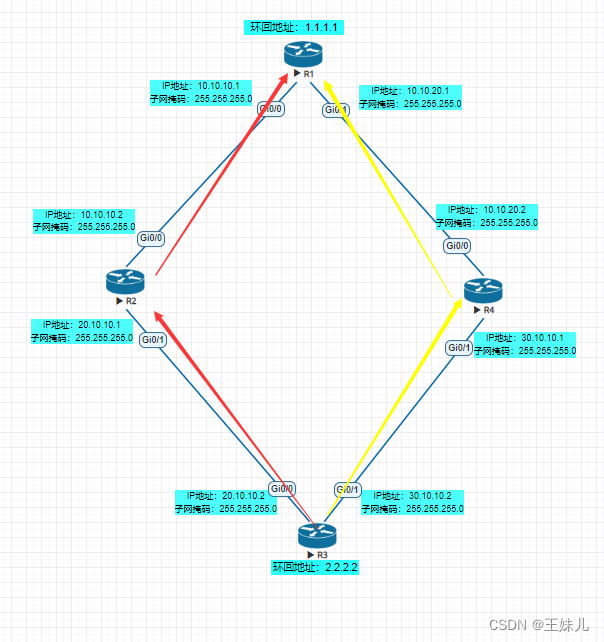
实验拓扑

一、配置IP地址
R1
Router#configure terminal
Router(config)#hostname R1
R1(config)#interface g0/0
R1(config-if)#ip address 10.10.10.1 255.255.255.0
R1(config-if)#no shutdown
R1(config-if)#exit
R1(config)#interface g0/1
R1(config-if)#ip address 10.10.20.1 255.255.255.0
R1(config-if)#no shutdown
R1(config-if)#exit
R1(config)#interface loopback 1
R1(config-if)#ip address 1.1.1.1 255.255.255.0
R1(config-if)#no shutdown
R2
Router#configure terminal
Router(config)#hostname R2
R2(config)#interface g0/0
R2(config-if)#ip address 10.10.10.2 255.255.255.0
R2(config-if)#no shutdown
R2(config-if)#exit
R2(config)#interface g0/1
R2(config-if)#ip address 20.10.10.1 255.255.255.0
R2(config-if)#no shutdown
R3
Router#configure terminal
Router(config)#hostname R3
R3(config)#interface g0/0
R3(config-if)#ip address 20.10.10.2 255.255.255.0
R3(config-if)#no shutdown
R3(config-if)#exit
R3(config)#interface g0/1
R3(config-if)#ip address 30.10.10.2 255.255.255.0
R3(config-if)#no shutdown
R3(config-if)#exit
R3(config)#interface loopback 1
R3(config-if)#ip address 2.2.2.2 255.255.255.0
R3(config-if)#no shutdown
R4
Router#configure terminal
Router(config)#hostname R4
R4(config)#interface g0/0
R4(config-if)#ip address 10.10.20.2 255.255.255.0
R4(config-if)#no shutdown
R4(config-if)#exit
R4(config)#interface g0/1
R4(config-if)#ip address 30.10.10.1 255.255.255.0
R4(config-if)#no shutdown
配置路由协议OSPF(R1,R2,R4)
R1
R1(config)#router ospf 10		创建一个进程为10的ospf
R1(config-router)#router-id 1.1.1.1		配置Router ID 1.1.1.1
R1(config-router)#network 10.10.10.0 0.0.0.255 area 0	宣告网络
R1(config-router)#network 10.10.20.0 0.0.0.255 area 0	宣告网络
R1(config-router)#network 1.1.1.0 0.0.0.255 area 0		宣告网络
R2
R2(config)#router ospf 10		创建一个进程为10的ospf
R2(config-router)#router-id 2.2.2.2		配置Router ID 2.2.2.2
R2(config-router)#network 10.10.10.0 0.0.0.255 area 0		宣告网络
R2(config-router)#network 20.10.10.0 255.255.255.0 area 0	宣告网络
R2(config-router)#default-information originate		传递默认路由
R4
R4(config)#router ospf 10		创建一个进程为10的ospf
R4(config-router)#router-id 3.3.3.3		配置Router ID 3.3.3.3
R4(config-router)#network 10.10.20.0 0.0.0.255 area 0		宣告网络
R4(config-router)#network 30.10.10.0 0.0.0.255 area 0		宣告网络
R4(config-router)#default-information originate		传递默认路由
三、配置BFD(R2,R3,R4)
R2
R2(config)#interface g0/1
R2(config-if)#bfd interval 50 min_rx 50 multiplier 3 每50毫秒发送一次BFD报文,最小接收间隔50毫秒,最小容错数3(参数一样才能协商成功)
R2(config-if)#exit
R2(config)#ip route static bfd g0/1 20.10.10.2		配置接口与BFD联动
R2(config)#ip route 0.0.0.0 0.0.0.0 g0/1 20.10.10.2		配置默认路由
R3
R3(config)#interface range g0/0 - 1
R3(config-if-range)#bfd interval 50 min_rx 50 multiplier 3	每50毫秒发送一次BFD报文,最小接收间隔50毫秒,最小容错数3(参数一样才能协商成功)
R3(config-if)#exit
R3(config)#ip route static bfd g0/0 20.10.10.1		配置接口与BFD联动
R3(config)#ip route static bfd g0/1 30.10.10.1		配置接口与BFD联动
R3(config)#ip route 0.0.0.0 0.0.0.0 g0/0 20.10.10.1 		配置默认路由
R3(config)#ip route 0.0.0.0 0.0.0.0 g0/1 30.10.10.1 5		配置AD为5的浮动默认路由
R4
R4(config)#interface g0/1
R4(config-if)#bfd interval 50 min_rx 50 multiplier 3	每50毫秒发送一次BFD报文,最小接收间隔50毫秒,最小容错数3(参数一样才能协商成功)
R4(config-if)#exit
R4(config)#ip route static bfd g0/1 30.10.10.2		配置接口与BFD联动
R4(config)#ip route 0.0.0.0 0.0.0.0 g0/1 30.10.10.2		配置默认路由
验证
show bfd neighbors查看bfd邻居状态,都是UP的

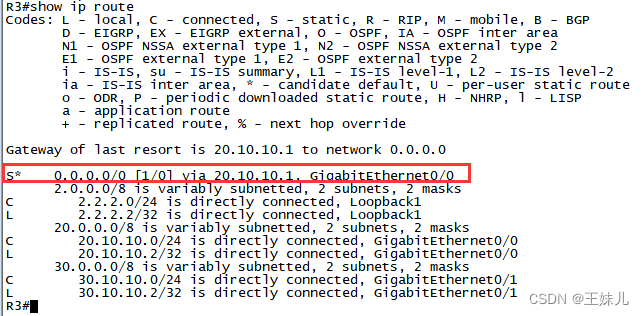
show ip route显示路由表,AD为1的默认路由被添加到路由表上
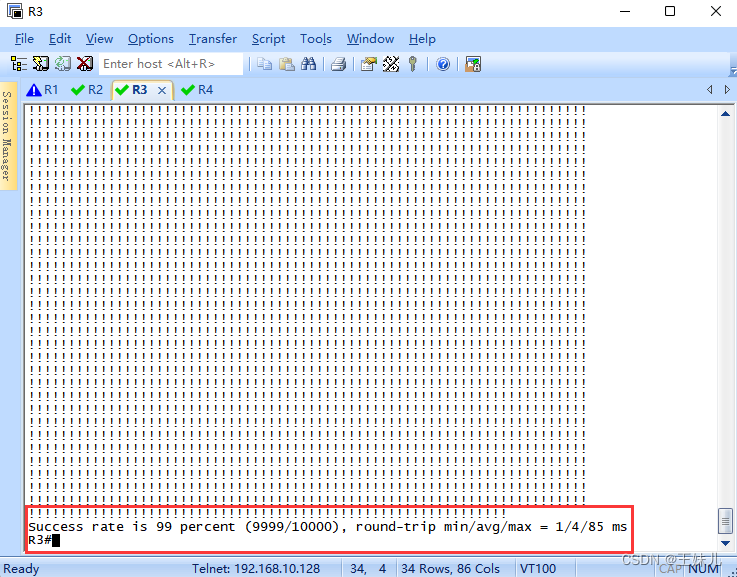
ping R1的 1.1.1.1 可以ping 通

ping R1的 1.1.1.1 (10000个包),ping 的同时关闭R2的g0/1接口,仍然可以ping通,只丢失一个包
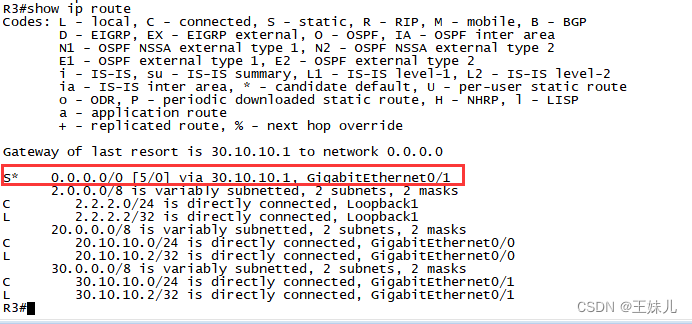
再次查看R3的路由表,AD为5的默认路由被添加到路由表上
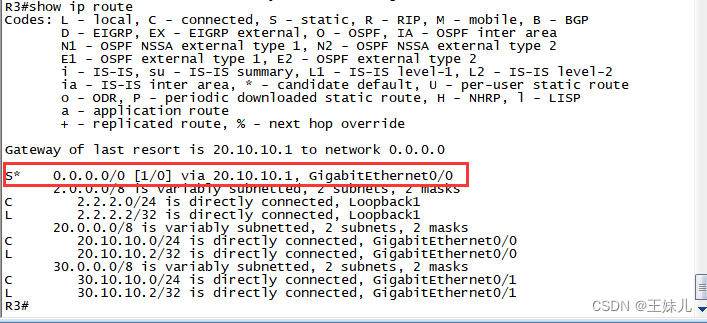
打开R2的g0/1接口后,再次查看路由表,AD为0的默认路由又被添加到路由表中
红色路线为正常情况下的路线,红色路线出现故障过后,会快速切换到黄色的路线


 1103
1103

 被折叠的 条评论
为什么被折叠?
被折叠的 条评论
为什么被折叠?
 到【灌水乐园】发言


