


前言
Hexo是一款基于Node.js的静态博客框架,依赖少易于安装使用,可以方便的生成静态网页托管在GitHub和Heroku上,是搭建博客的首选框架。
整体参考教程:【2023最新版】Hexo+github搭建个人博客并绑定个人域名_hexo部署github绑定自定义域名
准备工作
-
注册 Github 账号
-
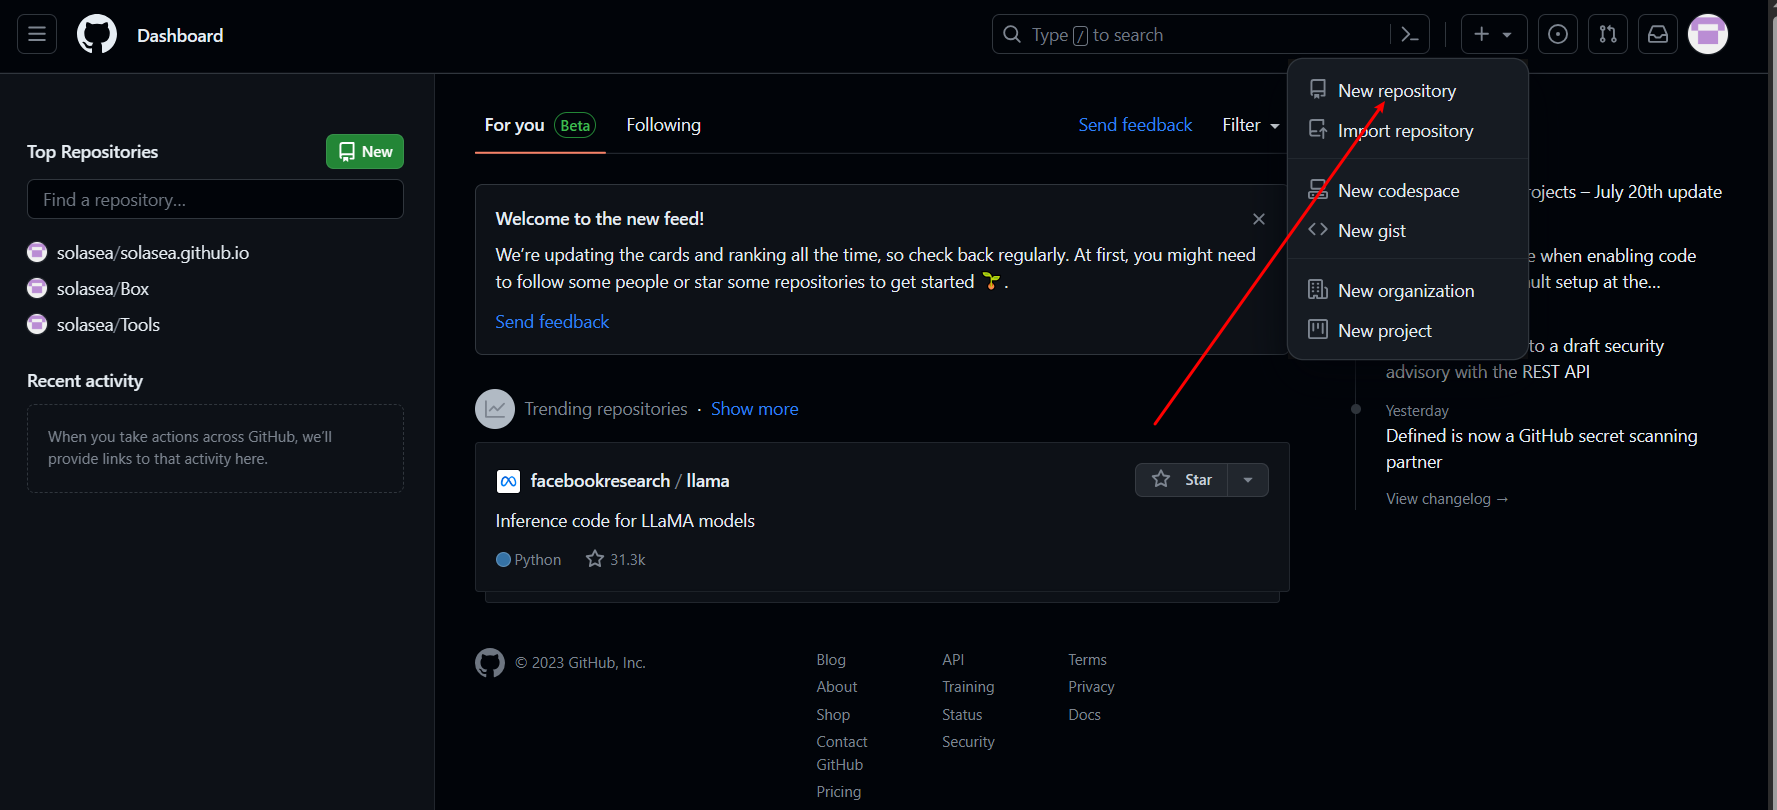
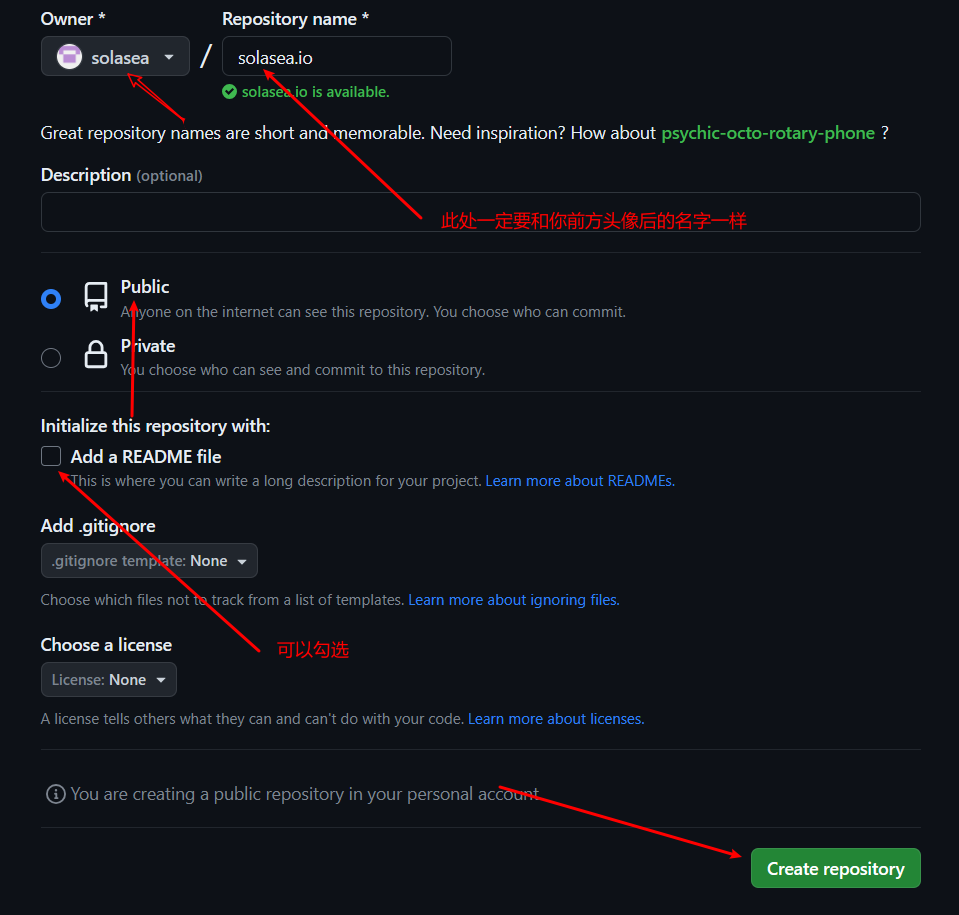
新建仓库,此仓库及存放你的博客文件的仓库
一、安装并配置Node.js
参考教程:nodejs安装和环境配置-Windows(非常详细)
安装过程会出现的问题,及解决办法,参考如下:
-
nodejs安装时遇到的问题及解决方案
二、安装并配置git
安装参考教程:Windows系统Git安装教程
配置参考教程参考文章:Github 生成SSH秘钥(详细教程)
三、配置Hexo
创建一个博客文件,方便起见,可以在任意一个本地磁盘的根目录下创建一个Blog的文件夹)

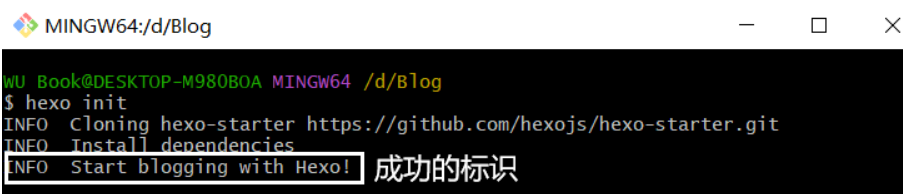
右键 Git Bash 程序,以管理员身份进入,输入cd /e/Blog (根据你的Blog文件位置输入路径)

初始化Hexo
hexo init
生成本地的 hexo 页面,点击出现的链接即可访问
hexo s

Ctrl+C 可以退出
修改 Blog 目录下的_config.yml 文件

注意冒号为英文冒号,且冒号后有一个英文空格
安装hexo-deployer-git 自动部署发布工具
npm install hexo-deployer-git --save

生成页面 并 上传
hexo g & hexo d
#(也可以分开操作)
中间会有一个登录页面,选第二种会方便些
最后访问你挂载在Github上的网站
四、Butterfly主题与基础美化
Butterfly使用参考官方文档:Butterfly 安裝文檔(一) 快速開始 | Butterfly
以下列出自己的修改说明
个人信息
修改Blog根目录下的 _config.yml blue 文件
title: Keep Thinking
subtitle: 'Rocky'
description: '保持思考,付诸行动'
keywords: solasea
author: Rocky
language: zh-CN
timezone: 'Asia/Shanghai'
网站图片
修改主题配置文件下的 label _config.yml 文件,该文件在不同下载模式下会出现在不同的地方,npm下载方式下会在node_modules 文件夹中的 hexo-theme-butterfly 子文件夹,其余下载方式会在根目录 label theme 文件夹内。
nav:
  logo: /img/mylogo.png  # 设置网站LOGO
  display_title: true
  fixed: false # fixed navigation bar

# Favicon(網站圖標)
favicon: /img/mylogo.png # 设置网站图标

# Avatar (頭像)
avatar:
  img: /img/head.jpeg    # 设置网站头像
  effect: false

# The banner image of home page
# 设置网站主页顶部图
index_img: https://rocky-box.oss-cn-beijing.aliyuncs.com/image/11.jpg

# Website Background (設置網站背景)
# can set it to color or image (可設置圖片 或者 顔色)
# The formal of image: url(http://xxxxxx.com/xxx.jpg)
# 设置网站背景
background: url(https://rocky-box.oss-cn-beijing.aliyuncs.com/image/11.jpg)

# Footer Background
footer_bg: false  # 取消页脚图片显示

#为了更好的显示背景图片,需要将页面顶部图与页脚的默认显示删掉
#主题文件下的 \source\css\_layout 下,分别将 footer.styl 和 head.styl 文件内删除以下内容
background: $light-blue
主页标签
同样修改Blog根目录下的config.yml blue文件
menu:
  首页: / || fas fa-home
  索引||fas fa-chain:
    归档: /archives/ || fas fa-archive
    标签: /tags/ || fas fa-tags
    分类: /categories/ || fas fa-folder-open
    项目: /Done/ || fas fa-check
  娱乐||fa fa-heartbeat:
    照片: /GalleryGroup/ || fas fa-images
  小计: /timeline/ || fas fa-paperclip
  友链: /link/ || fas fa-link
其中的 fa-home 、 fa-tags 均是图标名字,为 Font Awesome 图标库下图标,可直接使用。
网站特效
修改Blog根目录下的label _config.yml文件,选择自己喜欢的特效enable改为 true 即可。
# Typewriter Effect (打字效果)
# https://github.com/disjukr/activate-power-mode
activate_power_mode:
  enable: false
  colorful: true # open particle animation (冒光特效)
  shake: true #  open shake (抖動特效)
  mobile: false

# canvas_ribbon (靜止彩帶背景)
# See: https://github.com/hustcc/ribbon.js
canvas_ribbon:
  enable: false
  size: 150
  alpha: 0.6
  zIndex: -1
  click_to_change: false
  mobile: false

# Fluttering Ribbon (動態彩帶)
canvas_fluttering_ribbon:
  enable: false
  mobile: false

# canvas_nest
# https://github.com/hustcc/canvas-nest.js
canvas_nest:
  enable: true
  color: '0,0,255' #color of lines, default: '0,0,0'; RGB values: (R,G,B).(note: use ',' to separate.)
  opacity: 0.7 # the opacity of line (0~1), default: 0.5.
  zIndex: -1 # z-index property of the background, default: -1.
  count: 99 # the number of lines, default: 99.
  mobile: false

# Mouse click effects: fireworks (鼠標點擊效果: 煙火特效)
fireworks:
  enable: true
  zIndex: 9999 # -1 or 9999
  mobile: false

# Mouse click effects: Heart symbol (鼠標點擊效果: 愛心)
click_heart:
  enable: false
  mobile: false

# Mouse click effects: words (鼠標點擊效果: 文字)
ClickShowText:
  enable: false
  text:
    # - I
    # - LOVE
    # - YOU
  fontSize: 15px
  random: false
  mobile: false
# the subtitle on homepage (主頁subtitle)
subtitle:
  enable: true
  # Typewriter Effect (打字效果)
  effect: true
  # Customize typed.js (配置typed.js)
  # https://github.com/mattboldt/typed.js/#customization
  typed_option:
  # source 調用第三方服務
  # source: false 關閉調用
  # source: 1  調用一言網的一句話(簡體) https://hitokoto.cn/
  # source: 2  調用一句網(簡體) https://yijuzhan.com/
  # source: 3  調用今日詩詞(簡體) https://www.jinrishici.com/
  # subtitle 會先顯示 source , 再顯示 sub 的內容
  source: 1
  # 如果關閉打字效果,subtitle 只會顯示 sub 的第一行文字
  sub:


 139
139


 被折叠的 条评论
为什么被折叠?
被折叠的 条评论
为什么被折叠?
 到【灌水乐园】发言


