


一、SQL注入简介
SQL注入就是指Web应用程序对用户输入数据的合理性没有进行判断,前端传入后端的参数是攻击者可控制的,并且根据参数带入数据库查询,攻击者可以通过构造不同的SQL语句来对数据库进行任意查询。下面以PHP语句为例作为展示:
q u e r y = " S E L E C T ∗ F R O M u s e r s W H E R E i d = query=" SELECT*FROM users WHERE id=query="SELECT∗FROMusersWHEREid=_GET [‘id’] ";由于这里的参数ID可控,且带入数据库查询,所以非法用户可以任意拼接SQL语句进行攻击。
当然,SQL注入主要原因是程序员在开发用户和数据库的系统时没有对用户输入的字符串进行过滤、转义、限制或处理不严谨,导致攻击者可以通过精心构造的字符串去非法获取到数据库中的数据。
1.1 SQL注入的原理
SQL注入漏洞的产生需要满足以下两个条件:
(1)参数用户可控:前端传给后端的参数内容是用户可以控制的。
(2)参数带入数据库查询:传入的参数拼接到SQL语句,且带入参数库查询。``
数字型注入
当输入的参数为整形时,如果存在注入漏洞,可以认为是数字型注入。
测试步骤:
(1) 加单引号,URL:xxx.xxx.xxx/xxx.php?id=3’;
对应的sql:select * from table where id=3’ 这时sql语句出错,程序无法正常从数据库中查询出数据,就会抛出异常;
(2) 加and 1=1 ,URL:xxx.xxx.xxx/xxx.php?id=3 and 1=1;
对应的sql:select * from table where id=3’ and 1=1 语句执行正常,与原始页面没有差异;
(3) 加and 1=2,URL:xxx.xxx.xxx/xxx.php?id=3 and 1=2;
对应的sql:select * from table where id=3 and 1=2 语句可以正常执行,但是无法查询出结果,所以返回数据与原始网页存在差异;
如果满足以上三点,则可以判断该URL存在数字型注入。
字符型注入
当输入的参数为字符串时,称为字符型。字符型和数字型最大的一个区别在于,数字型不需要单引号来闭合,而字符串一般需要通过单引号来闭合的。
例如数字型语句:select * from table where id =3;
则字符型如下:select * from table where name=’admin’;
因此,在构造payload时通过闭合单引号可以成功执行语句。
测试步骤:
(1) 加单引号:select * from table where name=’admin’’;
由于加单引号后变成三个单引号,则无法执行,程序会报错;
(2) 加 ’and 1=1 此时sql 语句为:select * from table where name=’admin’ and 1=1’ ,也无法进行注入,还需要通过注释符号将其绕过;
因此,构造语句为:select * from table where name =’admin’ and 1=–’ 可成功执行返回结果正确;
(3) 加and 1=2— 此时sql语句为:select * from table where name=’admin’ and 1=2–’则会报错;
如果满足以上三点,可以判断该url为字符型注入。
二、实例演示:
首先创建一个测试表,并插入简单的数据(MySQL数据库):
CREATE TABLE `t_user` (
  `id` int(11) NOT NULL AUTO_INCREMENT,
  `username` varchar(30) DEFAULT NULL,
  `password` varchar(30) DEFAULT NULL,
  PRIMARY KEY (`id`)
) ENGINE=InnoDB DEFAULT CHARSET=utf8mb4;

INSERT INTO `t_user` VALUES ('1', 'John', '111111');
INSERT INTO `t_user` VALUES ('2', 'Tom', '222222');
接下来是Java程序部分,采用Spring Boot加上MyBatis的方式,如果对于搭建Spring Cloud工程还不太熟悉,可以参考之前的文章:手把手:Spring Cloud Alibaba项目搭建
在pom.xml文件中添加依赖:
<!-- 连接Spring Boot和MyBatis -->
<dependency>
    <groupId>org.mybatis.spring.boot</groupId>
    <artifactId>mybatis-spring-boot-starter</artifactId>
    <version>2.1.1</version>
</dependency>

<!-- mysql 驱动 -->
<dependency>
    <groupId>mysql</groupId>
    <artifactId>mysql-connector-java</artifactId>
</dependency>
然后是Java各层的代码,从controller一直到dao,为了完整起见,我把代码都贴出来。controller层有一个方法,参数为用户名,返回该用户的详细信息,为了演示方便,此处返回一个列表:
package com.fullstack.commerce.user.controller;

import com.fullstack.commerce.user.entity.User;
import com.fullstack.commerce.user.service.UserService;
import org.springframework.web.bind.annotation.RequestMapping;
import org.springframework.web.bind.annotation.RequestParam;
import org.springframework.web.bind.annotation.ResponseBody;
import org.springframework.web.bind.annotation.RestController;
import javax.annotation.Resource;
import java.util.List;

@RestController
@RequestMapping("user")
public class UserController {
    @Resource
    private UserService userService;

    @RequestMapping("getUserInfo")
    @ResponseBody
    // 根据用户姓名查询出用户列表信息
    public List<User> getUserInfo(@RequestParam("username")String username){
        List<User> result =  userService.getUserInfo(username);
        return result;
    }
}
service层比较简单,有一个接口和对应的实现类,而实现类就是调用dao的方法,把用户列表查询出来:
package com.fullstack.commerce.user.service;

import com.fullstack.commerce.user.entity.User;
import java.util.List;

public interface UserService {
    List<User> getUserInfo(String username);
}
package com.fullstack.commerce.user.service.impl;
import com.fullstack.commerce.user.dao.UserDao;
import com.fullstack.commerce.user.entity.User;
import com.fullstack.commerce.user.service.UserService;
import org.springframework.stereotype.Service;
import javax.annotation.Resource;
import java.util.List;
@Service
public class UserServiceImpl implements UserService {
@Resource
private UserDao userDao;
@Override
public List<User> getUserInfo(String username) {
return userDao.getUserInfo(username);
}
}dao层就是一个接口,里面只有一个方法:
package com.fullstack.commerce.user.dao;

import com.fullstack.commerce.user.entity.User;
import java.util.List;

public interface UserDao {
    List<User> getUserInfo(String username);
}
除了上面的业务代码,还需要有一个启动类:
package com.fullstack.commerce.user;

import org.mybatis.spring.annotation.MapperScan;
import org.springframework.boot.SpringApplication;
import org.springframework.boot.autoconfigure.SpringBootApplication;

@SpringBootApplication
@MapperScan(basePackages = "com.fullstack.commerce.user.dao")
public class UserApplication {
    public static void main(String[] args) {
        SpringApplication.run(UserApplication.class, args);
    }
}
以下是对应的mapper文件:
<?xml version="1.0" encoding="UTF-8" ?>
<!DOCTYPE mapper PUBLIC "-//mybatis.org//DTD Mapper 3.0//EN" "http://mybatis.org/dtd/mybatis-3-mapper.dtd">
<mapper namespace="com.fullstack.commerce.user.dao.UserDao">
    <resultMap id="UserMap" type="com.fullstack.commerce.user.entity.User">
        <result property="id" column="id" jdbcType="INTEGER"/>
        <result property="username" column="username" jdbcType="VARCHAR"/>
        <result property="password" column="password" jdbcType="VARCHAR"/>
    </resultMap>

    <select id="getUserInfo" resultMap="UserMap">
        SELECT * FROM t_user WHERE username = ${username}
    </select>
</mapper>
注意,在上面这个mapper文件中,只有一个select语句,而这个语句传参使用了符号$,它会把参数值直接进行替换,而不会进行预编译(如果使用占位符#,就会进行预编译,从而可以防止SQL注入)。
当然,application.yml文件也需要配置一下,数据库用户名和密码替换成实际的:
spring:
  datasource:
    url: jdbc:mysql://localhost:3306/test
    username: myuser
    password: myuser
    driver-class-name: com.mysql.cj.jdbc.Driver
mybatis:
  mapper-locations: mapper/*.xml
代码就算写完了,接下来我们测试一下看看。
三、测试验证:
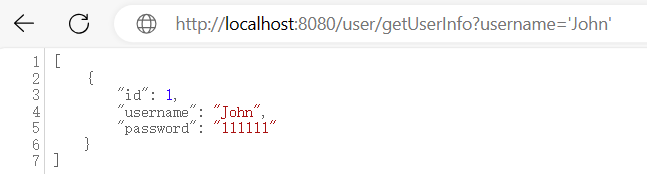
启动程序,我们来进行测试,在浏览器里面输入以下地址,然后回车:
http://localhost:8080/user/getUserInfo?username='John'没问题,我们是要查找用户名为John的数据,它返回了如下的结果,正是我们所期望的:
但如果我们把参数重新设置一下,变成如下这样:
http://localhost:8080/user/getUserInfo?username='John' OR 1=1那就相当于在数据库中执行下面的SQL了,也就是返回所有的用户数据:
SELECT * FROM t_user WHERE username = 'John' OR 1=1看结果,确实是这样,把表中的两条记录都返回到了客户端(测试数据只插了两条记录,如果有多条,同样会把所有的数据都返回过来):
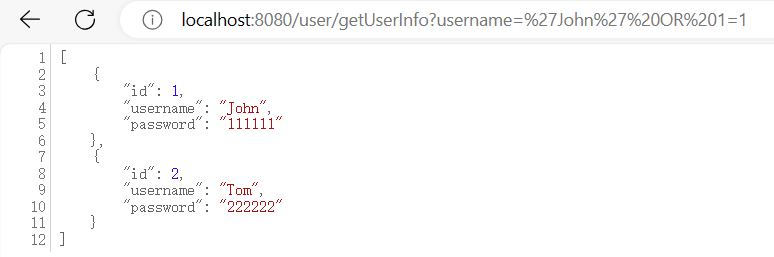
这显然是不对的,接口把查询范围之外的数据都搜索出来了,如果还有一些修改数据或者操纵数据库的一些命令,那就更危险了。
当然,我们把mapper文件里面的参数部分改成占位符#,这样就会先进行预编译,就不会发生刚才的情况了。修改成#以后运行程序,再执行上面的url,就会返回空了,因为这个时候是去数据库中查询用户名为【'John' OR 1=1】的记录,显然是不存在的。


 3784
3784

 被折叠的 条评论
为什么被折叠?
被折叠的 条评论
为什么被折叠?
 到【灌水乐园】发言


