


主要内容
- thread、condition、mutex
- atomic
- function、bind
- 使用新特性实现线程池(支持可变参数列表)
- 异常
- 协程
- 其他
1 C++11多线程thread
重点:
- join和detach的使用场景
- thread构造函数参数
- 绑定c函数
- 绑定类函数
- 线程封装基础类
- 互斥锁mutex
- condition notify、wait
- lock_guard/unique_lock
- function和bind
- 异步future/packaged_task/promise
- 线程池的实现,线程池涉及的技术点
1.1 线程thread
std::thread在#include头文件中声明,因此使用 std::thread时需要包含#include头文件。
1.1.1 语法
构造函数
- 默认构造函数
//创建一个空的 thread 执行对象。 thread() _NOEXCEPT { // construct with no thread _Thr_set_null(_Thr); } - 初始化构造函数
//创建std::thread执行对象,该thread对象可被joinable,新产生的线程会调用threadFun函数,该函 数的参数由 args 给出 template<class Fn, class... Args> explicit thread(Fn&& fn, Args&&... args); - 拷贝构造函数
// 拷贝构造函数(被禁用),意味着 thread 不可被拷贝构造。 thread(const thread&) = delete; thread t1; thread t2=t1;//这是错误的 - Move构造函数
//move 构造函数,调用成功之后 x 不代表任何 thread 执行对象。
注意:可被 joinable 的 thread 对象必须在他们销毁之前被主线程 join 或者将其设置为
detached。
thread(thread&& x)noexcept
thread t1;
thread t2=move(t1);//可以
#include<thread> using namespace std; void threadFun(int &a) // 引用传递 { cout << "this is thread fun !" <<endl; cout <<" a = "<<(a+=10)<<endl; } int main() { int x = 10; thread t1(threadFun, std::ref(x)); thread t2(std::move(t1)); // t1 线程失去所有权 thread t3; t3 = std::move(t2); // t2 线程失去所有权 //t1.join(); // ? t3.join(); cout<<"Main End "<<"x = "<<x<<endl; return 0; }
主要成员函数
- get_id()
- 获取线程ID,返回类型std::thread::id对象。
- http://www.cplusplus.com/reference/thread/thread/get_id/
- joinable()
- 判断线程是否可以加入等待,joinable()成员函数可以判断子线程的分离状态,函数返回布尔类型。
- http://www.cplusplus.com/reference/thread/thread/joinable/
- join()
- 等该线程执行完成后才返回。.join();是回收线程的资源
- http://www.cplusplus.com/reference/thread/thread/join/
- detach()
- detach调用之后,目标线程就成为了守护线程,驻留后台运行,与之关联的std::thread对象失去对目标线程的关联,无法再通过std::thread对象取得该线程的控制权。当线程主函数执行完之后,线程就结束了,运行时库负责清理与该线程相关的资源。
- 调用 detach 函数之后:
*this不再代表任何的线程执行实例。- joinable() == false
- get_id() == std::thread::id()
- http://www.cplusplus.com/reference/thread/thread/detach/
1.1.2 简单线程的创建
- 传入0个值
- 传入2个值
- 传入引用
- 传入类函数
- detach
- move
使用std::thread创建线程,提供线程函数或者函数对象,并可以同时指定线程函数的参数。
范例:1-thread1-simple
#include <iostream>
#include <thread> // 头文件
using namespace std;
// 1 传入0个值
void func1() {
	cout << "func1 into" << endl;
}
// 2 传入2个值
void func2(int a, int b) {
	cout << "func2 a + b = " << a+b << endl;
}
// 3 传入引用
void func3(int &c) // 引用传递 {
	cout << "func3 c = " << &c << endl;
	c += 10;
}
//
class A {
	public:
	// 4. 传入类函数
	void func4(int a) {
		// std::this_thread::sleep_for(std::chrono::seconds(1));
		cout << "thread:" << name_<< ", fun4 a = " << a << endl;
	}
	void setName(string name) {
		name_ = name;
	}
	void displayName() {
		cout << "this:" << this << ", name:" << name_ << endl;
	}
	void play() {
		std::cout<<"play call!"<<std::endl;
	}
	private:
	string name_;
}
;
//5. detach
void func5() {
	cout << "func5 into sleep " << endl;
	std::this_thread::sleep_for (std::chrono::seconds(1));
	cout << "func5 leave " << endl;
}
// 6. move
void func6() {
	cout << "this is func6 !" <<endl;
}
int main() {
	// 1. 传入0个值
	cout << "\n\n main1--------------------------\n";
	1.1.3 线程封装
	见范例1-thread2-pack
	zero_thread.h
	std::thread t1(&func1);
	// 只传递函数
	t1.join();
	// 阻塞等待线程函数执行结束
	// 2. 传入2个值
	cout << "\n\n main2--------------------------\n";
	int a =10;
	int b =20;
	std::thread t2(func2, a, b);
	// 加上参数传递,可以任意参数
	t2.join();
	// 3. 传入引用
	cout << "\n\n main3--------------------------\n";
	int c =10;
	std::thread t3(func3, std::ref(c));
	// 加上参数传递,可以任意参数
	t3.join();
	cout << "main3 c = " << &c << ", "<<c << endl;
	// 4. 传入类函数
	cout << "\n\n main4--------------------------\n";
	A * a4_ptr = new A();
	a4_ptr->setName("darren");
	std::thread t4(A::func4, a4_ptr, 10);
	t4.join();
	delete a4_ptr;
	// 5.detach
	cout << "\n\n main5--------------------------\n";
	std::thread t5(&func5);
	// 只传递函数
	t5.detach();
	// 脱离
	// std::this_thread::sleep_for(std::chrono::seconds(2)); // 如果这里不休眠会怎么
	样
	cout << "\n main5 end\n";
	// 6.move
	cout << "\n\n main6--------------------------\n";
	int x = 10;
	thread t6_1(func6);
	thread t6_2(std::move(t6_1));
	// t6_1 线程失去所有权
	t6_1.join();
	// 抛出异常
	t6_2.join();
	return 0;
}
1.1.3 线程封装
见范例1-thread2-pack
zero_thread.h
#ifndef ZERO_THREAD_H
#define ZERO_THREAD_H
#include <thread>
class ZERO_Thread {
public:
	ZERO_Thread();// 构造函数
	virtual ~ZERO_Thread();// 析构函数
	bool start();
	void stop();
	bool isAlive() const;// 线程是否存活.
	std::thread::id id() {
		return th_->get_id();
	}
	std::thread* getThread() {
		return th_;
	}
	void join();// 等待当前线程结束, 不能在当前线程上调用
	void detach();//能在当前线程上调用
	static size_t CURRENT_THREADID();
protected:
	void threadEntry();
	virtual void run() = 0;// 运行
protected:
	bool running_;//是否在运行
	std::thread *th_;
};
#endif // ZERO_THREAD_H
zero_thread.cpp
#include "zero_thread.h"
#include <sstream>
#include <iostream>
#include <exception>
ZERO_Thread::ZERO_Thread():
    running_(false), th_(NULL)
{

}

ZERO_Thread::~ZERO_Thread()
{
    if(th_ != NULL)
    {
        //如果到调用析构函数的时候,调用者还没有调用join则触发detach,此时是一个比较危险的动作,用户必须知道他在做什么
        if (th_->joinable())
        {
            std::cout << "~ZERO_Thread detach\n";
            th_->detach();
        }

        delete th_;
        th_ = NULL;
    }
    std::cout << "~ZERO_Thread()" << std::endl;
}

bool ZERO_Thread::start()
{
    if (running_)
    {
        return false;
    }
    try
    {
        th_ = new std::thread(ZERO_Thread::threadEntry, this);
    }
    catch(...)
    {
        throw  "[ZERO_Thread::start] thread start error";
    }
    return true;
}

void ZERO_Thread::stop()
{
    running_ = false;
}

bool ZERO_Thread::isAlive() const
{
    return running_;
}

void ZERO_Thread::join()
{
    if (th_->joinable())
    {
        th_->join();  // 不是detach才去join
    }
}

void ZERO_Thread::detach()
{
    th_->detach();
}

size_t ZERO_Thread::CURRENT_THREADID()
{
    // 声明为thread_local的本地变量在线程中是持续存在的,不同于普通临时变量的生命周期,
    // 它具有static变量一样的初始化特征和生命周期,即使它不被声明为static。
    static thread_local size_t threadId = 0;
    if(threadId == 0 )
    {
        std::stringstream ss;
        ss << std::this_thread::get_id();
        threadId = strtol(ss.str().c_str(), NULL, 0);
    }
    return threadId;
}

void ZERO_Thread::threadEntry()
{
    running_ = true;

    try
    {
        run();   // 函数运行所在
    }
    catch (std::exception &ex)
    {
        running_ = false;
        throw ex;
    }
    catch (...)
    {
        running_ = false;
        throw;
    }
    running_ = false;
}
main.cpp
#include <iostream>
#include <chrono>
#include "zero_thread.h"
using namespace std;
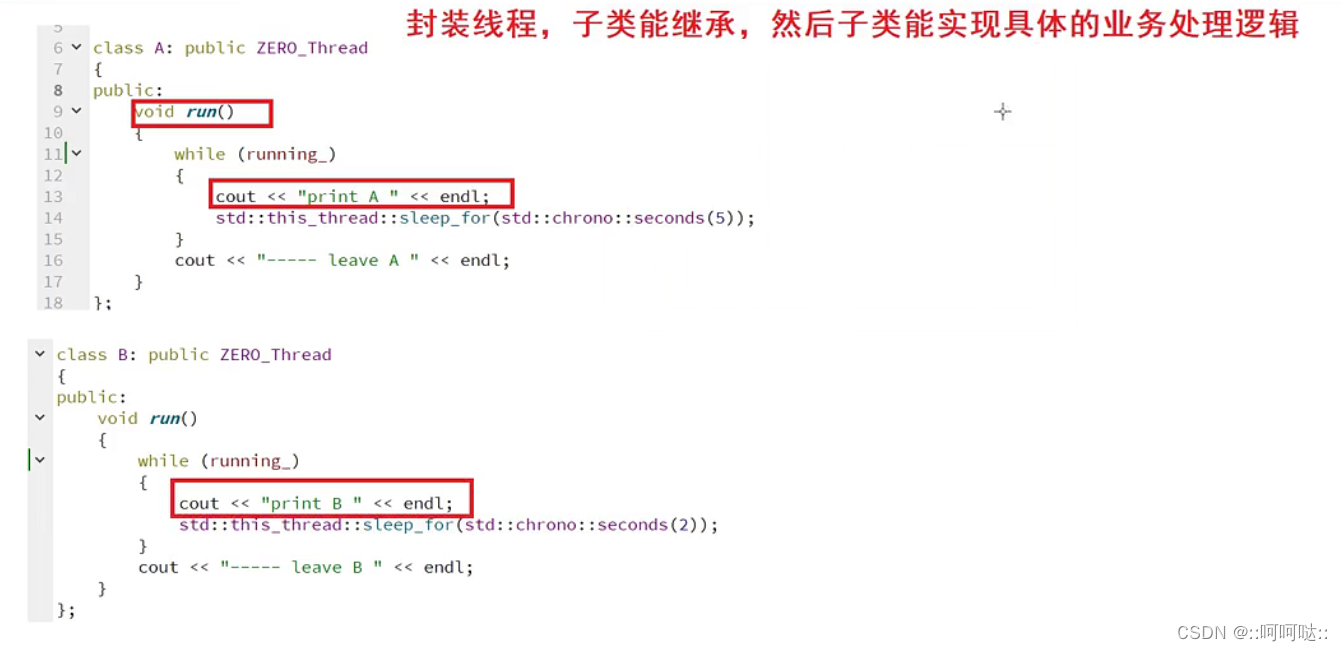
class A: public ZERO_Thread
{
public:
void run()
{
while (running_)
{
cout << "print A " << endl;
std::this_thread::sleep_for(std::chrono::seconds(5));
}
cout << "----- leave A " << endl;
}
};
class B: public ZERO_Thread
{
public:
void run()
{
while (running_)
{
cout << "print B " << endl;
std::this_thread::sleep_for(std::chrono::seconds(2));
}
cout << "----- leave B " << endl;
}
};
int main()
{
{
A a;
a.start();
B b;
b.start();
std::this_thread::sleep_for(std::chrono::seconds(5));
a.stop();
a.join();
b.stop();
b.join(); // 需要我们自己join
}
cout << "Hello World!" << endl;
return 0;
}
这里的创建线程和之前不太一样:

1.1.4 进一步阅读
this_thread - C++ Reference (cplusplus.com)
- get_id
Get thread id (function ) - yield
Yield to other threads (function ),比如范例:yield - C++ Reference (cplusplus.com) - sleep_until
Sleep until time point (function ) - sleep_for
Sleep for time span (function )
1.2 互斥量
mutex又称互斥量,C++ 11中与mutex相关的类(包括锁类型)和函数都声明在 头文件中,所以如果你需要使用 std::mutex,就必须包含 头文件。
C++11提供如下4种语义的互斥量(mutex)
- std::mutex,独占的互斥量,不能递归使用。
- std::time_mutex,带超时的独占互斥量,不能递归使用。
- std::recursive_mutex,递归互斥量,不带超时功能。
- std::recursive_timed_mutex,带超时的递归互斥量。
1.2.1 独占互斥量std::mutex
std::mutex介绍
下面以std::mutex为例介绍 C++11 中的互斥量用法。
std::mutex是C++11 中最基本的互斥量,std::mutex对象提供了独占所有权的特性——即不支持递归地对std::mutex对象上锁,而 std::recursive_lock则可以递归地对互斥量对象上锁。
std::mutex的成员函数
- 构造函数,
std::mutex不允许拷贝构造,也不允许move拷贝,最初产生的 mutex 对象是处于unlocked状态的。 lock(),调用线程将锁住该互斥量。线程调用该函数会发生下面 3 种情况:(1). 如果该互斥量当前没有被锁住,则调用线程将该互斥量锁住,直到调用 unlock之前,该线程一直拥有该锁。(2). 如果当前互斥量被其他线程锁住,则当前的调用线程被阻塞住。(3). 如果当前互斥量被当前调用线程锁住,则会产生死锁(deadlock)。- unlock(), 解锁,释放对互斥量的所有权。
try_lock(),尝试锁住互斥量,如果互斥量被其他线程占有,则当前线程也不会被阻塞。线程调用该函数也会出现下面 3 种情况,(1). 如果当前互斥量没有被其他线程占有,则该线程锁住互斥量,直到该线程调用 unlock 释放互斥量。(2). 如果当前互斥量被其他线程锁住,则当前调用线程返回false,而并不会被阻塞掉。(3). 如果当前互斥量被当前调用线程锁住,则会产生死锁(deadlock)
//1-2-mutex1
#include <iostream> // std::cout
#include <thread> // std::thread
#include <mutex> // std::mutex
volatile int counter(0); // non-atomic counter
std::mutex mtx; // locks access to counter
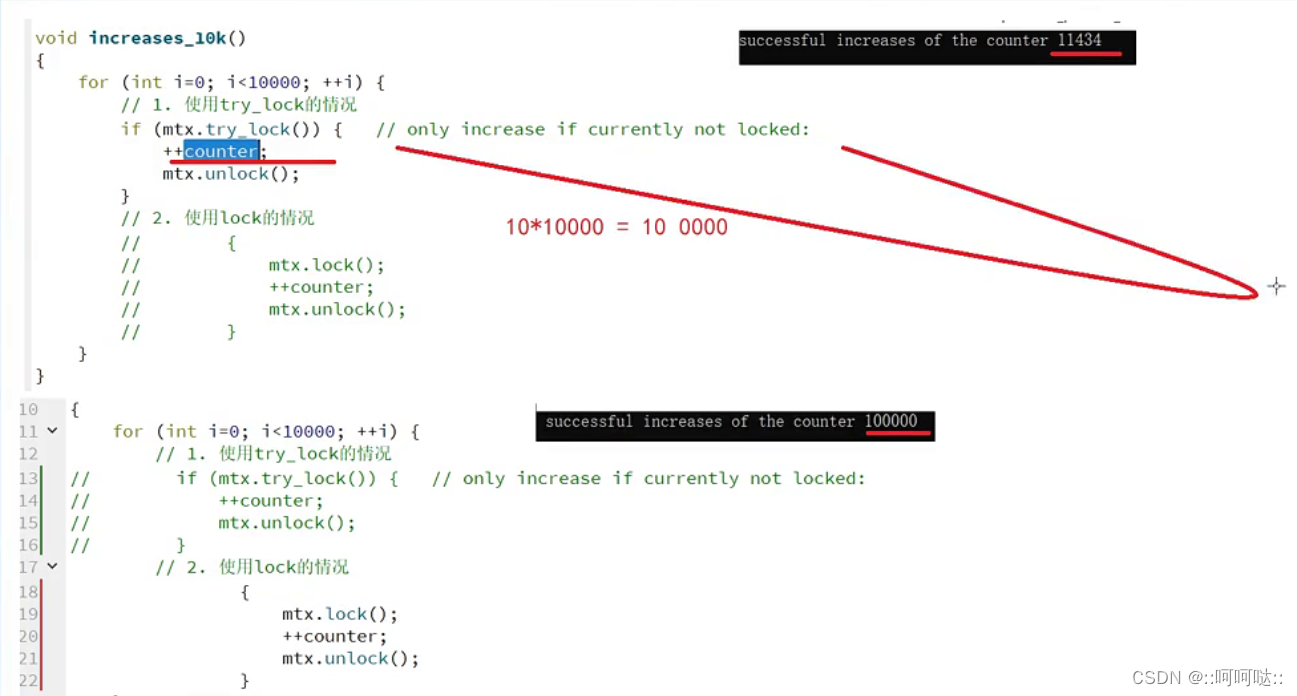
void increases_10k()
{
for (int i=0; i<10000; ++i) {
// 1. 使用try_lock的情况
if (mtx.try_lock()) { // only increase if currently not locked:
++counter;
mtx.unlock();
}
// 2. 使用lock的情况
// {
// mtx.lock();
// ++counter;
// mtx.unlock();
// }
}
}
int main()
{
std::thread threads[10];
for (int i=0; i<10; ++i)
threads[i] = std::thread(increases_10k);
for (auto& th : threads) th.join();
std::cout << " successful increases of the counter " << counter << std::endl;
return 0;
}
1.2.2 递归互斥量std::recursive_mutex
递归锁允许同一个线程多次获取该互斥锁,可以用来解决同一线程需要多次获取互斥量时死锁的问题。
//死锁范例1-2-mutex2-dead-lock
#include <iostream>
#include <thread>
#include <mutex>

struct Complex
{
    std::mutex mutex;
    int i;

    Complex() : i(0){}

    void mul(int x)
    {
        std::lock_guard<std::mutex> lock(mutex);
        i *= x;
    }

    void div(int x)
    {
        std::lock_guard<std::mutex> lock(mutex);
        i /= x;
    }

    void both(int x, int y)
    {
        //lock_guard 构造函数加锁, 析构函数释放锁
        std::lock_guard<std::mutex> lock(mutex);
        mul(x); // 获取不了锁
        div(y);
    }

    void init()
    {
        //lock_guard 构造函数加锁, 析构函数释放锁
        std::lock_guard<std::mutex> lock(mutex);
        sub_init();
    }
    void sub_init()
    {
        std::lock_guard<std::mutex> lock(mutex);
    }
};

int main(void)
{
    Complex complex;

    complex.both(32, 23);
    std::cout << "main finish\n";
    return 0;
}
运行后出现死锁的情况。在调用both时获取了互斥量,在调用mul时又要获取互斥量,但both的并没有释放,从而产生死锁。
使用递归锁
//递归锁1-2-recursive_mutex1
#include <iostream>
#include <thread>
#include <mutex>

struct Complex
{
    std::recursive_mutex mutex;
    int i;

    Complex() : i(0){}

    void mul(int x)
    {
        std::lock_guard<std::recursive_mutex> lock(mutex);
        i *= x;
    }

    void div(int x)
    {
        std::unique_lock<std::recursive_mutex> lock(mutex);


        i /= x;
    }

    void both(int x, int y)
    {
        std::lock_guard<std::recursive_mutex> lock(mutex);
        mul(x);
        div(y);
    }
};

int main(void)
{
    Complex complex;

    complex.both(32, 23);  //因为同一线程可以多次获取同一互斥量,不会发生死锁

    std::cout << "main finish\n";
    return 0;
}
虽然递归锁能解决这种情况的死锁问题,但是尽量不要使用递归锁,主要原因如下:
- 需要用到递归锁的多线程互斥处理本身就是可以简化的,允许递归很容易放纵复杂逻辑的产生,并且产生晦涩,当要使用递归锁的时候应该重新审视自己的代码是否一定要使用递归锁;
- 递归锁比起非递归锁,效率会低;
- 递归锁虽然允许同一个线程多次获得同一个互斥量,但可重复获得的最大次数并未具体说明,一旦超过一定的次数,再对lock进行调用就会抛出std::system错误。
1.2.3 带超时的互斥量std::timed_mutex和std::recursive_timed_mutex
std::timed_mutex比std::mutex多了两个超时获取锁的接口:try_lock_for和try_lock_until
//1-2-timed_mutex
#include <iostream>
#include <thread>
#include <mutex>
#include <chrono>

std::timed_mutex mutex;

void work()
{
    std::chrono::milliseconds timeout(100);

    while (true)
    {
        if (mutex.try_lock_for(timeout))
        {
            std::cout << std::this_thread::get_id() << ": do work with the mutex" << std::endl;

            std::chrono::milliseconds sleepDuration(250);
            std::this_thread::sleep_for(sleepDuration);

            mutex.unlock();
            std::this_thread::sleep_for(sleepDuration);
        }
        else
        {
            std::cout << std::this_thread::get_id() << ": do work without the mutex" << std::endl;

            std::chrono::milliseconds sleepDuration(100);
            std::this_thread::sleep_for(sleepDuration);
        }
    }
}

int main(void)
{
    std::thread t1(work);
    std::thread t2(work);

    t1.join();
    t2.join();

    std::cout << "main finish\n";
    return 0;
}
1.2.4 lock_guard和unique_lock的使用和区别
相对于手动lock和unlock,我们可以使用RAII(通过类的构造析构)来实现更好的编码方式。
RAII:也称为“资源获取就是初始化”,是c++等编程语言常用的管理资源、避免内存泄露的方法。它保证在任何情况下,使用对象时先构造对象,最后析构对象。
1 unique_lock,lock_guard的使用
这里涉及到unique_lock,lock_guard的使用。
#include <iostream>       // std::cout
#include <thread>         // std::thread
#include <mutex>          // std::mutex, std::lock_guard
#include <stdexcept>      // std::logic_error

std::mutex mtx;

void print_even (int x) {
    if (x%2==0) std::cout << x << " is even\n";
    else throw (std::logic_error("not even"));
}

void print_thread_id (int id) {
    try {
//        这里的lock_guard换成unique_lock是一样的。
        // using a local lock_guard to lock mtx guarantees unlocking on destruction / exception:
        std::lock_guard<std::mutex> lck (mtx);
        print_even(id);
    }
    catch (std::logic_error&) {
        std::cout << "[exception caught]\n";
    }
}

int main ()
{
    std::thread threads[10];
    // spawn 10 threads:
    for (int i=0; i<10; ++i)
        threads[i] = std::thread(print_thread_id,i+1);

    for (auto& th : threads) th.join();

    return 0;
}
这里的lock_guard换成unique_lock是一样的。
2 unique_lock,lock_guard的区别
- unique_lock与lock_guard都能实现自动加锁和解锁,但是前者更加灵活,能实现更多的功能。
- unique_lock可以进行临时解锁和再上锁,如在构造对象之后使用lck.unlock()就可以进行解锁,lck.lock()进行上锁,而不必等到析构时自动解锁。
#include <iostream>
#include <deque>
#include <thread>
#include <mutex>
#include <condition_variable>
#include <unistd.h>

std::deque<int> q;
std::mutex mu;
std::condition_variable cond;
int count = 0;

void fun1() {
    while (true) {
//        {
        std::unique_lock<std::mutex> locker(mu); // 能否换成lock_guard
        q.push_front(count++);
        locker.unlock();        // 这里是不是必须的?
        cond.notify_one();
//        }
        sleep(1);
    }
}

void fun2() {
    while (true) {
        std::unique_lock<std::mutex> locker(mu);
        cond.wait(locker, [](){return !q.empty();});
        auto data = q.back();
        q.pop_back();
//        locker.unlock(); // 这里是不是必须的?
        std::cout << "thread2 get value form thread1: " << data << std::endl;
    }
}
int main() {
    std::thread t1(fun1);
    std::thread t2(fun2);
    t1.join();
    t2.join();
    return 0;
}
条件变量的目的就是为了,在没有获得某种提醒时长时间休眠; 如果正常情况下, 我们需要一直循环(+sleep), 这样的问题就是CPU消耗+时延问题,条件变量的意思是在cond.wait这里一直休眠直到cond.notify_one唤醒才开始执行下一句; 还有cond.notify_all()接口用于唤醒所有等待的线程。
那么为什么必须使用unique_lock呢?
原因: 条件变量在wait时会进行unlock再进入休眠, lock_guard并无该操作接口(但是可以加个大括号,是他释放掉)
wait: 如果线程被唤醒或者超时那么会先进行lock获取锁, 再判断条件(传入的参数)是否成立, 如果成立则wait函数返回否则释放锁继续休眠
notify: 进行notify动作并不需要获取锁使用场景:需要结合notify+wait的场景使用。unique_lock: 如果只是单纯的互斥使用lock_guard,notify_one唤醒等待的其中一个。
3 总结
lock_guard
- std::lock_guard 在构造函数中进行加锁,析构函数中进行解锁。
- 锁在多线程编程中,使用较多,因此c++11提供了lock_guard模板类;在实际编程中,我们也可以根据自己的场景编写resource_guard RAII类,避免忘掉释放资源。
std::unique_lock
- unique_lock 是通用互斥包装器,允许延迟锁定、锁定的有时限尝试、递归锁定、所有权转移和与条件变量一同使用。
- unique_lock比lock_guard使用更加灵活,功能更加强大。
- 使用unique_lock需要付出更多的时间、性能成本。
1.3 条件变量
互斥量是多线程间同时访问某一共享变量时,保证变量可被安全访问的手段。但单靠互斥量无法实现线程的同步。线程同步是指线程间需要按照预定的先后次序顺序进行的行为。C++11对这种行为也提供了有力的支持,这就是条件变量。条件变量位于头文件condition_variable下。
http://www.cplusplus.com/reference/condition_variable/condition_variable
条件变量使用过程:
- 拥有条件变量的线程获取互斥量;
- 循环检查某个条件,如果条件不满足则阻塞直到条件满足;如果条件满足则向下执行;
- 某个线程满足条件执行完之后调用notify_one或notify_all唤醒一个或者所有等待线程。
条件变量提供了两类操作:wait和notify。这两类操作构成了多线程同步的基础。
1.3.1 成员函数
1 wait函数
函数原型
void wait (unique_lock<mutex>& lck);
template <class Predicate>
void wait (unique_lock<mutex>& lck, Predicate pred);
包含两种重载,第一种只包含unique_lock对象,另外一个Predicate 对象(等待条件),这里必须使用unique_lock,因为wait函数的工作原理:
- 当前线程调用wait()后将被阻塞并且函数会解锁互斥量,直到另外某个线程调用notify_one或者notify_all唤醒当前线程;一旦当前线程获得通知(notify),wait()函数也是自动调用lock(),同理不能使用lock_guard对象。
- 如果wait没有第二个参数,第一次调用默认条件不成立,直接解锁互斥量并阻塞到本行,直到某一个线程调用notify_one或notify_all为止,被唤醒后,wait重新尝试获取互斥量,如果得不到,线程会卡在这里,直到获取到互斥量,然后无条件地继续进行后面的操作。
- 如果wait包含第二个参数,如果第二个参数不满足,那么wait将解锁互斥量并堵塞到本行,直到某一个线程调用notify_one或notify_all为止,被唤醒后,wait重新尝试获取互斥量,如果得不到,线程会卡在这里,直到获取到互斥量,然后继续判断第二个参数,如果表达式为false,wait对互斥量解锁,然后休眠,如果为true,则进行后面的操作。
2 wait_for函数
函数原型:
template <class Rep, class Period>
	cv_status wait_for (unique_lock<mutex>& lck,
						const chrono::duration<Rep,Period>& rel_time);
template <class Rep, class Period, class Predicate>
	bool wait_for (unique_lock<mutex>& lck,
					const chrono::duration<Rep,Period>& rel_time, Predicate
pred);
和wait不同的是,wait_for可以执行一个时间段,在线程收到唤醒通知或者时间超时之前,该线程都会处于阻塞状态,如果收到唤醒通知或者时间超时,wait_for返回,剩下操作和wait类似.
3 wait_until函数
函数原型:
template <class Clock, class Duration>
	cv_status wait_until (unique_lock<mutex>& lck,
							const chrono::time_point<Clock,Duration>& abs_time);
template <class Clock, class Duration, class Predicate>
			bool wait_until (unique_lock<mutex>& lck,
							const chrono::time_point<Clock,Duration>& abs_time,
							Predicate pred);
与wait_for类似,只是wait_until可以指定一个时间点,在当前线程收到通知或者指定的时间点超时之前,该线程都会处于阻塞状态。如果超时或者收到唤醒通知,wait_until返回,剩下操作和wait类似
4 notify_one函数
函数原型:
void notify_one() noexcept;
解锁正在等待当前条件的线程中的一个,如果没有线程在等待,则函数不执行任何操作,如果正在等待的线程多余一个,则唤醒的线程是不确定的。
5 notify_all函数
函数原型:
void notify_all() noexcept;
解锁正在等待当前条件的所有线程,如果没有正在等待的线程,则函数不执行任何操作。
1.3.2 范例
使用条件变量实现一个同步队列,同步队列作为一个线程安全的数据共享区,经常用于线程之间数据读取。
代码范例:同步队列的实现1-3-condition-sync-queue
sync_queue.h
#ifndef SYNC_QUEUE_H
#define SYNC_QUEUE_H
#include<list>
#include<mutex>
#include<thread>
#include<condition_variable>
#include <iostream>

template<typename T>
class SyncQueue
{
private:
    bool IsFull() const
    {
        return _queue.size() == _maxSize;
    }

    bool IsEmpty() const
    {
        return _queue.empty();
    }

public:
    SyncQueue(int maxSize) : _maxSize(maxSize)
    {
    }

    void Put(const T& x)
    {
        std::lock_guard<std::mutex> locker(_mutex);

        while (IsFull())
        {
            std::cout << "full wait... size " << _queue.size()  << std::endl;
            _notFull.wait(_mutex);
        }

        _queue.push_back(x);
        _notEmpty.notify_one();
    }

    void Take(T& x)
    {
        std::lock_guard<std::mutex> locker(_mutex);

        while (IsEmpty())
        {
            std::cout << "empty wait.." << std::endl;
            _notEmpty.wait(_mutex);
        }

        x = _queue.front();
        _queue.pop_front();
        _notFull.notify_one();
    }

    bool Empty()
    {
        std::lock_guard<std::mutex> locker(_mutex);
        return _queue.empty();
    }

    bool Full()
    {
        std::lock_guard<std::mutex> locker(_mutex);
        return _queue.size() == _maxSize;
    }

    size_t Size()
    {
        std::lock_guard<std::mutex> locker(_mutex);
        return _queue.size();
    }

    int Count()
    {
        return _queue.size();
    }

private:
    std::list<T> _queue;                  //缓冲区
    std::mutex _mutex;                    //互斥量和条件变量结合起来使用
    std::condition_variable_any _notEmpty;//不为空的条件变量
    std::condition_variable_any _notFull; //没有满的条件变量
    int _maxSize;                         //同步队列最大的size
};
#endif // SYNC_QUEUE_H
main.cpp
#include <iostream>
#include "sync_queue.h"


#include <thread>
#include <iostream>
#include <mutex>
using namespace std;
SyncQueue<int> syncQueue(5);

void PutDatas()
{
    for (int i = 0; i < 20; ++i)
    {
        syncQueue.Put(i);
    }
    std::cout << "PutDatas finish\n";
}

void TakeDatas()
{
    int x = 0;

    for (int i = 0; i < 20; ++i)
    {
        syncQueue.Take(x);
        std::cout << x << std::endl;
    }
    std::cout << "TakeDatas finish\n";
}

int main(void)
{
    std::thread t1(PutDatas);  // 生产线程
    std::thread t2(TakeDatas); // 消费线程

    t1.join();
    t2.join();

    std::cout << "main finish\n";
    return 0;
}
代码中用到了std::lock_guard,它利用RAII机制可以保证安全释放mutex。
std::lock_guard<std::mutex> locker(_mutex);
while (IsFull())
{
	std::cout << "full wait..." << std::endl;
	_notFull.wait(_mutex);
}
可以改成
std::lock_guard<std::mutex> locker(_mutex);
_notFull.wait(_mutex, [this] {return !IsFull();});
两种写法效果是一样的,但是后者更简洁,条件变量会先检查判断式是否满足条件,如果满足条件则重新获取mutex,然后结束wait继续往下执行;如果不满足条件则释放mutex,然后将线程置为waiting状态继续等待。
这里需要注意的是,wait函数中会释放mutex,而lock_guard这时还拥有mutex,它只会在出了作用域之后才会释放mutex,所以这时它并不会释放,但执行wait时会提前释放mutex。
从语义上看这里使用lock_guard会产生矛盾,但是实际上并不会出问题,因为wait提前释放锁之后会处于等待状态,在被notify_one或者notify_all唤醒后会先获取mutex,这相当于lock_guard的mutex在释放之后又获取到了,因此,在出了作用域之后lock_guard自动释放mutex不会有问题。
这里应该用unique_lock,因为unique_lock不像lock_guard一样只能在析构时才释放锁,它可以随时释放锁,因此在wait时让unique_lock释放锁从语义上更加准确。
使用unique_lock和condition_variable_variable改写1-3-condition-sync-queue,改写为用等待一个判断式的方法来实现一个简单的队列。
范例:1-3-condition-sync-queue2
sync_queue.h
#ifndef SIMPLE_SYNC_QUEUE_H
#define SIMPLE_SYNC_QUEUE_H
#include <thread>
#include <condition_variable>
#include <mutex>
#include <list>
#include <iostream>

template<typename T>
class SimpleSyncQueue
{
public:
    SimpleSyncQueue(){}

    void Put(const T& x)
    {
        std::lock_guard<std::mutex> locker(_mutex);
        _queue.push_back(x);
        _notEmpty.notify_one();
    }

    void Take(T& x)
    {
        std::unique_lock<std::mutex> locker(_mutex);
        _notEmpty.wait(locker, [this]{return !_queue.empty(); });

        x = _queue.front();
        _queue.pop_front();
    }

    bool Empty()
    {
        std::lock_guard<std::mutex> locker(_mutex);
        return _queue.empty();
    }

    size_t Size()
    {
        std::lock_guard<std::mutex> locker(_mutex);
        return _queue.size();
    }

private:
    std::list<T> _queue;
    std::mutex _mutex;
    std::condition_variable _notEmpty;
};
#endif // SIMPLE_SYNC_QUEUE_H
main.cpp
#include <iostream>
#include "sync_queue.h"


#include <thread>
#include <iostream>
#include <mutex>
using namespace std;
SimpleSyncQueue<int> syncQueue;

void PutDatas()
{
    for (int i = 0; i < 20; ++i)
    {
        syncQueue.Put(888);
    }
}

void TakeDatas()
{
    int x = 0;

    for (int i = 0; i < 20; ++i)
    {
        syncQueue.Take(x);
        std::cout << x << std::endl;
    }
}

int main(void)
{
    std::thread t1(PutDatas);
    std::thread t2(TakeDatas);

    t1.join();
    t2.join();

     std::cout << "main finish\n";
    return 0;
}
1.4 原子变量
atomic是线程安全的。
具体参考:http://www.cplusplus.com/reference/atomic/atomic/
范例:1-4-atomic
// atomic::load/store example
#include <iostream>       // std::cout
#include <atomic>         // std::atomic, std::memory_order_relaxed
#include <thread>         // std::thread

//std::atomic<int> count = 0;//错误初始化
std::atomic<int> count(0); // 准确初始化

void set_count(int x)
{
    std::cout << "set_count:" << x << std::endl;
    count.store(x, std::memory_order_relaxed);     // set value atomically
}

void print_count()
{
    int x;
    do {
        x = count.load(std::memory_order_relaxed);  // get value atomically
    } while (x==0);
    std::cout << "count: " << x << '\n';
}

int main ()
{
    std::thread t1 (print_count);
    std::thread t2 (set_count, 10);
    t1.join();
    t2.join();
    std::cout << "main finish\n";
    return 0;
}
1.5 异步操作
首先我们先知道什么是异步:
异步是指一个任务的执行不需要等待前一个任务的完成。在异步编程中,程序不会一直等待一个操作的完成,而是可以继续执行其他任务,等待操作完成后再返回结果。异步编程可以提高程序的响应速度,避免程序一直阻塞等待任务的完成。
异步编程的应用非常广泛,例如在网络编程中,异步编程可以使用异步IO实现并发处理多个请求,从而提高服务器的性能和并发处理能力。在Web开发中,使用异步编程可以实现单页应用程序的渲染和交互,并且可以提高用户体验。
- std::future : 异步指向某个任务,然后通过future特性去获取任务函数的返回结果。
- std::aysnc: 异步运行某个任务函数
- std::packaged_task :将任务和feature绑定在一起的模板,是一种封装对任务的封装。
- std::promise

参考C++官方手册的范例。
1.5.1 std::aysnc和std::future
std::future期待一个返回,从一个异步调用的角度来说,future更像是执行函数的返回值,C++标准库使用std::future为一次性事件建模,如果一个事件需要等待特定的一次性事件,那么这线程可以获取一个future对象来代表这个事件。
异步调用往往不知道何时返回,但是如果异步调用的过程需要同步,或者说后一个异步调用需要使用前一个异步调用的结果。这个时候就要用到future。
线程可以周期性的在这个future上等待一小段时间,检查future是否已经ready,如果没有,该线程可以先去做另一个任务,一旦future就绪,该future就无法复位(无法再次使用这个future等待这个事件),所以future代表的是一次性事件。
future的类型
在库的头文件中声明了两种future,唯一future(std::future)和共享future(std::shared_future)这两个是参照。
std::unique_ptr和std::shared_ptr设立的,前者的实例是仅有的一个指向其关联事件的实例,而后者可以有多个实例指向同一个关联事件,当事件就绪时,所有指向同一事件的std::shared_future实例会变成就绪。
future的使用
std::future是一个模板,例如std::future,模板参数就是期待返回的类型,虽然future被用于线程间通信,但其本身却并不提供同步访问,热门必须通过互斥元或其他同步机制来保护访问。
future使用的时机是当你不需要立刻得到一个结果的时候,你可以开启一个线程帮你去做一项任务,并期待这个任务的返回,但是std::thread并没有提供这样的机制,这就需要用到std::async和std::future(都在头文件中声明)
std::async返回一个std::future对象,而不是给你一个确定的值(所以当你不需要立刻使用此值的时候才需要用到这个机制)。当你需要使用这个值的时候,对future使用get(),线程就会阻塞直到future就绪,然后返回该值。
//1-5-future
#include <iostream>
#include <future>
#include <thread>
using namespace std;

int find_result_to_add()
{
//    std::this_thread::sleep_for(std::chrono::seconds(2)); // 用来测试异步延迟的影响
    std::cout << "find_result_to_add" << std::endl;
    return 1 + 1;
}

int find_result_to_add2(int a, int b)
{
//    std::this_thread::sleep_for(std::chrono::seconds(5)); // 用来测试异步延迟的影响
    return a + b;
}

void do_other_things()
{
    std::cout << "do_other_things" << std::endl;
//    std::this_thread::sleep_for(std::chrono::seconds(5));
}

int main()
{
    std::future<int> result = std::async(find_result_to_add);
//    std::future<decltype (find_result_to_add())> result = std::async(find_result_to_add);
//    auto result = std::async(find_result_to_add);  // 推荐的写法
    do_other_things();
    std::cout << "result: " << result.get() << std::endl;  // 延迟是否有影响?

//    std::future<decltype (find_result_to_add2(int, int))> result2 = std::async(find_result_to_add2, 10, 20); //错误
    std::future<decltype (find_result_to_add2(0, 0))> result2 = std::async(find_result_to_add2, 10, 20);
    std::cout << "result2: " << result2.get() << std::endl;  // 延迟是否有影响?
//    std::cout << "main finish" << endl;
    return 0;
}
跟thread类似,async允许你通过将额外的参数添加到调用中,来将附加参数传递给函数。如果传入的函数指针是某个类的成员函数,则还需要将类对象指针传入(直接传入,传入指针,或者是std::ref封装)。
默认情况下,std::async是否启动一个新线程,或者在等待future时,任务是否同步运行都取决于你给的参数。这个参数为std::launch类型
- std::launch::defered表明该函数会被延迟调用,直到在future上调用get()或者wait()为止
- std::launch::async,表明函数会在自己创建的线程上运行
- std::launch::any = std::launch::defered |
- std::launch::async
- std::launch::sync = std::launch::defered
enum class launch
{
	async,deferred,sync=deferred,any=async|deferred
};
PS:默认选项参数被设置为std::launch::any。如果函数被延迟运行可能永远都不会运行。
1.5.2 std::packaged_task
如果说std::async和std::feature还是分开看的关系的话,那么std::packaged_task就是将任务和feature绑定在一起的模板,是一种封装对任务的封装。
The class template std::packaged_task wraps any Callable target (function, lambda expression,bind expression, or another function object) so that it can be invoked asynchronously. Its return value or exception thrown is stored in a shared state which can be accessed through std::future objects.
可以通过std::packaged_task对象获取任务相关联的feature,调用get_future()方法可以获得
std::packaged_task对象绑定的函数的返回值类型的future。std::packaged_task的模板参数是函数签名。
PS:例如int add(int a, intb)的函数签名就是int(int, int)
//1-5-package_task
#include <iostream>
#include <future>
using namespace std;

int add(int a, int b, int c)
{
    std::cout << "call add\n";
    return a + b + c;
}

void do_other_things()
{
    std::cout << "do_other_things" << std::endl;
}

int main()
{
    std::packaged_task<int(int, int, int)> task(add);  // 封装任务,还没有运行
    do_other_things();
    std::future<int> result = task.get_future();//这里只是获取future
    //这里才是真正运行
    task(1, 1, 2); //必须要让任务执行,否则在get()获取future的值时会一直阻塞
    std::cout << "result:" << result.get() << std::endl;
    return 0;
}
1.5.3 std::promise
std::promise提供了一种设置值的方式,它可以在这之后通过相关联的std::future对象进行读取。换种说法,之前已经说过std::future可以读取一个异步函数的返回值了,那么这个std::promise就提供一种方式手动让future就绪。
//1-5-promise
// std::promise和std::future配合,可以在线程之间传递数据。
#include <future>
#include <string>
#include <thread>
#include <iostream>
using namespace std;
void print1(std::promise<std::string>& p)
{
    std::cout << "print1 sleep" << std::endl;
    std::this_thread::sleep_for(std::chrono::seconds(1));
    p.set_value("set string");
}

void print2(std::promise<int>& p)
{
    std::cout << "print2 sleep" << std::endl;
    p.set_value(1);
}

void do_some_other_things()
{
    std::cout << "do_some_other_things" << std::endl;
}

int main()
{
    std::cout << "main1 -------------" << std::endl;
    std::promise<std::string> promise;  // 注意类型:

    std::future<std::string> result = promise.get_future();
    std::thread t(print1, std::ref(promise));
    do_some_other_things();
     std::cout << "wait get result" << std::endl;
    std::cout <<"result " << result.get() << std::endl;
    t.join();

    std::cout << "\n\nmain2 -------------" << std::endl;
    std::promise<int> promise2;

    std::future<int> result2 = promise2.get_future();
    std::thread t2(print2, std::ref(promise2));
    do_some_other_things();
    std::cout << "result2 " << result2.get() << std::endl;
    t2.join();
    return 0;
}
由此可以看出在promise创建好的时候future也已经创建好了
线程在创建promise的同时会获得一个future,然后将promise传递给设置他的线程,当前线程则持有future,以便随时检查是否可以取值。
1.5.4 总结
future的表现为期望,当前线程持有future时,期望从future获取到想要的结果和返回,可以把future当做异步函数的返回值。而promise是一个承诺,当线程创建了promise对象后,这个promise对象向线程承诺他必定会被人设置一个值,和promise相关联的future就是获取其返回的手段。
2 function和bind用法
在设计回调函数的时候,无可避免地会接触到可回调对象。在C++11中,提供了std::function和std::bind两个方法来对可回调对象进行统一和封装。
C++语言中有几种可调用对象:函数、函数指针、lambda表达式、bind创建的对象以及重载了函数调用运算符的类。
和其他对象一样,可调用对象也有类型。例如,每个lambda有它自己唯一的(未命名)类类型;函数及函数指针的类型则由其返回值类型和实参类型决定。
2.1 function的用法
- 保存普通函数
//保存普通函数 void func1(int a) { cout << a << endl; } //1. 保存普通函数 std::function<void(int a)> func; func = func1; func(2); //2 - 保存lambda表达式
std::function<void()> func_1 = [](){cout << "hello world" << endl;}; func_1(); //hello world - 保存成员函数
//保存成员函数
class A{
public:
	A(string name) : name_(name){}
	void func3(int i) const {cout <<name_ << ", " << i << endl;}
private:
	string name_;
};
//3 保存成员函数
std::function<void(const A&,int)> func3_ = &A::func3;
A a("darren");
func3_(a, 1);
完整代码:范例:2-1-function
#include <iostream>
#include <functional>
using namespace std;
//保存普通函数
void func1(int a)
{
     cout << a << endl;
}
//保存成员函数
class A{
public:
    A(string name) : name_(name){}
    void func3(int i) const {cout <<name_ << ", " << i << endl;}
private:
    string name_;
};
int main()
{
    cout << "main1 -----------------" << endl;
    //1. 保存普通函数
    std::function<void(int a)> func1_;
    func1_ = func1;
    func1_(2);   //2

     cout << "\n\nmain2 -----------------" << endl;
    //2. 保存lambda表达式
    std::function<void()> func2_ = [](){cout << "hello lambda" << endl;};
    func2_();  //hello world

    cout << "\n\nmain3 -----------------" << endl;

    //3 保存成员函数
    std::function<void(const A&,int)> func3_ = &A::func3;
    A a("darren");
    func3_(a, 1);

    return 0;
}
2.2 bind用法
可将bind函数看作是一个通用的函数适配器,它接受一个可调用对象,生成一个新的可调用对象来“适应”原对象的参数列表。
调用bind的一般形式:auto newCallable = bind(callable, arg_list);
其中,newCallable本身是一个可调用对象,arg_list是一个逗号分隔的参数列表,对应给定的callable的参数。即,当我们调用newCallable时,newCallable会调用callable,并传给它arg_list中的参数。
arg_list中的参数可能包含形如n的名字,其中n是一个整数,这些参数是“占位符”,表示newCallable的参数,它们占据了传递给newCallable的参数的“位置”。数值n表示生成的可调用对象中参数的位置:1为newCallable的第一个参数,_2为第二个参数,以此类推。
范例:2-2-bind
#include <iostream>
#include <functional>
using namespace std;
class A
{
public:
void fun_3(int k,int m)
{
cout << "fun_3 a = " << a<< endl;
cout<<"print: k="<<k<<",m="<<m<<endl;
}
int a;
};
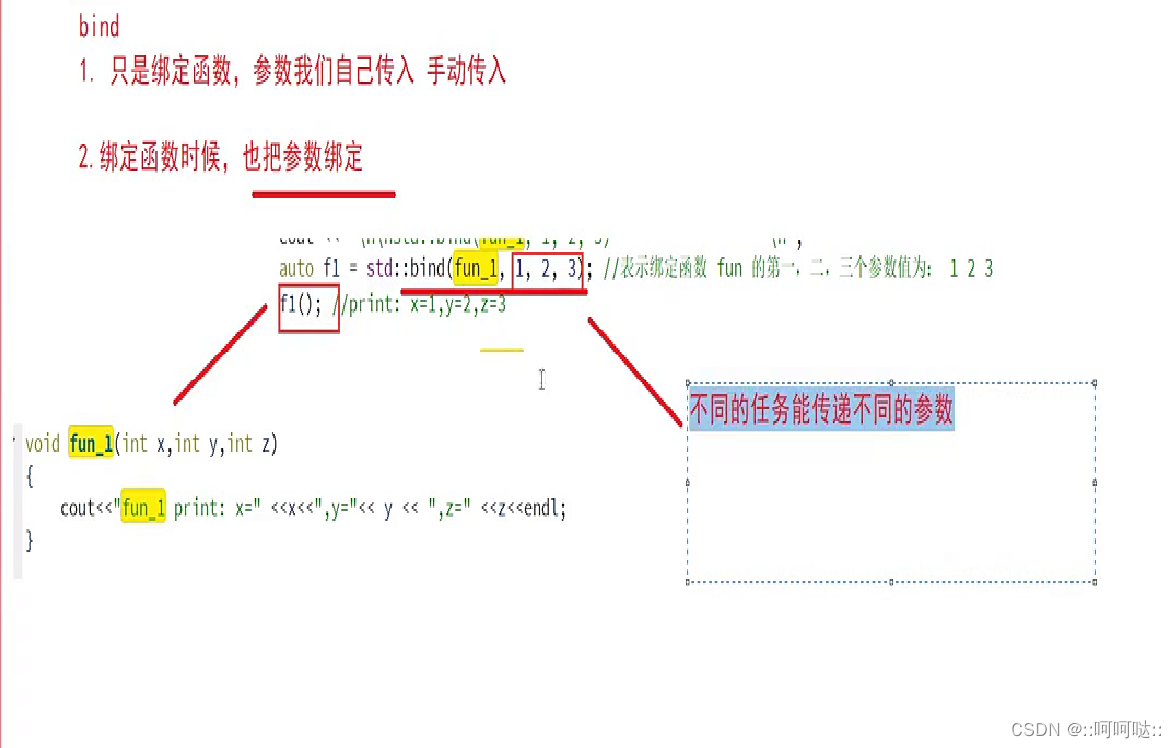
void fun_1(int x,int y,int z)
{
cout<<"print: x=" <<x<<",y="<< y << ",z=" <<z<<endl;
}
void fun_2(int &a,int &b)
{
a++;
b++;
cout<<"print: a=" <<a<<",b="<<b<<endl;
}
int main()
{
#if 1
//f1的类型为 function<void(int, int, int)>
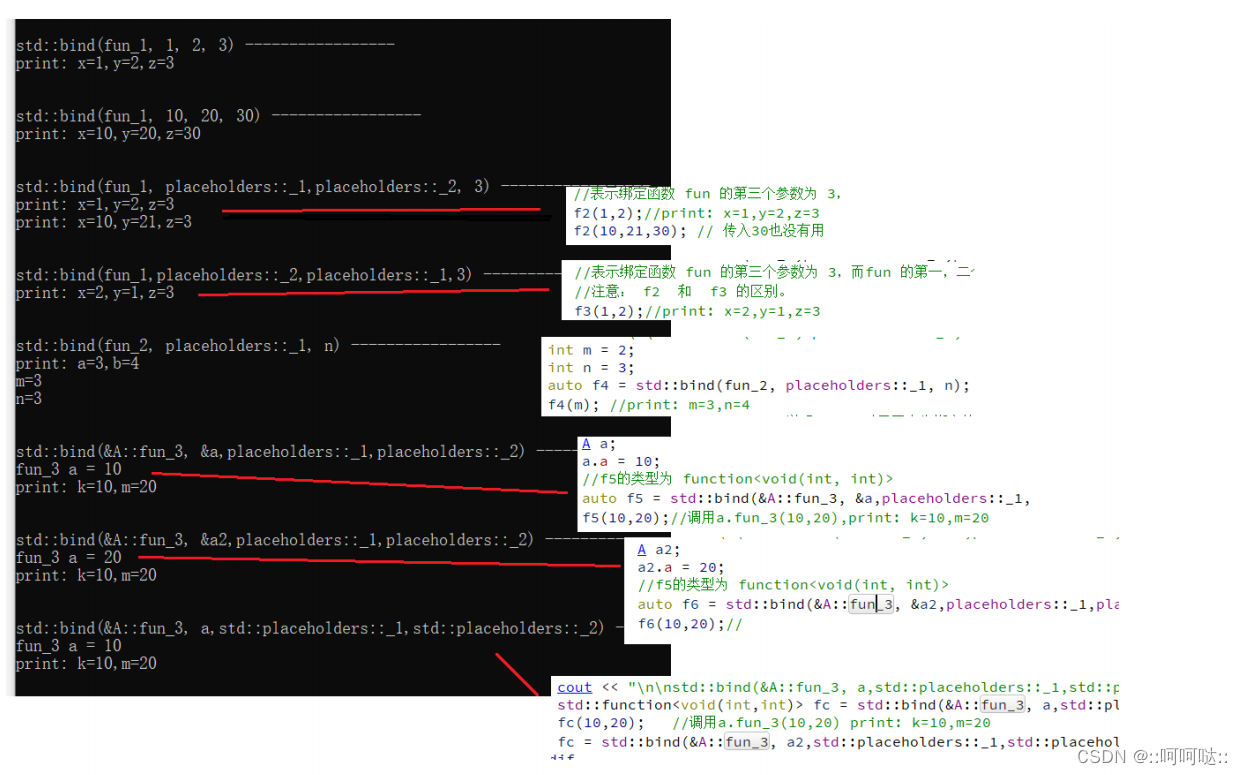
cout << "\n\nstd::bind(fun_1, 1, 2, 3) -----------------\n";
auto f1 = std::bind(fun_1, 1, 2, 3); //表示绑定函数 fun 的第一,二,三个参数值为: 1 2 3
f1(); //print: x=1,y=2,z=3
cout << "\n\nstd::bind(fun_1, 10, 20, 30) -----------------\n";
auto f11 = std::bind(fun_1, 10, 20, 30); //表示绑定函数 fun 的第一,二,三个参数值为: 1 2 3
f11();
cout << "\n\nstd::bind(fun_1, placeholders::_1,placeholders::_2, 3) -----------------\n";
auto f2 = std::bind(fun_1, placeholders::_1,placeholders::_2, 3);
//表示绑定函数 fun 的第三个参数为 3,而fun 的第一,二个参数分别由调用 f2 的第一,二个参数指定
f2(1,2);//print: x=1,y=2,z=3
f2(10,21,30); // 传入30也没有用
#endif
cout << "\n\nstd::bind(fun_1,placeholders::_2,placeholders::_1,3) -----------------\n";
auto f3 = std::bind(fun_1,placeholders::_2,placeholders::_1,3);
//表示绑定函数 fun 的第三个参数为 3,而fun 的第一,二个参数分别由调用 f3 的第二,一个参数指定
//注意: f2 和 f3 的区别。
f3(1,2);//print: x=2,y=1,z=3
cout << "\n\nstd::bind(fun_2, placeholders::_1, n) -----------------\n";
int m = 2;
int n = 3;
auto f4 = std::bind(fun_2, placeholders::_1, n); //表示绑定fun_2的第一个参数为n, fun_2的第二个参数由调用f4的第一个参数(_1)指定。
f4(m); //print: m=3,n=4
cout<<"m="<<m<<endl;//m=3 说明:bind对于不事先绑定的参数,通过std::placeholders传递的参数是通过引用传递的,如m
cout<<"n="<<n<<endl;//n=3 说明:bind对于预先绑定的函数参数是通过值传递的,如n
#if 1
cout << "\n\nstd::bind(&A::fun_3, &a,placeholders::_1,placeholders::_2) -----------------\n";
A a;
a.a = 10;
//f5的类型为 function<void(int, int)>
auto f5 = std::bind(&A::fun_3, &a,placeholders::_1,placeholders::_2); //使用auto关键字
f5(10,20);//调用a.fun_3(10,20),print: k=10,m=20
cout << "\n\nstd::bind(&A::fun_3, &a2,placeholders::_1,placeholders::_2) -----------------\n";
A a2;
a2.a = 20;
//f5的类型为 function<void(int, int)>
auto f6 = std::bind(&A::fun_3, &a2,placeholders::_1,placeholders::_2); //使用auto关键字
f6(10,20);//
cout << "\n\nstd::bind(&A::fun_3, a,std::placeholders::_1,std::placeholders::_2) -----------------\n";
std::function<void(int,int)> fc = std::bind(&A::fun_3, a,std::placeholders::_1,std::placeholders::_2);
fc(10,20); //调用a.fun_3(10,20) print: k=10,m=20
fc = std::bind(&A::fun_3, a2,std::placeholders::_1,std::placeholders::_2);
#endif
return 0;
}
3 可变模板参数
C++11的新特性–可变模版参数(variadic templates)是C++11新增的最强大的特性之一,它对参数进行了高度泛化,它能表示0到任意个数、任意类型的参数
3.1 可变模版参数的展开
可变参数模板语法
template <class... T>
void f(T... args);
上面的可变模版参数的定义当中,省略号的作用有两个:
- 声明一个参数包T… args,这个参数包中可以包含0到任意个模板参数;
- 在模板定义的右边,可以将参数包展开成一个一个独立的参数。
上面的参数args前面有省略号,所以它就是一个可变模版参数,我们把带省略号的参数称为“参数包”,它里面包含了0到N(N>=0)个模版参数。我们无法直接获取参数包args中的每个参数的,只能通过展开参数包的方式来获取参数包中的每个参数,这是使用可变模版参数的一个主要特点,也是最大的难点,即如何展开可变模版参数。可变模版参数和普通的模版参数语义是一致的,所以可以应用于函数和类,即可变模版参数函数和可变模版参数类,然而,模版函数不支持偏特化,所以可变模版参数函数和可变模版参数类展开可变模版参数的方法还不尽相同,下面我们来分别看看他们展开可变模版参数的方法。
3.1.1 可变模版参数函数
//3-1-variable-parameter 一个简单的可变模版参数函数
#include <iostream>
using namespace std;
template <class... T>
void f(T... args)
{
	cout << sizeof...(args) << endl; //打印变参的个数
}
int main()
{
	f(); //0
	f(1, 2); //2
	f(1, 2.5, ""); //3
	return 0;
}
上面的例子中,f()没有传入参数,所以参数包为空,输出的size为0,后面两次调用分别传入两个和三个参数,故输出的size分别为2和3。由于可变模版参数的类型和个数是不固定的,所以我们可以传任意类型和个数的参数给函数f。这个例子只是简单的将可变模版参数的个数打印出来,如果我们需要将参数包中的每个参数打印出来的话就需要通过一些方法了。
展开可变模版参数函数的方法一般有两种:
1. 通过递归函数来展开参数包,
2. 是通过逗号表达式来展开参数包。
下面来看看如何用这两种方法来展开参数包。
递归函数方式展开参数包
通过递归函数展开参数包,需要提供一个参数包展开的函数和一个递归终止函数,递归终止函数正是用来终止递归的。
//3-1-variable-parameter2 递归函数方式展开参数包
#include <iostream>

using namespace std;

//递归终止函数
void print()
{
   cout << "empty" << endl;
}
//template <class T>
//void print(T t)
//{
//   cout << t << endl;
//}
//展开函数
template <class T, class ...Args>
void print(T head, Args... rest)
{
   cout << "parameter " << head << endl;
   print(rest...);
}


int main(void)
{
   print(1,2,3,"darren", "youzi");
   return 0;
}

//template<typename T>
//T sum(T t)
//{
//    return t;
//}
//template<typename T, typename ... Types>
//T sum (T first, Types ... rest)
//{
//    return first + sum<T>(rest...);
//}
//sum(1,2,3,4); //10
上例会输出每一个参数,直到为空时输出empty。展开参数包的函数有两个,一个是递归函数,另外一个是递归终止函数,参数包Args...在展开的过程中递归调用自己,每调用一次参数包中的参数就会少一个,直到所有的参数都展开为止,当没有参数时,则调用非模板函数print终止递归过程。上面的递归终止函数还可以写成这样:
template <class T>
void print(T t)
{
	cout << t << endl;
}
逗号表达式展开参数包
递归函数展开参数包是一种标准做法,也比较好理解,但也有一个缺点,就是必须要一个重载的递归终止函数,即必须要有一个同名的终止函数来终止递归,这样可能会感觉稍有不便。有没有一种更简单的方式呢?其实还有一种方法可以不通过递归方式来展开参数包,这种方式需要借助逗号表达式和初始化列表。比如前面print的例子可以改成这样:
//3-1-variable-parameter3 逗号表达式展开参数包
#include <iostream>

using namespace std;

template <class T>
void printarg(T t)
{
    cout << t << endl;
}

template <class ...Args>
void expand(Args... args)
{
    int arr[] = {(printarg(args), 0)...};
}

int main()
{
    expand(1,2,3,4);
    return 0;
}
这个例子将分别打印出1,2,3,4四个数字。这种展开参数包的方式,不需要通过递归终止函数,是直接在expand函数体中展开的, printarg不是一个递归终止函数,只是一个处理参数包中每一个参数的函数。
expand函数中的逗号表达式:(printarg(args), 0),先执行printarg(args),再得到逗号表达式的结果0。同时还用到了C++11的另外一个特性——初始化列表,通过初始化列表来初始化一个变长数组,{(printarg(args), 0)...}将会展开成((printarg(arg1),0), (printarg(arg2),0),(printarg(arg3),0), etc... ),最终会创建一个元素值都为0的数组int arr[sizeof...(Args)]。由于是逗号表达式,在创建数组的过程中会先执行逗号表达式前面的部分printarg(args)打印出参数,也就是说在构造int数组的过程中就将参数包展开了,这个数组的目的纯粹是为了在数组构造的过程展开参数包。我们可以把上面的例子再进一步改进一下,将函数作为参数,就可以支持lambda表达式了,从而可以少写一个递归终止函数了,具体代码如
下:
//3-1-variable-parameter4
#include <iostream>

using namespace std;
template<class F, class... Args>void expand(const F& f, Args&&...args)
{
  //这里用到了完美转发
  initializer_list<int>{(f(std::forward< Args>(args)),0)...};
}
int main()
{
    expand([](int i){cout<<i<<endl;}, 1,2,3);
    return 0;
}
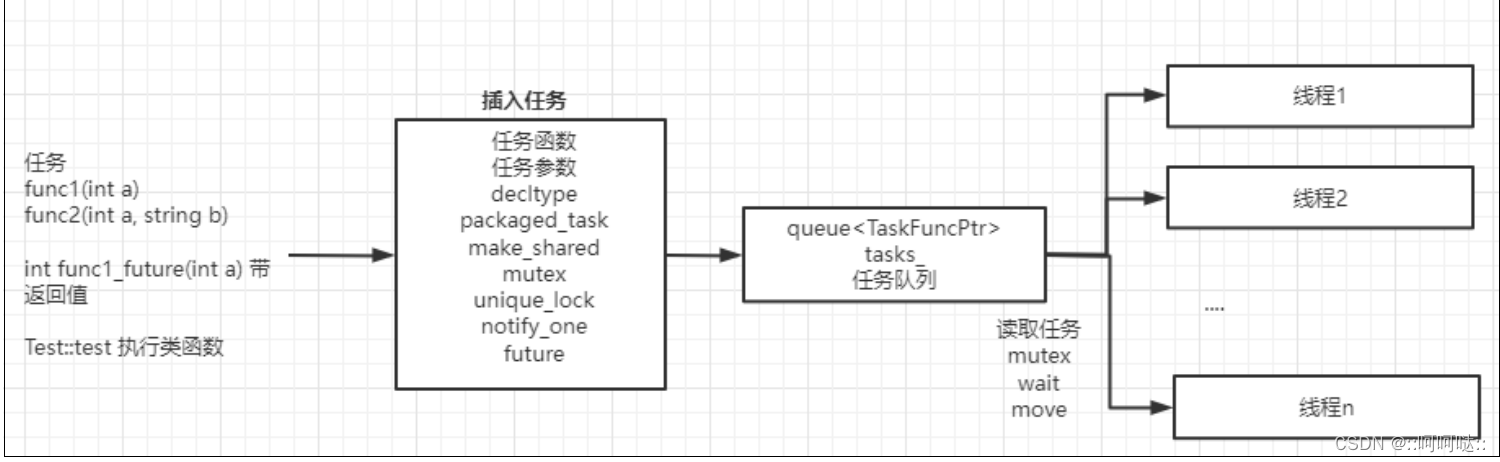
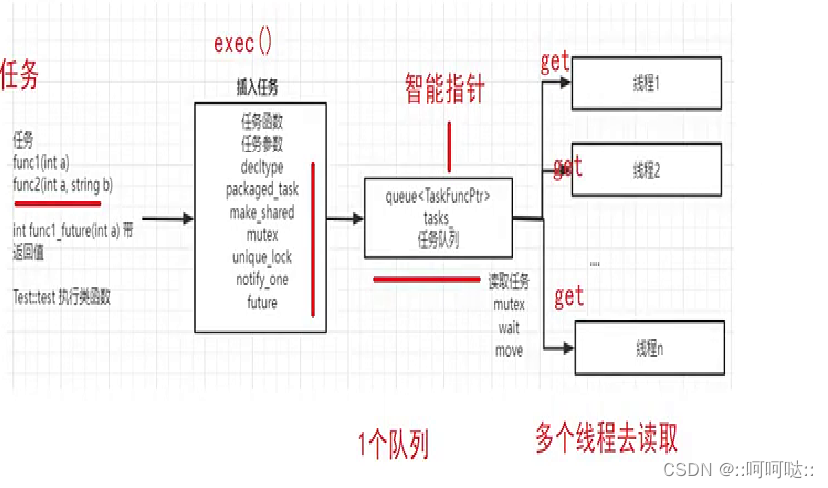
4 实现C++线程池
zero_threadpool.h
//zero_threadpool.h
#ifndef ZERO_THREADPOOL_H
#define ZERO_THREADPOOL_H
#include <future>
#include <functional>
#include <iostream>
#include <queue>
#include <mutex>
#include <memory>
#ifdef WIN32
#include <windows.h>
#else
#include <sys/time.h>
#endif
using namespace std;
void getNow(timeval *tv);
int64_t getNowMs();
#define TNOW getNow()
#define TNOWMS getNowMs()
/
/**
* @file zero_thread_pool.h
* @brief 线程池类,采用c++11来实现了,
* 使用说明:
* ZERO_ThreadPool tpool;
* tpool.init(5); //初始化线程池线程数
* //启动线程方式
* tpool.start();
* //将任务丢到线程池中
* tpool.exec(testFunction, 10); //参数和start相同
* //等待线程池结束
* tpool.waitForAllDone(1000); //参数<0时, 表示无限等待(注意有人调用stop也会推出)
* //此时: 外部需要结束线程池是调用
* tpool.stop();
* 注意:
* ZERO_ThreadPool::exec执行任务返回的是个future, 因此可以通过future异步获取结果, 比如:
* int testInt(int i)
* {
* return i;
* }
* auto f = tpool.exec(testInt, 5);
* cout << f.get() << endl; //当testInt在线程池中执行后, f.get()会返回数值5
*
* class Test
* {
* public:
* int test(int i);
* };
* Test t;
* auto f = tpool.exec(std::bind(&Test::test, &t, std::placeholders::_1), 10);
* //返回的future对象, 可以检查是否执行
* cout << f.get() << endl;
*/
class ZERO_ThreadPool
{
protected:
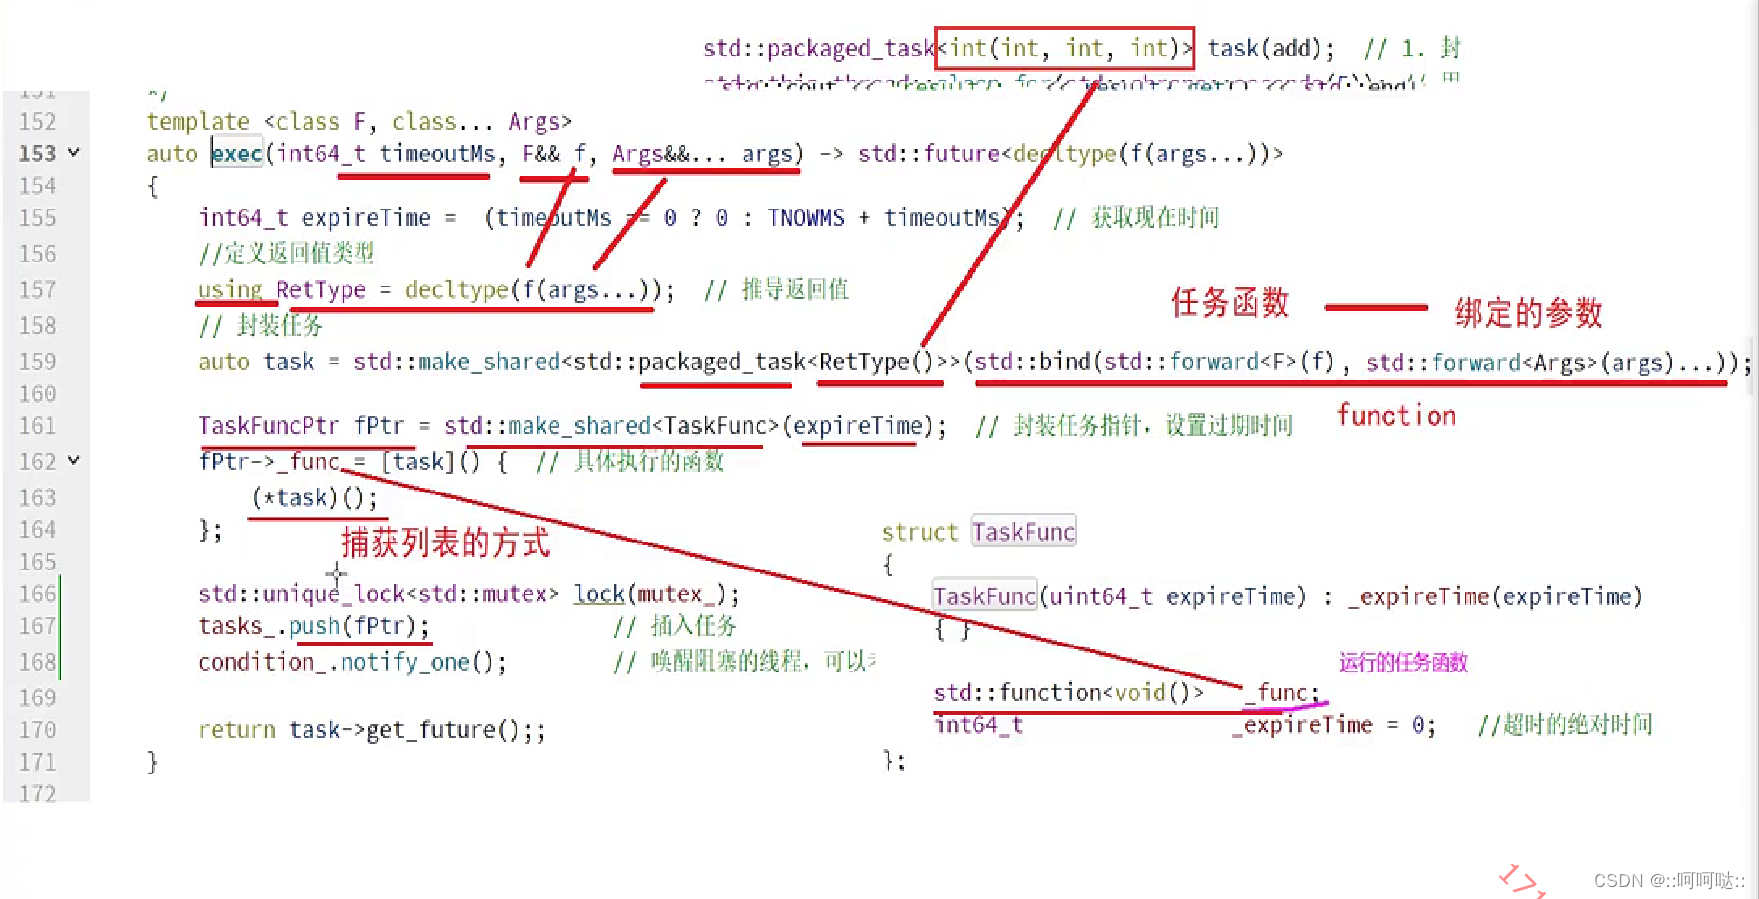
struct TaskFunc
{
TaskFunc(uint64_t expireTime) : _expireTime(expireTime)
{ }
std::function<void()> _func;
int64_t _expireTime = 0; //超时的绝对时间
};
typedef shared_ptr<TaskFunc> TaskFuncPtr;
public:
/**
* @brief 构造函数
*
*/
ZERO_ThreadPool();
/**
* @brief 析构, 会停止所有线程
*/
virtual ~ZERO_ThreadPool();
/**
* @brief 初始化.
*
* @param num 工作线程个数
*/
bool init(size_t num);
/**
* @brief 获取线程个数.
*
* @return size_t 线程个数
*/
size_t getThreadNum()
{
std::unique_lock<std::mutex> lock(mutex_);
return threads_.size();
}
/**
* @brief 获取当前线程池的任务数
*
* @return size_t 线程池的任务数
*/
size_t getJobNum()
{
std::unique_lock<std::mutex> lock(mutex_);
return tasks_.size();
}
/**
* @brief 停止所有线程, 会等待所有线程结束
*/
void stop();
/**
* @brief 启动所有线程
*/
bool start(); // 创建线程
/**
* @brief 用线程池启用任务(F是function, Args是参数)
*
* @param ParentFunctor
* @param tf
* @return 返回任务的future对象, 可以通过这个对象来获取返回值
*/
template <class F, class... Args>
auto exec(F&& f, Args&&... args) -> std::future<decltype(f(args...))>
{
return exec(0,f,args...);
}
/**
* @brief 用线程池启用任务(F是function, Args是参数)
*
* @param 超时时间 ,单位ms (为0时不做超时控制) ;若任务超时,此任务将被丢弃
* @param bind function
* @return 返回任务的future对象, 可以通过这个对象来获取返回值
*/
/*
template <class F, class... Args>
它是c++里新增的最强大的特性之一,它对参数进行了高度泛化,它能表示0到任意个数、任意类型的参数
auto exec(F &&f, Args &&... args) -> std::future<decltype(f(args...))>
std::future<decltype(f(args...))>:返回future,调用者可以通过future获取返回值
返回值后置
*/
template <class F, class... Args>
auto exec(int64_t timeoutMs, F&& f, Args&&... args) -> std::future<decltype(f(args...))>
{
int64_t expireTime = (timeoutMs == 0 ? 0 : TNOWMS + timeoutMs); // 获取现在时间
//定义返回值类型
using RetType = decltype(f(args...)); // 推导返回值
// 封装任务
auto task = std::make_shared<std::packaged_task<RetType()>>(std::bind(std::forward<F>(f), std::forward<Args>(args)...));
TaskFuncPtr fPtr = std::make_shared<TaskFunc>(expireTime); // 封装任务指针,设置过期时间
fPtr->_func = [task]() { // 具体执行的函数
(*task)();
};
std::unique_lock<std::mutex> lock(mutex_);
tasks_.push(fPtr); // 插入任务
condition_.notify_one(); // 唤醒阻塞的线程,可以考虑只有任务队列为空的情况再去notify
return task->get_future();;
}
/**
* @brief 等待当前任务队列中, 所有工作全部结束(队列无任务).
*
* @param millsecond 等待的时间(ms), -1:永远等待
* @return true, 所有工作都处理完毕
* false,超时退出
*/
bool waitForAllDone(int millsecond = -1);
protected:
/**
* @brief 获取任务
*
* @return TaskFuncPtr
*/
bool get(TaskFuncPtr&task);
/**
* @brief 线程池是否退出
*/
bool isTerminate() { return bTerminate_; }
/**
* @brief 线程运行态
*/
void run();
protected:
/**
* 任务队列
*/
queue<TaskFuncPtr> tasks_;
/**
* 工作线程
*/
std::vector<std::thread*> threads_;
std::mutex mutex_;
std::condition_variable condition_;
size_t threadNum_;
bool bTerminate_;
std::atomic<int> atomic_{ 0 };
};
#endif // ZERO_THREADPOOL_H
zero_threadpool.cpp
#include "zero_threadpool.h"

ZERO_ThreadPool::ZERO_ThreadPool()
    :  threadNum_(1), bTerminate_(false)
{
}

ZERO_ThreadPool::~ZERO_ThreadPool()
{
    stop();
}

bool ZERO_ThreadPool::init(size_t num)
{
    std::unique_lock<std::mutex> lock(mutex_);

    if (!threads_.empty())
    {
        return false;
    }

    threadNum_ = num;
    return true;
}

void ZERO_ThreadPool::stop()
{
    {
        std::unique_lock<std::mutex> lock(mutex_);

        bTerminate_ = true;

        condition_.notify_all();
    }

    for (size_t i = 0; i < threads_.size(); i++)
    {
        if(threads_[i]->joinable())
        {
            threads_[i]->join();
        }
        delete threads_[i];
        threads_[i] = NULL;
    }

    std::unique_lock<std::mutex> lock(mutex_);
    threads_.clear();
}

bool ZERO_ThreadPool::start()
{
    std::unique_lock<std::mutex> lock(mutex_);

    if (!threads_.empty())
    {
        return false;
    }

    for (size_t i = 0; i < threadNum_; i++)
    {
        threads_.push_back(new thread(&ZERO_ThreadPool::run, this));
    }
    return true;
}

bool ZERO_ThreadPool::get(TaskFuncPtr& task)
{
    std::unique_lock<std::mutex> lock(mutex_);

    if (tasks_.empty())
    {
        condition_.wait(lock, [this] { return bTerminate_//要终止线程池bTerminate_设置为true,外部notify后
                                || !tasks_.empty();//任务队列不为空
                            });//notify->1.退出线程池 2.任务队列不为空
    }

    if (bTerminate_)
        return false;

    if (!tasks_.empty())
    {
        task = std::move(tasks_.front());  // 使用了移动语义

        tasks_.pop();

        return true;
    }

    return false;
}

void ZERO_ThreadPool::run()  // 执行任务的线程
{
    //调用处理部分
    while (!isTerminate()) // 判断是不是要停止
    {
        TaskFuncPtr task;
        bool ok = get(task);        // 1. 读取任务
        if (ok)
        {
            ++atomic_;
            try
            {
                if (task->_expireTime != 0 && task->_expireTime  < TNOWMS )
                {
                    //超时任务,是否需要处理?
                }
                else
                {
                    task->_func();  // 2. 执行任务
                }
            }
            catch (...)
            {
            }

            --atomic_;

            //任务都执行完毕了
            std::unique_lock<std::mutex> lock(mutex_);
            if (atomic_ == 0 && tasks_.empty())//3.检测是否所有任务都运行完毕
            {
                condition_.notify_all();  // 这里只是为了通知waitForAllDone
            }
        }
    }
}

bool ZERO_ThreadPool::waitForAllDone(int millsecond)
{
    std::unique_lock<std::mutex> lock(mutex_);

    if (tasks_.empty())
        return true;

    if (millsecond < 0)
    {
        condition_.wait(lock, [this] { return tasks_.empty(); });
        return true;
    }
    else
    {
        return condition_.wait_for(lock, std::chrono::milliseconds(millsecond), [this] { return tasks_.empty(); });
    }
}


int gettimeofday(struct timeval &tv)
{
#if WIN32
    time_t clock;
    struct tm tm;
    SYSTEMTIME wtm;
    GetLocalTime(&wtm);
    tm.tm_year   = wtm.wYear - 1900;
    tm.tm_mon   = wtm.wMonth - 1;
    tm.tm_mday   = wtm.wDay;
    tm.tm_hour   = wtm.wHour;
    tm.tm_min   = wtm.wMinute;
    tm.tm_sec   = wtm.wSecond;
    tm. tm_isdst  = -1;
    clock = mktime(&tm);
    tv.tv_sec = clock;
    tv.tv_usec = wtm.wMilliseconds * 1000;

    return 0;
#else
    return ::gettimeofday(&tv, 0);
#endif
}

void getNow(timeval *tv)
{
#if TARGET_PLATFORM_IOS || TARGET_PLATFORM_LINUX

    int idx = _buf_idx;
    *tv = _t[idx];
    if(fabs(_cpu_cycle - 0) < 0.0001 && _use_tsc)
    {
        addTimeOffset(*tv, idx);
    }
    else
    {
        TC_Common::gettimeofday(*tv);
    }
#else
    gettimeofday(*tv);
#endif
}

int64_t getNowMs()
{
    struct timeval tv;
    getNow(&tv);

    return tv.tv_sec * (int64_t)1000 + tv.tv_usec / 1000;
}
main.cpp
#include <iostream>
#include <zero_threadpool.h>
using namespace std;

void func0()
{
    cout << "func0()" << endl;
}

void func1(int a)
{
    cout << "func1() a=" << a << endl;
}

void func2(int a, string b)
{
    cout << "func2() a=" << a << ", b=" << b<< endl;
}


void test1() // 简单测试线程池
{
    ZERO_ThreadPool threadpool;//封装一个线程池
    threadpool.init(1);//设置线程数量
    threadpool.start(); // 启动线程池,创建线程,线程没有start,创建完毕被调度。
    // 假如要执行的任务
    threadpool.exec(1000,func0);//1000是超时1000的意思。
    threadpool.exec(func1, 10);//插入任务
    threadpool.exec(func2, 20, "darren");//插入任务
    threadpool.waitForAllDone();//等待都执行完退出运行函数插入1000个任务,等1000个任务执行完毕才退出
    threadpool.stop(); //这里才是真正的退出
}

int func1_future(int a)
{
    cout << "func1() a=" << a << endl;
    return a;
}

string func2_future(int a, string b)
{
    cout << "func1() a=" << a << ", b=" << b<< endl;
    return b;
}

void test2() // 测试任务函数返回值
{
    ZERO_ThreadPool threadpool;
    threadpool.init(1);
    threadpool.start(); // 启动线程池
    // 假如要执行的任务
    std::future<decltype (func1_future(0))> result1 = threadpool.exec(func1_future, 10);
    std::future<string> result2 = threadpool.exec(func2_future, 20, "darren");
//  auto result2 = threadpool.exec(func2_future, 20, "darren");

    std::cout << "result1: " << result1.get() << std::endl;
    std::cout << "result2: " << result2.get() << std::endl;
    threadpool.waitForAllDone();
    threadpool.stop();
}

class Test
{
public:
    int test(int i){
        cout << _name << ", i = " << i << endl;
        return i;
    }
    void setName(string name){
        _name = name;
    }
    string _name;
};

void test3() // 测试类对象函数的绑定
{
    ZERO_ThreadPool threadpool;
    threadpool.init(1);
    threadpool.start(); // 启动线程池
    Test t1;
    Test t2;
    t1.setName("Test1");
    t2.setName("Test2");
    auto f1 = threadpool.exec(std::bind(&Test::test, &t1, std::placeholders::_1), 10);
    auto f2 = threadpool.exec(std::bind(&Test::test, &t2, std::placeholders::_1), 20);
    threadpool.waitForAllDone();
    cout << "t1 " << f1.get() << endl;
    cout << "t2 " << f2.get() << endl;
}
int main()
{
//    test1(); // 简单测试线程池
//    test2(); // 测试任务函数返回值
    test3(); // 测试类对象函数的绑定
    cout << "main finish!" << endl;
    return 0;
}
这里比较重要:
线程重载函数:
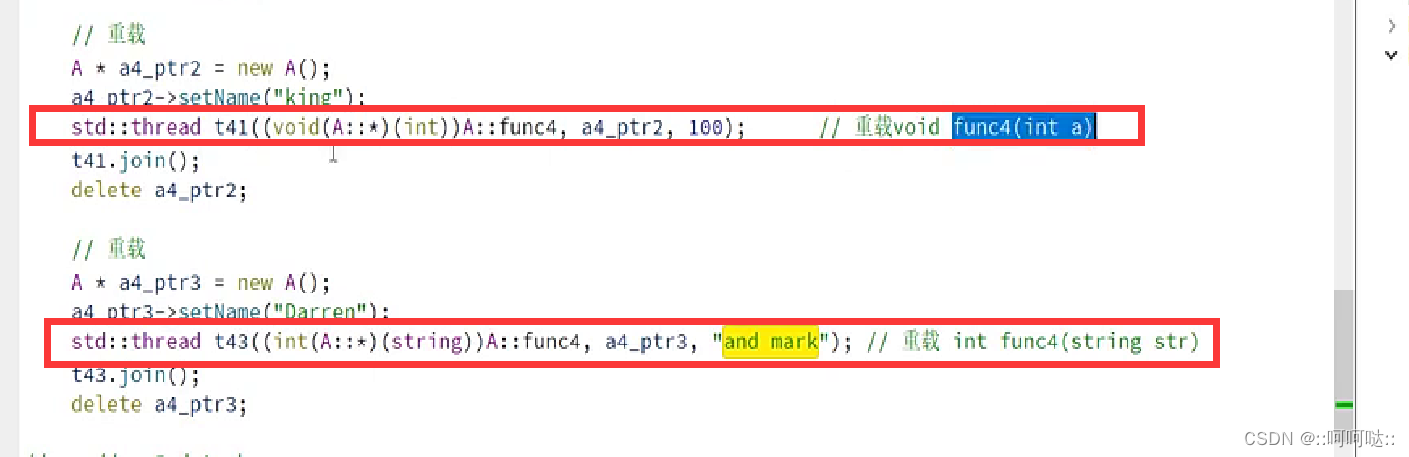

5 异常处理
5.1 异常处理基本语法
C++的提供的关于异常的三个关键字: try{ throw } catch{ }
#include <stdexcept>
#include <limits>
#include <iostream>

using namespace std;

void MyFunc(int c)
{
    if (c > numeric_limits< char> ::max())
        throw invalid_argument("throw MyFunc argument too large.");
    //...
}

int main()
{
//    try
    {
        MyFunc(256); //cause an exception to throw
    }
//    catch (invalid_argument& e)
//    {
//        cerr << "catch " << e.what() << endl;
//        return -1;
//    }
    //...
    cout << "end\n";
    return 0;
}
try 在块中,如果引发异常,则它将被其类型与异常匹配的第一个关联 catch 块捕获。 换言之,执行从 throw 语句跳转到 catch 语句。 如果未找到可用的 catch 块, std::terminate 则将调用并退出程序。 在 c + + 中,可能会引发任何类型;但是,我们建议你引发直接或间接从 std::exception 派生的类型。 在上面的示例中,异常类型invalid_argument 在标头文件的标准库 中定义。
语法比较简单:throw(抛出)一个数据,然后再用catch(捕获)接收。throw的数据类型可以是任意的,所以当然也可以是一个对象
struct Test
{
	Test(const char* s, int i, double d)
		: s(s)
		, i(i)
		, d(d) {};
	const char* s;
	int i;
	double d;
	void print() const
	{
		printf("%s %d %.2f\n", s, i, d);
	}
};
int main()
{
	try
	{
		throw Test("LLF", 520, 13.14);
	}
	catch (const Test& e)
	{
		e.print();
	}
}
5.2 基本指导原则
强大的错误处理对于任何编程语言都很有挑战性。 尽管异常提供了多个支持良好错误处理的功能,但它们无法为你完成所有工作。 若要实现异常机制的优点,请在设计代码时记住异常。
- 使用断言来检查绝不应发生的错误。 使用异常来检查可能出现的错误,例如,公共函数参数的输入验证中的错误。 有关详细信息,请参阅 异常与断言 部分。
- 当处理错误的代码与通过一个或多个干预函数调用检测到错误的代码分离时,使用异常。 当处理错误的代码与检测到错误的代码紧密耦合时,考虑是否使用错误代码而不是在性能关键循环中。
- 对于可能引发或传播异常的每个函数,请提供以下三种异常保证之一:强保障、基本保证或
nothrow (noexcept) 保证。 有关详细信息,请参阅 如何:设计异常安全性。 - 按值引发异常,按引用来捕获异常。 不要捕获无法处理的内容。
- 不要使用 c + + 11 中已弃用的异常规范。 有关详细信息,请参阅异常规范和 noexcept 部分。
- 应用时使用标准库异常类型。 从 exception 类层次结构派生自定义异常类型。
- 不允许对析构函数或内存释放函数进行转义
Exception 类
对上面代码的分析,可以看到,发生异常时抛出一个对象而不是一个简单的数据类型,可以传递更多的错误信息,但是这样的话,我们需要针对不同的异常情况定义不同的类。有没有统一的解决方法?
C++给出来了一个标准的异常类Exception。
看一下定义:
/**
* @brief Base class for all library exceptions.
*
* This is the base class for all exceptions thrown by the standard
* library, and by certain language expressions. You are free to derive
* your own %exception classes, or use a different hierarchy, or to
* throw non-class data (e.g., fundamental types).
*/
class exception
{
public:
	exception() noexcept { }
	virtual ~exception() noexcept;
	exception(const exception&) = default;
	exception& operator=(const exception&) = default;
	exception(exception&&) = default;
	exception& operator=(exception&&) = default;
	/** Returns a C-style character string describing the general cause
	* of the current error. */
	virtual const char* what() const noexcept;
};
主要就是定义了一个what的虚函数,返回C_style的字符串,主要作用就是描述发生一场的原因。在使用的时候,往往需要自定义一个异常类:
#include<exception>
#include<iostream>
using namespace std;

class MyException:public exception{
   public:
      const char* what()const throw(){ //throw () 表示不允许任何异常产生
           return "ERROR! Don't divide a number by integer zero.\n";
      }
};
void check(int y) throw(MyException){ //throw (MyException)表示只允许myException的异常发生
    if(y==0) throw MyException();
}

int main()
{
   int x=100,y=0;
   try{
       check(y);
       cout<<x/y;
   }catch(MyException& me){
       cout<<me.what();
       cout << "finish exception\n";
       return -1;
   }
   cout << "finish ok\n";
   return 0;
}
5.4 标准异常扩展
C++定义了一些标准的异常,用于各种场景,他们都是继承自std::exception的:
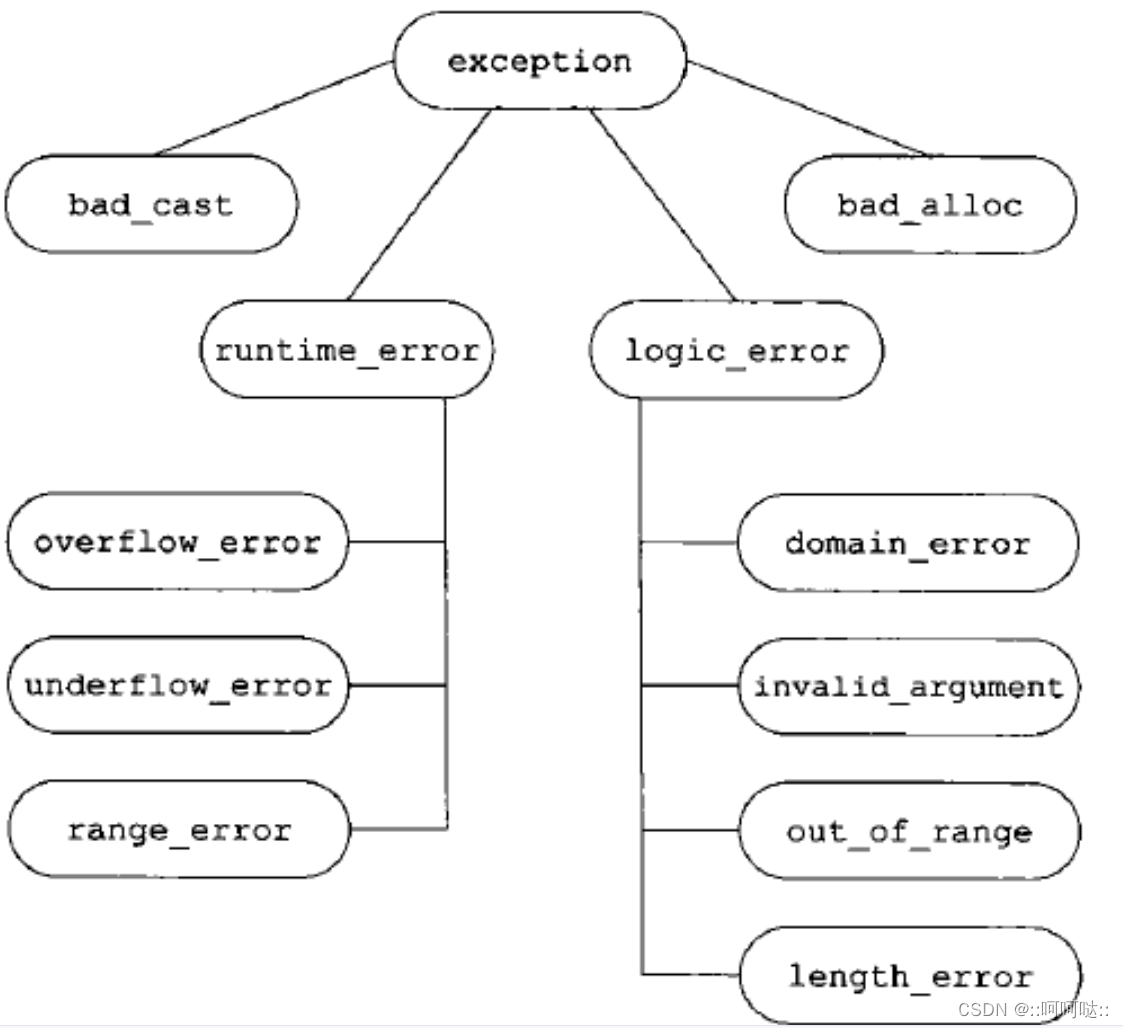
下表是对上面层次结构中出现的每个异常的说明:
| 异常 | 描述 |
|---|---|
| std::exception | 该异常是所有标准 C++ 异常的父类。 |
| std::bad_alloc | 该异常可以通过 new 抛出。 |
| std::bad_cast | 该异常可以通过 dynamic_cast 抛出。 |
| std::bad_exception | 这在处理 C++ 程序中无法预期的异常时非常有用。 |
| std::bad_typeid | 该异常可以通过 typeid 抛出。 |
| std::logic_error | 理论上可以通过读取代码来检测到的异常。 |
| std::domain_error | 当使用了一个无效的数学域时,会抛出该异常。 |
| std::invalid_argument | 当使用了无效的参数时,会抛出该异常。 |
| std::length_error | 当创建了太长的 std::string 时,会抛出该异常。 |
| std::out_of_range | 该异常可以通过方法抛出,例如 std::vector 和std::bitset<>::operator。 |
| std::runtime_error | 理论上不可以通过读取代码来检测到的异常。 |
| std::overflow_error | 当发生数学上溢时,会抛出该异常。 |
| std::range_error | 当尝试存储超出范围的值时,会抛出该异常。 |
| std::underflow_error | 当发生数学下溢时,会抛出该异常。 |
5.5 std::exception_ptr
根据官方文档的介绍 std::exception_ptr是一个指向 exception object 的共享智能指针。
关键在于理解 “exception object” 是什么,是std::exception类的对象吗?这种理解是不准的,按我的理解,所谓“exception object” 应该是被throw抛出的对象,根据我们上面的学习,塔既可以是int、double等简单的数据类型、也可以是自定义的类对象,当然也可以是std::exception类对象。
有四个操作std::exception_ptr的函数:
- current_exception
- make_exception_ptr
- nested_exception::nested_ptr
- rethrow_exception
前两个用于生成一个std::exception_ptr,最后一个用于将exception_ptr指向的异常对象重新抛出(重新这个词语是相对于current_exception而言的)。直接看官方的代码:
//5-5-exception_ptr  exception_ptr example
#include <iostream>       // std::cout
#include <exception>      // std::exception_ptr, std::current_exception, std::rethrow_exception
#include <stdexcept>      // std::logic_error

int main ()
{
  std::exception_ptr p;
  try {
     throw std::logic_error("some logic_error exception");   // throws
  } catch(const std::exception& e) {
     p = std::current_exception();
     std::cout << "exception caught, but continuing...\n";
  }

  std::cout << "(after exception)\n";

  try {
     std::rethrow_exception (p);
  } catch (const std::exception& e) {
     std::cout << "exception caught: " << e.what() << '\n';
  }
  return 0;
}
- 首先定义了一个 std::exception_ptr变量p
- 然后在第一个try中,抛出了一个标准异常(见上)
- 在第一个catch中,调用 current_exception() ,
- 这样就让p指向了捕获的异常对象
- 然后在第二个try中,调用 rethrow_exception ,将异常重新抛出
- 然后在第二个catch中,依然正常的捕获到了这个异常对象
// 5-5-make_exception_ptr make_exception_ptr example
#include <iostream>       // std::cout
#include <exception>      // std::make_exception_ptr, std::rethrow_exception
#include <stdexcept>      // std::logic_error

int main ()
{
  auto p = std::make_exception_ptr(std::logic_error("logic_error"));

  try {
     std::rethrow_exception (p);  // 重新抛出异常
  } catch (const std::exception& e) {
     std::cout << "exception caught: " << e.what() << '\n'; // 捕获异常
  }
  return 0;
}
- 首先创建了一个异常make_exception_ptr
- 然后再try中抛出该异常
- 接着在catch捕获抛出的异常。
嵌套异常:nested_exception::nested_ptr
//5-5-nested_exception  nested_exception example
#include <iostream>       // std::cerr
#include <exception>      // std::exception, std::throw_with_nested, std::rethrow_if_nested
#include <stdexcept>      // std::logic_error

// recursively print exception whats:
void print_what (const std::exception& e)
{
    std::cout << __FUNCTION__ << ", L"<< __LINE__ << ", what:" << e.what() << '\n';
    try {
        std::rethrow_if_nested(e);
    } catch (const std::exception& nested) {
        std::cerr << "nested: ";
        print_what(nested);
    }
}

// throws an exception nested in another:
void throw_nested()
{
    try {
        throw std::logic_error ("first");
    } catch (const std::exception& e) {
        std::throw_with_nested(std::logic_error("second"));
    }
}

int main ()
{
    try {
        std::cout << __FUNCTION__ << ", L"<< __LINE__ << std::endl;
        throw_nested();
    } catch (std::exception& e) {
        std::cout << __FUNCTION__ << ", L"<< __LINE__ << std::endl;
        print_what(e);
    }

    return 0;
}


 1486
1486


 被折叠的 条评论
为什么被折叠?
被折叠的 条评论
为什么被折叠?
 到【灌水乐园】发言


