


分布式事务 seata+nacos 部署
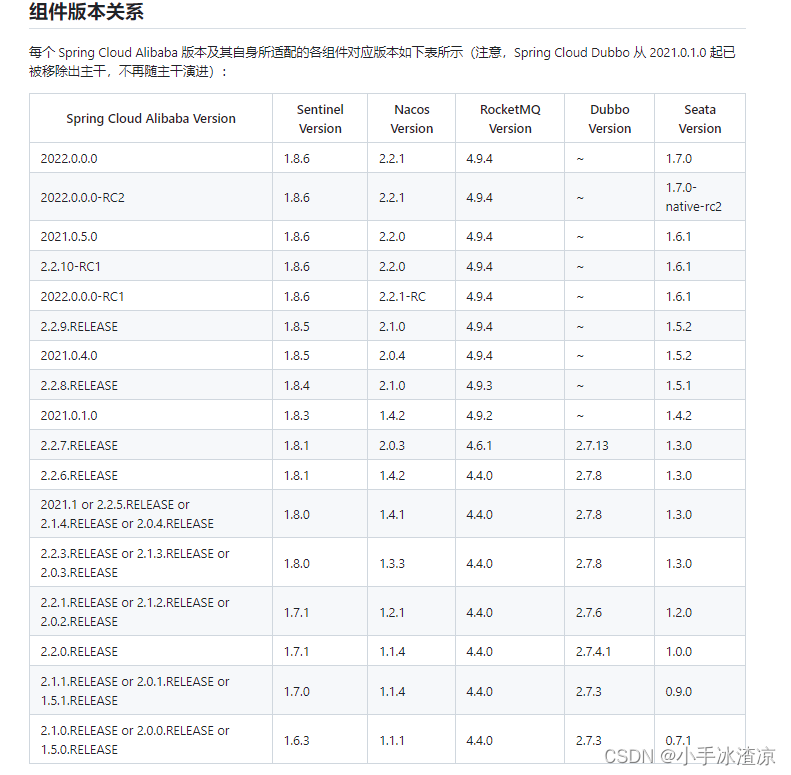
这里使用的版本:
nacos:2.0.4
seata:1.5.2
seata官方地址:https://seata.apache.org/zh-cn/blog/seata-nacos-analysis
官方1.5版本:https://seata.apache.org/zh-cn/docs/v1.5/overview/what-is-seata
官方新人文档:https://seata.apache.org/zh-cn/docs/v1.5/ops/deploy-guide-beginner
若依配置文档:https://doc.ruoyi.vip/ruoyi-cloud/cloud/seata.html#集成nacos配置中心
在写一个文章怪麻烦的,直接在这里写了,这里的测试就直接使用若依的微服务框架:https://gitee.com/y_project/RuoYi-Cloud
一、下载seata
seata官网:https://seata.apache.org/zh-cn/
github下载地址:https://github.com/apache/incubator-seata/releases
根据相应的项目版本进行下载
我这里使用的是nacos2.0.4
下载了seata1.5.2
官网下载:https://github.com/apache/incubator-seata/releases/download/v1.5.2/seata-server-1.5.2.zip
github下载:https://github.com/apache/incubator-seata/releases/download/v1.5.2/seata-server-1.5.2.zip
二、解压配置
这里就以我下载的seata-server-1.5.2.zip为例
1、解压完成后进入conf目录
2、修改application.yml配置文件(如果没有该文件可以修改application.example.yml文件为applicatio.yml或直接新建文件复制下面代码)
seata支持注册和配置方式:nacos, eureka, redis, zk, consul, etcd3, sofa,我们这里使用nacos
注:根据官方文档说明,从v1.4.2版本开始,已支持从一个Nacos dataId中获取所有配置信息,你只需要额外添加一个dataId配置项,当然支持不代表一定要使用
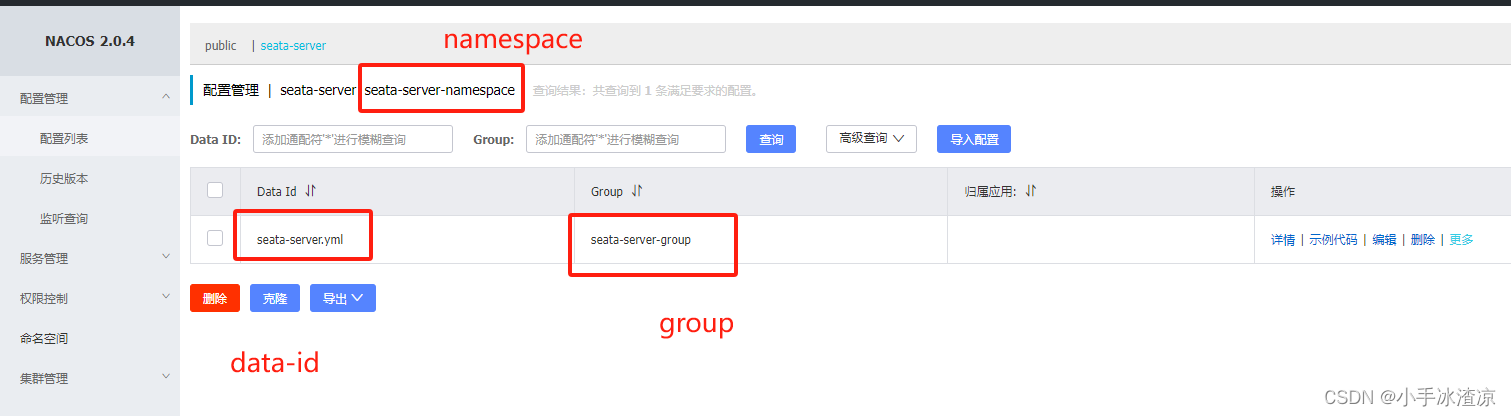
namespace不写默认使用public
这个图片是之前测试的
我这里直接使用若依的配置

server:
  port: 7091

spring:
  application:
    name: seata-server

logging:
  config: classpath:logback-spring.xml
  file:
    path: ${user.home}/logs/seata
  extend:
    logstash-appender:
      destination: 127.0.0.1:4560
    kafka-appender:
      bootstrap-servers: 127.0.0.1:9092
      topic: logback_to_logstash

# 控制台通过127.0.0.1:7091访问登录
console:
  user:
    username: seata
    password: seata

seata:
  # seata 接入 nacos 配置中心
  config:
    # support: nacos, consul, apollo, zk, etcd3
    type: nacos
    nacos:
      server-addr: 127.0.0.1:8848
      namespace: # 命名空间ID,换成自己的
      group: DEFAULT_GROUP # 组名,换成自己的
      username: nacos
      password: nacos
      data-id: seataServer.properties
  # seata 接入 nacos 注册中心
  registry:
    # support: nacos, eureka, redis, zk, consul, etcd3, sofa
    type:  nacos
    nacos:
      application: seata-server #在nacos显示的注册名
      server-addr: 127.0.0.1:8848
      namespace:
      group: DEFAULT_GROUP
      cluster: default
      username: nacos
      password: nacos

  # 以下通过配置文件配置即可
  # store:
    # support: file 、 db 、 redis
    # mode: file
#  server:
#    service-port: 8091 #If not configured, the default is '${server.port} + 1000'
  security:
    secretKey: SeataSecretKey0c382ef121d778043159209298fd40bf3850a017
    tokenValidityInMilliseconds: 1800000
    ignore:
      urls: /,/**/*.css,/**/*.js,/**/*.html,/**/*.map,/**/*.svg,/**/*.png,/**/*.ico,/console-fe/public/**,/api/v1/auth/login
看第六步也有图片

三、导入数据库
简单描述一下,用词可能不太准确
1、启动seata需要用到的数据库
进入
script\server\db找到sql文件,根据不同数据库选择相应文件,这里我选择了mysql.sql
新建seata数据库,导入以下数据(这里使用的是seata默认的AT模式,所以需要导入undo_log表)
官方地址:https://github.com/apache/incubator-seata/blob/master/script/client/at/db/mysql.sql
-- -------------------------------- The script used when storeMode is 'db' --------------------------------
-- the table to store GlobalSession data
CREATE TABLE IF NOT EXISTS `global_table`
(
    `xid`                       VARCHAR(128) NOT NULL,
    `transaction_id`            BIGINT,
    `status`                    TINYINT      NOT NULL,
    `application_id`            VARCHAR(32),
    `transaction_service_group` VARCHAR(32),
    `transaction_name`          VARCHAR(128),
    `timeout`                   INT,
    `begin_time`                BIGINT,
    `application_data`          VARCHAR(2000),
    `gmt_create`                DATETIME,
    `gmt_modified`              DATETIME,
    PRIMARY KEY (`xid`),
    KEY `idx_status_gmt_modified` (`status` , `gmt_modified`),
    KEY `idx_transaction_id` (`transaction_id`)
) ENGINE = InnoDB
  DEFAULT CHARSET = utf8mb4;

-- the table to store BranchSession data
CREATE TABLE IF NOT EXISTS `branch_table`
(
    `branch_id`         BIGINT       NOT NULL,
    `xid`               VARCHAR(128) NOT NULL,
    `transaction_id`    BIGINT,
    `resource_group_id` VARCHAR(32),
    `resource_id`       VARCHAR(256),
    `branch_type`       VARCHAR(8),
    `status`            TINYINT,
    `client_id`         VARCHAR(64),
    `application_data`  VARCHAR(2000),
    `gmt_create`        DATETIME(6),
    `gmt_modified`      DATETIME(6),
    PRIMARY KEY (`branch_id`),
    KEY `idx_xid` (`xid`)
) ENGINE = InnoDB
  DEFAULT CHARSET = utf8mb4;

-- the table to store lock data
CREATE TABLE IF NOT EXISTS `lock_table`
(
    `row_key`        VARCHAR(128) NOT NULL,
    `xid`            VARCHAR(128),
    `transaction_id` BIGINT,
    `branch_id`      BIGINT       NOT NULL,
    `resource_id`    VARCHAR(256),
    `table_name`     VARCHAR(32),
    `pk`             VARCHAR(36),
    `status`         TINYINT      NOT NULL DEFAULT '0' COMMENT '0:locked ,1:rollbacking',
    `gmt_create`     DATETIME,
    `gmt_modified`   DATETIME,
    PRIMARY KEY (`row_key`),
    KEY `idx_status` (`status`),
    KEY `idx_branch_id` (`branch_id`),
    KEY `idx_xid_and_branch_id` (`xid` , `branch_id`)
) ENGINE = InnoDB
  DEFAULT CHARSET = utf8mb4;

CREATE TABLE IF NOT EXISTS `distributed_lock`
(
    `lock_key`       CHAR(20) NOT NULL,
    `lock_value`     VARCHAR(20) NOT NULL,
    `expire`         BIGINT,
    primary key (`lock_key`)
) ENGINE = InnoDB
  DEFAULT CHARSET = utf8mb4;

INSERT INTO `distributed_lock` (lock_key, lock_value, expire) VALUES ('AsyncCommitting', ' ', 0);
INSERT INTO `distributed_lock` (lock_key, lock_value, expire) VALUES ('RetryCommitting', ' ', 0);
INSERT INTO `distributed_lock` (lock_key, lock_value, expire) VALUES ('RetryRollbacking', ' ', 0);
INSERT INTO `distributed_lock` (lock_key, lock_value, expire) VALUES ('TxTimeoutCheck', ' ', 0);
2、使用事务需要用到的
在要使用事物的数据库导入以下数据表(我这里使用了多个数据库,都使用了事务,所以我都加入了下面的表)
-- for AT mode you must to init this sql for you business database. the seata server not need it.
CREATE TABLE IF NOT EXISTS `undo_log`
(
    `branch_id`     BIGINT       NOT NULL COMMENT 'branch transaction id',
    `xid`           VARCHAR(128) NOT NULL COMMENT 'global transaction id',
    `context`       VARCHAR(128) NOT NULL COMMENT 'undo_log context,such as serialization',
    `rollback_info` LONGBLOB     NOT NULL COMMENT 'rollback info',
    `log_status`    INT(11)      NOT NULL COMMENT '0:normal status,1:defense status',
    `log_created`   DATETIME(6)  NOT NULL COMMENT 'create datetime',
    `log_modified`  DATETIME(6)  NOT NULL COMMENT 'modify datetime',
    UNIQUE KEY `ux_undo_log` (`xid`, `branch_id`)
) ENGINE = InnoDB AUTO_INCREMENT = 1 DEFAULT CHARSET = utf8mb4 COMMENT ='AT transaction mode undo table';
ALTER TABLE `undo_log` ADD INDEX `ix_log_created` (`log_created`);
有的时候使用会进行报错,java.sql.SQLException: io.seata.common.exception.NotSupportYetException: undo_log needs to contain the primary key.意思就是undo_log表缺少主键那就用下面这个表
CREATE TABLE IF NOT EXISTS `undo_log`
(
		`id` 						BIGINT	 	 	 NOT NULL AUTO_INCREMENT,
    `branch_id`     BIGINT       NOT NULL COMMENT 'branch transaction id',
    `xid`           VARCHAR(128) NOT NULL COMMENT 'global transaction id',
    `context`       VARCHAR(128) NOT NULL COMMENT 'undo_log context,such as serialization',
    `rollback_info` LONGBLOB     NOT NULL COMMENT 'rollback info',
    `log_status`    INT(11)      NOT NULL COMMENT '0:normal status,1:defense status',
    `log_created`   DATETIME(6)  NOT NULL COMMENT 'create datetime',
    `log_modified`  DATETIME(6)  NOT NULL COMMENT 'modify datetime',
		PRIMARY KEY (`id`),
    UNIQUE KEY `ux_undo_log` (`xid`, `branch_id`)
) ENGINE = InnoDB
AUTO_INCREMENT = 1
DEFAULT CHARSET = utf8mb4 COMMENT ='AT transaction mode undo table';
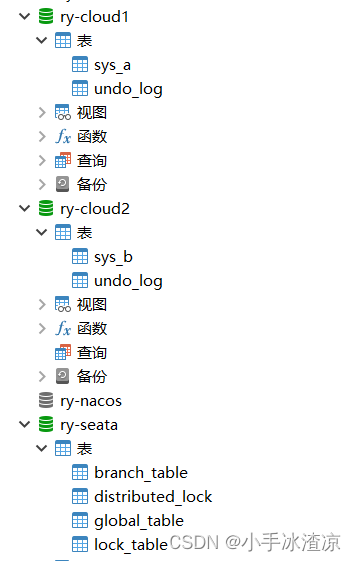
3、数据库图示
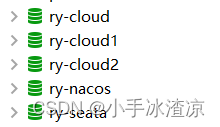
项目使用了ry-cloud ,ry-cloud1,ry-cloud2数据库
nacos使用了ry-nacos数据库
seata使用了ry-seata
注意:这里的表引擎都是InnoDB
数据库对应的表(ry-cloud也有undo_log表)
这里就为了简单的测试使用,两个表都创建了一条数据
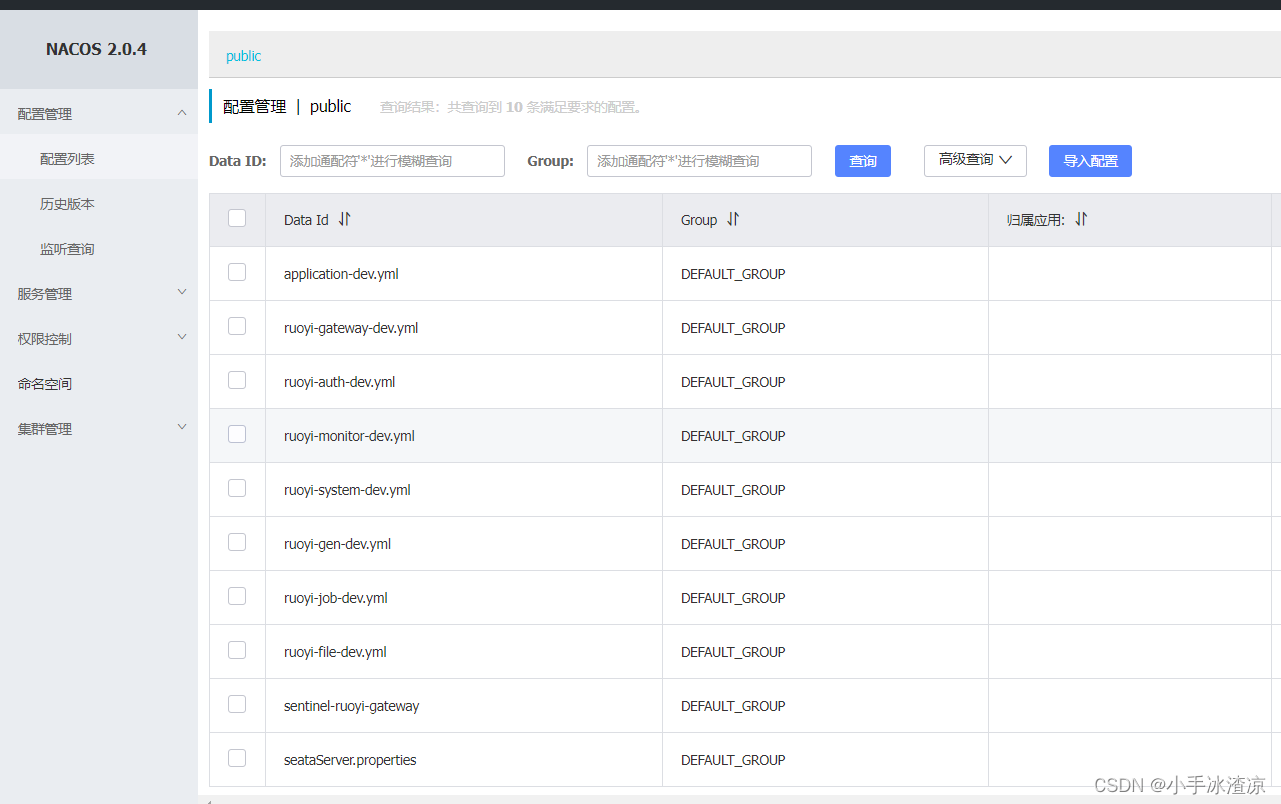
四、nacos配置
进入
script\config-center找到config.txt文件,根据内容进行相应配置
1、创建名为seataServer.properties的配置文件(如果在application.yml文件配置了data-id需要一致)
2、注意:driverClassName配置需要根据自己的数据库版本进行选择
5.x版本使用 com.mysql.jdbc.Driver
8.x版本使用 com.mysql.cj.jdbc.Driver
我的数据库版本是8.0.30使用下面那个
3、这里的service.vgroupMapping.xxx=default需要注意一下(等会服务加入事务两个需要在同一个组,不然会报错找不到到)
4、修改下面的store.db.配置(数据库配置)
#For details about configuration items, see https://seata.io/zh-cn/docs/user/configurations.html
#Transport configuration, for client and server
transport.type=TCP
transport.server=NIO
transport.heartbeat=true
transport.enableTmClientBatchSendRequest=false
transport.enableRmClientBatchSendRequest=true
transport.enableTcServerBatchSendResponse=false
transport.rpcRmRequestTimeout=30000
transport.rpcTmRequestTimeout=30000
transport.rpcTcRequestTimeout=30000
transport.threadFactory.bossThreadPrefix=NettyBoss
transport.threadFactory.workerThreadPrefix=NettyServerNIOWorker
transport.threadFactory.serverExecutorThreadPrefix=NettyServerBizHandler
transport.threadFactory.shareBossWorker=false
transport.threadFactory.clientSelectorThreadPrefix=NettyClientSelector
transport.threadFactory.clientSelectorThreadSize=1
transport.threadFactory.clientWorkerThreadPrefix=NettyClientWorkerThread
transport.threadFactory.bossThreadSize=1
transport.threadFactory.workerThreadSize=default
transport.shutdown.wait=3
transport.serialization=seata
transport.compressor=none

#Transaction routing rules configuration, only for the client
service.vgroupMapping.ruoyi-system-group=default
#If you use a registry, you can ignore it
service.default.grouplist=127.0.0.1:8091
service.enableDegrade=false
service.disableGlobalTransaction=false

#Transaction rule configuration, only for the client
client.rm.asyncCommitBufferLimit=10000
client.rm.lock.retryInterval=10
client.rm.lock.retryTimes=30
client.rm.lock.retryPolicyBranchRollbackOnConflict=true
client.rm.reportRetryCount=5
client.rm.tableMetaCheckEnable=true
client.rm.tableMetaCheckerInterval=60000
client.rm.sqlParserType=druid
client.rm.reportSuccessEnable=false
client.rm.sagaBranchRegisterEnable=false
client.rm.sagaJsonParser=fastjson
client.rm.tccActionInterceptorOrder=-2147482648
client.tm.commitRetryCount=5
client.tm.rollbackRetryCount=5
client.tm.defaultGlobalTransactionTimeout=60000
client.tm.degradeCheck=false
client.tm.degradeCheckAllowTimes=10
client.tm.degradeCheckPeriod=2000
client.tm.interceptorOrder=-2147482648
client.undo.dataValidation=true
client.undo.logSerialization=jackson
client.undo.onlyCareUpdateColumns=true
server.undo.logSaveDays=7
server.undo.logDeletePeriod=86400000
client.undo.logTable=undo_log
client.undo.compress.enable=true
client.undo.compress.type=zip
client.undo.compress.threshold=64k
#For TCC transaction mode
tcc.fence.logTableName=tcc_fence_log
tcc.fence.cleanPeriod=1h

#Log rule configuration, for client and server
log.exceptionRate=100

#Transaction storage configuration, only for the server. The file, db, and redis configuration values are optional.
store.mode=db
store.lock.mode=db
store.session.mode=db
#Used for password encryption
#store.publicKey=

#These configurations are required if the `store mode` is `db`. If `store.mode,store.lock.mode,store.session.mode` are not equal to `db`, you can remove the configuration block.
store.db.datasource=druid
store.db.dbType=mysql
store.db.driverClassName=com.mysql.cj.jdbc.Driver
store.db.url=jdbc:mysql://127.0.0.1:3306/ry-seata?useUnicode=true&rewriteBatchedStatements=true
store.db.user=root
store.db.password=root
store.db.minConn=5
store.db.maxConn=30
store.db.globalTable=global_table
store.db.branchTable=branch_table
store.db.distributedLockTable=distributed_lock
store.db.queryLimit=100
store.db.lockTable=lock_table
store.db.maxWait=5000

#Transaction rule configuration, only for the server
server.recovery.committingRetryPeriod=1000
server.recovery.asynCommittingRetryPeriod=1000
server.recovery.rollbackingRetryPeriod=1000
server.recovery.timeoutRetryPeriod=1000
server.maxCommitRetryTimeout=-1
server.maxRollbackRetryTimeout=-1
server.rollbackRetryTimeoutUnlockEnable=false
server.distributedLockExpireTime=10000
server.xaerNotaRetryTimeout=60000
server.session.branchAsyncQueueSize=5000
server.session.enableBranchAsyncRemove=false
server.enableParallelRequestHandle=false

#Metrics configuration, only for the server
metrics.enabled=false
metrics.registryType=compact
metrics.exporterList=prometheus
metrics.exporterPrometheusPort=9898
五、配置要引入事务的模块的配置文件
# 事务组名称和配置文件中service.vgroupMapping.default_tx_group=default相对应
seata:
  # Seata 应用编号,默认为 ${spring.application.name}
  # application-id: ${spring.application.name}
  # Seata 事务组编号,用于 TC 集群名
  tx-service-group: ruoyi-system-group
  service:
    vgroupMapping:
      hello-world: default
    disable-global-transaction: false
    grouplist:
      default: 127.0.0.1:8091
我这里用若依的系统模使用了多数据源进行回滚操作ruoyi-system-dev.yml文件如下
# spring配置
spring:
  redis:
    host: localhost
    port: 6379
    password:
  datasource:
    druid:
      stat-view-servlet:
        enabled: true
        loginUsername: admin
        loginPassword: 123456
    dynamic:
      druid:
        initial-size: 5
        min-idle: 5
        maxActive: 20
        maxWait: 60000
        connectTimeout: 30000
        socketTimeout: 60000
        timeBetweenEvictionRunsMillis: 60000
        minEvictableIdleTimeMillis: 300000
        validationQuery: SELECT 1 FROM DUAL
        testWhileIdle: true
        testOnBorrow: false
        testOnReturn: false
        poolPreparedStatements: true
        maxPoolPreparedStatementPerConnectionSize: 20
        filters: stat,slf4j
        connectionProperties: druid.stat.mergeSql\=true;druid.stat.slowSqlMillis\=5000
      datasource:
          # 主库数据源
          master:
            driver-class-name: com.mysql.cj.jdbc.Driver
            url: jdbc:mysql://localhost:3306/ry-cloud?useUnicode=true&characterEncoding=utf8&zeroDateTimeBehavior=convertToNull&useSSL=true&serverTimezone=GMT%2B8
            username: root
            password: root
          testA:
            driver-class-name: com.mysql.cj.jdbc.Driver
            url: jdbc:mysql://localhost:3306/ry-cloud1?useUnicode=true&characterEncoding=utf8&zeroDateTimeBehavior=convertToNull&useSSL=true&serverTimezone=GMT%2B8
            username: root
            password: root
          testB:
            driver-class-name: com.mysql.cj.jdbc.Driver
            url: jdbc:mysql://localhost:3306/ry-cloud2?useUnicode=true&characterEncoding=utf8&zeroDateTimeBehavior=convertToNull&useSSL=true&serverTimezone=GMT%2B8
            username: root
            password: root
      # 开启seata代理,开启后默认每个数据源都代理,如果某个不需要代理可单独关闭
      seata: true

# 事务组名称和配置文件中service.vgroupMapping.xxx=default相对应
seata:
  # Seata 事务分组名称,用于区分不同的环境
  tx-service-group: ruoyi-system-group
  service:
    vgroupMapping:
      ruoyi-system-group: default
    disable-global-transaction: false
    grouplist:
      default: 127.0.0.1:8091

# mybatis配置
mybatis:
    # 搜索指定包别名
    typeAliasesPackage: com.ruoyi.system
    # 配置mapper的扫描,找到所有的mapper.xml映射文件
    mapperLocations: classpath:mapper/**/*.xml

# swagger配置
swagger:
  title: 系统模块接口文档
  license: Powered By ruoyi
  licenseUrl: https://ruoyi.vip
六、启动
进入bin目录打开
seata-server.bat
然后访问http://127.0.0.1:7091,账号密码都是seata
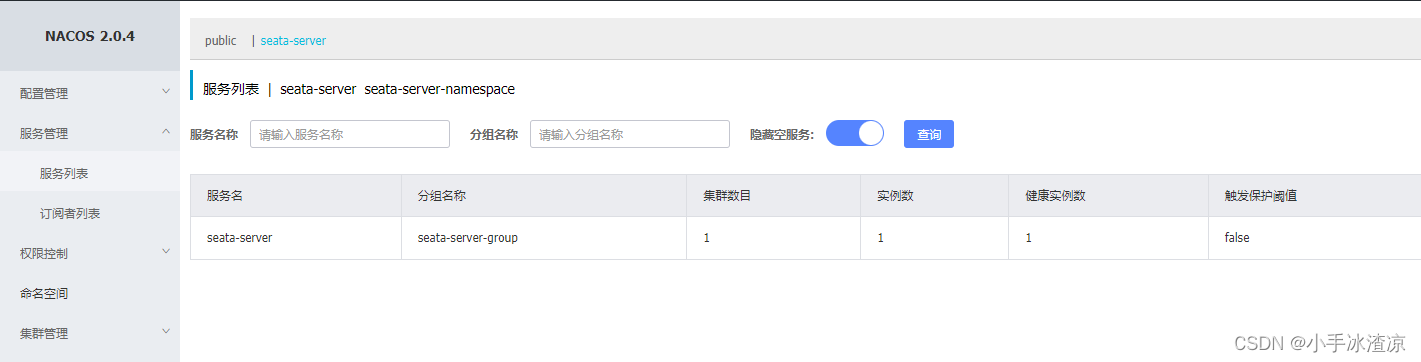
查看nacos,发现服务也已被注册了
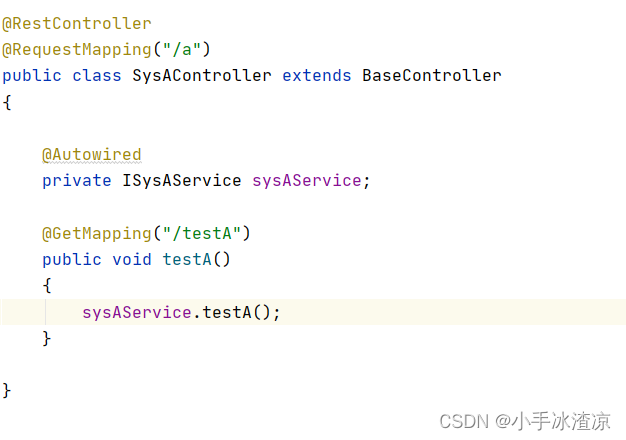
七、测试
要先在pom文件引入seata模块
因为我使用的若依已经集成了,我这边直接在ruoyi-system的pom.xml引入下面模块就可以了
<dependency>
    <groupId>com.ruoyi</groupId>
    <artifactId>ruoyi-common-seata</artifactId>
</dependency>
该模块引入的东西就是下面这个
<!-- SpringBoot Seata -->
<dependency>
    <groupId>com.alibaba.cloud</groupId>
    <artifactId>spring-cloud-starter-alibaba-seata</artifactId>
</dependency>
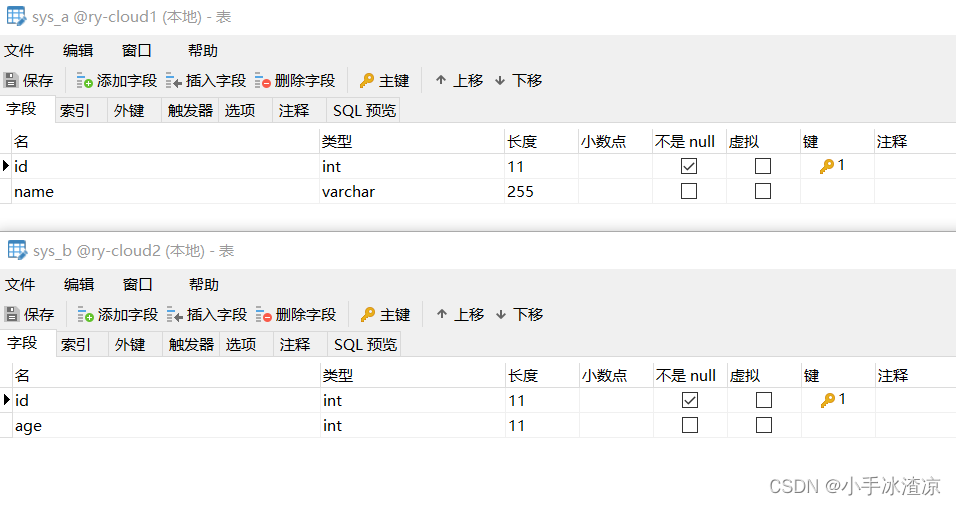
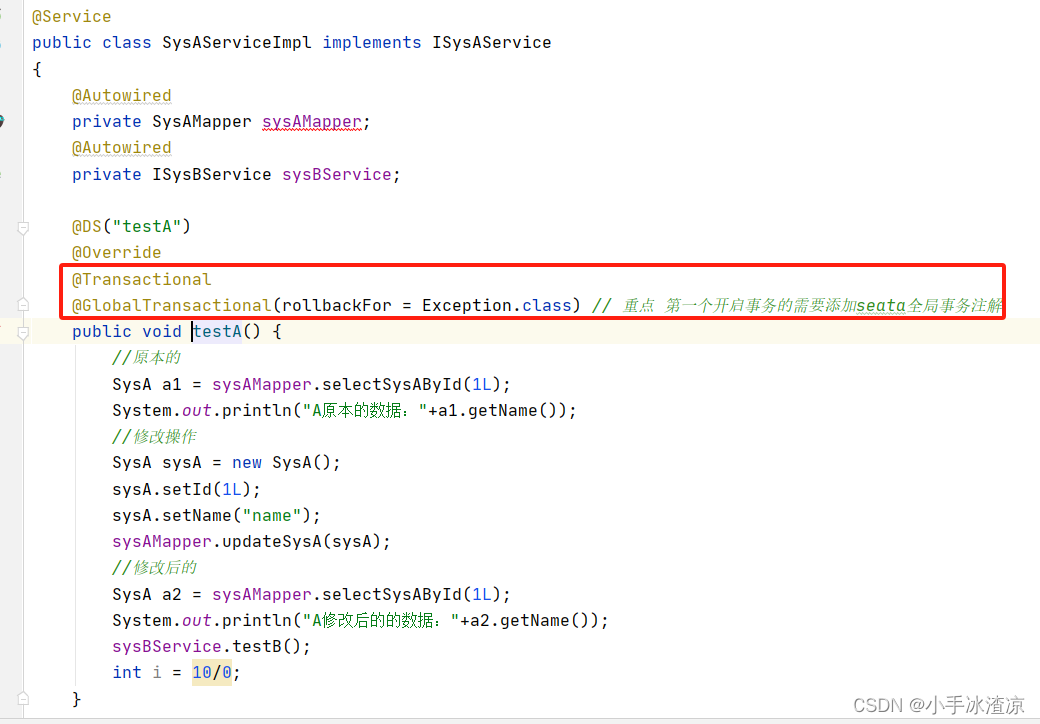
逻辑,目前有两个库,ry-cloud1里面的表sys_a修改了数据,ry-cloud2里面的表sys_b也修改了数据,然后遇到遇到异常,看其是否能成功回滚
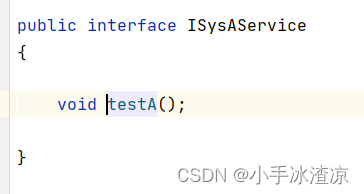
@DS("testA") //更换数据源也就是换数据库,对应上面的ry-cloud1数据库
@Transactional
@GlobalTransactional(rollbackFor = Exception.class) // 重点 第一个开启事务的需要添加seata全局事务注解
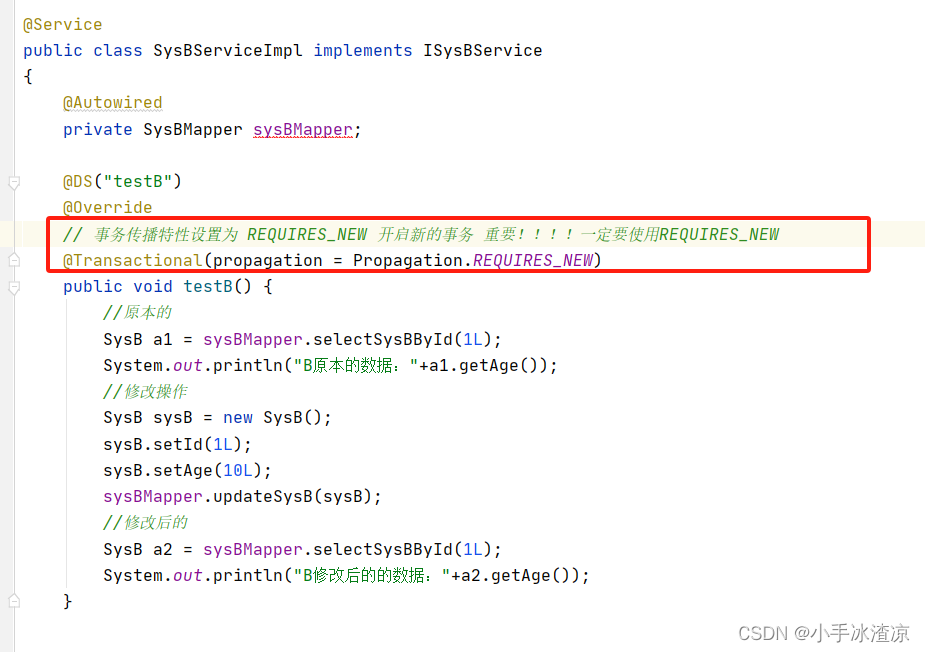
@DS("testB") //这个是更换为ry-cloud2数据库
// 事务传播特性设置为 REQUIRES_NEW 开启新的事务 重要!!!!一定要使用REQUIRES_NEW
@Transactional(propagation = Propagation.REQUIRES_NEW)
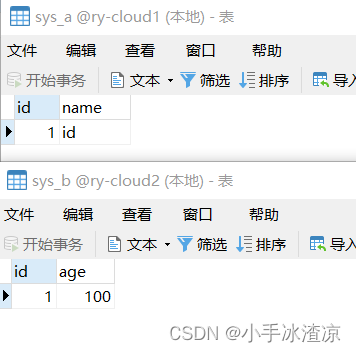
如果没有事务,执行此操作会报错,结果数据库还是被修改了,
如果把int i = 10/0;移动到sysBService.testB();之前,那么会出现a更改然后报错,b没有被更改的情况
假如,就假如这是一个订单库存系统,用户下单扣除余额,但是没有库存了,此时抛出异常,如果没有事务,就发生了问题,钱到账了,货没少,我就被投诉了。
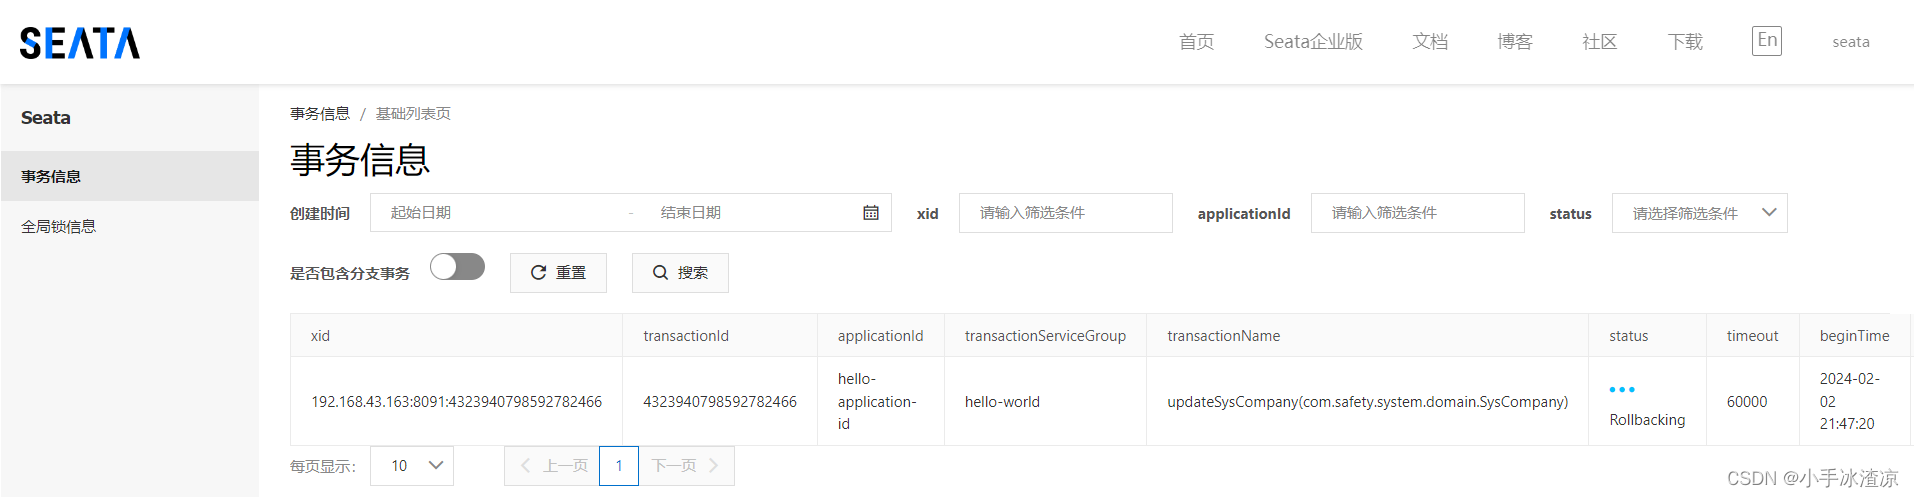
使用了事务,数据库更改完成,但是出现报错进行了回滚操作,出现了rollback status: Rollbacked就代表回滚成功了
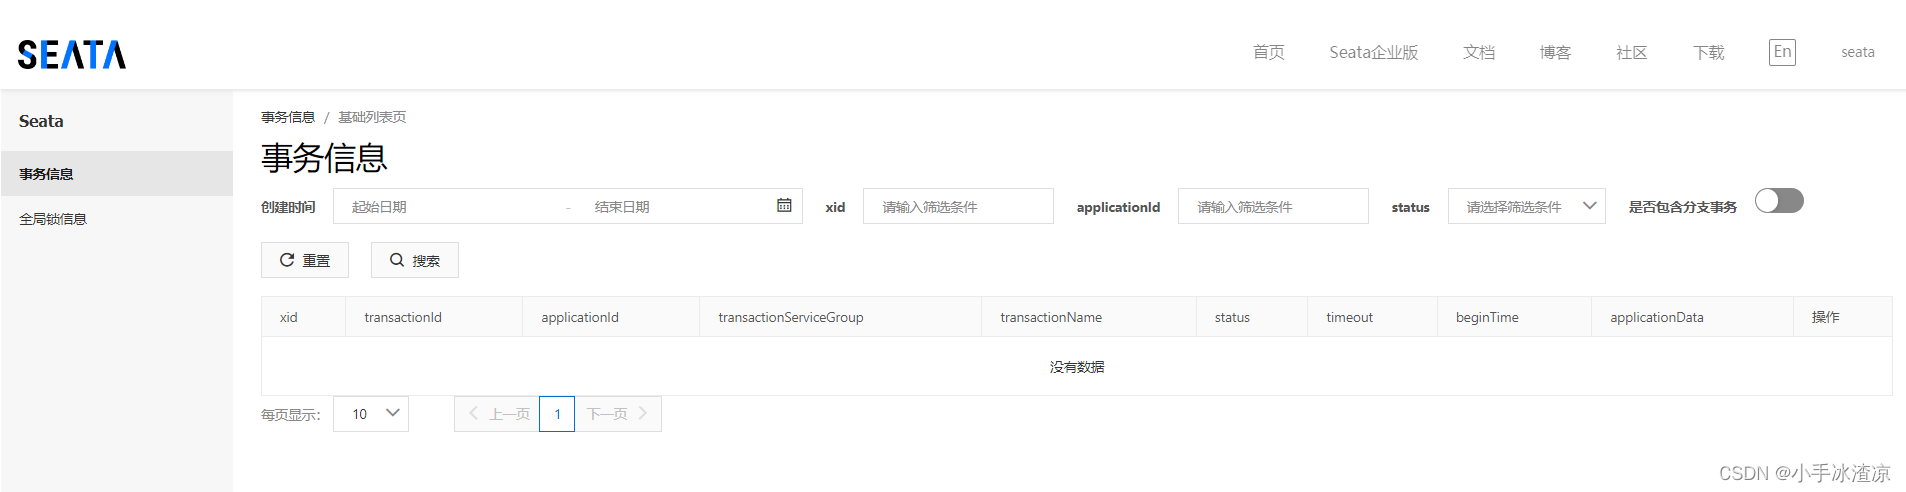
里面的applicationId,transactionServiceGroup还有transactionName以及调用时间都能对得上。
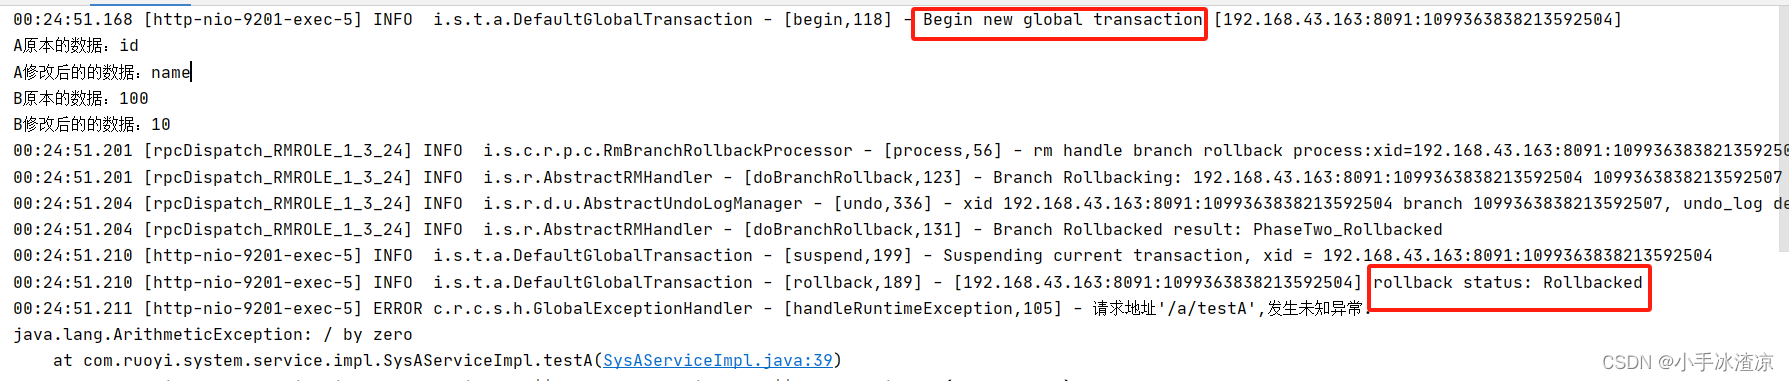
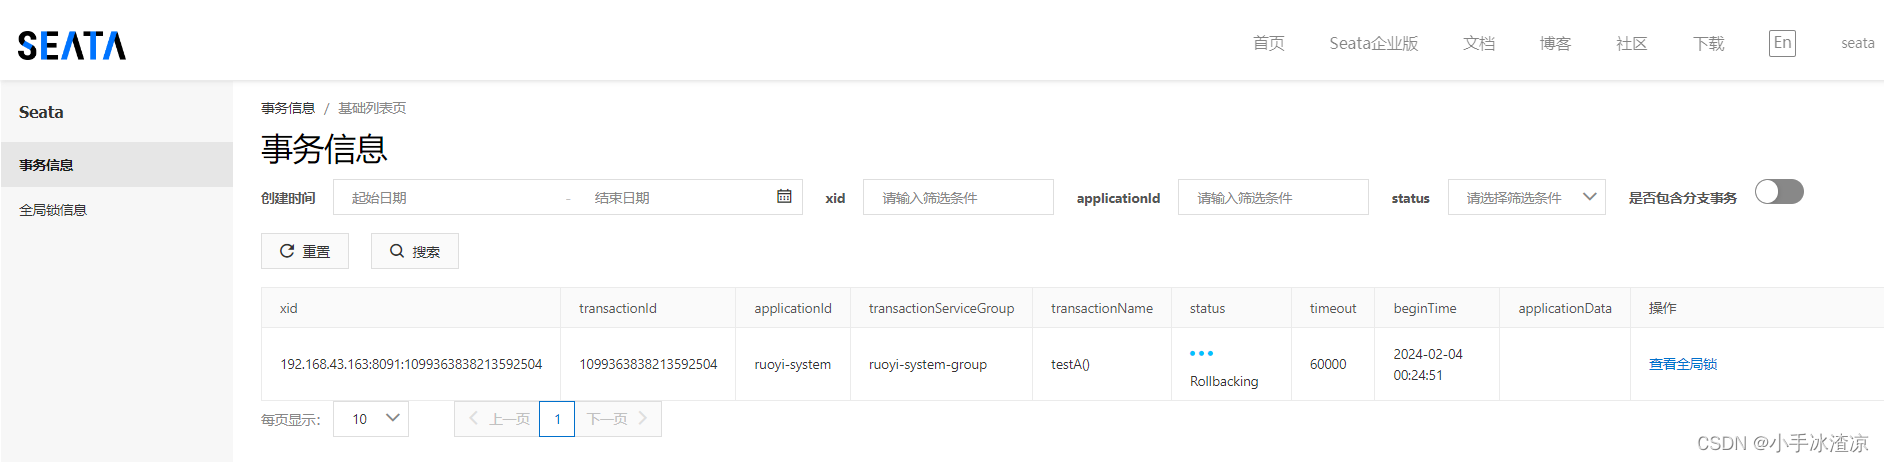
制造异常,已回滚成功
就先简单测试,能用就行,其他的等之后遇到在进行修改。


 1793
1793


 被折叠的 条评论
为什么被折叠?
被折叠的 条评论
为什么被折叠?
 到【灌水乐园】发言


