


一,创建数据文件
1.准备
①import pandas as pd #调用pandas并设为pd‘设置pd是为了方便用’
②如果建立表中有中文注意用 utf-8
③ df = pd.DataFrame({'ID':[1, 2, 3],'Name':['Tim', 'Victor', 'Nick']}) #创建一个DataFrame对象非常容易,只需传入Table对象即可
④df=df.set_index('ID') #设置新建索引为 ID
⑤df.to_excel('D:/shuju/test.xlsx') #to_excel是输出excel,后面是输出到什么地方
代码
import pandas as pd
# utf-8
df = pd.DataFrame({'ID':[1, 2, 3],'Name':['Tim', 'Victor', 'Nick']})
df=df.set_index('ID')
df.to_excel('D:/shuju/test.xlsx')
print('Done!')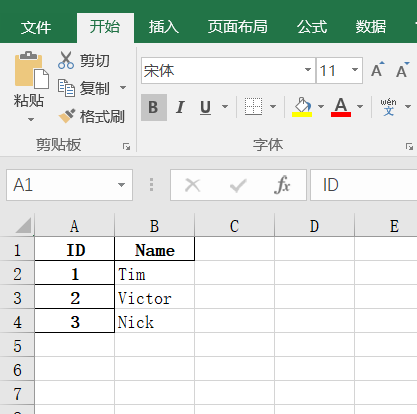
二,读取文件
1.准备
①import pandas as pd #调用pandas并设为pd‘设置pd是为了方便用’
②people= pd.read_excel('文件位置',header=None) # pd.read_excel读取文件,header=None,没有头标题
③行标签,index和 列标签,columns
2.代码
import pandas as pd
people= pd.read_excel('C:/Users/张浩坤/OneDrive/桌面/111.xlsx',header=None)#23行,4列
print(people.shape)
print(people.columns)
print(people.head())
三,行,列,单元格
1.准备
①import pandas as pd #调用pandas并设为pd‘设置pd是为了方便用’
②print(people.tail(3)) #后数三个
③people.columns=['ID','Type','Title','FirstName'] #指明列标签是什么
④people.set_index('ID',inplace=True) #设置索引为ID,并且不用新建,inplace=True(意思是用原来的ID作为索引)
2.代码(和二 一起使用)
import pandas as pd
print(people.tail(3))
people.columns=['ID','Type','Title','FirstName']
people.set_index('ID',inplace=True)
print(people.columns)
people.to_excel('文件位置putput.xlsx')
print('Done!')
四,数据域自动填充数据
1.准备
①s1=pd.Series(L1,index=L2) #Series 是一个 一维数组对象 ,类似于 NumPy 的一维 array。它除了包含一组数据还包含一组索引,所以可以把它理解为一组带索引的数组。
②print(s1.index) #输出索引的值
③s1 = pd.Series([1, 2, 3], index=[1, 2, 3], name='A') #s1中的1 2 3 对应s1的索引1 2 3
④df = pd.DataFrame({s1.name: s1, s2.name: s2, s3.name: s3}) #将s1的name成为s1的索引,s2,s3同理
⑤print(df) #输出df
2.代码
import pandas as pd

L1=[100,200,300]
L2=['x','y','z']
s1=pd.Series(L1,index=L2)
print(s1.index)
s1 = pd.Series([1, 2, 3], index=[1, 2, 3], name='A')
s2 = pd.Series([10, 20, 30], index=[1, 2, 3], name='B')
s3 = pd.Series([100, 200, 300], index=[2, 3, 4], name='C')

df = pd.DataFrame({s1.name: s1, s2.name: s2, s3.name: s3})
# df=PD.DataFrame([s1, s2, s3])
print(df)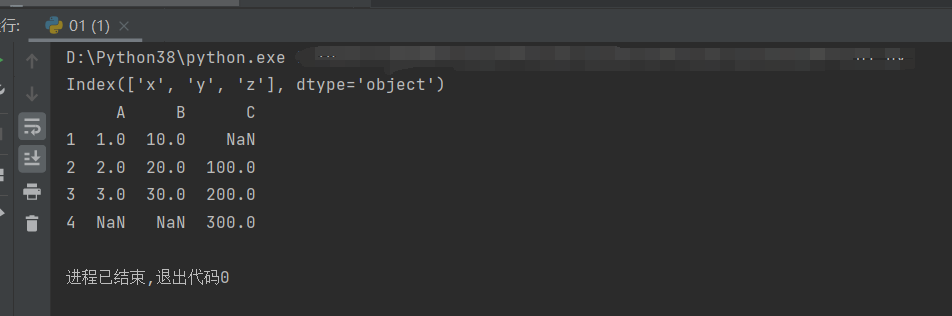
五,填充日期序列
准备
①datetime #时间库
②timedelta #时间差
③def add_month(d, md): #到return是开始定义这个函数,(这里应该可以用lambda直接定义,方便一点)
④skiprows=4 #跳过4行,用于一开始excel的表格不是定格的时候
⑤usecols='D:G' #使用从D列---G列的数值
⑥index_col = None #重新设置一列成为index值
2.代码
import pandas as pd
from datetime import date, timedelta


def add_month(d, md):
    yd = md // 12
    m = d.month + md % 12
    if m!=12:
        yd+=m//12
        m=m%12
    return date(d.year+yd,m,d.day)


books = pd.read_excel('文件位置04.xlsx', skiprows=4, usecols='D:G', index_col=None,
                      dtype={'ID': str, 'InStore': str, 'Date': str})
start = date(2018, 1, 1)
for i in books.index:
    books.at[i,'ID'] = i + 1
    books.at[i,'Instore'] = 'Yes' if i % 2 == 0 else 'No'
    # books['Date'].at[i] = start +timedelta(days=i)
    # books['Date'].at[i] = date(start.year + i, start.month, start.day)
    books.at[i,'Date'] = add_month(start,i)
books.set_index('ID',inplace=True)
print(books)
 books.to_excel('文件位置output04.xlsx')
print('Done!')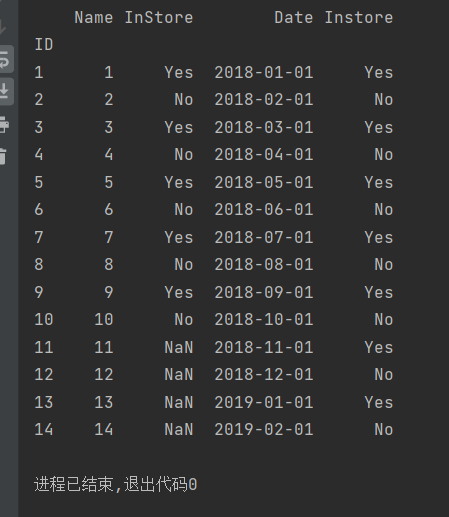
六,函数填充,计算列
1.准备
①def add_2(x): #定义,x+2
②lambda x:x+2 #作用与①同理
2.代码
import pandas as pd

# def add_2(x):
#     return x+2

books=pd.read_excel('文件位置05.xlsx',index_col='ID')
# books['Price']=books['ListPrice']*books['Discount']

# for i in range(5,16):
#     books['Price'].at[i]=books['ListPrice'].at[i]*books['Discount'].at[i]

# books['ListPrice']=books['ListPrice'].apply(add_2)

books['ListPrice']=books['ListPrice'].apply(lambda x:x+2)

print(books)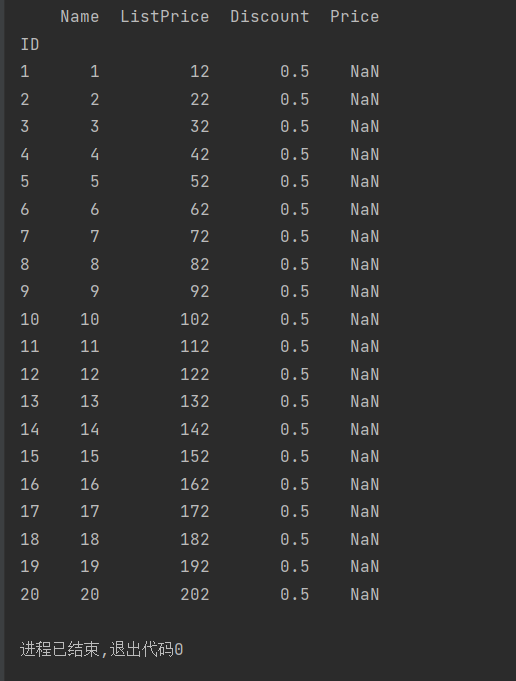
七,排序,多重排序
准备
①sort_values #排序values这一列的值
②by=['Worthy','Price'],inplace=True,ascending=[True,False] #1>先排Worthy,2>inplace=True,在原对象基础上进行修改,3>ascending: 输入布尔型, True是升序 , False是降序
2.代码
import pandas as pd
products=pd.read_excel('文件位置07.xlsx',index_col='ID')
products.sort_values(by=['Worthy','Price'],inplace=True,ascending=[True,False])
print(products)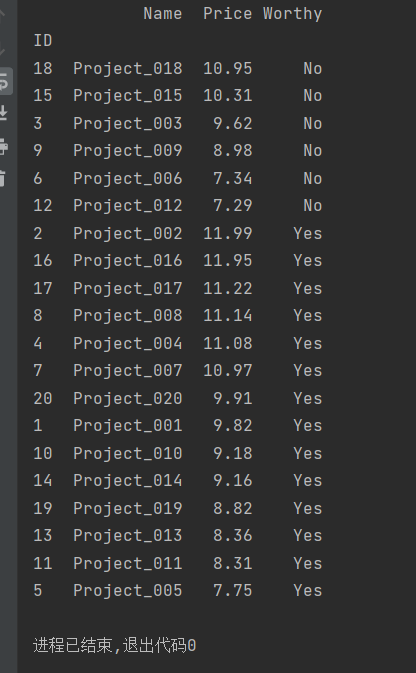
八,数据筛选,过滤
1.准备
①def age_18_to_30(a): #定义,我要进行18到30岁之间的筛选计算
②3,4//6.7行的定义做法可以直接用后面的lember来做
③students.loc[students['Age'].apply(lambda a: a>=18and a<30)] #位置,年龄,作lambda a的判断,这个做完了,在这个基础上再进行下一步loc[students['Score'].apply(lambda s: 85<=s<=100) (千万不可以分两步,这个第二步不会在第一步的基础上,因为你没有更改它的底层文件)
2.代码
import pandas as pd

def age_18_to_30(a):
return a>=18and a<30

def level_a(s):
return 85<=s<=100

students=pd.read_excel('文件位置08.xlsx',index_col='ID')
# students = students.loc[students['Age'].apply(age_18_to_30)].loc[students['Score'].apply(level_a)]
students = students.loc[students['Age'].apply(lambda a: a>=18and a<30)].loc[students['Score'].apply(lambda s: 85<=s<=100)]
print(students)
九,柱状图
准备
①matplotlib #是一个 Python 的 2D绘图库
②plt.bar(students.Fleld,students.Number,color='orange') #柱状图用法,x:Fleld,y:Number,颜色:橘色
③rotation=90 #旋转90度
④plt.tight_layout() #会自动调整子图参数,使之填充整个图像区域
⑤plt.title('Intereation Students by Fleld') #设置标题
⑥plt.show() #打印柱状图
代码
import pandas as pd
import matplotlib.pyplot as plt

students=pd.read_excel(文件位置09.xlsx')
students.sort_values(by='Number',inplace=True,ascending=False)

print(students)
#students.plot.bar(x='Fleld',y='Number',color='orange',title='Intereasd Students by Fleid')
plt.bar(students.Fleld,students.Number,color='orange')
plt.xticks(students.Fleld,rotation=90)
plt.xlabel('Fleld')
plt.ylabel('Number')
plt.title('Intereation Students by Fleld')
plt.tight_layout()
plt.show()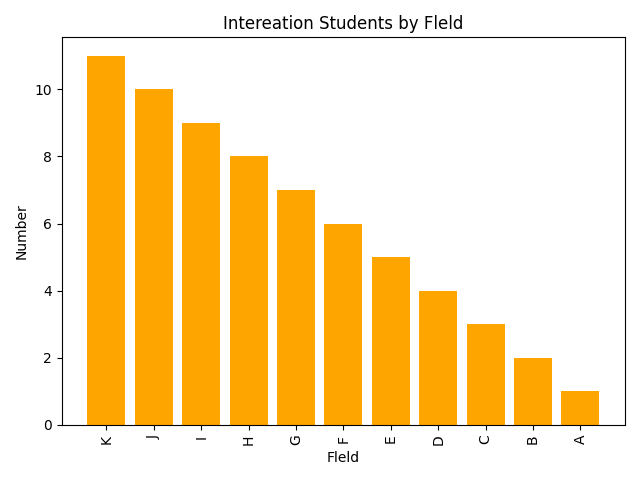
十,分组主图深度优化
准备
①y=[2016,2017] #y轴是两个对称轴
②fontsize=16,fontweight='bold' #字体大小为16,字体加粗
③plt.gcf() #设置当前坐标区的字体大小、刻度方向、刻度长度以及 y 坐标轴范围。使用 gca 指代当前坐标区。
④subplots_adjust #控制距离
⑤ax.set_xticklabels #ax.set_xticklabels(),可以将任何其他类型的值作为标签.可以赋值给之前已经设置过的set_xtick.
⑥ha #Horizontal 水平方向上以标注文本的哪个位置作为中心
代码
import pandas as pd
import matplotlib.pyplot as plt
students=pd.read_excel('文件位置10.xlsx')
students.sort_values(by=2017,inplace=True,ascending=False)
print(students)
students.plot.bar(x='Field',y=[2016,2017],color=['orange','red'])
plt.title('sjifdrbiubfugewghfniowefngweo',fontsize=16,fontweight='bold')
plt.xlabel('Field',fontweight='bold')
plt.xlabel('Number',fontweight='bold')
ax=plt.gca()
ax.set_xticklabels(students['Field'],rotation=45,ha='right')
f=plt.gcf()
f.subplots_adjust(left=0.2,bottom=0.42)
plt.tight_layout()
plt.show()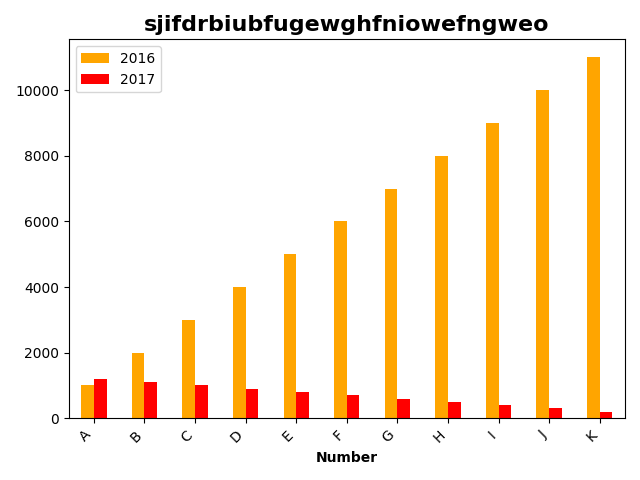


 438
438


 被折叠的 条评论
为什么被折叠?
被折叠的 条评论
为什么被折叠?
 到【灌水乐园】发言


