


前言
- 本文内容主要来源于油管知名博主Murtaza’s Workshop - Robotics and AI 的4小时入门OpenCV的C++课程。本篇博客不仅包含课程中的所有代码,而且还在一些较复杂代码中加入了详细的注释和一些知识点的归纳总结,方便有计算机视觉基础的同学快速上手使用OpenCV
- 代码中所使用到的图片、视频以及xml文件所在路径需要根据自己的实际情况进行更改
Chapter1_Read Images Videos and Webcams
这边为了显示方便,就没有把多余的主函数注释掉。
#include<opencv2/highgui.hpp>
#include<opencv2/imgcodecs.hpp>
#include<opencv2/imgproc.hpp>

using namespace cv;
using namespace std;


/  Images  //

void main() {

    string path = "Resources/Resources/test.png";
    Mat img = imread(path);
    imshow("Image", img);
    waitKey(0);

}

///  Video  //

void main() {
	string path = "Resources/Resources/test_video.mp4";
	VideoCapture cap(path);  //对输入的影像的每一帧进行捕捉
	Mat img;

	while (true) {

		cap.read(img);   //将捕获到的信息输入到img对象中
		imshow("Image", img);
		waitKey(2); //设置延迟
	}
}


/  Webcam  //

void main() {

	VideoCapture cap(0);
	Mat img;

	while (true) {

		cap.read(img);
		imshow("Image", img);
		waitKey(1);
	}
}
Chpater2_Basic Functions
#include <opencv2/imgcodecs.hpp>
#include <opencv2/highgui.hpp>
#include <opencv2/imgproc.hpp>
#include <iostream>

using namespace cv;
using namespace std;

///  Basic Functions  //

void main() {

	string path = "Resources/Resources/test.png";
	Mat img = imread(path);
	Mat imgGray, imgBlur, imgCanny, imgDil, imgErode;

	cvtColor(img, imgGray, COLOR_BGR2GRAY);
	GaussianBlur(imgGray, imgBlur, Size(7, 7), 5, 0);
	Canny(imgBlur, imgCanny, 25, 75);

	Mat kernel = getStructuringElement(MORPH_RECT, Size(3, 3));//得到膨胀模板
	dilate(imgCanny, imgDil, kernel);
	erode(imgDil, imgErode, kernel);

	imshow("Image", img);
	imshow("Image Gray", imgGray);
	imshow("Image Blur", imgBlur);
	imshow("Image Canny", imgCanny);
	imshow("Image Dilation", imgDil);
	imshow("Image Erode", imgErode);
	waitKey(0);
}
Chapter3_Resize and Crop
#include <opencv2/imgcodecs.hpp>
#include <opencv2/highgui.hpp>
#include <opencv2/imgproc.hpp>
#include <iostream>

using namespace cv;
using namespace std;


///  Resize and Crop //

void main() {

	string path = "Resources/test.png";
	Mat img = imread(path);
	Mat imgResize, imgCrop;

	//cout << img.size() << endl;
	resize(img, imgResize, Size(), 0.5, 0.5);

	Rect roi(200, 100, 300, 300); //设置矩形的大小
	imgCrop = img(roi);

	imshow("Image", img);
	imshow("Image Resize", imgResize);
	imshow("Image Crop", imgCrop);
	waitKey(0);
}
Chapter4_Drawing Shapes and Text
#include <opencv2/imgcodecs.hpp>
#include <opencv2/highgui.hpp>
#include <opencv2/imgproc.hpp>
#include <iostream>

using namespace cv;
using namespace std;

//  Draw Shapes and Text //

void main() {

	// Blank Image
	Mat img(512, 512, CV_8UC3, Scalar(255, 255, 255));

	circle(img, Point(256, 256), 155, Scalar(0, 69, 255), FILLED); //画圈
	rectangle(img, Point(130, 226), Point(382, 286), Scalar(255, 255, 255), FILLED);  //画矩阵
	line(img, Point(130, 296), Point(382, 296), Scalar(255, 255, 255), 2); //画连线

	putText(img, "Murtaza's Workshop", Point(137, 262), FONT_HERSHEY_DUPLEX, 0.75, Scalar(0, 69, 255), 2);

	imshow("Image", img);
	waitKey(0);
}
Chpater5_Warp Perspective
#include <opencv2/imgcodecs.hpp>
#include <opencv2/highgui.hpp>
#include <opencv2/imgproc.hpp>
#include <iostream>

using namespace cv;
using namespace std;

///  Warp Images  //

void main() {

	string path = "Resources/Resources/cards.jpg";
	Mat img = imread(path);
	Mat matrix, imgWarp;
	float w = 250, h = 350;

	Point2f src[4] = { {529,142},{771,190},{405,395},{674,457} };  //定位原本图像的区域
	Point2f dst[4] = { {0.0f,0.0f},{w,0.0f},{0.0f,h},{w,h} };    //定位要投影图像的区域

	matrix = getPerspectiveTransform(src, dst);  //得到透视转换器的矩阵
	warpPerspective(img, imgWarp, matrix, Point(w, h));

	for (int i = 0; i < 4; i++)
	{
		circle(img, src[i], 10, Scalar(0, 0, 255), FILLED);
	}

	imshow("Image", img);
	imshow("Image Warp", imgWarp);
	waitKey(0);

}
Chapter6_Color Detection
- 实现图像颜色检测与跟踪,先将图像转换为HSV格式,再利用相应颜色的hsv取值范围对图像进行inRange进行颜色提取,同时为了使得提取颜色方便,不用一直修改相应颜色的取值范围,还创建了动态修改取值范围的追踪栏
HSV是一种将RGB色彩空间中的点在倒圆锥体中的表示方法。HSV即色相(Hue)、饱和度(Saturation)、亮度(Value)。
#include <opencv2/imgcodecs.hpp>
#include <opencv2/highgui.hpp>
#include <opencv2/imgproc.hpp>
#include <iostream>

using namespace cv;
using namespace std;

///  Color Detection  //
//实现图像颜色检测与跟踪,先将图像转换为HSV格式,再利用相应颜色的hsv取值范围对图像进行inRange进行颜色提取,同时
//为了使得提取颜色方便,不用一直修改相应颜色的取值范围,还创建了动态修改取值范围的追踪栏

void main() {

	string path = "Resources/lambo.png";
	Mat img = imread(path);
	Mat imgHSV, mask;
	int hmin = 0, smin = 110, vmin = 153;   //设置HSV色彩空间中的取值范围
	int hmax = 19, smax = 240, vmax = 255;

	cvtColor(img, imgHSV, COLOR_BGR2HSV);  //cenvert 对图像进行色彩空间转换

	namedWindow("Trackbars", (640, 200));   // 创建一个新窗口并命名大小,同时设置窗口大小
	createTrackbar("Hue Min", "Trackbars", &hmin, 179);   //在指定名称的窗口中创建一个追踪栏,并设置好追踪栏的名称以及取值范围
	createTrackbar("Hue Max", "Trackbars", &hmax, 179);	  //利用追踪栏我们可以很灵活的调整传入的值
	createTrackbar("Sat Min", "Trackbars", &smin, 255);
	createTrackbar("Sat Max", "Trackbars", &smax, 255);
	createTrackbar("Val Min", "Trackbars", &vmin, 255);
	createTrackbar("Val Max", "Trackbars", &vmax, 255);

	while (true) {

		Scalar lower(hmin, smin, vmin);    //设置标量Scalar
		Scalar upper(hmax, smax, vmax);
		inRange(imgHSV, lower, upper, mask);  // 对指定好取值范围内的色彩进行提取 用二值化的形式输出到目的图像中

		imshow("Image", img);
		imshow("Image HSV", imgHSV);
		imshow("Image Mask", mask);
		waitKey(1);
	}
}
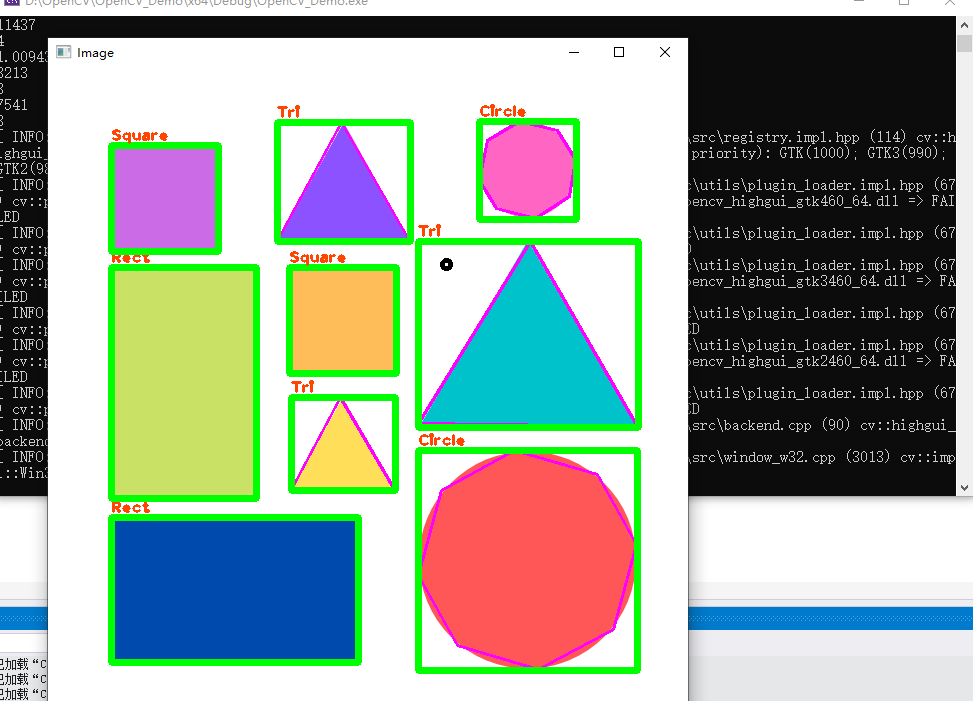
Chpater7_Shapes/Contour Detection
#include <opencv2/imgcodecs.hpp>
#include <opencv2/highgui.hpp>
#include <opencv2/imgproc.hpp>
#include <iostream>

using namespace cv;
using namespace std;

///  Color Detection  //

void getContours(Mat imgDil, Mat img) {

	vector<vector<Point>> contours;  //轮廓集合 每一个轮廓由若干个点组成 所以这边用到了vector的vector
	vector<Vec4i> hierarchy; // 层次结构由4位整数组成

	//该方法能够将输入的轮廓图像进行提取,将其轮廓信息进行提取,得到contours和hierarchy,同时我们可以指定提取模式和提取方法
	findContours(imgDil, contours, hierarchy, RETR_EXTERNAL, CHAIN_APPROX_SIMPLE);
	//drawContours(img, contours, -1, Scalar(255, 0, 255), 2);  //在img图像上将轮廓画出来

	vector<vector<Point>> conPoly(contours.size());   //每一个图形中的含有的节点
	vector<Rect> boundRect(contours.size());     //得到每一个轮廓的外包矩形的四个点的坐标

	for (int i = 0; i < contours.size(); i++)
	{
		int area = contourArea(contours[i]);   // contourArea可以计算出每一个contours元素中所有点连线所围成的区域大小
		cout << area << endl;
		string objectType;

		if (area > 1000)   //如果存在噪声那么噪声的Area肯定很小,所以我们可以假定只有Area大于1000才是正常的形状,我们才去提取它的轮廓
		{
			float peri = arcLength(contours[i], true);    //计算每一个轮廓的长度
			approxPolyDP(contours[i], conPoly[i], 0.02 * peri, true);  //根据每一个轮廓的长度以及我们自定义的分割单位,分割出一个轮廓所包含的节点
			cout << conPoly[i].size() << endl;
			boundRect[i] = boundingRect(conPoly[i]);   //根据轮廓中所包含的节点构造一个外包矩阵

			int objCor = (int)conPoly[i].size();   //将轮廓中的节点数转换为整数,便于下一步的判断形状并输出

			if (objCor == 3) { objectType = "Tri"; }
			else if (objCor == 4)  //对于四个节点数的图形,进行进一步区分
			{
				float aspRatio = (float)boundRect[i].width / (float)boundRect[i].height;
				cout << aspRatio << endl;
				if (aspRatio > 0.95 && aspRatio < 1.05) { objectType = "Square"; }  //如果矩形的宽高比很接近1左右 就判断为正方形
				else { objectType = "Rect"; }
			}
			else if (objCor > 4) { objectType = "Circle"; }

			drawContours(img, conPoly, i, Scalar(255, 0, 255), 2);
			rectangle(img, boundRect[i].tl(), boundRect[i].br(), Scalar(0, 255, 0), 5);  //将之前检测出的外包矩形绘制出来
			putText(img, objectType, { boundRect[i].x,boundRect[i].y - 5 }, FONT_HERSHEY_PLAIN, 1, Scalar(0, 69, 255), 2);  //将判断好的图形输出
		}
	}
}


void main() {

	string path = "Resources/shapes.png";
	Mat img = imread(path);
	Mat imgGray, imgBlur, imgCanny, imgDil;

	// Preprocessing
	cvtColor(img, imgGray, COLOR_BGR2GRAY);
	GaussianBlur(imgGray, imgBlur, Size(3, 3), 3, 0);  //高斯模糊
	Canny(imgBlur, imgCanny, 25, 75);
	Mat kernel = getStructuringElement(MORPH_RECT, Size(3, 3));
	dilate(imgCanny, imgDil, kernel);  // 图像边缘提取之后,进行膨胀操作扩大边缘

	getContours(imgDil, img);  //将膨胀过后的边缘,提取出来放在原图像上

	imshow("Image", img);
	//imshow("Image Gray", imgGray);
	//imshow("Image Blur", imgBlur);
	//imshow("Image Canny", imgCanny);
	//imshow("Image Dil", imgDil);

	waitKey(0);

}
最终效果:
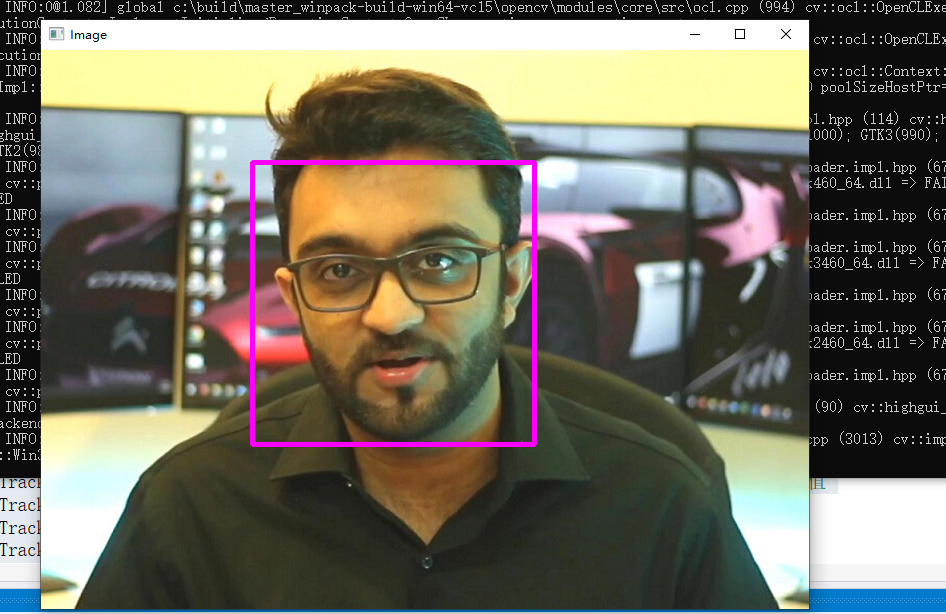
Chapter8_Face Detection
- 这边并不是在叫你如何从0到1去实现人脸识别,而是直接使用Viola-Jones算法来实现人脸识别,然后其中的级联分类器也是事先训练好给你的,所以我们要做的只是懂得如何使用opencv进行相关代码实现
#include <opencv2/imgcodecs.hpp>
#include <opencv2/highgui.hpp>
#include <opencv2/imgproc.hpp>
#include <opencv2/objdetect.hpp>
#include <iostream>

using namespace cv;
using namespace std;


///  Images  //

#include <opencv2/imgcodecs.hpp>
#include <opencv2/highgui.hpp>
#include <opencv2/imgproc.hpp>
#include <opencv2/objdetect.hpp>
#include <iostream>

using namespace cv;
using namespace std;


///  Images  //

void main() {

	string path = "Resources/Resources/test.png";
	Mat img = imread(path);

	CascadeClassifier faceCascade;   //使用Viola-Jones算法来实人脸识别
	faceCascade.load("Resources/Resources/haarcascade_frontalface_default.xml");  //导入事先训练好的级联分类器

	if (faceCascade.empty()) { cout << "XML file not loaded" << endl; }  //判断是否导入成功

	vector<Rect> faces;  //定义脸部显示框为矩形
	faceCascade.detectMultiScale(img, faces, 1.1, 10);  //将输入图像的脸部定位框位置上的四个节点输出

	for (int i = 0; i < faces.size(); i++)
	{
		rectangle(img, faces[i].tl(), faces[i].br(), Scalar(255, 0, 255), 3);   //缩写top righy ; bottom left
	}

	imshow("Image", img);
	waitKey(0);
}
最终效果:
Project1_Virtual Painter
- 在之前学习到的内容基础上进行整合,实现虚拟画家这一功能
#include <opencv2/imgcodecs.hpp>
#include <opencv2/highgui.hpp>
#include <opencv2/imgproc.hpp>
#include <iostream>

using namespace cv;
using namespace std;


/  Project 1 - Virtual Painter //

Mat img;
VideoCapture cap(0);
vector<vector<int>> newPoints;  // to store all points

/  COLOR VALUES
						   // hmin, smin, vmin hmax, smax, vmax
vector<vector<int>> myColors{ {124,48,117,143,170,255}, // Purple
								{68,72,156,102,126,255} };// Green
vector<Scalar> myColorValues{ {255,0,255},		// Purple
								{0,255,0} };// Green


Point getContours(Mat image) {


	vector<vector<Point>> contours;
	vector<Vec4i> hierarchy;

	findContours(image, contours, hierarchy, RETR_EXTERNAL, CHAIN_APPROX_SIMPLE);
	//drawContours(img, contours, -1, Scalar(255, 0, 255), 2);
	vector<vector<Point>> conPoly(contours.size());
	vector<Rect> boundRect(contours.size());

	Point myPoint(0, 0);

	for (int i = 0; i < contours.size(); i++)
	{
		int area = contourArea(contours[i]);
		cout << area << endl;

		string objectType;

		if (area > 1000)
		{
			float peri = arcLength(contours[i], true);
			approxPolyDP(contours[i], conPoly[i], 0.02 * peri, true);

			cout << conPoly[i].size() << endl;
			boundRect[i] = boundingRect(conPoly[i]);
			myPoint.x = boundRect[i].x + boundRect[i].width / 2;
			myPoint.y = boundRect[i].y;

			//drawContours(img, conPoly, i, Scalar(255, 0, 255), 2);
			//rectangle(img, boundRect[i].tl(), boundRect[i].br(), Scalar(0, 255, 0), 5);
		}
	}
	return myPoint;
}


vector<vector<int>> findColor(Mat img)
{
	Mat imgHSV;
	cvtColor(img, imgHSV, COLOR_BGR2HSV);

	for (int i = 0; i < myColors.size(); i++)
	{
		Scalar lower(myColors[i][0], myColors[i][1], myColors[i][2]);
		Scalar upper(myColors[i][3], myColors[i][4], myColors[i][5]);
		Mat mask;
		inRange(imgHSV, lower, upper, mask);
		//imshow(to_string(i), mask);
		Point myPoint = getContours(mask);
		if (myPoint.x != 0) {
			newPoints.push_back({ myPoint.x,myPoint.y,i });
		}
	}
	return newPoints;
}

void drawOnCanvas(vector<vector<int>> newPoints, vector<Scalar> myColorValues)
{

	for (int i = 0; i < newPoints.size(); i++)
	{
		circle(img, Point(newPoints[i][0], newPoints[i][1]), 10, myColorValues[newPoints[i][2]], FILLED);
	}
}


void main() {

	while (true) {

		cap.read(img);
		newPoints = findColor(img);
		drawOnCanvas(newPoints, myColorValues);

		imshow("Image", img);
		waitKey(1);
	}
}
Project2_Document Scanner
#include <opencv2/imgcodecs.hpp>
#include <opencv2/highgui.hpp>
#include <opencv2/imgproc.hpp>
#include <iostream>

using namespace cv;
using namespace std;

///  Project 2 - Document Scanner  //

Mat imgOriginal, imgGray, imgBlur, imgCanny, imgThre, imgDil, imgErode, imgWarp, imgCrop;
vector<Point> initialPoints, docPoints;
float w = 420, h = 596;

Mat preProcessing(Mat img)
{
	cvtColor(img, imgGray, COLOR_BGR2GRAY);
	GaussianBlur(imgGray, imgBlur, Size(3, 3), 3, 0);
	Canny(imgBlur, imgCanny, 25, 75);
	Mat kernel = getStructuringElement(MORPH_RECT, Size(3, 3));
	dilate(imgCanny, imgDil, kernel);
	//erode(imgDil, imgErode, kernel);
	return imgDil;
}

vector<Point> getContours(Mat image) {

	vector<vector<Point>> contours;
	vector<Vec4i> hierarchy;

	findContours(image, contours, hierarchy, RETR_EXTERNAL, CHAIN_APPROX_SIMPLE);
	//drawContours(img, contours, -1, Scalar(255, 0, 255), 2);
	vector<vector<Point>> conPoly(contours.size());
	vector<Rect> boundRect(contours.size());

	vector<Point> biggest;
	int maxArea = 0;

	for (int i = 0; i < contours.size(); i++)
	{
		int area = contourArea(contours[i]);
		//cout << area << endl;

		string objectType;

		if (area > 1000)
		{
			float peri = arcLength(contours[i], true);
			approxPolyDP(contours[i], conPoly[i], 0.02 * peri, true);

			if (area > maxArea && conPoly[i].size() == 4) {

				//drawContours(imgOriginal, conPoly, i, Scalar(255, 0, 255), 5);
				biggest = { conPoly[i][0],conPoly[i][1] ,conPoly[i][2] ,conPoly[i][3] };
				maxArea = area;
			}
			//drawContours(imgOriginal, conPoly, i, Scalar(255, 0, 255), 2);
			//rectangle(imgOriginal, boundRect[i].tl(), boundRect[i].br(), Scalar(0, 255, 0), 5);
		}
	}
	return biggest;
}

void drawPoints(vector<Point> points, Scalar color)
{
	for (int i = 0; i < points.size(); i++)
	{
		circle(imgOriginal, points[i], 10, color, FILLED);
		putText(imgOriginal, to_string(i), points[i], FONT_HERSHEY_PLAIN, 4, color, 4);
	}
}

vector<Point> reorder(vector<Point> points)
{
	vector<Point> newPoints;
	vector<int>  sumPoints, subPoints;

	for (int i = 0; i < 4; i++)
	{
		sumPoints.push_back(points[i].x + points[i].y);
		subPoints.push_back(points[i].x - points[i].y);
	}

	newPoints.push_back(points[min_element(sumPoints.begin(), sumPoints.end()) - sumPoints.begin()]); // 0
	newPoints.push_back(points[max_element(subPoints.begin(), subPoints.end()) - subPoints.begin()]); //1
	newPoints.push_back(points[min_element(subPoints.begin(), subPoints.end()) - subPoints.begin()]); //2
	newPoints.push_back(points[max_element(sumPoints.begin(), sumPoints.end()) - sumPoints.begin()]); //3

	return newPoints;
}

Mat getWarp(Mat img, vector<Point> points, float w, float h)
{
	Point2f src[4] = { points[0],points[1],points[2],points[3] };
	Point2f dst[4] = { {0.0f,0.0f},{w,0.0f},{0.0f,h},{w,h} };

	Mat matrix = getPerspectiveTransform(src, dst);
	warpPerspective(img, imgWarp, matrix, Point(w, h));

	return imgWarp;
}

void main() {

	string path = "Resources/paper.jpg";
	imgOriginal = imread(path);
	//resize(imgOriginal, imgOriginal, Size(), 0.5, 0.5);

	// Preprpcessing - Step 1
	imgThre = preProcessing(imgOriginal);

	// Get Contours - Biggest  - Step 2
	initialPoints = getContours(imgThre);
	//drawPoints(initialPoints, Scalar(0, 0, 255));
	docPoints = reorder(initialPoints);
	//drawPoints(docPoints, Scalar(0, 255, 0));

	// Warp - Step 3
	imgWarp = getWarp(imgOriginal, docPoints, w, h);

	//Crop - Step 4
	int cropVal = 5;
	Rect roi(cropVal, cropVal, w - (2 * cropVal), h - (2 * cropVal));
	imgCrop = imgWarp(roi);

	imshow("Image", imgOriginal);
	//imshow("Image Dilation", imgThre);
	//imshow("Image Warp", imgWarp);
	imshow("Image Crop", imgCrop);
	waitKey(0);

}
Project3_License Plate Detector
#include <opencv2/imgcodecs.hpp>
#include <opencv2/highgui.hpp>
#include <opencv2/imgproc.hpp>
#include <opencv2/objdetect.hpp>
#include <iostream>

using namespace cv;
using namespace std;

///  Project 3 - License Plate Detector //

void main() {

	Mat img;
	VideoCapture cap(0);

	CascadeClassifier plateCascade;
	plateCascade.load("Resources/haarcascade_russian_plate_number.xml");

	if (plateCascade.empty()) { cout << "XML file not loaded" << endl; }

	vector<Rect> plates;

	while (true) {

		cap.read(img);
		plateCascade.detectMultiScale(img, plates, 1.1, 10);

		for (int i = 0; i < plates.size(); i++)
		{
			Mat imgCrop = img(plates[i]);
			//imshow(to_string(i), imgCrop);
			imwrite("Resources/Plates/" + to_string(i) + ".png", imgCrop);
			rectangle(img, plates[i].tl(), plates[i].br(), Scalar(255, 0, 255), 3);
		}

		imshow("Image", img);
		waitKey(1);
	}
}


 2290
2290


 被折叠的 条评论
为什么被折叠?
被折叠的 条评论
为什么被折叠?
 到【灌水乐园】发言


