


12-17 Spring容器中有关bean的生命周期的学习——脑图
Spring注解驱动开发第12讲——如何使用@Bean注解指定初始化和销毁的方法?看这一篇就够了!!
bean的生命周期
通常意义上讲的bean的生命周期,指的是bean从创建到初始化,经过一系列的流程,最终销毁的过程。只不过,在Spring中,bean的生命周期是由Spring容器来管理的。**在Spring中,我们可以自己来指定bean的初始化和销毁的方法。**我们指定了bean的初始化和销毁方法之后,当容器在bean进行到当前生命周期的阶段时,会自动调用我们自定义的初始化和销毁方法。
如何定义初始化和销毁方法?
我们已经知道了由Spring管理bean的生命周期时,我们可以指定bean的初始化和销毁方法,那具体该如何定义这些初始化和销毁方法呢?接下来,我们就介绍第一种定义初始化和销毁方法的方式:通过@Bean注解指定初始化和销毁方法。
如果我们使用注解的方式,那么该如何实现指定bean的初始化和销毁方法呢?别急,我们下面就一起来搞定它!!
首先,创建一个名称为Car的类,这个类的实现比较简单,如下所示。
package com.meimeixia.bean;

public class Car {

	public Car() {
		System.out.println("car constructor...");
	}

	public void init() {
		System.out.println("car ... init...");
	}

	public void destroy() {
		System.out.println("car ... destroy...");
	}

}
然后,我们将Car类对象通过注解的方式注册到Spring容器中,具体的做法就是新建一个MainConfigOfLifeCycle类作为Spring的配置类,将Car类对象通过MainConfigOfLifeCycle类注册到Spring容器中,MainConfigOfLifeCycle类的代码如下所示。
@Configuration
public class MainConfigOfLifeCycle {

	@Bean
	public Car car() {
		return new Car();
	}

}
接着,我们就新建一个IOCTest_LifeCycle类来测试容器中的Car对象,该测试类的代码如下所示。
public class IOCTest_LifeCycle {

	@Test
	public void test01() {
		// 1. 创建IOC容器
		AnnotationConfigApplicationContext applicationContext = new AnnotationConfigApplicationContext(MainConfigOfLifeCycle.class);
		System.out.println("容器创建完成");
	}

}
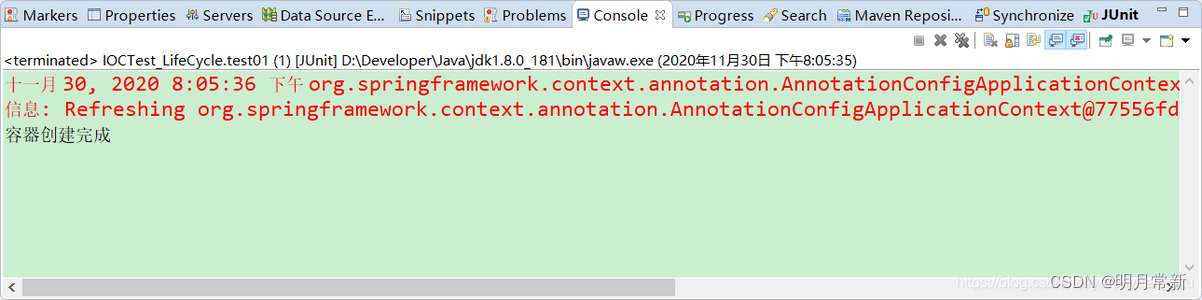
在前面的文章中,我们说过,对于单实例bean对象来说,在Spring容器创建完成后,就会对单实例bean进行实例化。那么,我们先来运行下IOCTest_LifeCycle类中的test01()方法,发现输出的结果信息如下所示。
 可以看到,在Spring容器创建完成时(前),会自动调用单实例bean的构造方法,对单实例bean进行了实例化操作。
总之,对于单实例bean来说,会在Spring容器启动的时候创建对象;对于多实例bean来说,会在每次获取bean的时候创建对象。
现在,我们在Car类中指定了init()方法和destroy()方法,那么,如何让Spring容器知道Car类中的init()方法是用来执行对象的初始化操作,而destroy()方法是用来执行对象的销毁操作呢?如果是使用XML文件配置的话,那么我们可以使用如下配置来实现。
<bean id="car" class="com.meimeixia.bean.Car" init-method="init" destroy-method="destroy">

</bean>
如果我们使用的是@Bean注解,那么又该如何实现呢?其实很简单,我们来看下@Bean注解的源码,如下所示。

看到@Bean注解的源码,相信小伙伴们会有种豁然开朗的感觉,没错,就是使用@Bean注解的initMethod属性和destroyMethod属性来指定bean的初始化方法和销毁方法。
所以,我们得在MainConfigOfLifeCycle配置类的@Bean注解中指定initMethod属性和destroyMethod属性,如下所示。
@Configuration
public class MainConfigOfLifeCycle {

	@Bean(initMethod="init", destroyMethod="destroy")
	public Car car() {
		return new Car();
	}

}

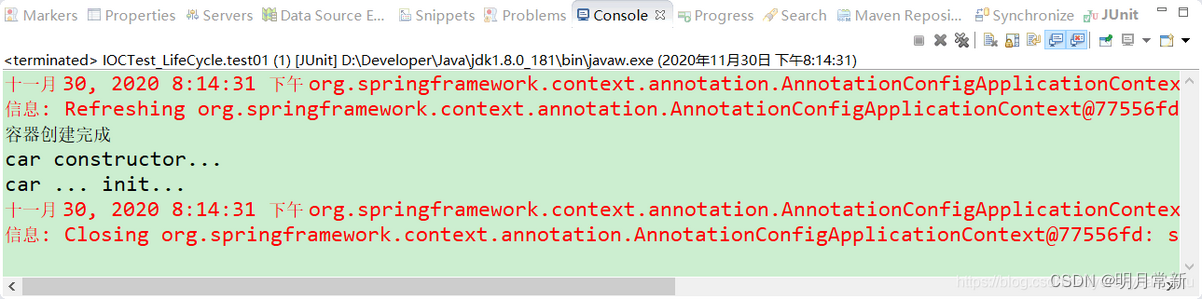
从输出结果中可以看出,在Spring容器中,先是调用了Car类的构造方法来创建Car对象,接下来便是调用了Car对象的init()方法来进行初始化。
有些小伙伴们可能会问了,运行上面的测试方法并没有打印出bean的销毁方法中的信息啊,那什么时候执行bean的销毁方法呢?这个问题问的很好,bean的销毁方法是在容器关闭的时候被调用的。
所以,我们在IOCTest_LifeCycle类中的test01()方法中,添加关闭容器的代码,如下所示。
public class IOCTest_LifeCycle {

	@Test
	public void test01() {
		// 1. 创建IOC容器
		AnnotationConfigApplicationContext applicationContext = new AnnotationConfigApplicationContext(MainConfigOfLifeCycle.class);
		System.out.println("容器创建完成");

		// 关闭容器
		applicationContext.close();
	}

}
此时,我们再来运行IOCTest_LifeCycle类中的test01()方法,会发现输出的结果信息如下所示。

可以看到,此时输出了对象的销毁方法中的信息,说明执行了对象的销毁方法。
指定初始化和销毁方法的使用场景(典型的使用场景就是对于数据源的管理)
一个典型的使用场景就是对于数据源的管理。例如,在配置数据源时,在初始化的时候,会对很多的数据源的属性进行赋值操作;在销毁的时候,我们需要对数据源的连接等信息进行关闭和清理。这个时候,我们就可以在自定义的初始化和销毁方法中来做这些事情了!
初始化和销毁方法调用的时机
你有没有想过这样一个问题,初始化方法和销毁方法是在什么时候被调用的啊?
bean对象的初始化方法调用的时机:对象创建完成,如果对象中存在一些属性,并且这些属性也都赋好值之后,那么就会调用bean的初始化方法。
对于单实例bean来说,在Spring容器创建完成后,Spring容器会自动调用bean的初始化方法;
对于多实例bean来说,在每次获取bean对象的时候,调用bean的初始化方法。
bean对象的销毁方法调用的时机:对于单实例bean来说,在容器关闭的时候,会调用bean的销毁方法;对于多实例bean来说,Spring容器不会管理这个bean,也就不会自动调用这个bean的销毁方法了。不过,小伙伴们可以手动调用多实例bean的销毁方法。
多实例不创建对象
 多实例创建对象
可以看到,多实例的bean在容器关闭的时候是不进行销毁的,也就是说你每次获取时,IOC容器帮你创建出对象交还给你,至于要什么时候销毁这是你自己的事,Spring容器压根就不会再管理这些多实例的bean了。
Spring注解驱动开发第13讲——使用InitializingBean和DisposableBean来管理bean的生命周期,你真的了解吗?
在上一讲中,我们讲述了如何使用@Bean注解来指定bean初始化和销毁的方法,具体的用法就是在@Bean注解中使用init-method属性和destroy-method属性来指定初始化方法和销毁方法。除此之外,Spring中是否还提供了其他的方式来对bean实例进行初始化和销毁呢?
InitializingBean接口
InitializingBean接口概述
Spring中提供了一个InitializingBean接口,该接口为bean提供了属性初始化后的处理方法,它只包括afterPropertiesSet方法,凡是继承该接口的类,在bean的属性初始化后都会执行该方法。InitializingBean接口的源码如下所示。
根据InitializingBean接口中提供的afterPropertiesSet()方法的名字不难推断出,afterPropertiesSet()方法是在属性赋好值之后调用的。
那到底是不是这样的呢?下面我们来分析下afterPropertiesSet()方法的调用时机。
何时调用InitializingBean接口?
我们定位到Spring中的org.springframework.beans.factory.support.AbstractAutowireCapableBeanFactory这个类里面的invokeInitMethods()方法中,来查看Spring加载bean的方法。
关于为什么是定位到这个方法: 在 Car 实现的 InitializingBean 的 afterPropertiesSet 方法中打断点, 即 System.out.println(“cat afterPropertiesSet…”); 这一句,程序运行到此停住时查看 调用栈 即可定位到此方法


题外话:不要问我为什么会是这个invokeInitMethods()方法,问我我也不知道,因为我就不熟悉Spring框架的源码,那就更加没看过它的源码了,可能有些小伙伴比较熟悉Spring框架的源码,那他自然就知道是这个invokeInitMethods()方法了。不熟悉Spring框架的源码的同学(比如笔者本人),也没关系,你只须定位到该方法中即可。所以,小伙伴们不要只顾着使用Spring,还是要多看看Spring的源码啊!Spring框架中使用了大量优秀的设计模型,其代码的编写规范和严谨程度也是业界开源框架中数一数二的,非常值得阅读。
我们来到AbstractAutowireCapableBeanFactory类中的invokeInitMethods()方法处,如下所示。
  protected void invokeInitMethods(String beanName, final Object bean, RootBeanDefinition mbd) throws Throwable {
  //判断been  是否实现了InitializingBean 接口 如果实现了就调用been  的afterPropertiesSet
        boolean isInitializingBean = bean instanceof InitializingBean;
        if (isInitializingBean && (mbd == null || !mbd.isExternallyManagedInitMethod("afterPropertiesSet"))) {
            if (this.logger.isDebugEnabled()) {
                this.logger.debug("Invoking afterPropertiesSet() on bean with name '" + beanName + "'");
            }

            if (System.getSecurityManager() != null) {
                try {
                    AccessController.doPrivileged(new PrivilegedExceptionAction<Object>() {
                        public Object run() throws Exception {
                            ((InitializingBean)bean).afterPropertiesSet();//调用been  的afterPropertiesSet
                            return null;
                        }
                    }, this.getAccessControlContext());
                } catch (PrivilegedActionException var6) {
                    throw var6.getException();
                }
            } else {
                ((InitializingBean)bean).afterPropertiesSet();///调用been  的afterPropertiesSet
            }
        }
		 if (mbd != null) {
		            String initMethodName = mbd.getInitMethodName();
		            if (initMethodName != null && (!isInitializingBean || !"afterPropertiesSet".equals(initMethodName)) 	&& 	!mbd.isExternallyManagedInitMethod(initMethodName)) {
		                this.invokeCustomInitMethod(beanName, bean, mbd);//调用been  的afterPropertiesSet
		            }
		        }
分析上述代码后,我们可以初步得出如下信息:
1 ,Spring为bean提供了两种初始化的方式,实现InitializingBean接口(也就是要实现该接口中的afterPropertiesSet方法),或者在配置文件或@Bean注解中通过init-method来指定,两种方式可以同时使用。
2, 实现InitializingBean接口是直接调用afterPropertiesSet()方法,与通过反射调用init-method指定的方法相比,效率相对来说要高点。但是init-method方式消除了对Spring的依赖。
3,如果调用afterPropertiesSet方法时出错,那么就不会调用init-method指定的方法了。
也就是说Spring为bean提供了两种初始化的方式,第一种方式是实现InitializingBean接口(也就是要实现该接口中的afterPropertiesSet方法),第二种方式是在配置文件或@Bean注解中通过init-method来指定,这两种方式可以同时使用,同时使用先调用afterPropertiesSet方法,后执行init-method指定的方法。
DisposableBean接口
DisposableBean接口概述
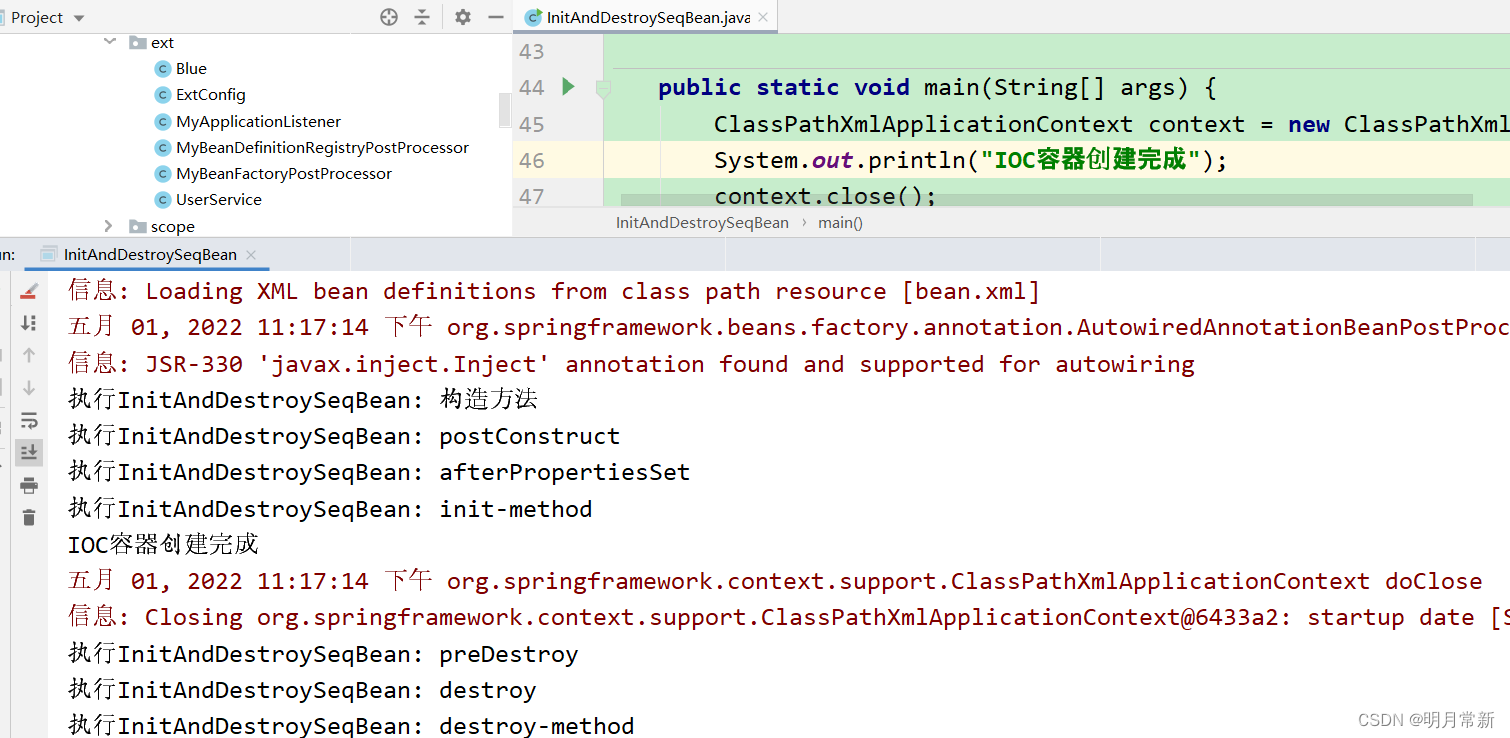
Spring容器中的Bean几种初始化方法和销毁方法的先后顺序
从执行结果可以看出:
Bean在实例化的过程中
1 Constructor
2 @PostConstruct
3 InitializingBean
4 init-method
IOC容器创建完成
Bean在销毁的过程中:
1 @PreDestroy
2 DisposableBean
3 destroy-method
实现org.springframework.beans.factory.DisposableBean接口的bean在销毁前,Spring将会调用DisposableBean接口的destroy()方法。也就是说我们可以实现DisposableBean这个接口来定义咱们这个销毁的逻辑。
可以看到,在DisposableBean接口中只定义了一个destroy()方法。

在bean生命周期结束前调用destroy()方法做一些收尾工作,亦可以使用destroy-method。前者与Spring耦合高,使用类型强转.方法名(),效率高;后者耦合低,使用反射,效率相对来说较低。
DisposableBean接口注意事项
多实例bean的生命周期不归Spring容器来管理,这里的DisposableBean接口中的方法是由Spring容器来调用的,所以如果一个多实例bean实现了DisposableBean接口是没有啥意义的,因为相应的方法根本不会被调用,当然了,在XML配置文件中指定了destroy方法,也是没有任何意义的。所以,在多实例bean情况下,Spring是不会自动调用bean的销毁方法的。
单实例bean案例
首先,创建一个Cat的类来实现InitializingBean和DisposableBean这俩接口,代码如下所示,注意该Cat类上标注了一个@Component注解。
从输出的结果信息中可以看出,单实例bean情况下,IOC容器创建完成后,会自动调用bean的初始化方法;而在容器销毁前,会自动调用bean的销毁方法。
Spring注解驱动开发第14讲——你了解@PostConstruct注解和@PreDestroy注解吗?
在之前的文章中,我们介绍了如何使用@Bean注解指定初始化和销毁的方法,也介绍了使用InitializingBean和DisposableBean来处理bean的初始化和销毁。除此之外,在JDK中还提供了两个注解能够在bean创建完成并且属性赋值完成之后执行一些初始化工作和在容器销毁bean之前通知我们进行一些清理工作。今天,我们就一起来看看这两个注解的用法。
@PostConstruct注解和@PreDestroy注解
@PostConstruct注解
@PostConstruct注解好多人以为是Spring提供的,其实它是Java自己的注解,是JSR-250规范里面定义的一个注解。我们来看下@PostConstruct注解的源码,如下所示。

@PostConstruct注解被用来修饰一个非静态的void()方法。被@PostConstruct注解修饰的方法会在服务器加载Servlet的时候运行,并且只会被服务器执行一次。被@PostConstruct注解修饰的方法通常在构造函数之后,init()方法之前执行。
通常我们是会在Spring框架中使用到@PostConstruct注解的,该注解的方法在整个bean初始化中的执行顺序如下:
Constructor(构造方法)→@Autowired(依赖注入)→@PostConstruct(注释的方法)
@PreDestroy注解
被@PreDestroy注解修饰的方法会在服务器卸载Servlet的时候运行,并且只会被服务器调用一次,类似于Servlet的destroy()方法。被**@PreDestroy注解修饰的方法会在destroy()方法之后,Servlet被彻底卸载之前执行**。
执行顺序如下所示:
调用destroy()方法→@PreDestroy→destroy()方法→bean销毁
@PostConstruct和@PreDestroy是Java规范JSR-250引入的注解,定义了对象的创建和销毁工作,同一期规范中还有@Resource注解,Spring也支持了这些注解。
一个案例
对@PostConstruct注解和@PreDestroy注解有了简单的了解之后,接下来,我们就写一个简单的程序来加深对这两个注解的理解。
首先,我们创建一个Dog类,如下所示,注意在该类上标注了一个@Component注解。
@Component
public class Dog {
public Dog() {
System.out.println("dog constructor...");
}
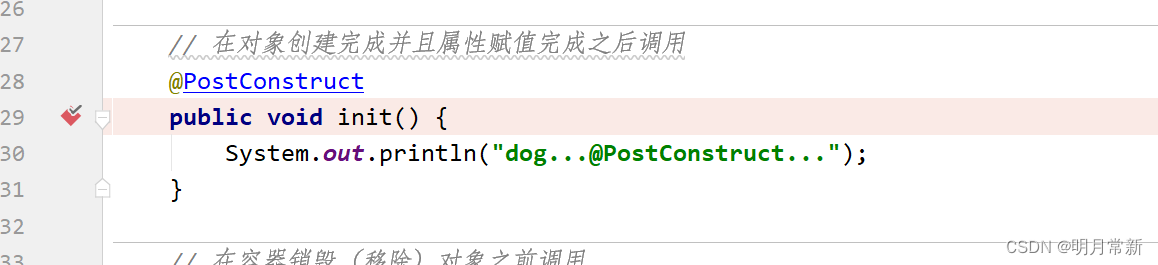
// 在对象创建完成并且属性赋值完成之后调用
@PostConstruct
public void init() {
System.out.println("dog...@PostConstruct...");
}
// 在容器销毁(移除)对象之前调用
@PreDestroy
public void destory() {
System.out.println("dog...@PreDestroy...");
}
}
可以看到,在以上Dog类中,我们提供了构造方法、init()方法以及destroy()方法,并且还使用了@PostConstruct注解和@PreDestroy注解来分别标注init()方法和destroy()方法。
然后,在MainConfigOfLifeCycle配置类中通过包扫描的方式将以上类注入到Spring容器中。
@ComponentScan("com.meimeixia.bean")
@Configuration
public class MainConfigOfLifeCycle {

	@Scope("prototype")
	@Bean(initMethod="init", destroyMethod="destroy")
	public Car car() {
		return new Car();
	}

}

从输出的结果信息中可以看出,被@PostConstruct注解修饰的方法是在bean创建完成并且属性赋值完成之后才执行的,而被@PreDestroy注解修饰的方法是在容器销毁bean之前执行的,通常是进行一些清理工作。
Spring注解驱动开发第15讲——关于BeanPostProcessor后置处理器,你了解多少?
有些小伙伴问我,学习Spring是不是不用学习到这么细节的程度啊?感觉这些细节的部分在实际工作中使用不到啊,我到底需不需要学习到这么细节的程度呢?我的答案是:有必要学习到这么细节的程度,而且是有机会、有条件一定要学!吃透Spring的原理和源码!往往拉开人与人之间差距的就是这些细节的部分,当前只要是使用Java技术栈开发的Web项目,几乎都会使用Spring框架。而且目前各招聘网站上对于Java开发的要求几乎清一色的都是熟悉或者精通Spring,所以,你很有必要学习Spring的细节知识点。
Spring注解开发(六)——Bean的生命周期以及BeanPostProcessor的源码分析
BeanPostProcessor后置处理器概述
首先,我们来看下BeanPostProcessor的源码,看下它到底是个什么鬼,如下所示。

从源码可以看出,BeanPostProcessor是一个接口,其中有两个方法,即postProcessBeforeInitialization和postProcessAfterInitialization这两个方法,这两个方法分别是在Spring容器中的bean初始化前后执行,所以Spring容器中的每一个bean对象初始化前后,都会执行BeanPostProcessor接口的实现类中的这两个方法。
也就是说,postProcessBeforeInitialization方法会在bean实例化和属性设置之后,自定义初始化方法之前被调用,而postProcessAfterInitialization方法会在自定义初始化方法之后被调用。当容器中存在多个BeanPostProcessor的实现类时,会按照它们在容器中注册的顺序执行。对于自定义的BeanPostProcessor实现类,还可以让其实现Ordered接口自定义排序。
**因此我们可以在每个bean对象初始化前后,加上自己的逻辑。**实现方式是自定义一个BeanPostProcessor接口的实现类,例如MyBeanPostProcessor,然后在该类的postProcessBeforeInitialization和postProcessAfterInitialization这俩方法中写上自己的逻辑。
BeanPostProcessor后置处理器实例
我们创建一个MyBeanPostProcessor类,实现BeanPostProcessor接口,如下所示。
/**
 * 后置处理器,在初始化前后进行处理工作
 * @author liayun
 *
 */
@Component // 将后置处理器加入到容器中,这样的话,Spring就能让它工作了
public class MyBeanPostProcessor implements BeanPostProcessor {

	@Override
	public Object postProcessBeforeInitialization(Object bean, String beanName) throws BeansException {
		// TODO Auto-generated method stub
		System.out.println("postProcessBeforeInitialization..." + beanName + "=>" + bean);
		return bean;
	}

	@Override
	public Object postProcessAfterInitialization(Object bean, String beanName) throws BeansException {
		// TODO Auto-generated method stub
		System.out.println("postProcessAfterInitialization..." + beanName + "=>" + bean);
		return bean;
	}

}

可以看到,postProcessBeforeInitialization方法会在bean实例化和属性设置之后,自定义初始化方法之前被调用,而postProcessAfterInitialization方法会在自定义初始化方法之后被调用。
当然了,也可以让我们自己写的MyBeanPostProcessor类来实现Ordered接口自定义排序,如下所示。
/**
 * 后置处理器,在初始化前后进行处理工作
 * @author liayun
 *
 */
@Component // 将后置处理器加入到容器中,这样的话,Spring就能让它工作了
public class MyBeanPostProcessor implements BeanPostProcessor, Ordered {

	@Override
	public Object postProcessBeforeInitialization(Object bean, String beanName) throws BeansException {
		// TODO Auto-generated method stub
		System.out.println("postProcessBeforeInitialization..." + beanName + "=>" + bean);
		return bean;
	}

	@Override
	public Object postProcessAfterInitialization(Object bean, String beanName) throws BeansException {
		// TODO Auto-generated method stub
		System.out.println("postProcessAfterInitialization..." + beanName + "=>" + bean);
		return bean;
	}

	@Override
	public int getOrder() {
		// TODO Auto-generated method stub
		return 3;
	}

}

BeanPostProcessor后置处理器作用
后置处理器可用于bean对象初始化前后进行逻辑增强。 Spring提供了BeanPostProcessor接口的很多实现类,例如AutowiredAnnotationBeanPostProcessor用于@Autowired注解的实现,AnnotationAwareAspectJAutoProxyCreator用于Spring AOP的动态代理等等。
除此之外,我们还可以自定义BeanPostProcessor接口的实现类,在其中写入咱们需要的逻辑。
下面我会以AnnotationAwareAspectJAutoProxyCreator为例,简单说明一下后置处理器是怎样工作的。
我们都知道spring AOP的实现原理是动态代理,最终放入容器的是代理类的对象,而不是bean本身的对象,那么Spring是什么时候做到这一步的呢?就是在AnnotationAwareAspectJAutoProxyCreator(AbstractAutoProxyCreator的子类)后置处理器的postProcessAfterInitialization方法中,即bean对象初始化完成之后,**后置处理器会判断该bean是否注册了切面,若是,则生成代理对象注入到容器中。**这一部分的关键代码是在哪儿呢?我们定位到AbstractAutoProxyCreator抽象类中的postProcessAfterInitialization方法处便能看到了,如下所示。

 public Object postProcessAfterInitialization(Object bean, String beanName) throws BeansException {
        if (bean != null) {
            Object cacheKey = this.getCacheKey(bean.getClass(), beanName);
            if (!this.earlyProxyReferences.contains(cacheKey)) {//后置处理器会判断该bean是否注册了切面,若是,则生成代理对象注入到容器中。
                return this.wrapIfNecessary(bean, beanName, cacheKey);
            }
        }

        return bean;
    }
雷神总结
 1 , BeanPostProcessor是一个接口,其中有两个方法,即postProcessBeforeInitialization和postProcessAfterInitialization这两个方法,这两个方法分别是在Spring容器中的bean初始化前后执行,所以Spring容器中的每一个bean对象初始化前后,都会执行BeanPostProcessor接口的实现类中的这两个方法。
2 ,根据InitializingBean接口中提供的afterPropertiesSet()方法的名字不难推断出,afterPropertiesSet()方法是在属性赋好值之后调用的。
 1 , BeanPostProcessor是一个接口,其中有两个方法,即postProcessBeforeInitialization和postProcessAfterInitialization这两个方法,这两个方法分别是在Spring容器中的bean初始化前后执行,所以Spring容器中的每一个bean对象初始化前后,都会执行BeanPostProcessor接口的实现类中的这两个方法。
2,@PostConstruct注解被用来修饰一个非静态的void()方法。被@PostConstruct注解修饰的方法会在服务器加载Servlet的时候运行,并且只会被服务器执行一次。被@PostConstruct注解修饰的方法通常在构造函数之后,init()方法之前执行。
 init 前后 执行
最好调试一遍代码直接明了
Spring注解驱动开发第16讲——面试官再问你BeanPostProcessor的执行流程,就把这篇文章甩给他!
在前面的文章中,我们讲述了BeanPostProcessor的postProcessBeforeInitialization()方法和postProcessAfterInitialization()方法在bean初始化的前后调用。而且我们可以自定义类来实现BeanPostProcessor接口,并在postProcessBeforeInitialization()方法和postProcessAfterInitialization()方法中编写我们自定义的逻辑。
今天,我们来一起探讨下BeanPostProcessor的底层原理。
bean的初始化和销毁
我们知道BeanPostProcessor的postProcessBeforeInitialization()方法是在bean的初始化之前被调用;而postProcessAfterInitialization()方法是在bean初始化的之后被调用。并且bean的初始化和销毁方法我们可以通过如下方式进行指定。
(一)通过@Bean指定init-method和destroy-method
@Bean(initMethod="init", destroyMethod="destroy")
public Car car() {
    return new Car();
}
(二)通过让bean实现InitializingBean和DisposableBean这俩接口
@Component
public class Cat implements InitializingBean, DisposableBean {

	public Cat() {
		System.out.println("cat constructor...");
	}

	/**
	 * 会在容器关闭的时候进行调用
	 */
	@Override
	public void destroy() throws Exception {
		// TODO Auto-generated method stub
		System.out.println("cat destroy...");
	}

	/**
	 * 会在bean创建完成,并且属性都赋好值以后进行调用
	 */
	@Override
	public void afterPropertiesSet() throws Exception {
		// TODO Auto-generated method stub
		System.out.println("cat afterPropertiesSet...");
	}

}
(三)使用JSR-250规范里面定义的@PostConstruct和@PreDestroy这俩注解
@PostConstruct:在bean创建完成并且属性赋值完成之后,来执行初始化方法
@PreDestroy:在容器销毁bean之前通知我们进行清理工作
@Component
public class Dog {

	public Dog() {
		System.out.println("dog constructor...");
	}

	// 在对象创建完成并且属性赋值完成之后调用
	@PostConstruct
	public void init() {
		System.out.println("dog...@PostConstruct...");
	}

	// 在容器销毁(移除)对象之前调用
	@PreDestroy
	public void destory() {
		System.out.println("dog...@PreDestroy...");
	}

}
(四)通过让bean实现BeanPostProcessor接口
/**
 * 后置处理器,在初始化前后进行处理工作
 * @author liayun
 *
 */
@Component // 将后置处理器加入到容器中,这样的话,Spring就能让它工作了
public class MyBeanPostProcessor implements BeanPostProcessor, Ordered {

	@Override
	public Object postProcessBeforeInitialization(Object bean, String beanName) throws BeansException {
		// TODO Auto-generated method stub
		System.out.println("postProcessBeforeInitialization..." + beanName + "=>" + bean);
		return bean;
	}

	@Override
	public Object postProcessAfterInitialization(Object bean, String beanName) throws BeansException {
		// TODO Auto-generated method stub
		System.out.println("postProcessAfterInitialization..." + beanName + "=>" + bean);
		return bean;
	}

	@Override
	public int getOrder() {
		// TODO Auto-generated method stub
		return 3;
	}

}
通过以上这四种方式,我们就可以对bean的整个生命周期进行控制:
1,bean的实例化:调用bean的构造方法,我们可以在bean的无参构造方法中执行相应的逻辑。(构造方法)
2,bean的初始化:在初始化时,可以通过BeanPostProcessor的postProcessBeforeInitialization()方法和postProcessAfterInitialization()方法进行拦截,执行自定义的逻辑;
postProcessBeforeInitialization方法会在bean实例化和属性设置之后,自定义初始化方法之前被调用(在构造方法执行完后 init执行之前),而postProcessAfterInitialization方法会在自定义初始化方法之后被调用。

通过@PostConstruct注解、
被@PostConstruct注解修饰的方法会在服务器加载Servlet的时候运行,并且只会被服务器执行一次。被@PostConstruct注解修饰的方法通常在构造函数之后,init()方法之前执行。
InitializingBean
该接口为bean提供了属性初始化后的处理方法,它只包括afterPropertiesSet方法,凡是继承该接口的类,在bean的属性初始化后都会执行该方法。(在init之后执行)
和init-method(初始化方法)
来指定bean初始化前后执行的方法,在该方法中咱们可以执行自定义的逻辑。(init)
3,bean的销毁:可以通过@PreDestroy注解、DisposableBean和destroy-method来指定bean在销毁前执行的方法,在该方法中咱们可以执行自定义的逻辑。
被@PreDestroy注解修饰的方法会在服务器卸载Servlet的时候运行,并且只会被服务器调用一次,类似于Servlet的destroy()方法。被**@PreDestroy注解修饰的方法会在destroy()方法之后,Servlet被彻底卸载之前执行**。?
@PostConstruct和@PreDestroy这两个作用于Servlet生命周期的注解,实现Bean初始化之前和销毁之前的自定义操作。
被@PreDestroy修饰的方法会在服务器卸载Servlet的时候运行,并且只会被服务器调用一次,类似于Servlet的destroy()方法。被@PreDestroy修饰的方法会在destroy()方法之后运行,在Servlet被彻底卸载之前。

实现org.springframework.beans.factory.DisposableBean接口的bean在销毁前,Spring将会调用DisposableBean接口的destroy()方法。也就是说我们可以实现DisposableBean这个接口来定义咱们这个销毁的逻辑。
destroy-method (定义销毁方法)
所以,通过上述四种方式,我们可以控制Spring中bean的整个生命周期。
BeanPostProcessor源码解析
如果想深刻理解BeanPostProcessor的工作原理,那么就不得不看下相关的源码,我们可以在MyBeanPostProcessor类的postProcessBeforeInitialization()方法和postProcessAfterInitialization()方法这两处打上断点来进行调试,如下所示。
//ctrl + f8打断点 方法断点

随后,我们以Debug的方式来运行IOCTest_LifeCycle类中的test01()方法,运行后的效果如下所示。
通过这个方法调用栈,我们可以详细地分析从运行IOCTest_LifeCycle类中的test01()方法开始,到进入MyBeanPostProcessor类的postProcessBeforeInitialization()方法中的执行流程。只要我们在Eclipse的方法调用栈中找到IOCTest_LifeCycle类的test01()方法,依次分析方法调用栈中在该类的test01()方法上面位置的方法,即可了解整个方法调用栈的过程。要想定位方法调用栈中的方法,只需要在Eclipse的方法调用栈中单击相应的方法即可。
温馨提示:方法调用栈是先进后出的,也就是说,最先调用的方法会最后退出,每调用一个方法,JVM会将当前调用的方法放入栈的栈顶,方法退出时,会将方法从栈顶的位置弹出。
方法栈的调用
1 测试类中创建IOC容器
public class IOCTest_LifeCycle {

	@Test
	public void test01() {
		// 1. 创建IOC容器
		AnnotationConfigApplicationContext applicationContext = new AnnotationConfigApplicationContext(MainConfigOfLifeCycle.class);
		System.out.println("容器创建完成");
		// 关闭容器
		applicationContext.close();
	}

}
2 IOC容器的构造器方法,他会调用refresh();刷新容器
/**
	 * Create a new AnnotationConfigApplicationContext, scanning for bean definitions
	 * in the given packages and automatically refreshing the context.
	 * @param basePackages the packages to check for annotated classes
	 */
	public AnnotationConfigApplicationContext(String... basePackages) {
		this();
		scan(basePackages);
		refresh();
	}
3 在refresh()方法中初始化所有剩下的单实例bean对象
finishBeanFactoryInitialization(beanFactory);
@Override
	public void refresh() throws BeansException, IllegalStateException {
		synchronized (this.startupShutdownMonitor) {
			// Prepare this context for refreshing.
			prepareRefresh();

			// Tell the subclass to refresh the internal bean factory.
			ConfigurableListableBeanFactory beanFactory = obtainFreshBeanFactory();

			// Prepare the bean factory for use in this context.
			prepareBeanFactory(beanFactory);

			try {
				// Allows post-processing of the bean factory in context subclasses.
				postProcessBeanFactory(beanFactory);

				// Invoke factory processors registered as beans in the context.
				invokeBeanFactoryPostProcessors(beanFactory);

				// Register bean processors that intercept bean creation.
				registerBeanPostProcessors(beanFactory);

				// Initialize message source for this context.
				initMessageSource();

				// Initialize event multicaster for this context.
				initApplicationEventMulticaster();

				// Initialize other special beans in specific context subclasses.
				onRefresh();

				// Check for listener beans and register them.
				registerListeners();

				// Instantiate all remaining (non-lazy-init) singletons.
				初始化所有剩下的单实例对象
				finishBeanFactoryInitialization(beanFactory);

				// Last step: publish corresponding event.
				finishRefresh();
			}

			catch (BeansException ex) {
				if (logger.isWarnEnabled()) {
					logger.warn("Exception encountered during context initialization - " +
							"cancelling refresh attempt: " + ex);
				}

				// Destroy already created singletons to avoid dangling resources.
				destroyBeans();

				// Reset 'active' flag.
				cancelRefresh(ex);

				// Propagate exception to caller.
				throw ex;
			}

			finally {
				// Reset common introspection caches in Spring's core, since we
				// might not ever need metadata for singleton beans anymore...
				resetCommonCaches();
			}
		}
	}
4 这行代码的作用同样是初始化所有的(非懒加载的)单实例bean。
beanFactory.preInstantiateSingletons();
/**
* Finish the initialization of this context's bean factory,
* initializing all remaining singleton beans.
*/
protected void finishBeanFactoryInitialization(ConfigurableListableBeanFactory beanFactory) {
// Initialize conversion service for this context.
if (beanFactory.containsBean(CONVERSION_SERVICE_BEAN_NAME) &&
beanFactory.isTypeMatch(CONVERSION_SERVICE_BEAN_NAME, ConversionService.class)) {
beanFactory.setConversionService(
beanFactory.getBean(CONVERSION_SERVICE_BEAN_NAME, ConversionService.class));
}
// Register a default embedded value resolver if no bean post-processor
// (such as a PropertyPlaceholderConfigurer bean) registered any before:
// at this point, primarily for resolution in annotation attribute values.
if (!beanFactory.hasEmbeddedValueResolver()) {
beanFactory.addEmbeddedValueResolver(new StringValueResolver() {
@Override
public String resolveStringValue(String strVal) {
return getEnvironment().resolvePlaceholders(strVal);
}
});
}
// Initialize LoadTimeWeaverAware beans early to allow for registering their transformers early.
String[] weaverAwareNames = beanFactory.getBeanNamesForType(LoadTimeWeaverAware.class, false, false);
for (String weaverAwareName : weaverAwareNames) {
getBean(weaverAwareName);
}
// Stop using the temporary ClassLoader for type matching.
beanFactory.setTempClassLoader(null);
// Allow for caching all bean definition metadata, not expecting further changes.
beanFactory.freezeConfiguration();
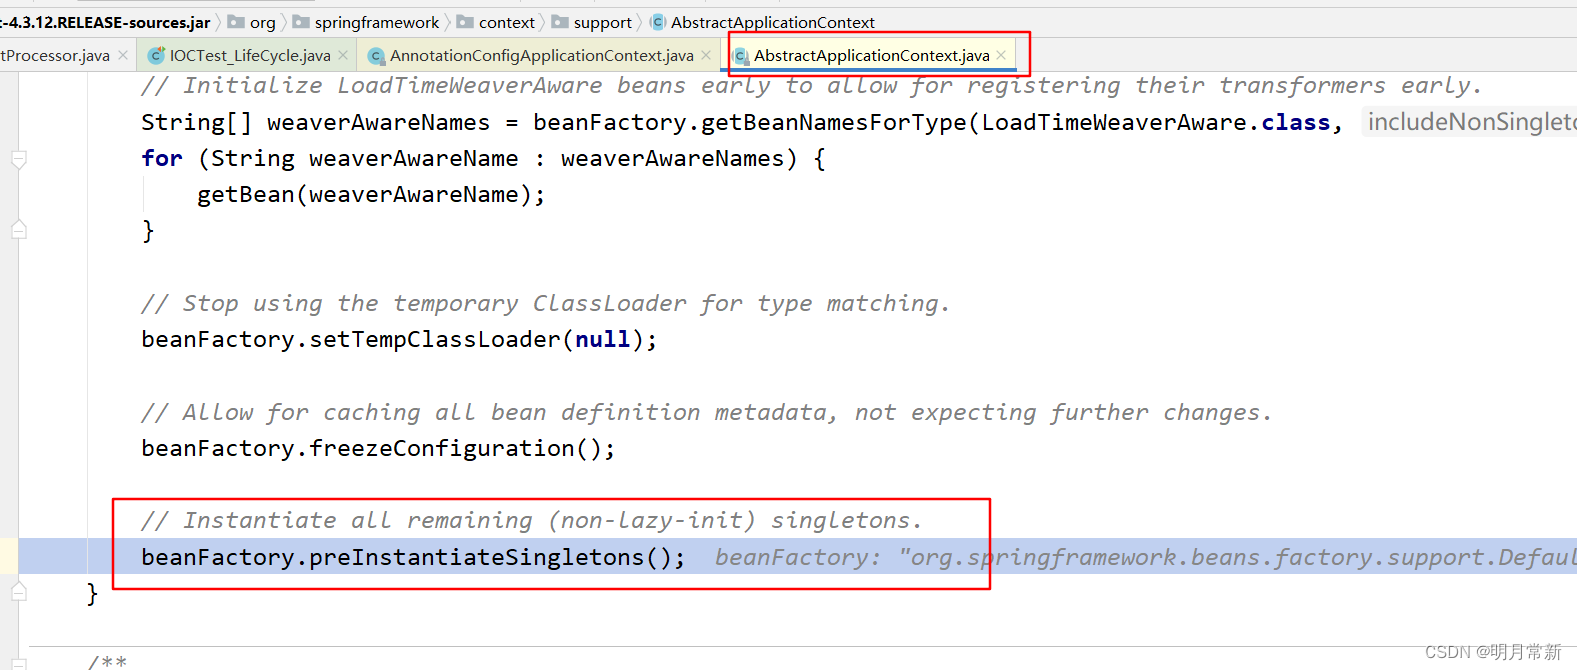
// Instantiate all remaining (non-lazy-init) singletons.
这行代码的作用同样是初始化所有的(非懒加载的)单实例bean。
beanFactory.preInstantiateSingletons();
}
贴个图
5,我们继续跟进方法调用栈,如下所示,可以看到,方法的执行定位到DefaultListableBeanFactory类的preInstantiateSingletons()方法的最后一个else分支调用的getBean()方法上。
getBean(beanName);
@Override
	public void preInstantiateSingletons() throws BeansException {
		if (this.logger.isDebugEnabled()) {
			this.logger.debug("Pre-instantiating singletons in " + this);
		}

		// Iterate over a copy to allow for init methods which in turn register new bean definitions.
		// While this may not be part of the regular factory bootstrap, it does otherwise work fine.
		List<String> beanNames = new ArrayList<String>(this.beanDefinitionNames);

		// Trigger initialization of all non-lazy singleton beans...
		for (String beanName : beanNames) {
			RootBeanDefinition bd = getMergedLocalBeanDefinition(beanName);
			if (!bd.isAbstract() && bd.isSingleton() && !bd.isLazyInit()) {
				if (isFactoryBean(beanName)) {
					final FactoryBean<?> factory = (FactoryBean<?>) getBean(FACTORY_BEAN_PREFIX + beanName);
					boolean isEagerInit;
					if (System.getSecurityManager() != null && factory instanceof SmartFactoryBean) {
						isEagerInit = AccessController.doPrivileged(new PrivilegedAction<Boolean>() {
							@Override
							public Boolean run() {
								return ((SmartFactoryBean<?>) factory).isEagerInit();
							}
						}, getAccessControlContext());
					}
					else {
						isEagerInit = (factory instanceof SmartFactoryBean &&
								((SmartFactoryBean<?>) factory).isEagerInit());
					}
					if (isEagerInit) {
						getBean(beanName);
					}
				}
				else {
					getBean(beanName);
				}
			}
		}

		// Trigger post-initialization callback for all applicable beans...
		for (String beanName : beanNames) {
			Object singletonInstance = getSingleton(beanName);
			if (singletonInstance instanceof SmartInitializingSingleton) {
				final SmartInitializingSingleton smartSingleton = (SmartInitializingSingleton) singletonInstance;
				if (System.getSecurityManager() != null) {
					AccessController.doPrivileged(new PrivilegedAction<Object>() {
						@Override
						public Object run() {
							smartSingleton.afterSingletonsInstantiated();
							return null;
						}
					}, getAccessControlContext());
				}
				else {
					smartSingleton.afterSingletonsInstantiated();
				}
			}
		}
	}
6,继续跟进方法调用栈,如下所示。
	@Override
	public Object getBean(String name) throws BeansException {
		return doGetBean(name, null, null, false);
	}
此时方法定位到AbstractBeanFactory类的getBean()方法中了,在getBean()方法中,又调用了doGetBean()方法。
7,继续跟进方法调用栈,如下所示,此时,方法的执行定位到AbstractBeanFactory类的doGetBean()方法中的如下那行代码处。
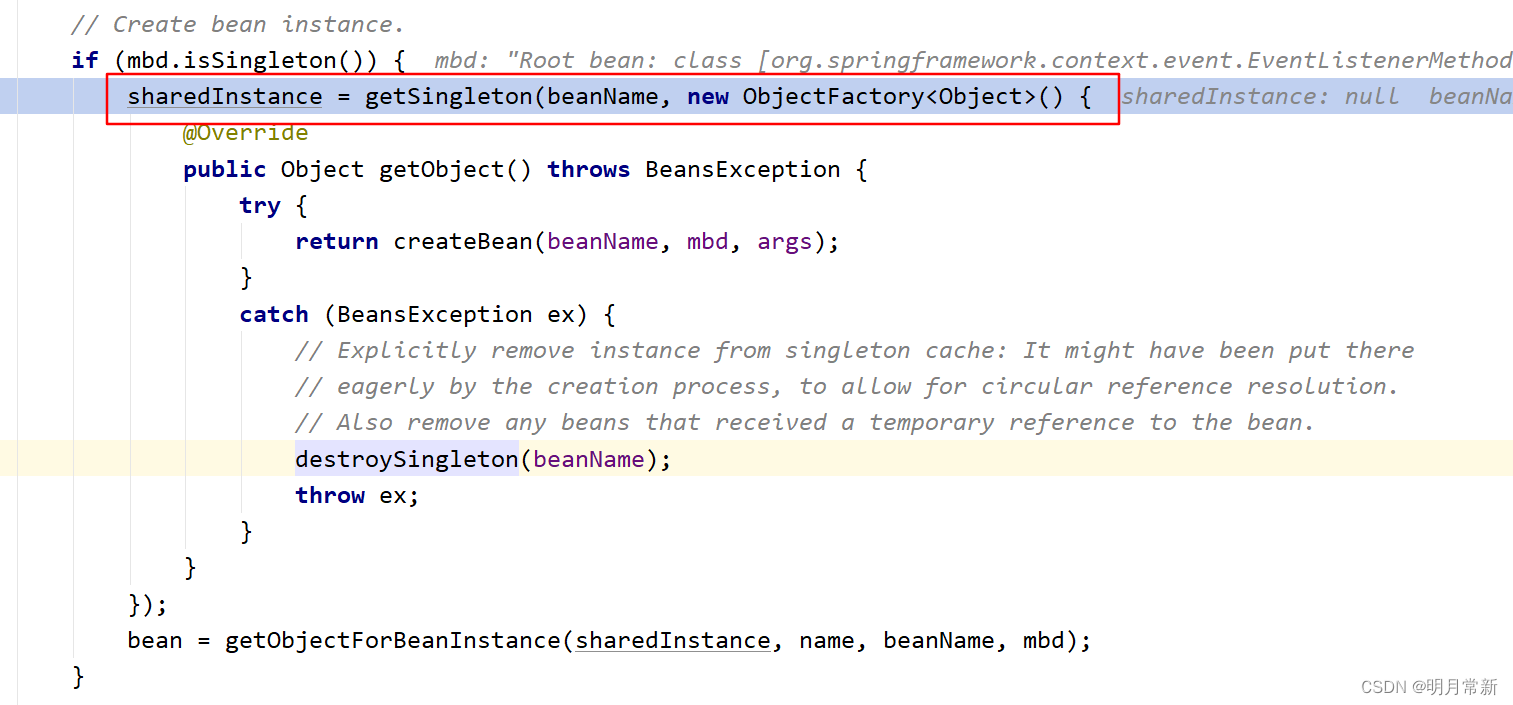
// Create bean instance.
				if (mbd.isSingleton()) {
					sharedInstance = getSingleton(beanName, new ObjectFactory<Object>() {
						@Override
						public Object getObject() throws BeansException {
							try {
								return createBean(beanName, mbd, args);
							}
							catch (BeansException ex) {
								// Explicitly remove instance from singleton cache: It might have been put there
								// eagerly by the creation process, to allow for circular reference resolution.
								// Also remove any beans that received a temporary reference to the bean.
								destroySingleton(beanName);
								throw ex;
							}
						}
					});
					bean = getObjectForBeanInstance(sharedInstance, name, beanName, mbd);
				}
可以看到,在Spring内部是通过getSingleton()方法来获取单实例bean的。
8,继续跟进方法调用栈,如下所示,此时,方法定位到DefaultSingletonBeanRegistry类的getSingleton()方法中的如下那行代码处。

try {
					singletonObject = singletonFactory.getObject();
					newSingleton = true;
				}
可以看到,在getSingleton()方法里面又调用了getObject()方法来获取单实例bean。
9,继续跟进方法调用栈,如下所示,此时,方法定位到AbstractBeanFactory类的doGetBean()方法中的如下那行代码处。
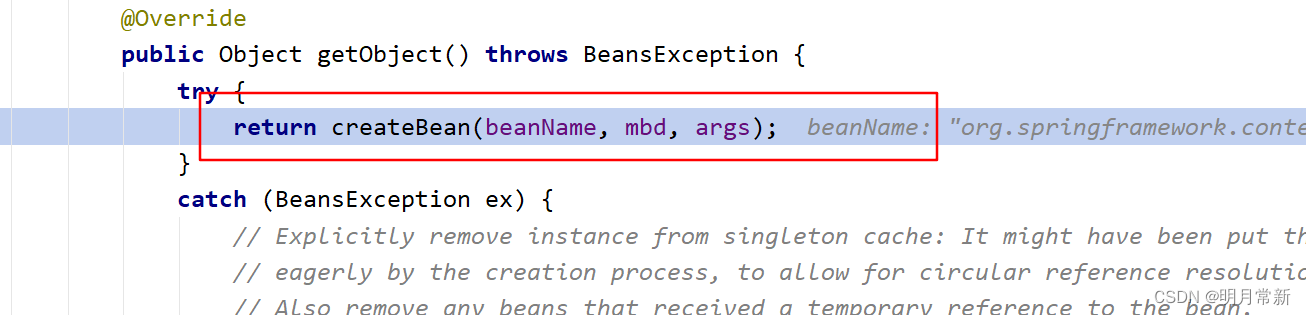
@Override
						public Object getObject() throws BeansException {
							try {
								return createBean(beanName, mbd, args);
							}
							catch (BeansException ex) {
								// Explicitly remove instance from singleton cache: It might have been put there
								// eagerly by the creation process, to allow for circular reference resolution.
								// Also remove any beans that received a temporary reference to the bean.
								destroySingleton(beanName);
								throw ex;
							}
						}
也就是说,当第一次获取单实例bean时,由于单实例bean还未创建,那么Spring会调用createBean()方法来创建单实例bean。
10,继续跟进方法调用栈,如下所示,可以看到,方法的执行定位到AbstractAutowireCapableBeanFactory类的createBean()方法中的如下那行代码处。
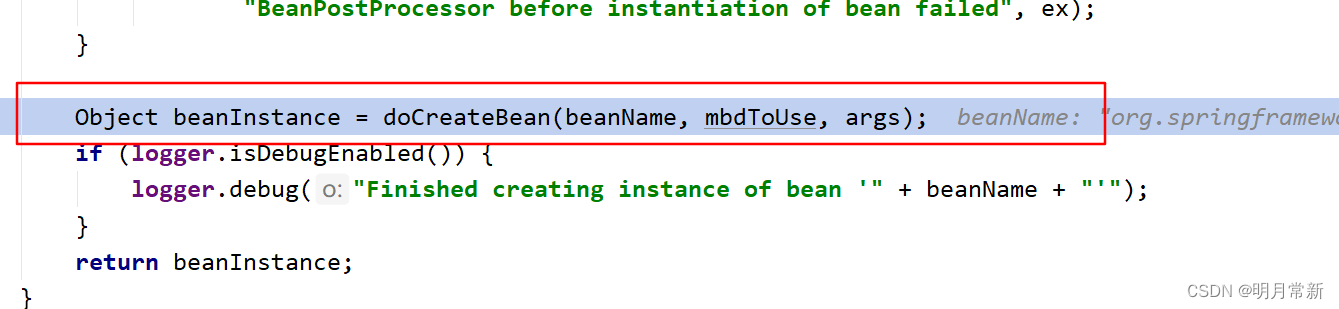
可以看到,Spring中创建单实例bean调用的是doCreateBean()方法。
11,继续跟进方法调用栈,如下所示,此时,方法的执行已经定位到AbstractAutowireCapableBeanFactory类的doCreateBean()方法中的如下那行代码处了。

在initializeBean()方法里面会调用一系列的后置处理器。
12,继续跟进方法调用栈,如下所示,此时,方法的执行定位到AbstractAutowireCapableBeanFactory类的initializeBean()方法中的如下那行代码处

小伙伴们需要重点留意一下这个applyBeanPostProcessorsBeforeInitialization()方法。
回过头来我们再来看看AbstractAutowireCapableBeanFactory类的doCreateBean()方法中的如下这行代码。
**没错,在以上initializeBean()方法中调用了后置处理器的逻辑,**这我上面已经说到了。小伙伴们需要特别注意一下,在AbstractAutowireCapableBeanFactory类的doCreateBean()方法中,调用initializeBean()方法之前,还调用了一个populateBean()方法,我也在上图中标注出来了。
我们点进去这个populateBean()方法中,看下这个方法到底执行了哪些逻辑,如下所示。
/**
	 * Populate the bean instance in the given BeanWrapper with the property values
	 * from the bean definition.
	 * @param beanName the name of the bean
	 * @param mbd the bean definition for the bean
	 * @param bw BeanWrapper with bean instance
	 */
	protected void populateBean(String beanName, RootBeanDefinition mbd, BeanWrapper bw) {
		PropertyValues pvs = mbd.getPropertyValues();

		if (bw == null) {
			if (!pvs.isEmpty()) {
				throw new BeanCreationException(
						mbd.getResourceDescription(), beanName, "Cannot apply property values to null instance");
			}
			else {
				// Skip property population phase for null instance.
				return;
			}
		}

		// Give any InstantiationAwareBeanPostProcessors the opportunity to modify the
		// state of the bean before properties are set. This can be used, for example,
		// to support styles of field injection.
		boolean continueWithPropertyPopulation = true;

		if (!mbd.isSynthetic() && hasInstantiationAwareBeanPostProcessors()) {
			for (BeanPostProcessor bp : getBeanPostProcessors()) {
				if (bp instanceof InstantiationAwareBeanPostProcessor) {
					InstantiationAwareBeanPostProcessor ibp = (InstantiationAwareBeanPostProcessor) bp;
					if (!ibp.postProcessAfterInstantiation(bw.getWrappedInstance(), beanName)) {
						continueWithPropertyPopulation = false;
						break;
					}
				}
			}
		}

		if (!continueWithPropertyPopulation) {
			return;
		}

		if (mbd.getResolvedAutowireMode() == RootBeanDefinition.AUTOWIRE_BY_NAME ||
				mbd.getResolvedAutowireMode() == RootBeanDefinition.AUTOWIRE_BY_TYPE) {
			MutablePropertyValues newPvs = new MutablePropertyValues(pvs);

			// Add property values based on autowire by name if applicable.
			if (mbd.getResolvedAutowireMode() == RootBeanDefinition.AUTOWIRE_BY_NAME) {
				autowireByName(beanName, mbd, bw, newPvs);
			}

			// Add property values based on autowire by type if applicable.
			if (mbd.getResolvedAutowireMode() == RootBeanDefinition.AUTOWIRE_BY_TYPE) {
				autowireByType(beanName, mbd, bw, newPvs);
			}

			pvs = newPvs;
		}

		boolean hasInstAwareBpps = hasInstantiationAwareBeanPostProcessors();
		boolean needsDepCheck = (mbd.getDependencyCheck() != RootBeanDefinition.DEPENDENCY_CHECK_NONE);

		if (hasInstAwareBpps || needsDepCheck) {
			PropertyDescriptor[] filteredPds = filterPropertyDescriptorsForDependencyCheck(bw, mbd.allowCaching);
			if (hasInstAwareBpps) {
				for (BeanPostProcessor bp : getBeanPostProcessors()) {
					if (bp instanceof InstantiationAwareBeanPostProcessor) {
						InstantiationAwareBeanPostProcessor ibp = (InstantiationAwareBeanPostProcessor) bp;
						pvs = ibp.postProcessPropertyValues(pvs, filteredPds, bw.getWrappedInstance(), beanName);
						if (pvs == null) {
							return;
						}
					}
				}
			}
			if (needsDepCheck) {
				checkDependencies(beanName, mbd, filteredPds, pvs);
			}
		}

		applyPropertyValues(beanName, mbd, bw, pvs);
	}
populateBean()方法同样是AbstractAutowireCapableBeanFactory类中的方法,它里面的代码比较多,但是逻辑非常简单**,populateBean()方法做的工作就是为bean的属性赋值。**也就是说,在Spring中会先调用populateBean()方法为bean的属性赋好值,然后再调用initializeBean()方法。
接下来,我们好好分析下initializeBean()方法,为了方便,我将Spring中AbstractAutowireCapableBeanFactory类的initializeBean()方法的代码特意提取出来了,如下所示。
protected Object initializeBean(final String beanName, final Object bean, RootBeanDefinition mbd) {
		if (System.getSecurityManager() != null) {
			AccessController.doPrivileged(new PrivilegedAction<Object>() {
				@Override
				public Object run() {
					invokeAwareMethods(beanName, bean);
					return null;
				}
			}, getAccessControlContext());
		}
		else {
			invokeAwareMethods(beanName, bean);
		}

		Object wrappedBean = bean;
		if (mbd == null || !mbd.isSynthetic()) {
			wrappedBean = applyBeanPostProcessorsBeforeInitialization(wrappedBean, beanName);
		}

		try {
			invokeInitMethods(beanName, wrappedBean, mbd);
		}
		catch (Throwable ex) {
			throw new BeanCreationException(
					(mbd != null ? mbd.getResourceDescription() : null),
					beanName, "Invocation of init method failed", ex);
		}

		if (mbd == null || !mbd.isSynthetic()) {
			wrappedBean = applyBeanPostProcessorsAfterInitialization(wrappedBean, beanName);
		}
		return wrappedBean;
	}
在initializeBean()方法中,调用了invokeInitMethods()方法,代码行如下所示。
invokeInitMethods(beanName, wrappedBean, mbd);
invokeInitMethods()方法的作用就是执行初始化方法,这些初始化方法包括我们之前讲的:在XML配置文件的标签中使用init-method属性指定的初始化方法;在@Bean注解中使用initMehod属性指定的方法;使用@PostConstruct注解标注的方法;实现InitializingBean接口的方法等。
wrappedBean = applyBeanPostProcessorsBeforeInitialization(wrappedBean, beanName);
在调用invokeInitMethods()方法之前,Spring调用了applyBeanPostProcessorsBeforeInitialization()这个方法,代码行如下所示。
wrappedBean = applyBeanPostProcessorsBeforeInitialization(wrappedBean, beanName);
在调用invokeInitMethods()方法之后,Spring又调用了applyBeanPostProcessorsAfterInitialization()这个方法,如下所示。
wrappedBean = applyBeanPostProcessorsAfterInitialization(wrappedBean, beanName);
这里,我们先来看看applyBeanPostProcessorsBeforeInitialization()方法中具体执行了哪些逻辑,该方法位于AbstractAutowireCapableBeanFactory类中,源码如下所示。
@Override
	public Object applyBeanPostProcessorsBeforeInitialization(Object existingBean, String beanName)
			throws BeansException {

		Object result = existingBean;
		for (BeanPostProcessor beanProcessor : getBeanPostProcessors()) {
			result = beanProcessor.postProcessBeforeInitialization(result, beanName);
			if (result == null) {
				return result;
			}
		}
		return result;
	}
可以看到,在applyBeanPostProcessorsBeforeInitialization()方法中,会遍历所有BeanPostProcessor对象,然后依次执行所有BeanPostProcessor对象的postProcessBeforeInitialization()方法,一旦BeanPostProcessor对象的postProcessBeforeInitialization()方法返回null以后,则后面的BeanPostProcessor对象便不再执行了,而是直接退出for循环。这些都是我们看源码看到的。
看Spring源码,我们还看到了一个细节**,在Spring中调用initializeBean()方法之前,还调用了populateBean()方法来为bean的属性赋值, 这在上面我也已经说过了。**
经过上面的一系列的跟踪源码分析,我们可以将关键代码的调用过程使用如下伪代码表述出来。
populateBean(beanName, mbd, instanceWrapper); // 给bean进行属性赋值
initializeBean(beanName, exposedObject, mbd)
{
	applyBeanPostProcessorsBeforeInitialization(wrappedBean, beanName);
	invokeInitMethods(beanName, wrappedBean, mbd); // 执行自定义初始化
	applyBeanPostProcessorsAfterInitialization(wrappedBean, beanName);
}
也就是说,在Spring中,调用initializeBean()方法之前,调用了populateBean()方法为bean的属性赋值,为bean的属性赋好值之后,再调用initializeBean()方法进行初始化。
在initializeBean()中,调用自定义的初始化方法(即invokeInitMethods())之前,调用了applyBeanPostProcessorsBeforeInitialization()方法,而在调用自定义的初始化方法之后,又调用了applyBeanPostProcessorsAfterInitialization()方法。至此,整个bean的初始化过程就这样结束了。
Spring注解驱动开发第17讲——BeanPostProcessor在Spring底层是如何使用的?看完这篇我懂了
在上一讲中,我们详细的介绍了BeanPostProcessor的执行流程。那么,BeanPostProcessor在Spring底层是如何使用的呢?今天,我们就一起来探讨下Spring的源码,一探BeanPostProcessor在Spring底层的使用情况。
BeanPostProcessor接口
我们先来看下BeanPostProcessor接口的源码,如下所示。
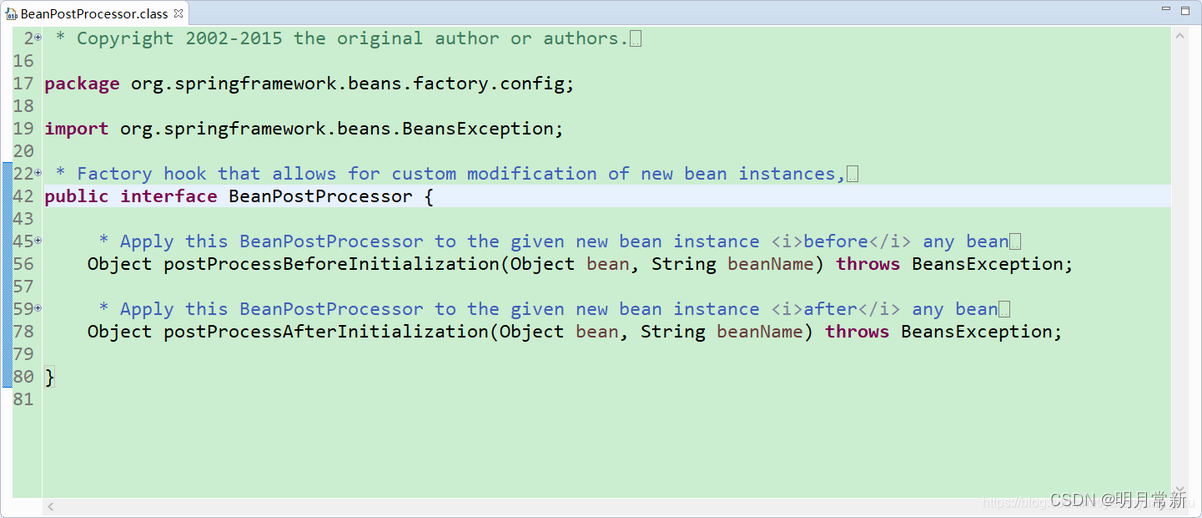
可以看到,在BeanPostProcessor接口中,提供了两个方法:postProcessBeforeInitialization()方法和postProcessAfterInitialization()方法。postProcessBeforeInitialization()方法会在bean初始化之前调用,postProcessAfterInitialization()方法会在bean初始化之后调用。接下来,我们就来分析下BeanPostProcessor接口在Spring中的实现。
注意:这里,我列举几个BeanPostProcessor接口在Spring中的实现类,来让大家更加清晰的理解BeanPostProcessor接口在Spring底层的应用。
ApplicationContextAwareProcessor类
org.springframework.context.support.ApplicationContextAwareProcessor是BeanPostProcessor接口的一个实现类,这个类的作用是可以向组件中注入IOC容器,大致的源码如下所示。
重点两处
else {
			invokeAwareInterfaces(bean);
		}


if (bean instanceof ApplicationContextAware) {
				((ApplicationContextAware) bean).setApplicationContext(this.applicationContext);
			}
/*
 * Copyright 2002-2016 the original author or authors.
 *
 * Licensed under the Apache License, Version 2.0 (the "License");
 * you may not use this file except in compliance with the License.
 * You may obtain a copy of the License at
 *
 *      http://www.apache.org/licenses/LICENSE-2.0
 *
 * Unless required by applicable law or agreed to in writing, software
 * distributed under the License is distributed on an "AS IS" BASIS,
 * WITHOUT WARRANTIES OR CONDITIONS OF ANY KIND, either express or implied.
 * See the License for the specific language governing permissions and
 * limitations under the License.
 */

package org.springframework.context.support;

import java.security.AccessControlContext;
import java.security.AccessController;
import java.security.PrivilegedAction;

import org.springframework.beans.BeansException;
import org.springframework.beans.factory.Aware;
import org.springframework.beans.factory.config.BeanPostProcessor;
import org.springframework.beans.factory.config.EmbeddedValueResolver;
import org.springframework.context.ApplicationContextAware;
import org.springframework.context.ApplicationEventPublisherAware;
import org.springframework.context.ConfigurableApplicationContext;
import org.springframework.context.EmbeddedValueResolverAware;
import org.springframework.context.EnvironmentAware;
import org.springframework.context.MessageSourceAware;
import org.springframework.context.ResourceLoaderAware;
import org.springframework.util.StringValueResolver;

/**
 * {@link org.springframework.beans.factory.config.BeanPostProcessor}
 * implementation that passes the ApplicationContext to beans that
 * implement the {@link EnvironmentAware}, {@link EmbeddedValueResolverAware},
 * {@link ResourceLoaderAware}, {@link ApplicationEventPublisherAware},
 * {@link MessageSourceAware} and/or {@link ApplicationContextAware} interfaces.
 *
 * <p>Implemented interfaces are satisfied in order of their mention above.
 *
 * <p>Application contexts will automatically register this with their
 * underlying bean factory. Applications do not use this directly.
 *
 * @author Juergen Hoeller
 * @author Costin Leau
 * @author Chris Beams
 * @since 10.10.2003
 * @see org.springframework.context.EnvironmentAware
 * @see org.springframework.context.EmbeddedValueResolverAware
 * @see org.springframework.context.ResourceLoaderAware
 * @see org.springframework.context.ApplicationEventPublisherAware
 * @see org.springframework.context.MessageSourceAware
 * @see org.springframework.context.ApplicationContextAware
 * @see org.springframework.context.support.AbstractApplicationContext#refresh()
 */
class ApplicationContextAwareProcessor implements BeanPostProcessor {

	private final ConfigurableApplicationContext applicationContext;

	private final StringValueResolver embeddedValueResolver;


	/**
	 * Create a new ApplicationContextAwareProcessor for the given context.
	 */
	public ApplicationContextAwareProcessor(ConfigurableApplicationContext applicationContext) {
		this.applicationContext = applicationContext;
		this.embeddedValueResolver = new EmbeddedValueResolver(applicationContext.getBeanFactory());
	}


	@Override
	public Object postProcessBeforeInitialization(final Object bean, String beanName) throws BeansException {
		AccessControlContext acc = null;

		if (System.getSecurityManager() != null &&
				(bean instanceof EnvironmentAware || bean instanceof EmbeddedValueResolverAware ||
						bean instanceof ResourceLoaderAware || bean instanceof ApplicationEventPublisherAware ||
						bean instanceof MessageSourceAware || bean instanceof ApplicationContextAware)) {
			acc = this.applicationContext.getBeanFactory().getAccessControlContext();
		}

		if (acc != null) {
			AccessController.doPrivileged(new PrivilegedAction<Object>() {
				@Override
				public Object run() {
					invokeAwareInterfaces(bean);
					return null;
				}
			}, acc);
		}
		else {
			invokeAwareInterfaces(bean);
		}

		return bean;
	}

	private void invokeAwareInterfaces(Object bean) {
		if (bean instanceof Aware) {
			if (bean instanceof EnvironmentAware) {
				((EnvironmentAware) bean).setEnvironment(this.applicationContext.getEnvironment());
			}
			if (bean instanceof EmbeddedValueResolverAware) {
				((EmbeddedValueResolverAware) bean).setEmbeddedValueResolver(this.embeddedValueResolver);
			}
			if (bean instanceof ResourceLoaderAware) {
				((ResourceLoaderAware) bean).setResourceLoader(this.applicationContext);
			}
			if (bean instanceof ApplicationEventPublisherAware) {
				((ApplicationEventPublisherAware) bean).setApplicationEventPublisher(this.applicationContext);
			}
			if (bean instanceof MessageSourceAware) {
				((MessageSourceAware) bean).setMessageSource(this.applicationContext);
			}
			if (bean instanceof ApplicationContextAware) {
				((ApplicationContextAware) bean).setApplicationContext(this.applicationContext);
			}
		}
	}

	@Override
	public Object postProcessAfterInitialization(Object bean, String beanName) {
		return bean;
	}

}
注意:我这里的Spring版本为4.3.12.RELEASE。
那具体如何使用ApplicationContextAwareProcessor类向组件中注入IOC容器呢?别急,我会用一个例子来说明下,相信小伙伴们看完后会有一种豁然开朗的感觉——哦,原来是它啊,我之前在项目中使用过的!
要想使用ApplicationContextAwareProcessor类向组件中注入IOC容器,我们就不得不提Spring中的另一个接口了,即ApplicationContextAware。如果需要向组件中注入IOC容器,那么可以让组件实现ApplicationContextAware接口。
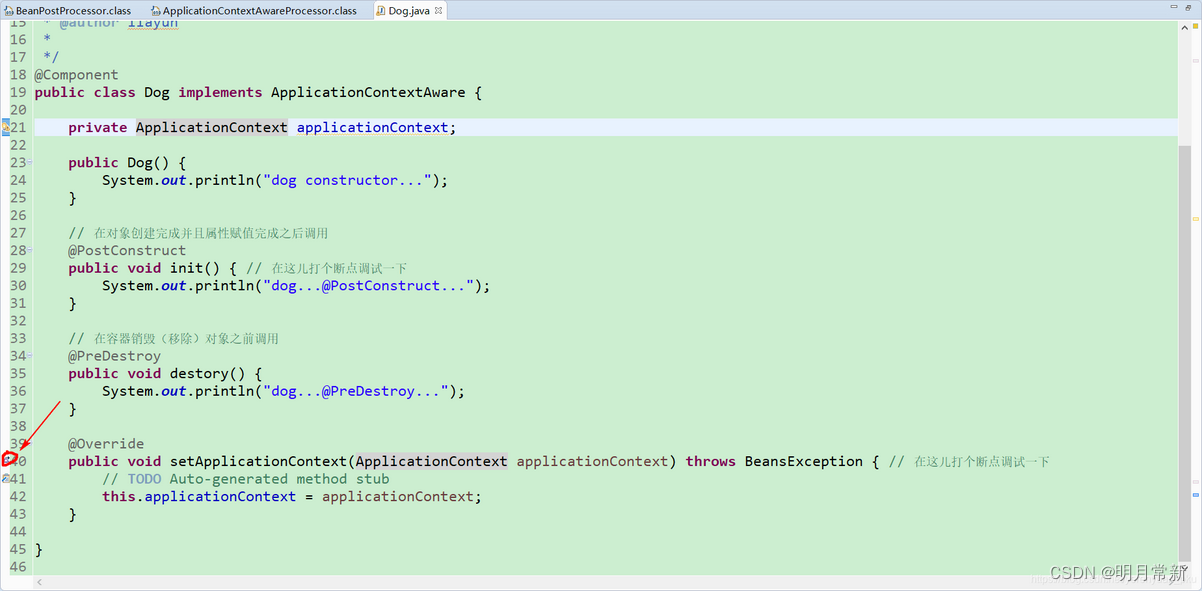
例如,我们创建一个Dog类,使其实现ApplicationContextAware接口,此时,我们需要实现ApplicationContextAware接口中的setApplicationContext()方法,在setApplicationContext()方法中有一个ApplicationContext类型的参数,这个就是IOC容器对象,我们可以在Dog类中定义一个ApplicationContext类型的成员变量,然后在setApplicationContext()方法中为这个成员变量赋值,此时就可以在Dog类中的其他方法中使用ApplicationContext对象了,如下所示。
(是老师的表述有点问题, 老师就是想通过这个方法找到bean所在的容器, 并设置到这个bean所在的属性中, 而不是真正的"将容器注入到bean中")
package com.meimeixia.bean;

import javax.annotation.PostConstruct;
import javax.annotation.PreDestroy;

import org.springframework.beans.BeansException;
import org.springframework.context.ApplicationContext;
import org.springframework.context.ApplicationContextAware;
import org.springframework.stereotype.Component;

/**
 * ApplicationContextAwareProcessor这个类的作用是可以帮我们在组件里面注入IOC容器,
 * 怎么注入呢?我们想要IOC容器的话,比如我们这个Dog组件,只需要实现ApplicationContextAware接口就行
 *
 * @author liayun
 *
 */
@Component
public class Dog implements ApplicationContextAware {

	private ApplicationContext applicationContext;

	public Dog() {
		System.out.println("dog constructor...");
	}

	// 在对象创建完成并且属性赋值完成之后调用
	@PostConstruct
	public void init() {
		System.out.println("dog...@PostConstruct...");
	}

	// 在容器销毁(移除)对象之前调用
	@PreDestroy
	public void destory() {
		System.out.println("dog...@PreDestroy...");
	}

	@Override
	public void setApplicationContext(ApplicationContext applicationContext) throws BeansException { // 在这儿打个断点调试一下
		// TODO Auto-generated method stub
		this.applicationContext = applicationContext;
	}

}
看到这里,相信不少小伙伴们都有一种很熟悉的感觉,没错,我之前也在项目中使用过!是的,这就是BeanPostProcessor在Spring底层的一种使用场景。至于上面的案例代码为何会在setApplicationContext()方法中获取到ApplicationContext对象,这就是ApplicationContextAwareProcessor类的功劳了!
接下来,我们就深入分析下ApplicationContextAwareProcessor类。
我们先来看下ApplicationContextAwareProcessor类中对于postProcessBeforeInitialization()方法的实现,如下所示。
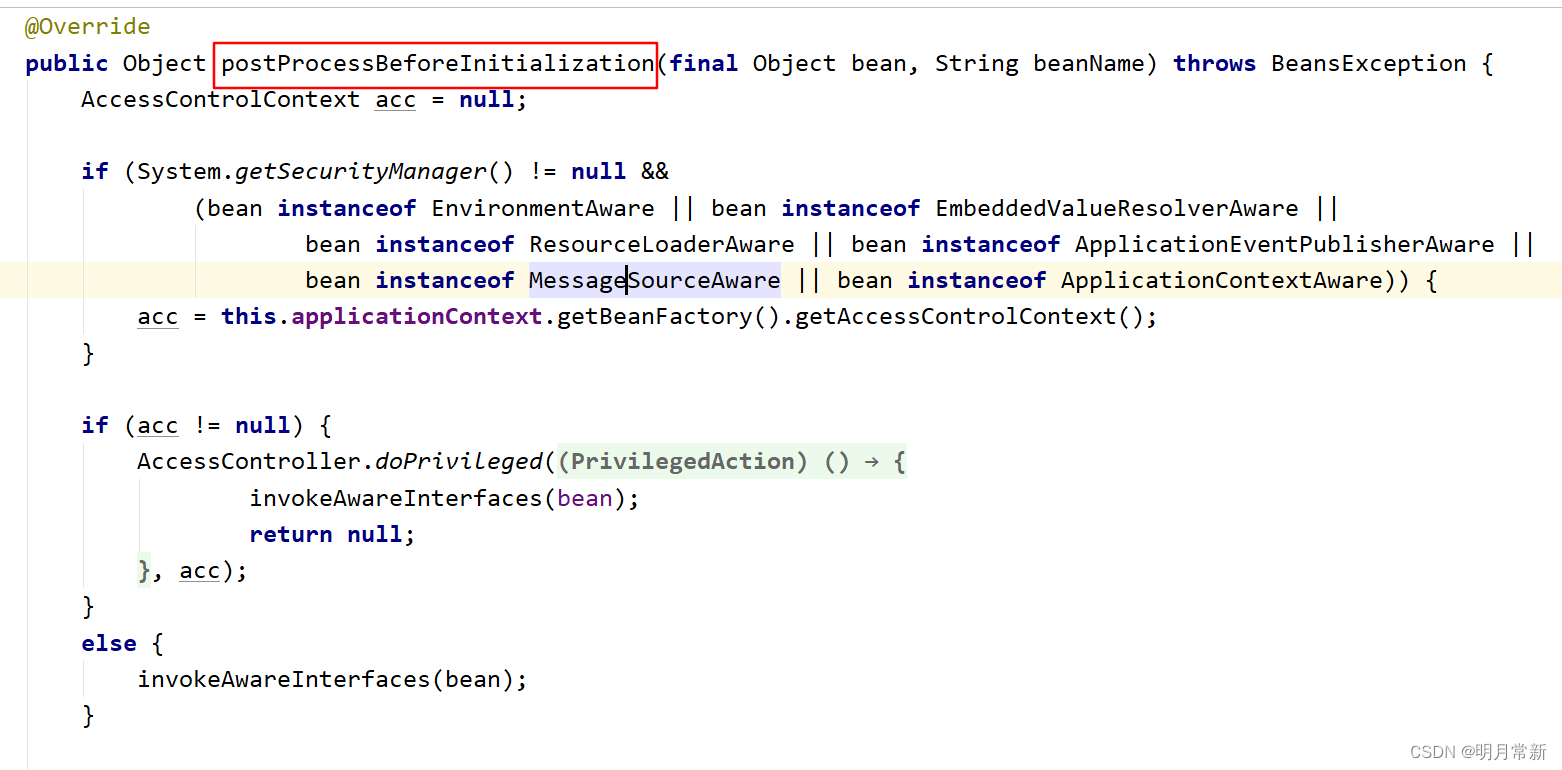
在bean初始化之前,首先对当前bean的类型进行判断,如果当前bean的类型不是EnvironmentAware,不是EmbeddedValueResolverAware,不是ResourceLoaderAware,不是ApplicationEventPublisherAware,不是MessageSourceAware,也不是ApplicationContextAware,那么直接返回bean。如果是上面类型中的一种类型,那么最终会调用invokeAwareInterfaces()方法,并将bean传递给该方法。
invokeAwareInterfaces()方法又是个什么鬼呢?我们继续看invokeAwareInterfaces()方法的源码,如下所示。
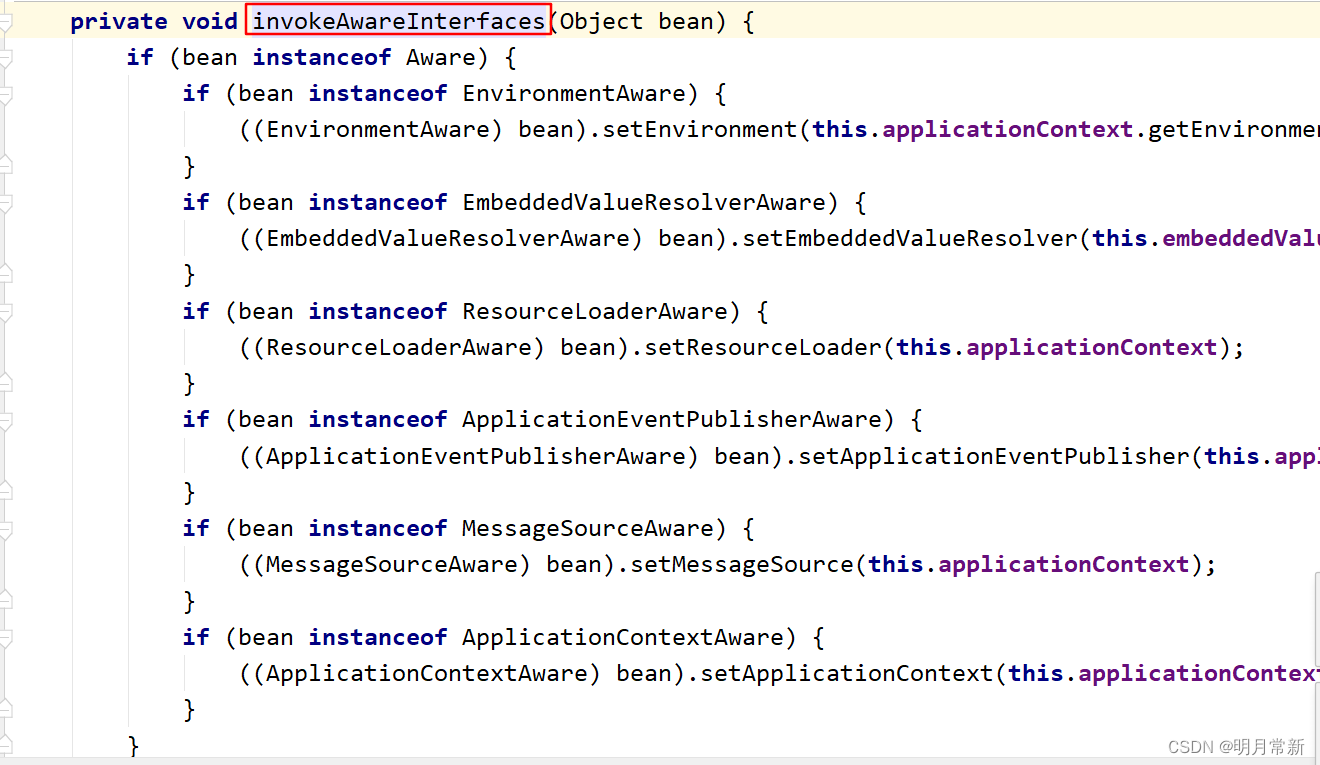
可以看到invokeAwareInterfaces()方法的源码比较简单,就是判断当前bean属于哪种接口类型,然后将bean强转为哪种接口类型的对象,接着调用接口中的方法,将相应的参数传递到接口的方法中。这里,我们在创建Dog类时,实现的是ApplicationContextAware接口,所以,在invokeAwareInterfaces()方法中,会执行如下的逻辑代码。
if (bean instanceof ApplicationContextAware) {
    ((ApplicationContextAware) bean).setApplicationContext(this.applicationContext);
}
我们可以看到,此时会将this.applicationContext传递到ApplicationContextAware接口的setApplicationContext()方法中。所以,我们在Dog类的setApplicationContext()方法中就可以直接接收到ApplicationContext对象了。
当然了,我们也可以在Eclipse中通过Debug的形式来看一下程序的执行流程,此时我们在Dog类的setApplicationContext()方法上设置一个断点,如下所示。
然后,我们以Debug的方式来运行IOCTest_LifeCycle类中的test01()方法,运行后的效果如下图所示。
在Eclipse的左上角可以看到方法的调用堆栈,通过对方法调用栈的分析,我们看到在执行Dog类中的setApplicationContext()方法之前,执行了ApplicationContextAwareProcessor类中的invokeAwareInterfaces方法,如下所示。
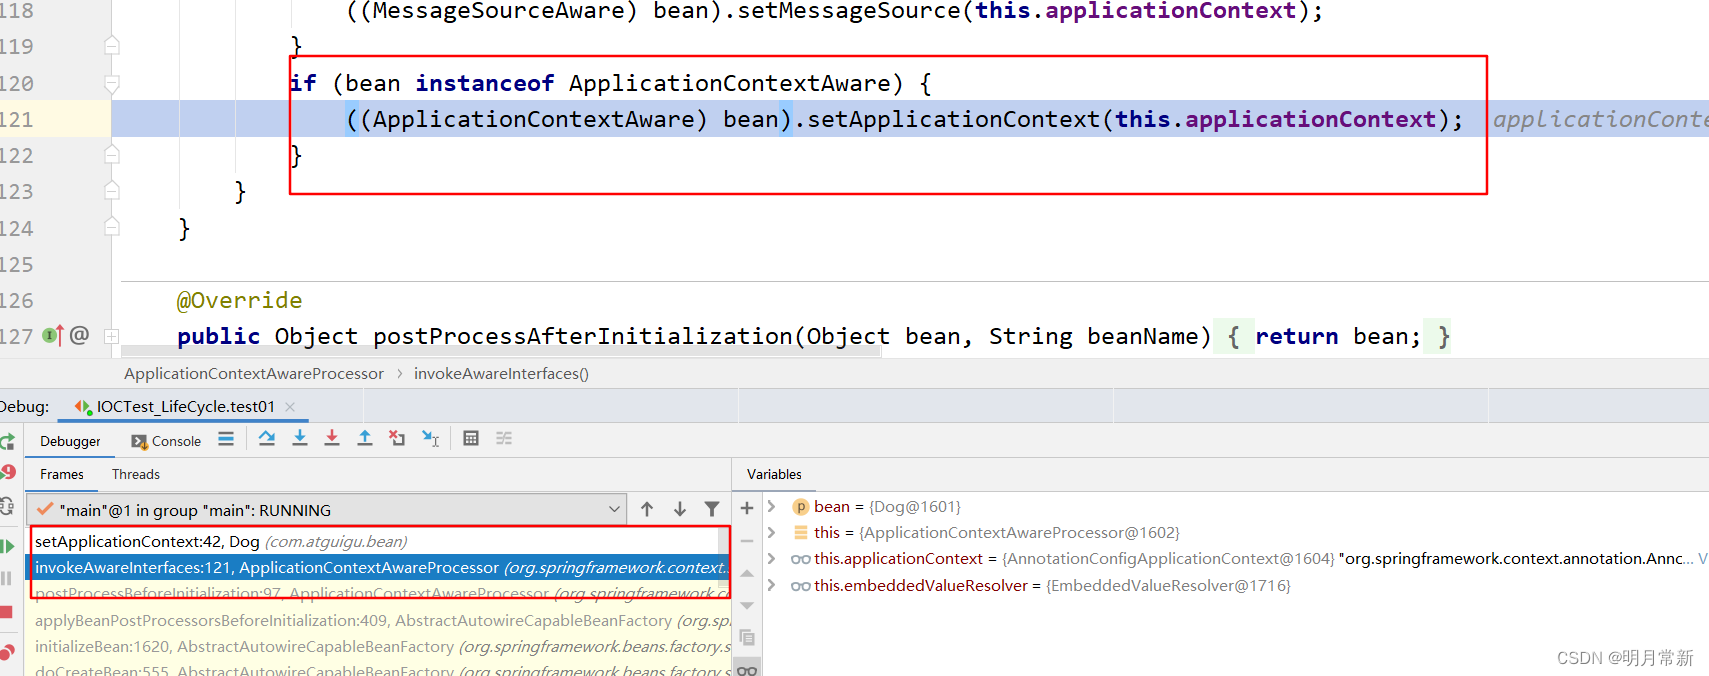
当我们点击方法调用栈中的invokeAwareInterfaces()方法时,方法的执行定位到如下这行代码处了。
((ApplicationContextAware) bean).setApplicationContext(this.applicationContext);
这和我们之前分析的逻辑一致。
BeanValidationPostProcessor类
org.springframework.validation.beanvalidation.BeanValidationPostProcessor类主要是用来为bean进行校验操作的,当我们创建bean,并为bean赋值后,我们可以通过BeanValidationPostProcessor类为bean进行校验操作。BeanValidationPostProcessor类的源码如下所示。
/*
 * Copyright 2002-2012 the original author or authors.
 *
 * Licensed under the Apache License, Version 2.0 (the "License");
 * you may not use this file except in compliance with the License.
 * You may obtain a copy of the License at
 *
 *      http://www.apache.org/licenses/LICENSE-2.0
 *
 * Unless required by applicable law or agreed to in writing, software
 * distributed under the License is distributed on an "AS IS" BASIS,
 * WITHOUT WARRANTIES OR CONDITIONS OF ANY KIND, either express or implied.
 * See the License for the specific language governing permissions and
 * limitations under the License.
 */

package org.springframework.validation.beanvalidation;

import java.util.Iterator;
import java.util.Set;
import javax.validation.ConstraintViolation;
import javax.validation.Validation;
import javax.validation.Validator;
import javax.validation.ValidatorFactory;

import org.springframework.beans.BeansException;
import org.springframework.beans.factory.BeanInitializationException;
import org.springframework.beans.factory.InitializingBean;
import org.springframework.beans.factory.config.BeanPostProcessor;

/**
 * Simple {@link BeanPostProcessor} that checks JSR-303 constraint annotations
 * in Spring-managed beans, throwing an initialization exception in case of
 * constraint violations right before calling the bean's init method (if any).
 *
 * @author Juergen Hoeller
 * @since 3.0
 */
public class BeanValidationPostProcessor implements BeanPostProcessor, InitializingBean {

	private Validator validator;

	private boolean afterInitialization = false;


	/**
	 * Set the JSR-303 Validator to delegate to for validating beans.
	 * <p>Default is the default ValidatorFactory's default Validator.
	 */
	public void setValidator(Validator validator) {
		this.validator = validator;
	}

	/**
	 * Set the JSR-303 ValidatorFactory to delegate to for validating beans,
	 * using its default Validator.
	 * <p>Default is the default ValidatorFactory's default Validator.
	 * @see javax.validation.ValidatorFactory#getValidator()
	 */
	public void setValidatorFactory(ValidatorFactory validatorFactory) {
		this.validator = validatorFactory.getValidator();
	}

	/**
	 * Choose whether to perform validation after bean initialization
	 * (i.e. after init methods) instead of before (which is the default).
	 * <p>Default is "false" (before initialization). Switch this to "true"
	 * (after initialization) if you would like to give init methods a chance
	 * to populate constrained fields before they get validated.
	 */
	public void setAfterInitialization(boolean afterInitialization) {
		this.afterInitialization = afterInitialization;
	}

	@Override
	public void afterPropertiesSet() {
		if (this.validator == null) {
			this.validator = Validation.buildDefaultValidatorFactory().getValidator();
		}
	}


	@Override
	public Object postProcessBeforeInitialization(Object bean, String beanName) throws BeansException {
		if (!this.afterInitialization) {
			doValidate(bean);
		}
		return bean;
	}

	@Override
	public Object postProcessAfterInitialization(Object bean, String beanName) throws BeansException {
		if (this.afterInitialization) {
			doValidate(bean);
		}
		return bean;
	}


	/**
	 * Perform validation of the given bean.
	 * @param bean the bean instance to validate
	 * @see javax.validation.Validator#validate
	 */
	protected void doValidate(Object bean) {
		Set<ConstraintViolation<Object>> result = this.validator.validate(bean);
		if (!result.isEmpty()) {
			StringBuilder sb = new StringBuilder("Bean state is invalid: ");
			for (Iterator<ConstraintViolation<Object>> it = result.iterator(); it.hasNext();) {
				ConstraintViolation<Object> violation = it.next();
				sb.append(violation.getPropertyPath()).append(" - ").append(violation.getMessage());
				if (it.hasNext()) {
					sb.append("; ");
				}
			}
			throw new BeanInitializationException(sb.toString());
		}
	}

}
这里,我们也来看看postProcessBeforeInitialization()方法和postProcessAfterInitialization()方法的实现,如下所示。
	@Override
	public Object postProcessBeforeInitialization(Object bean, String beanName) throws BeansException {
		if (!this.afterInitialization) {
			doValidate(bean);
		}
		return bean;
	}

	@Override
	public Object postProcessAfterInitialization(Object bean, String beanName) throws BeansException {
		if (this.afterInitialization) {
			doValidate(bean);
		}
		return bean;
	}
可以看到,在postProcessBeforeInitialization()方法和postProcessAfterInitialization()方法中的主要逻辑都是调用doValidate()方法对bean进行校验,只不过在这两个方法中都会对afterInitialization这个boolean类型的成员变量进行判断,若afterInitialization的值为false,则在postProcessBeforeInitialization()方法中调用doValidate()方法对bean进行校验;若afterInitialization的值为true,则在postProcessAfterInitialization()方法中调用doValidate()方法对bean进行校验。
InitDestroyAnnotationBeanPostProcessor类
org.springframework.beans.factory.annotation.InitDestroyAnnotationBeanPostProcessor类主要用来处理@PostConstruct注解和@PreDestroy注解。
例如,我们之前创建的Dog类中就使用了@PostConstruct注解和@PreDestroy注解,如下所示。
package com.meimeixia.bean;

import javax.annotation.PostConstruct;
import javax.annotation.PreDestroy;

import org.springframework.beans.BeansException;
import org.springframework.context.ApplicationContext;
import org.springframework.context.ApplicationContextAware;
import org.springframework.stereotype.Component;

/**
 * ApplicationContextAwareProcessor这个类的作用是可以帮我们在组件里面注入IOC容器,
 * 怎么注入呢?我们想要IOC容器的话,比如我们这个Dog组件,只需要实现ApplicationContextAware接口就行
 *
 * @author liayun
 *
 */
@Component
public class Dog implements ApplicationContextAware {

	private ApplicationContext applicationContext;

	public Dog() {
		System.out.println("dog constructor...");
	}

	// 在对象创建完成并且属性赋值完成之后调用
	@PostConstruct
	public void init() {
		System.out.println("dog...@PostConstruct...");
	}

	// 在容器销毁(移除)对象之前调用
	@PreDestroy
	public void destory() {
		System.out.println("dog...@PreDestroy...");
	}

	@Override
	public void setApplicationContext(ApplicationContext applicationContext) throws BeansException {
		// TODO Auto-generated method stub
		this.applicationContext = applicationContext;
	}

}
那么,在Dog类中使用了@PostConstruct注解和@PreDestroy注解来标注方法,Spring怎么就知道什么时候执行@PostConstruct注解标注的方法,什么时候执行@PreDestroy注解标注的方法呢?这就要归功于InitDestroyAnnotationBeanPostProcessor类了。
接下来,我们也通过Debug的方式来跟进下代码的执行流程。首先,在Dog类的initt()方法上打上一个断点,如下所示。
然后,我们以Debug的方式运行IOCTest_LifeCycle类中的test01()方法,效果如下所示。
我们还是带着问题来分析,Spring怎么就能定位到使用@PostConstruct注解标注的方法呢?通过分析方法的调用栈,我们发现在进入使用@PostConstruct注解标注的方法之前,Spring调用了InitDestroyAnnotationBeanPostProcessor类的postProcessBeforeInitialization()方法,如下所示。
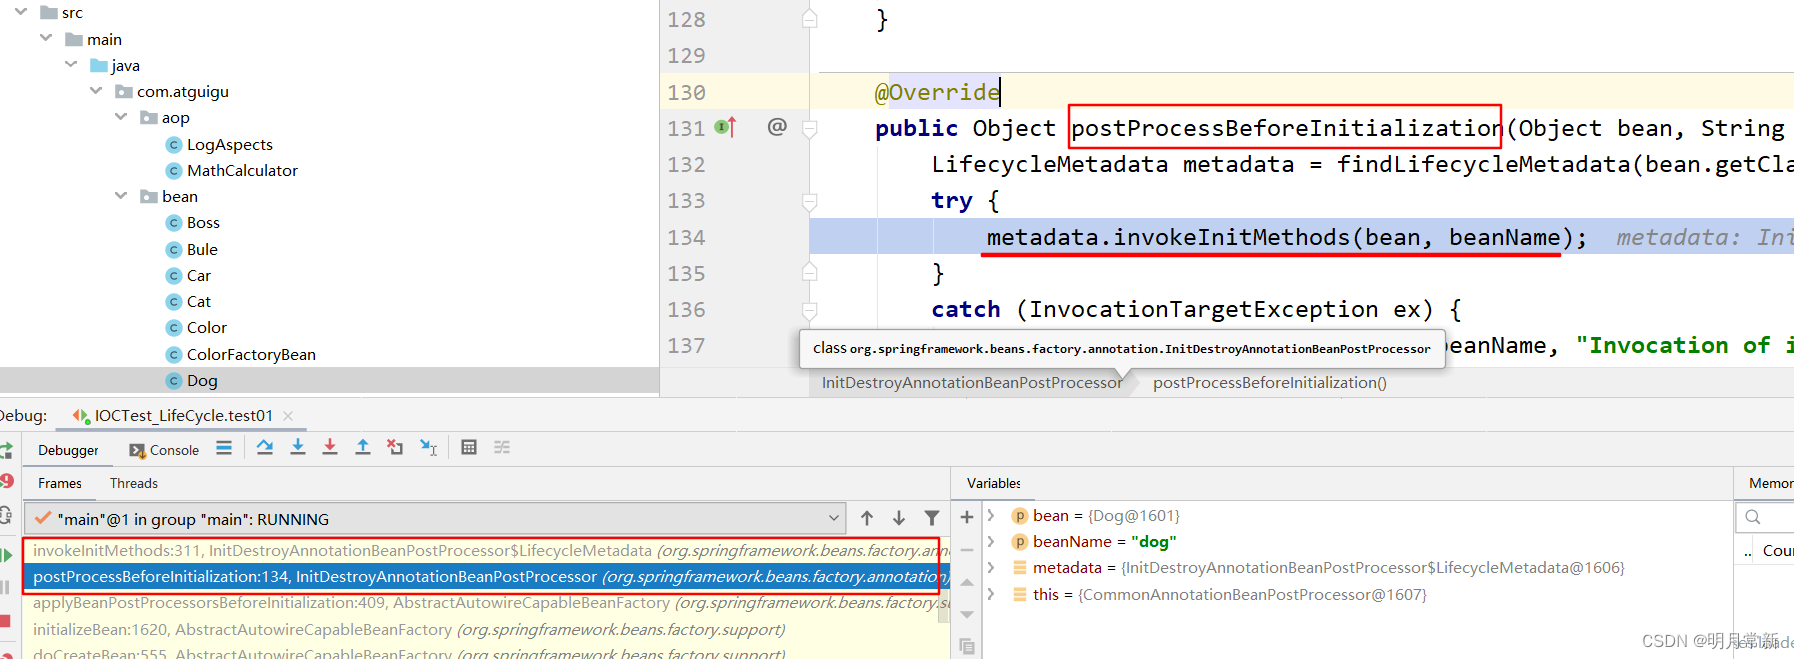
在InitDestroyAnnotationBeanPostProcessor类的postProcessBeforeInitialization()方法中,**首先会找到bean中有关生命周期的注解,比如@PostConstruct注解等,找到这些注解之后,则将这些信息赋值给LifecycleMetadata类型的变量metadata,之后调用metadata的invokeInitMethods()方法,通过反射来调用标注了@PostConstruct注解的方法。**这就是为什么标注了@PostConstruct注解的方法会被Spring执行的原因。
AutowiredAnnotationBeanPostProcessor类
org.springframework.beans.factory.annotation.AutowiredAnnotationBeanPostProcessor类主要是用于处理标注了@Autowired注解的变量或方法。
Spring为何能够自动处理标注了@Autowired注解的变量或方法,就交给小伙伴们自行分析了。大家可以写一个测试方法并通过方法调用堆栈来分析AutowiredAnnotationBeanPostProcessor类的源码,从而找到自己想要的答案。
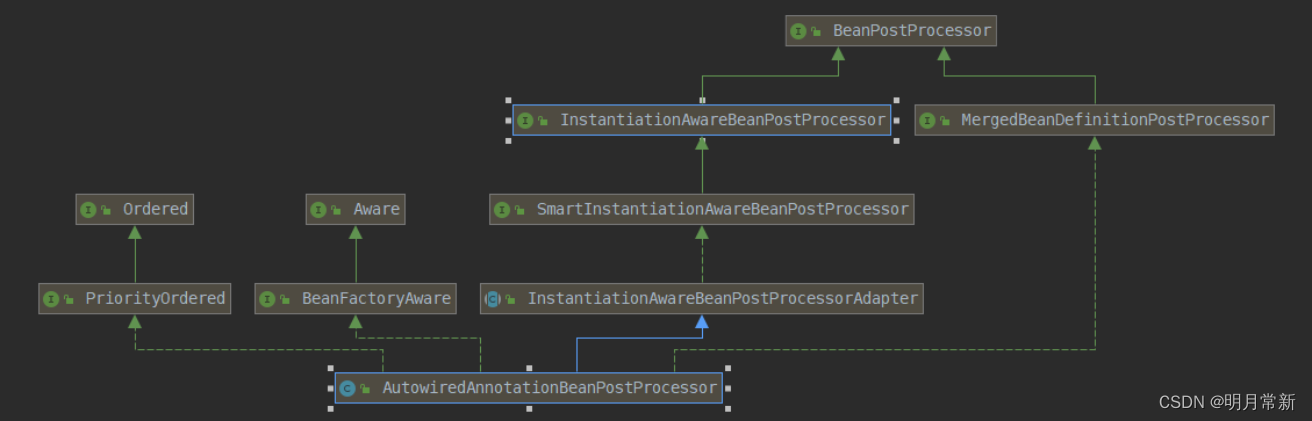
AutowiredAnnotationBeanPostProcessor实现了BeanPostProcessor接口,当 Spring 容器启动时,AutowiredAnnotationBeanPostProcessor 将扫描 Spring 容器中所有 Bean,当发现 Bean 中拥有@Autowired 注解时就找到和其匹配(默认按类型匹配)的 Bean,并注入到对应的地方中去。先来看下buildAutowiringMetadata方法
buildAutowiringMetadata方法解析等待自动注入类的所有属性,它通过分析所有字段和方法并初始化org.springframework.beans.factory.annotation.InjectionMetadata类的实例来实现,InjectionMetadata类包含要注入的元素的列表,注入是通过Java的 Reflection Field set方法或Method invoke方法完成的,此过程直接在AutowiredAnnotationBeanPostProcessor的方法中调用public void processInjection(Object bean) throws BeanCreationException。它将所有可注入的bean检索为InjectionMetadata实例,并调用它们的inject()方法。


 743
743


 被折叠的 条评论
为什么被折叠?
被折叠的 条评论
为什么被折叠?
 到【灌水乐园】发言


