


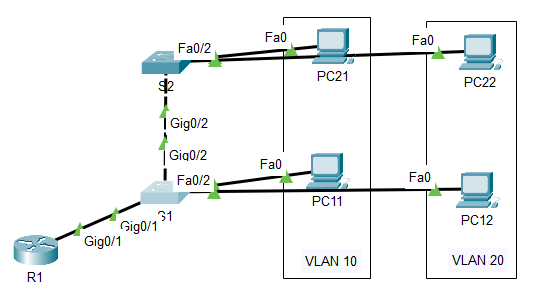
场景
在本练习中,您将在实施 VLAN 间路由之前先检查连接。 然后,配置 VLAN 和 VLAN 间路由。 最后,您将启用中继,并验证 VLAN 之间的连接是否通路。
第1部分:为交换机添加 VLAN,为PC添加配置相应地址
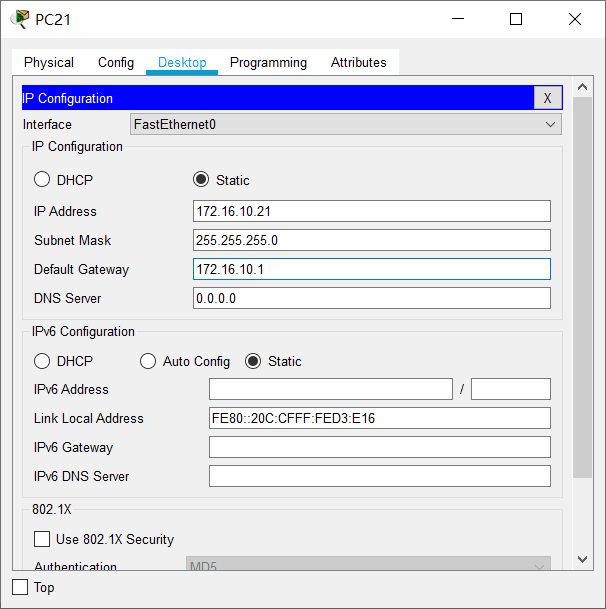
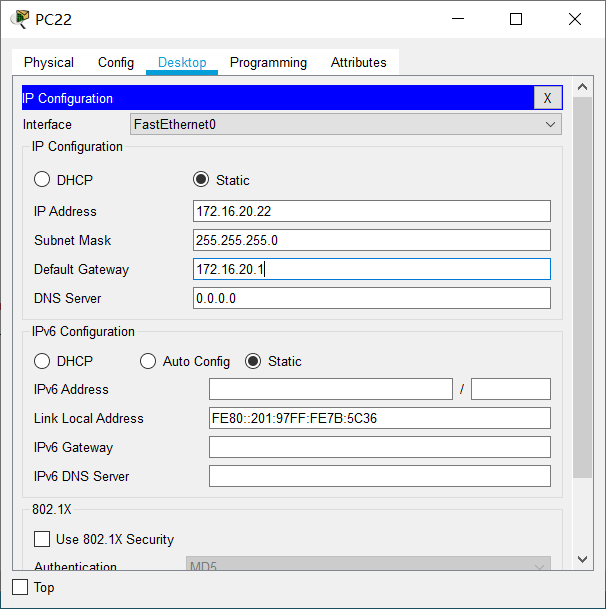
步骤1:根据地址分配表,配置PC地址


步骤2:根据交换机接口表建相应VLAN及接口模式
参考命令:
Vlan 10 (建立vlan)
Name abc (vlan名字设置为abc)
Interface F0/1 (进入F0/1接口模式)
Switchport mode access (将接口设置为access模式)
switchport access vlan 10 (将接口加入vlan 10中)
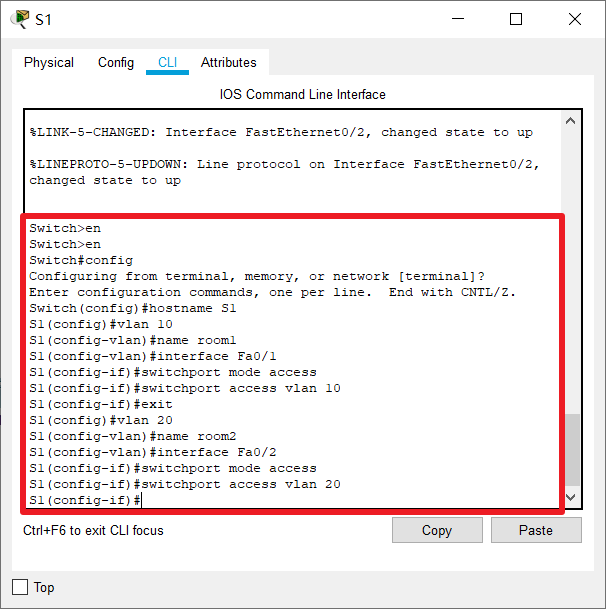
Switch>en
Switch#config
Configuring from terminal, memory, or network [terminal]?
Enter configuration commands, one per line.  End with CNTL/Z.
Switch(config)#hostname S1
S1(config)#vlan 10
S1(config-vlan)#name room1
S1(config-vlan)#interface Fa0/1
S1(config-if)#switchport mode access
S1(config-if)#switchport access vlan 10
S1(config-if)#exit
S1(config)#vlan 20
S1(config-vlan)#name room2
S1(config-vlan)#interface Fa0/2
S1(config-if)#switchport mode access
S1(config-if)#switchport access vlan 20
S1(config-if)#
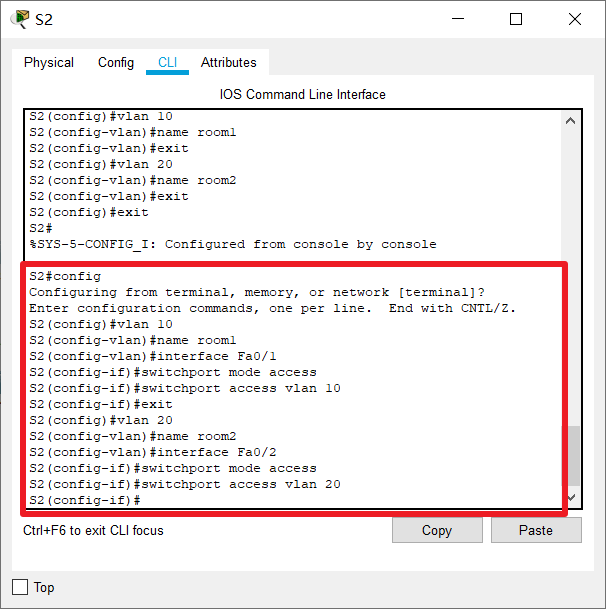
S2#config
Configuring from terminal, memory, or network [terminal]?
Enter configuration commands, one per line.  End with CNTL/Z.
S2(config)#vlan 10
S2(config-vlan)#name room1
S2(config-vlan)#interface Fa0/1
S2(config-if)#switchport mode access
S2(config-if)#switchport access vlan 10
S2(config-if)#exit
S2(config)#vlan 20
S2(config-vlan)#name room2
S2(config-vlan)#interface Fa0/2
S2(config-if)#switchport mode access
S2(config-if)#switchport access vlan 20
S2(config-if)#
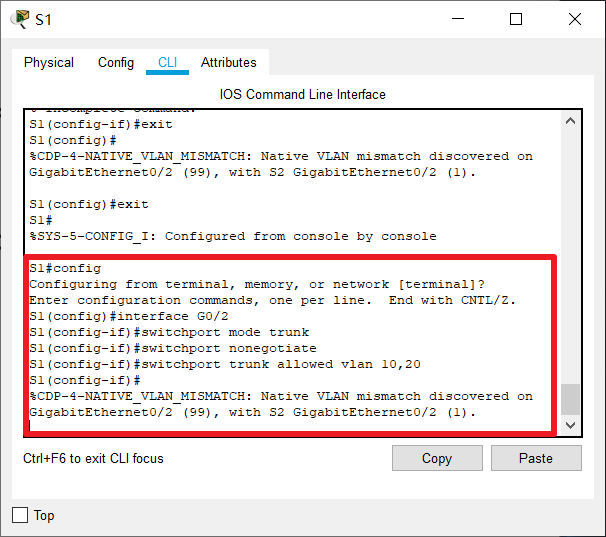
S1#config
Configuring from terminal, memory, or network [terminal]?
Enter configuration commands, one per line.  End with CNTL/Z.
S1(config)#interface G0/2
S1(config-if)#switchport mode trunk
S1(config-if)#switchport nonegotiate
S1(config-if)#switchport trunk allowed vlan 10,20
S1(config-if)#
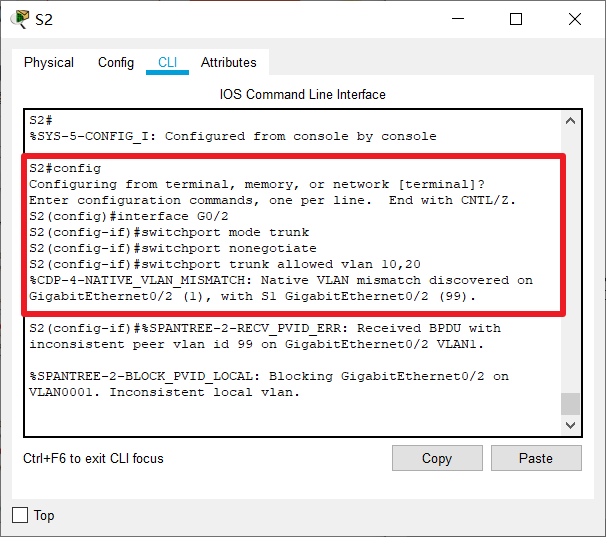
S2#config
Configuring from terminal, memory, or network [terminal]?
Enter configuration commands, one per line.  End with CNTL/Z.
S2(config)#interface G0/2
S2(config-if)#switchport mode trunk
S2(config-if)#switchport nonegotiate
S2(config-if)#switchport trunk allowed vlan 10,20
第2部分:测试不使用 VLAN 间路由时的连接
步骤 1: 在 PC11 和 PC12之间 Ping。
当 PC11 和 PC12 的链路灯亮变绿时,在PC11 和 PC12之间执行 ping 操作。 由于两台 PC 位于不同的网络上,而且 R1 未配置,因此 ping 操作失败。
第3部分:配置子接口
1、子接口定义
子接口(subinterface)是通过协议和技术将路由器的一个物理接口虚拟出来的多个逻辑接口。
2、子接口意义
子接口打破了路由器对物理接口数量的限制。从经济角度来讲,子接口可以大大节省成本。
3、子接口缺点
多个子接口共用一个物理接口,性能比单个物理接口差,负载大的情况下容易造成网络瓶颈。
4、子接口应用
子接口不仅可以应用于LAN,也可以应用于WAN。
5、子接口配置
Interface interface_id.subinterface_id //在接口模式下,创建子接口(如:interface f0/0.10)
encapsulation dot1q vlan_id //在子接口模式下,封装802.1Q允许相应VLAN通过
ip address ip_address subnet_mask //配置子接口IP地址为对应VLAN的网关
步骤 1: 使用 802.1Q 封装在 R1 上配置子接口。
a. 创建子接口 G0/1.10、G0/1.20。
将封装类型设置为 802.1Q 并将 VLAN 10 分配给子接口。
参见地址表,为子接口分配正确的 IP 地址。
b. 为 G0/0.20子接口重复此操作。
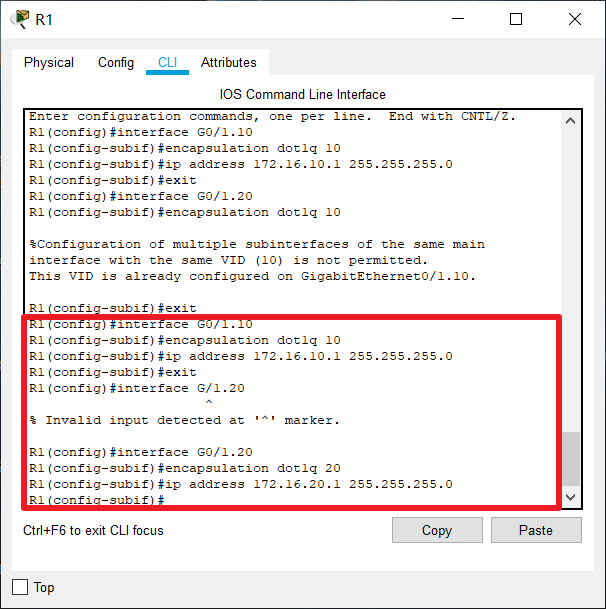
R1(config)#interface G0/1.10
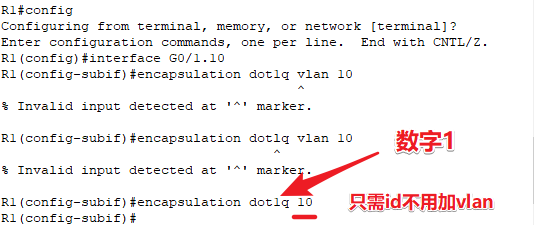
R1(config-subif)#encapsulation dot1q 10
R1(config-subif)#ip address 172.16.10.1 255.255.255.0
R1(config-subif)#exit
R1(config)#interface G0/1.20
R1(config-subif)#encapsulation dot1q 20
R1(config-subif)#ip address 172.16.20.1 255.255.255.0
R1(config-subif)#
注意!!!
步骤 2: 验证配置。
a. 使用 show ip interface brief 命令验证子接口配置。 两个子接口都关闭。 子接口是与物理接口关联的虚拟接口。 因此,为了启用子接口,您必须启用与它们关联的物理接口。
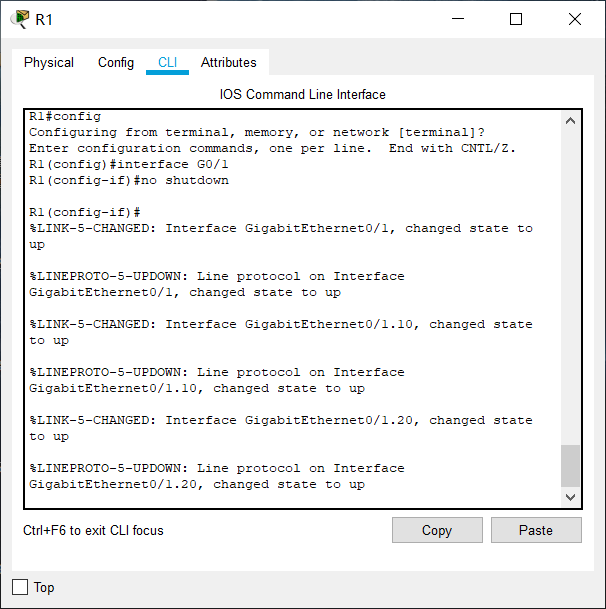
b. 启用 G0/1 接口。 验证子接口现在是否处于活动状态。
R1#config
Configuring from terminal, memory, or network [terminal]?
Enter configuration commands, one per line.  End with CNTL/Z.
R1(config)#interface G0/1
R1(config-if)#no shutdown
注意:
思科如何启用G0/1.10
interface G0/1
no shutdown
enc dot1q
interface g0/1.10
第4部分:测试使用 VLAN 间路由时的连接
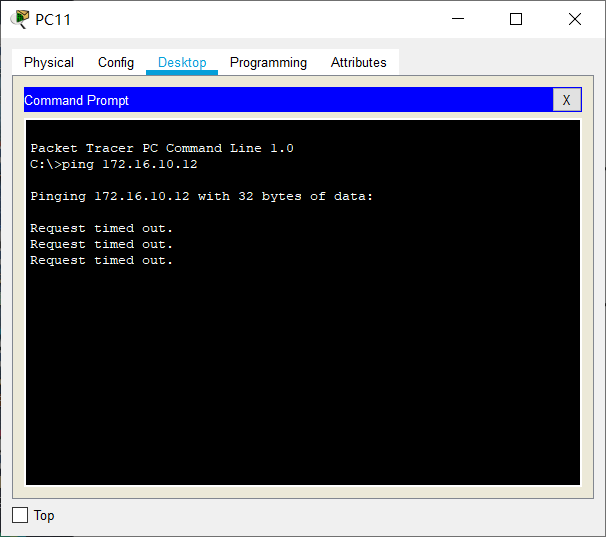
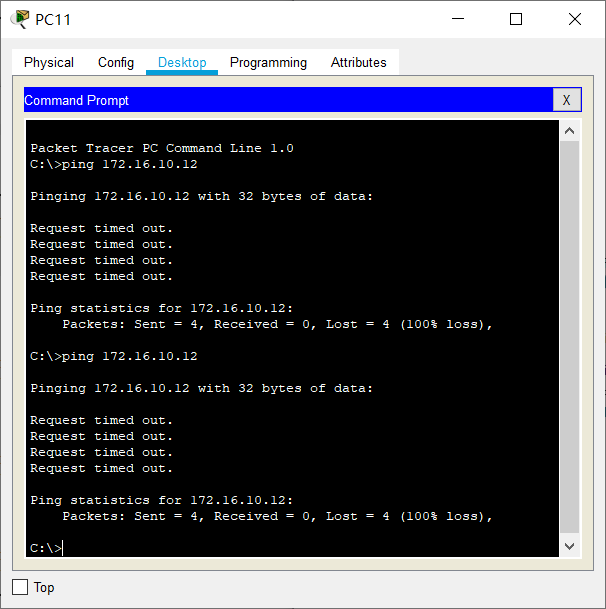
步骤 1: 在 PC11 和 PC12 之间 Ping。
从 PC11 ping PC12。 Ping 仍然会失败。
步骤 2: 启用中继。
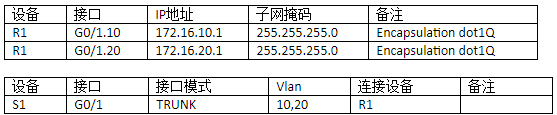
路由器接口表
参考命令:
Interface F0/1 (进入F0/1接口模式)
Switchport mode trunk (将接口设置为trunk模式)
switchport trunk allowed vlan 10 (接口仅允许vlan 10 通过)
S1#config
Configuring from terminal, memory, or network [terminal]?
Enter configuration commands, one per line. End with CNTL/Z.
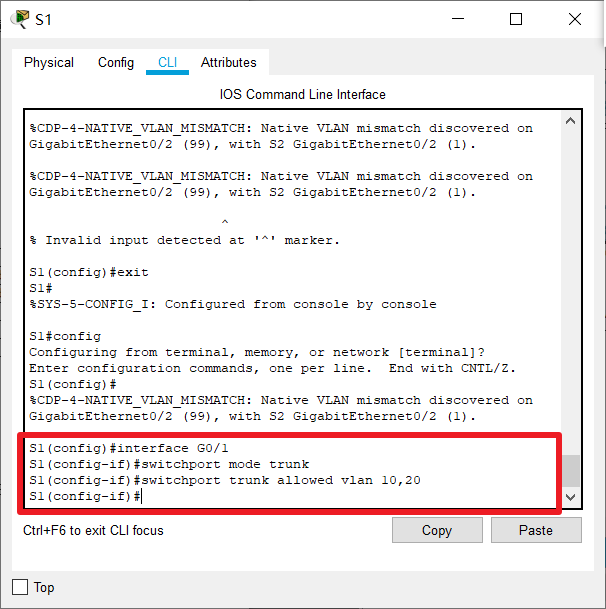
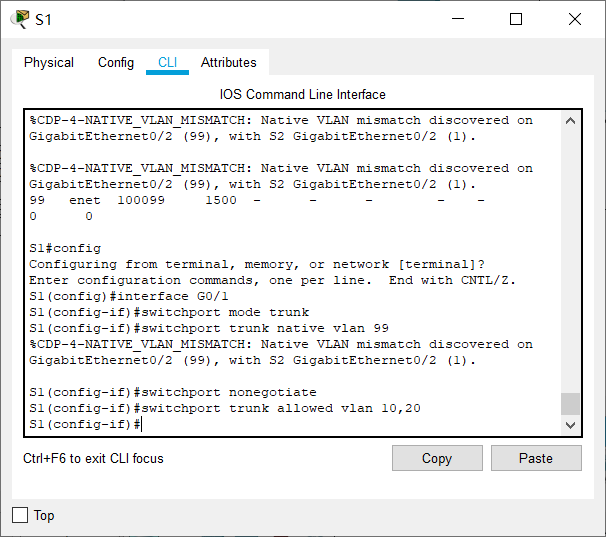
S1(config)#interface G0/1
S1(config-if)#switchport mode trunk
S1(config-if)#switchport nonegotiate
S1(config-if)#switchport trunk allowed vlan 10,20
S1(config-if)#
a. 在 S1 上,发出 show vlan 命令。 G0/1 分配到哪个 VLAN?
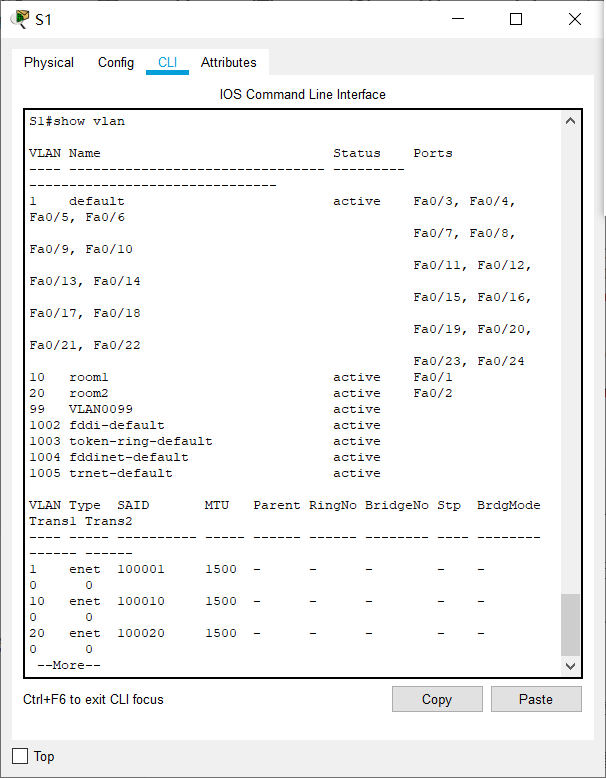
b. 由于路由器配置了已分配到不同 VLAN 的多个子接口,连接到路由器的交换机端口必须配置为中继。 在接口 G0/1 上启用中继。
c. 如何使用 show vlan 命令来确定接口为中继端口?
d. 发出 show interface trunk 命令以验证接口是否配置为中继。
e. 使用show ip interface brief 查看接口信息。


 1354
1354


 被折叠的 条评论
为什么被折叠?
被折叠的 条评论
为什么被折叠?
 到【灌水乐园】发言


