


项目开发时,需要文本框显示代码,并在左侧显示行号,以符合编程习惯。
所需控件:
panel以及RichTextBox
使用前须知:
RichTextBox只能放置在panle容器中,因此上述panel和RichTextBox底层需要放置一个大的panel容器
步骤一:控件配置
将panel(pnl_ShowLine)(Dock中设置为1左对齐)和RichTextBox (textBox_Prog_Edit)(Dock:Fill)拖拽至窗口。左侧为Panel,右侧为RichTextBox控件
步骤二:命名空间引用
//以下为命名空间引用,在类的最上面,程序开头的地方,检查下有没有全部涵盖住就行
using System;
 using System.IO;
 using System.Collections.Generic;
 using System.ComponentModel;
 using System.Data;
 using System.Drawing;
 using System.Linq;
 using System.Text;
 using System.Threading.Tasks;
 using System.Windows.Forms;
步骤三:方法解析坐标
在主程序里面新建showLineNo()方法,当接到文件字符后进行坐标解析,绘制行号
private void showLineNo()
        {
            //获得当前坐标信息
            Point p = this.textBox_Prog_Edit.Location;
            int crntFirstIndex = this.textBox_Prog_Edit.GetCharIndexFromPosition(p);
            int crntFirstLine = this.textBox_Prog_Edit.GetLineFromCharIndex(crntFirstIndex);

            Point crntFirstPos = this.textBox_Prog_Edit.GetPositionFromCharIndex(crntFirstIndex);

            p.Y += this.textBox_Prog_Edit.Height;

            int crntLastIndex = this.textBox_Prog_Edit.GetCharIndexFromPosition(p);
            int crntLastLine = this.textBox_Prog_Edit.GetLineFromCharIndex(crntLastIndex);
            Point crntLastPos = this.textBox_Prog_Edit.GetPositionFromCharIndex(crntLastIndex);

            //准备画图
            Graphics g = this.pnl_ShowLine.CreateGraphics();
            Font font = new Font(this.textBox_Prog_Edit.Font, this.textBox_Prog_Edit.Font.Style);
            SolidBrush brush = new SolidBrush(Color.Green);

            //画图开始

            //刷新画布
            Rectangle rect = this.pnl_ShowLine.ClientRectangle;
            brush.Color = this.pnl_ShowLine.BackColor;
            g.FillRectangle(brush, 0, 0, this.pnl_ShowLine.ClientRectangle.Width, this.pnl_ShowLine.ClientRectangle.Height);
            brush.Color = Color.Black;//重置画笔颜色,更改行号颜色

            //绘制行号
            int lineSpace = 0;
            if (crntFirstLine != crntLastLine)
            {
                lineSpace = (crntLastPos.Y - crntFirstPos.Y) / (crntLastLine - crntFirstLine);
            }
            else
            {
                lineSpace = Convert.ToInt32(this.textBox_Prog_Edit.Font.Size);
            }
            int brushX = this.pnl_ShowLine.ClientRectangle.Width - Convert.ToInt32(font.Size * 3);    //更改宽度方向距离
            int brushY = crntLastPos.Y + Convert.ToInt32(font.Size * 0.35f); //更改高度方向距离
            for (int i = crntLastLine; i >= crntFirstLine; i--)
            {
                g.DrawString((i + 1).ToString(), font, brush, brushX, brushY);
                brushY -= lineSpace;
            }
            g.Dispose();
            font.Dispose();
            brush.Dispose();
        }
步骤四:控件加载
启用RichTextBox控件的TextChanged事件-控件加载
//控件加载事件
private void textBox_Prog_Edit_TextChanged(object sender, EventArgs e)
   {
      showLineNo();
   }
步骤五:设置滚动事件
设置控件滚动事件(用于当算出的行数大于本控件长度)
//控件滚动事件,当算出的行数大于本控件长度
private void textBox_Prog_Edit_VScroll(object sender, EventArgs e)
{
showLineNo();
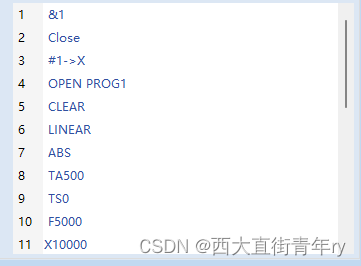
}步骤六:效果展示
配置完成后,F5启用程序,效果如下。案例可整体移植至其他相关应用。
注意:
textBox_Prog_Edit的【ScrollBars】属性设置为Vertical以右侧显示滚动条
——做到极致,挖掘干净,大道至简,万物可期。


 2321
2321


 被折叠的 条评论
为什么被折叠?
被折叠的 条评论
为什么被折叠?
 到【灌水乐园】发言


