


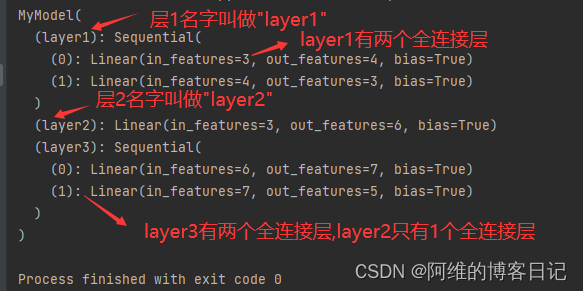
1.打印模型,理解模型结构
import torch


class MyModel(torch.nn.Module):
    def __init__(self):
        super().__init__()
        self.layer1 = torch.nn.Sequential(
            torch.nn.Linear(3, 4),
            torch.nn.Linear(4, 3),
        )
        self.layer2 = torch.nn.Linear(3, 6)

        self.layer3 = torch.nn.Sequential(
            torch.nn.Linear(6, 7),
            torch.nn.Linear(7, 5),
        )

    def forward(self, x):
        x = self.layer1(x)
        x = self.layer2(x)
        x = self.layer3(x)
        return x


net = MyModel()
print(net)
2.模型保存与加载
本节介绍如何保存模型,如何保存模型参数
import torchvision.models as models
from torchsummary import summary
import torch


# https://pytorch.org/vision/stable/models.html
# alexnet = models.alexnet(weights=None)
# resnet50 = models.resnet50(weights=models.ResNet50_Weights.DEFAULT)
# print(resnet50)


# -----------------------------------------------------------
# 保存模型 / 保存模型+参数
# -----------------------------------------------------------

# resnet50 = models.resnet50(weights=models.ResNet50_Weights.DEFAULT)

# 1、仅保存模型的参数
# state_dict是存储模型参数的
# torch.save(resnet50.state_dict(), 'resnet50_weight.pth')

# 2、保存模型 + 参数
# torch.save(resnet50, 'resnet50.pth')


# -----------------------------------------------------------
# 加载模型 / 加载模型+参数
# -----------------------------------------------------------

# 1、加载模型+参数
net = torch.load("resnet50.pth")
print(net)

# 2、已有模型,加载预训练参数
# resnet50 = models.resnet50(weights=None)

# resnet50.load_state_dict(torch.load('resnet50_weight.pth'))
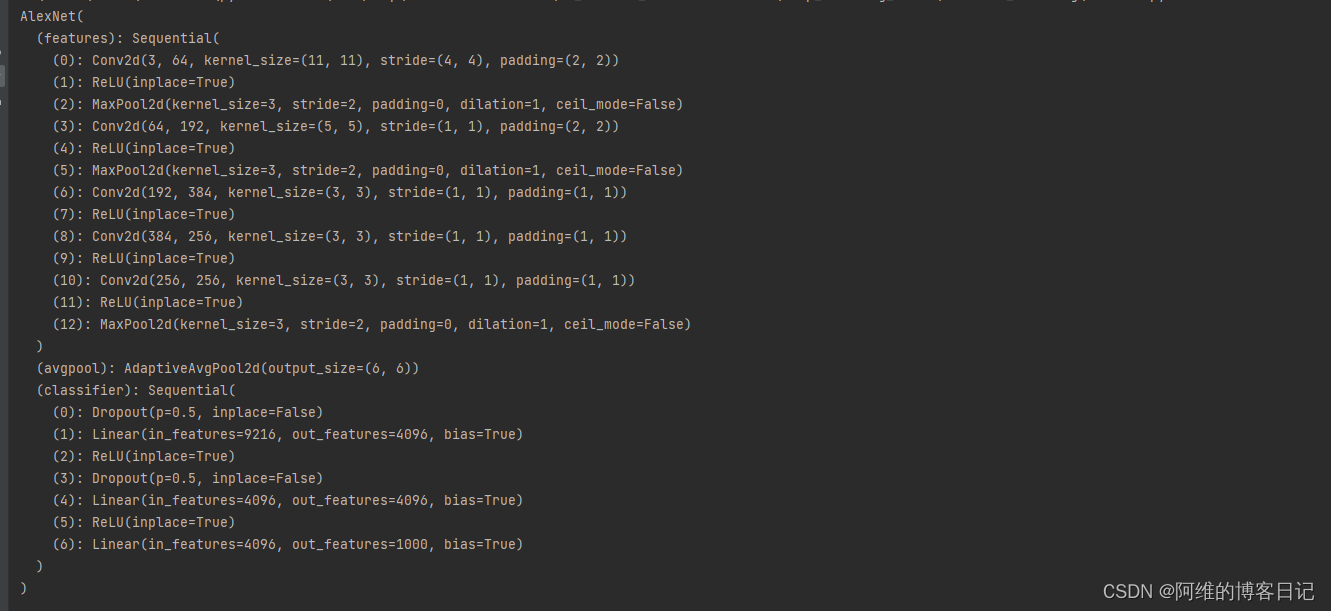
3.模型的模块CRUD和模块的层的CRUD
本节介绍模型的层layer的CRUD
import torch.nn as nn
import torchvision.models as models


alexnet = models.alexnet(weights=models.AlexNet_Weights.DEFAULT)
print(alexnet)

# 1、----- 删除网络的最后一层 -----
# 代码解释del alexnet.classifier是直接删除AlexNet中名称为classifier的模块
# 代码解释del alexnet.classifier[6]是删除classifier模块里面的第六层,也就是括号(6)
# del alexnet.classifier
# del alexnet.classifier[6]
# print(alexnet)


# 2、----- 删除网络的最后多层 -----
# 代码解释: 列表切片
# alexnet.classifier = alexnet.classifier[:-2]
# print(alexnet)


# 3、----- 修改网络的某一层 -----
# alexnet.classifier[6] = nn.Linear(in_features=4096, out_features=1024)
# print(alexnet)


# 4、----- 网络添加层, 每次添加一层 -----
# alexnet.classifier.add_module('7', nn.ReLU(inplace=True))
# alexnet.classifier.add_module('8', nn.Linear(in_features=1024, out_features=20))
# print(alexnet)


# 4、----- 网络添加层,一次添加多层 -----
# block = nn.Sequential(nn.ReLU(inplace=True),
#                       nn.Linear(in_features=1024, out_features=20))
# 模型中添加名称为block的模块
# alexnet.add_module('block', block)
# print(alexnet)
结合代码注释和下图理解即可


 3319
3319


 被折叠的 条评论
为什么被折叠?
被折叠的 条评论
为什么被折叠?
 到【灌水乐园】发言


