


程序结构剖析
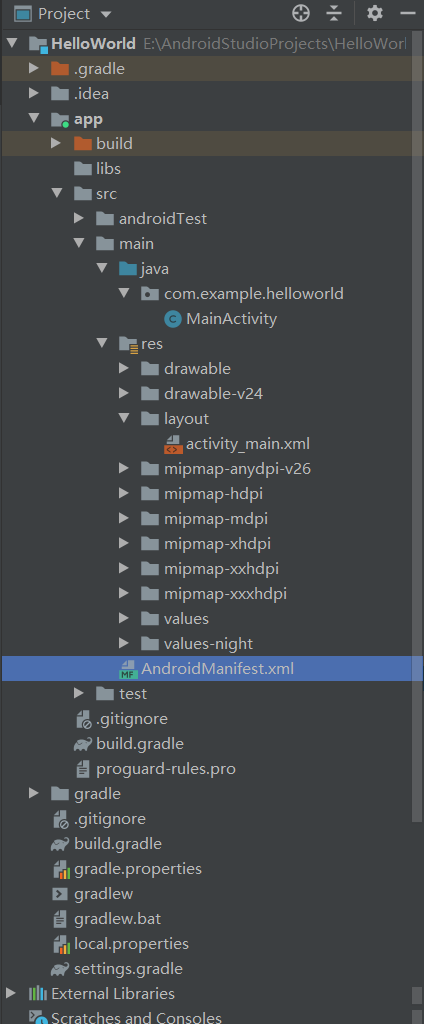
主要活动文件
主要活动代码在MainActivity.java的Java文件中。这是实际的应用程序文件,将被转化为Dalvik可执行文件并运行。下面是由应用向导为Hello World应用生成的默认代码 -
package com.example.helloworld;

import androidx.appcompat.app.AppCompatActivity;

import android.os.Bundle;
/**
 *  继承自AppCompatActivity,是一种向下兼容的Activity
 *  可以将Activity在各个系统版本中增加的特性和功能最低兼容到Android2.1系统
 *  Activity是Android系统提供的一个活动基类
 *  我们项目中所有的活动都必须继承他或者他的子类才能拥有活动的特性
 *  (AppCompatActivity是Activity的子类)
 */
public class MainActivity extends AppCompatActivity {

    @Override
    protected void onCreate(Bundle savedInstanceState) {
        /*
            onCreate()方法:一个活动被创建时,必定要执行的方法
         */
        super.onCreate(savedInstanceState);
        /*
            Android程序的设计讲究逻辑和视图分离
            不推荐在活动(Activity)中直接编写界面
            通用的做法是在布局文件中编写界面,然后在活动中引入
            使用setContentView()方法,引入布局
         */
        setContentView(R.layout.activity_main);
    }
}
这里,R.layout.activity_main引用自res/layout目录下的activity_main.xml文件。onCreate()是活动被加载之后众多被调用的方法之一。
AndroidManifest.xml文件
无论你开发什么组件用作应用程序中的一部分,都需要在应用程序项目根目录下的AndroidManifest.xml文件中声明所有的组件。这个文件是Android操作系统与你的应用程序之间的接口,因此,如果没有在这个文件中声明你的组件,将无法被操作系统所识别。举个例子,一个默认的清单文件看起来如下:
<?xml version="1.0" encoding="utf-8"?>
<manifest xmlns:android="http://schemas.android.com/apk/res/android"
    package="com.example.helloworld">

    <application
        android:allowBackup="true"
        android:icon="@mipmap/ic_launcher"
                 <!--  icon:应用图标,位于res/mipmap-hdpi下面的应用程序图标,使用dmipmap-hdpi文件夹下名为ic_launcher.png的图片     -->
        android:label="@string/app_name"
    			<!--  label:应用名称,@string指的是strings.xml,@string/app_name指的是定义在strings.xml中的app_name,实际为"Hello World" -->
        android:roundIcon="@mipmap/ic_launcher_round"
    <!--   位于res/mipmap-hdpi下面的应用程序图标,使用mipmap-hdpi文件夹下名为ic_launcher.png的图片     -->
        android:supportsRtl="true"
        android:theme="@style/Theme.HelloWorld">

    <!--  MainActivity进行注册,如果没有在这里注册的话,活动是不能使用的 -->
        <activity android:name=".MainActivity">
            <intent-filter>
                <!--  主活动,点开手机上的应用图标,首先启动的就是这两个活动,凡是在Android应用中看得到的东西,都是放在活动之中的 -->
                <action android:name="android.intent.action.MAIN" />
                <category android:name="android.intent.category.LAUNCHER" />
            </intent-filter>
        </activity>
    </application>

</manifest>
Layout 文件
activity_main.xml是一个在res/layout目录下的layout文件。当应用程序构建它的界面时被引用。你将非常频繁的修改这个文件来改变应用程序的布局。在"Hello World"应用程序中,这个文件具有默认的布局,内容如下:
<?xml version="1.0" encoding="utf-8"?>
<androidx.constraintlayout.widget.ConstraintLayout
    xmlns:android="http://schemas.android.com/apk/res/android"
    xmlns:app="http://schemas.android.com/apk/res-auto"
    xmlns:tools="http://schemas.android.com/tools"
    android:layout_width="match_parent"
    android:layout_height="match_parent"
    tools:context=".MainActivity">

    <TextView <!-- TextView是一个Android的控件用于构建用户图形界面 -->
        android:layout_width="wrap_content" <!-- 用来设置用户图形界面的宽度和高度-->
        android:layout_height="wrap_content"
        android:text="Hello World!"
        app:layout_constraintBottom_toBottomOf="parent"
        app:layout_constraintLeft_toLeftOf="parent"
        app:layout_constraintRight_toRightOf="parent"
        app:layout_constraintTop_toTopOf="parent" />

</androidx.constraintlayout.widget.ConstraintLayout>
ConstraintLayout约束布局
layout_constraintTop_toTopOf       // 将所需视图的顶部与另一个视图的顶部对齐。

layout_constraintTop_toBottomOf    // 将所需视图的顶部与另一个视图的底部对齐。

layout_constraintBottom_toTopOf    // 将所需视图的底部与另一个视图的顶部对齐。

layout_constraintBottom_toBottomOf // 将所需视图的底部与另一个视图的底部对齐。

layout_constraintLeft_toTopOf      // 将所需视图的左侧与另一个视图的顶部对齐。

layout_constraintLeft_toBottomOf   // 将所需视图的左侧与另一个视图的底部对齐。

layout_constraintLeft_toLeftOf     // 将所需视图的左边与另一个视图的左边对齐。

layout_constraintLeft_toRightOf    // 将所需视图的左边与另一个视图的右边对齐。

layout_constraintRight_toTopOf     // 将所需视图的右对齐到另一个视图的顶部。

layout_constraintRight_toBottomOf  // 将所需视图的右对齐到另一个的底部。

layout_constraintRight_toLeftOf    // 将所需视图的右边与另一个视图的左边对齐。

layout_constraintRight_toRightOf   // 将所需视图的右边与另一个视图的右边对齐。
项目中的资源

| 包名 | 作用 |
|---|---|
| drawable | 图片 |
| mipmap | 应用图标 |
| values | 字符串、样式、颜色等配置 |
| layout | 布局文件 |
drawable和mipmap有多个包可以更好的兼容各种设备
程序运行的时候,会自动根据当前运行设备分辨率高低选择加载哪个文件夹下的图片
values文件夹

srtings.xml
<resources>
     <!--
		定义了一个应用程序名的字符串,有两种方式引用它
		1. 在代码中通过R.string.app_name获得该字符串的引用
		2. 在xml中通过@string/app_name获得该字符串的引用
 	-->
    <string name="app_name">HelloWorld</string>

</resources>

我们把鼠标放到AndroidManifest.xml中的android:lable标签上,可以看到,这里是通过@string/app_name获取到的HelloWorld
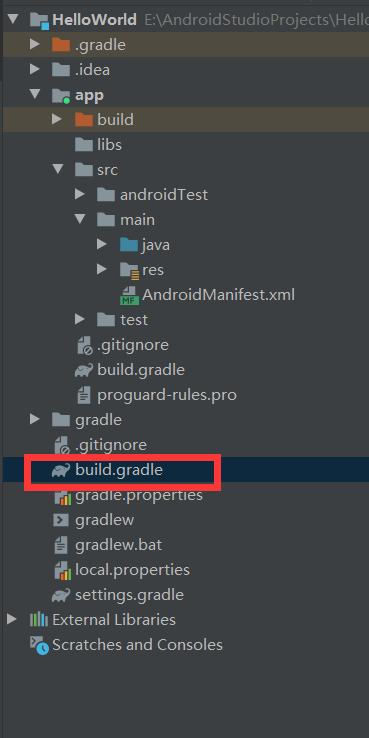
build.gradle
Gradle
-
Gradle是一个基于Apache Ant和Apache Maven概念的项目自动化构建开源工具。
-
它使用一种基于Groovy的特定领域语言(DSL)来声明项目设置,抛弃了基于XML的各种繁琐配置。
-
免费开源
// Top-level build file where you can add configuration options common to all sub-projects/modules.
buildscript {
    repositories {
        google()
        jcenter()
        //jcenter():代码托管仓库,很多开源Android开源项目都会选择将代码托管到jcenter上
        //有了这个声明,我们开源在项目中引用任何jcenter上的开源项目
    }
    dependencies {
        //使用classpath声明了一个Gradle插件(其他语言也可以使用gradle)
        classpath "com.android.tools.build:gradle:4.1.1"

        // NOTE: Do not place your application dependencies here; they belong
        // in the individual module build.gradle files
    }
}

allprojects {
    repositories {
        google()
        jcenter()
    }
}

task clean(type: Delete) {
    delete rootProject.buildDir
}
| 仓库名称 | 阿里云仓库地址 | 阿里云仓库地址(老版) |
|---|---|---|
| jcenter | https://maven.aliyun.com/repository/public | https://maven.aliyun.com/nexus/content/repositories/jcenter |

plugins {//表示这是一个应用程序模块
id 'com.android.application'
/*
选择插件为com.android.application,应用程序模块,可以直接运行
还有一个可选项:com.android.library,库模块,作为代码库依附于别的程序模块来运行
*/
}
//可以配置项目构建的各种属性
android {
compileSdkVersion 30 //指定项目的编译版本(API Level)
buildToolsVersion "30.0.3" //指定项目构建工具的版本
defaultConfig {
applicationId "com.example.helloworld" //指定项目的包名
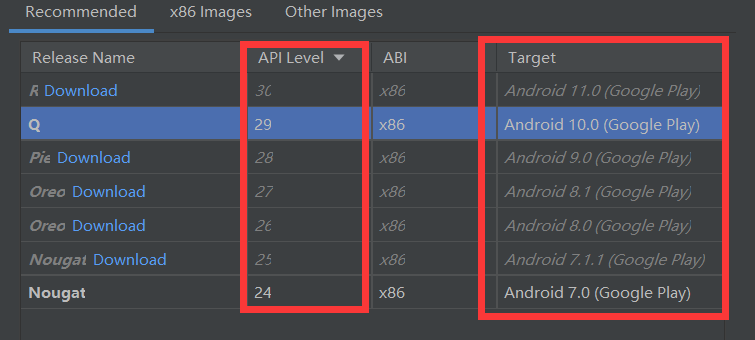
minSdkVersion 16 //指定项目最低兼容的Android系统版本(Jelly Bean 4.1系统)
targetSdkVersion 30 //指定的值表示在该目标版本已经做过充分的测试,系统将会为你的应用程序启用一些最新的功能和特性
versionCode 1 //指定项目的版本号
versionName "1.0" //指定项目的版本名
testInstrumentationRunner "androidx.test.runner.AndroidJUnitRunner"
}
//指定生成安装文件的相关配置
buildTypes {
//有两个子闭包
//debug(可以忽略不写)/release
release {//用于指定生成正式版安装文件的配置
minifyEnabled false//用于指定是否对项目的代码进行混淆,true混淆,false不混淆
proguardFiles getDefaultProguardFile('proguard-android-optimize.txt'), 'proguard-rules.pro'
//用于指定混淆时使用的规则文件
//proguard-android-optimize.txt:在Android SDK目录下的,所有项目通用的混淆规则
//proguard-rules.pro:当前项目的根目录下的,可以编写当前项目特有的混淆规则
}
}
compileOptions {
sourceCompatibility JavaVersion.VERSION_1_8
targetCompatibility JavaVersion.VERSION_1_8
}
}
dependencies {
/*
三种依赖方式:
本地依赖--对本地的jar包或目录添加依赖关系
库依赖--对项目中的库模块添加依赖关系
远程依赖--对jcenter库上的开源项目添加依赖关系
*/
implementation 'androidx.appcompat:appcompat:1.1.0' //远程依赖库
implementation 'com.google.android.material:material:1.1.0'
implementation 'androidx.constraintlayout:constraintlayout:1.1.3'
testImplementation 'junit:junit:4.+'//声明测试用例库
androidTestImplementation 'androidx.test.ext:junit:1.1.1'
androidTestImplementation 'androidx.test.espresso:espresso-core:3.2.0'
}
三者之间关系minSdkVersion <= targetSdkVersion <= compileSdkVersion。
为了尽可能使用新的API,compileSdkVersion应该尽可能高。
为了使APP更加契合新版本Android的外观特性,targetSdkVersion应该尽可能高。
在实践中一般minSdkVersion <= targetSdkVersion == compileSdkVersion
compileSdkVersion 30 //指定项目的编译版本(API Level)


 832
832


 被折叠的 条评论
为什么被折叠?
被折叠的 条评论
为什么被折叠?
 到【灌水乐园】发言


