


使用的linux系统是ubuntu
一、安装与卸载
1.apt安装
1.1 安装
解释:apt install nginx
1.2 卸载
解释:nginx主要由nginx 、nginx-core、nginx-common三部分组成,完整删除即把它们删除即可
apt remove --purge nginx #purge 清除软件的配置apt remove --purge nginx-core #purge 清除软件的配置apt autoremove #清除相关关联包
2.源码安装(推荐)
2.1 安装
解释:源码安装更灵活,而且对于第三方模块的安装更方便,按照下面每一步执行即可
-
安装依赖:
apt install -y gcc libpcre3 libpcre3-dev libxslt-dev libgd-dev zlib1g-dev openssl libssl-dev -
安装:
wget http://nginx.org/download/nginx-1.18.0.tar.gz -
解压(自己提前选好地方):
tar -zxvf nginx-1.18.0.tar.gz -
配置(提前进行nginx-1.18.0文件夹)(建议先阅读https://blog.csdn.net/weixin_46765649/article/details/128045791再进行下一步):
./configure --with-cc-opt='-g -O2 -fdebug-prefix-map=/build/nginx-KTLRnK/nginx-1.18.0=. -fstack-protector-strong -Wformat -Werror=format-security -fPIC -Wdate-time -D_FORTIFY_SOURCE=2' --with-ld-opt='-Wl,-Bsymbolic-functions -Wl,-z,relro -Wl,-z,now -fPIC' --prefix=/usr/share/nginx --conf-path=/etc/nginx/nginx.conf --http-log-path=/var/log/nginx/access.log --error-log-path=/var/log/nginx/error.log --lock-path=/var/lock/nginx.lock --pid-path=/run/nginx.pid --modules-path=/usr/lib/nginx/modules --http-client-body-temp-path=/var/lib/nginx/body --http-fastcgi-temp-path=/var/lib/nginx/fastcgi --http-proxy-temp-path=/var/lib/nginx/proxy --http-scgi-temp-path=/var/lib/nginx/scgi --http-uwsgi-temp-path=/var/lib/nginx/uwsgi --with-debug --with-compat --with-pcre-jit --with-http_ssl_module --with-http_stub_status_module --with-http_realip_module --with-http_auth_request_module --with-http_v2_module --with-http_dav_module --with-http_slice_module --with-threads --with-http_addition_module --with-http_gunzip_module --with-http_gzip_static_module --with-http_image_filter_module=dynamic --with-http_sub_module --with-http_xslt_module=dynamic --with-stream=dynamic --with-stream_ssl_module --with-mail=dynamic --with-mail_ssl_module -
编译&&安装(编译是生成核心二进制文件(linux可用);安装是把
./configure配置的路径进行创建与写入)
make && make install
2.2 配置nginx快捷方式
解释:如果要执行nginx自带功能需要去/usr/share/nginx/sbin找到nginx执行./nginx -t#检查配置、./nginx -s start #启动、./nginx -s stop #关闭
配置到Ubuntu快捷命令
- 原理:就是把二进制文件(就是
/usr/share/nginx/sbin/nginx)复制到/usr/sbin目录下 cp /usr/share/nginx/sbin/nginx /usr/sbin/nginx
2.3 配置systemctl快捷方式
解释:apt安装完后,可以直接用systemctl start nginx执行命令,但是源码安装需要配置,但是很简单
- 在
/lib/systemd/system/下面创建nginx.service文件 - 写入以下内容
- 注意下面内容如
PIDFile=/run/nginx.pid需要对应上2.1 配置这一部给其配置的路径,其它参数也需要完成2.2之后才行(这样下面的/usr/sbin/nginx才会有内容)
[Unit] Description=Gao Documentation=man:nginx(8) After=network.target [Service] Type=forking PIDFile=/run/nginx.pid ExecStartPre=/usr/sbin/nginx -t -q -g 'daemon on; master_process on;' ExecStart=/usr/sbin/nginx -g 'daemon on; master_process on;' ExecReload=/usr/sbin/nginx -g 'daemon on; master_process on;' -s reload ExecStop=-/sbin/start-stop-daemon --quiet --stop --retry QUIT/5 --pidfile /run/nginx.pid TimeoutStopSec=5 KillMode=mixed [Install] WantedBy=multi-user.target - 注意下面内容如
二、配置文件
1.主配置文件
默认位置:/etc/nginx/nginx.conf
基础配置内容解读:
user www-data; #nginx是以www-data身份去访问的,(需要注意可能出现访问文件的权限问题)[重要]
worker_processes auto;#nginx对外提供web服务时的worker进程数(当设置成auto时nginx将自动启动与cpu数量相同的worker进程)[重要]
pid /run/nginx.pid;#记录着当前nginx的进程号
include /etc/nginx/modules-enabled/*.conf;

events {
        worker_connections 768;#nginx的最大连接数(最好经过压力测试进行配置)[重要]
}

http {
        sendfile on;#高效文件传输(使用其能使得文件传输不经过程序,加载到缓存直接发送,相反off的话,需要在硬盘-缓存-程序-发送)
        tcp_nopush on;#其会将即将发送的数据存在缓存区达到一定数量再发送,减少网络压力(需在sendfile打开下使用)
        tcp_nodelay on;数据无延时发送(在目前linux版本与tcp_nopush无矛盾(当无需在缓存区填满时,靠该参数强制发送))(需要开启keepalive_timeout)
        keepalive_timeout 65;#保持连接超时时长秒为单位,此时会占用1个worker_connections连接数(应当合理配置,时间过长浪费资源,时间过短可能过多占用worker_connections,而且上传大文件时间过长超过该时间可能导致失败)[重要]
        types_hash_max_size 2048;

        include /etc/nginx/mime.types;#表示支持各种类型的文件(比如text/css、text/html)
        default_type application/octet-stream;#当用户访问到mime.types为定义的扩展名提供下载服务(application/octet-stream就是下载)

        ##
        # SSL配置
        ##

        ssl_protocols TLSv1 TLSv1.1 TLSv1.2 TLSv1.3; # Dropping SSLv3, ref: POODLE
        ssl_prefer_server_ciphers on;

        ##
        # 日志配置
        ##

        access_log /var/log/nginx/access.log;
        error_log /var/log/nginx/error.log;

        ##
        # Gzip压缩配置
        ##

        gzip on;

        # gzip_vary on;
        # gzip_proxied any;
        # gzip_comp_level 6;
        # gzip_buffers 16 8k;
        # gzip_http_version 1.1;
        # gzip_types text/plain text/css application/json application/javascript text/xml application/xml application/xml+rss text/javascript;
        ##
		# Virtual Host Configs
		##

		include /etc/nginx/conf.d/*.conf;
		include /etc/nginx/sites-enabled/*;#server配置的位置[重要]


}
2.server服务配置
默认位置:/etc/nginx/sites-enabled/default
解释:静态资源网站
注意:每个server配置也是有先后顺序的
server {
        listen 80;# 当是80端口进来的时候就来到这个server
        server_name _;#不绑定域名
        location / {
                root /var/www/html;#去哪找页面(服务器放文件的目录)
                index index.html;# 首页面地址
        }
}
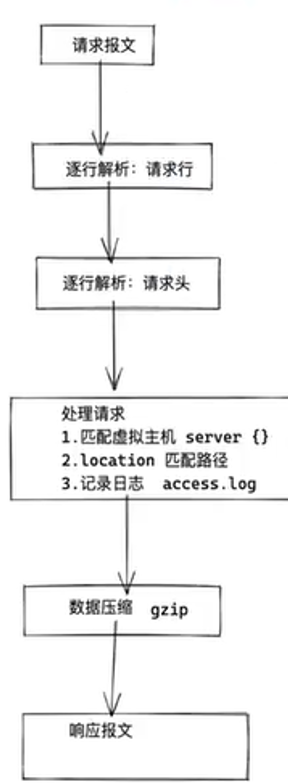
三、请求处理流程


 960
960


 被折叠的 条评论
为什么被折叠?
被折叠的 条评论
为什么被折叠?
 到【灌水乐园】发言


