


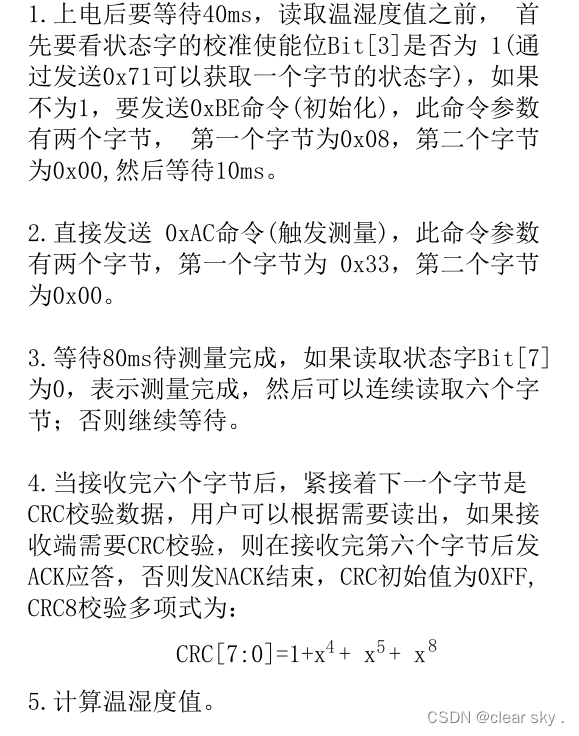
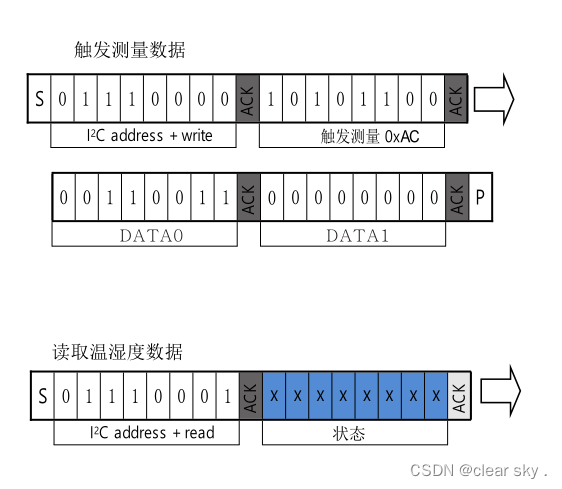
AHT20温度传感器使用程序:
使用i2c读取温度传感器数据很简单,但市面上有至少两个手册,我这个对应的手册贴出来:
main:
#include "stm32f10x.h"                  // Device header
#include <stdint.h>
#include "delay.h"
#include "OLED.h"
#include "MPU6050.h"
#include "AHT20.h"
#include "serial.h"
#include "i2c.h"
#include "Delay.h"

int16_t AX,AY,AZ,GX,GY,GZ;int count=0;
uint8_t ReceiveData=0,ReceiveData1=0;uint32_t arr[6]={0};uint32_t H1=0,T1=0;
int main (void)
{
    Serial_USART1_Init();
    printf("begin\r\n");
    I2C_GPIO_Init();
	OLED_Init();
	//AHT20Init();
    //AHT20_Begin_Measure();
    I2C_Start();
    I2C_Send_DataByte(0x71);
    I2C_Receive_Ack();
    ReceiveData=I2C_Read_DataByte();
    if((ReceiveData&0x08)==0x08){
        printf("success\r\n");
    }
    else{
        printf("failed\r\n");
    }

    /*开启测量*/
    I2C_Start();
    I2C_Send_DataByte(0x70);
    I2C_Receive_Ack();
    I2C_Send_DataByte(0xAC);
    I2C_Receive_Ack();
    I2C_Send_DataByte(0x33);
    I2C_Receive_Ack();
    I2C_Send_DataByte(0x00);
    I2C_Receive_Ack();
    I2C_Stop();

    Delay_ms(210);

    I2C_Start();
    I2C_Send_DataByte(0x71);
    I2C_Receive_Ack();

    ReceiveData1=I2C_Read_DataByte();
    if((ReceiveData1&0x80)==0x00){
        printf("completed\r\n");
    }
    else{
        printf("uncompleted\r\n");
    }
    I2C_Send_Ack(0);
    arr[0]=I2C_Read_DataByte();//hum
    I2C_Send_Ack(0);
    arr[1]=I2C_Read_DataByte();//temp
    I2C_Send_Ack(0);
    arr[2]=I2C_Read_DataByte();//湿度+温度
    I2C_Send_Ack(0);
    arr[3]=I2C_Read_DataByte();//temp
    I2C_Send_Ack(1);
    I2C_Stop();

    H1=arr[0];
    H1=(H1<<8)|arr[1];
    H1=(H1<<8)|arr[2];
    H1=H1>>4;

    H1=H1*1000/1024/1024;
    printf("H1=%d\r\n",H1);
    printf("H1=%d%d.%d\r\n",H1/100,(H1/10)%10,H1%10);

    T1=arr[2];
    T1=T1&0x0000000F;
    T1=T1<<8;
    T1=T1|arr[3];
    T1=T1<<8;
    T1=T1|arr[4];

    T1=(T1*2000/1024/1024-500);
    //printf("T1=%d",T1);
    printf("T1=%d%d.%d",T1/100,T1/10%10,T1%10);

    OLED_ShowString(1,1,"str");

	while(1){
        MPU6050_Get_Data(&AX);
        //printf("%d\r\n",AX);
        OLED_ShowSignedNum(3,1,count,2);
		OLED_ShowSignedNum(2,1,AX,10);
        count++;
	}

}
AHT20.c:
#include "stm32f10x.h"                  // Device header
#include "delay.h"
#include "i2c.h"
#include <stdint.h>
#include "AHT20.h"
#define Dev_Addr 0x70
#define Command1 0xAC
#define Command2 0x33
#define Command3 0x00


//开启测量
void AHT20_Begin_Measure(){
    I2C_Start();
    I2C_Send_DataByte(Dev_Addr);//0x70
    I2C_Receive_Ack();
    I2C_Send_DataByte(Command1);//0xAC
    I2C_Receive_Ack();
    I2C_Send_DataByte(Command2);//0x33
    I2C_Receive_Ack();
    I2C_Send_DataByte(Command3);//0x00
    I2C_Receive_Ack();
    I2C_Stop();
    Delay_ms(150);

}

void AHT20Init(){
    //AHT20Reset();
    I2C_Start();
    I2C_Send_DataByte(0x71);
    I2C_Receive_Ack();
    I2C_Send_DataByte(0xbe);
    I2C_Receive_Ack();
    I2C_Send_DataByte(0x08);
    I2C_Receive_Ack();
    I2C_Send_DataByte(0x00);
    I2C_Receive_Ack();
    I2C_Stop();

}

void AHT20Reset(){
    I2C_Start();
    I2C_Send_DataByte(0x70);
    I2C_Receive_Ack();
    I2C_Send_DataByte(0xBA);
    I2C_Receive_Ack();
    I2C_Stop();
}

uint8_t AHT20_Read_State_Field(){
    uint8_t StateDataReceive=0;
    I2C_Start();
    I2C_Send_DataByte((Dev_Addr|0x01));
    I2C_Receive_Ack();
    StateDataReceive=I2C_Read_DataByte();

    return StateDataReceive;
}
i2c.c:
#include "stm32f10x.h"                  // Device header
#include "delay.h"


void I2C_GPIO_Init(){
    RCC_APB2PeriphClockCmd(RCC_APB2Periph_GPIOB, ENABLE);

	GPIO_InitTypeDef GPIO_InitStructure;
 	GPIO_InitStructure.GPIO_Mode = GPIO_Mode_Out_OD;//开漏输出
	GPIO_InitStructure.GPIO_Pin=GPIO_Pin_10|GPIO_Pin_11;
	GPIO_InitStructure.GPIO_Speed = GPIO_Speed_50MHz;
 	GPIO_Init(GPIOB, &GPIO_InitStructure);
	GPIO_SetBits(GPIOB,GPIO_Pin_10|GPIO_Pin_11);//设置引脚为高电平
}

void I2C_W_SCL(uint8_t BitValue){
    GPIO_WriteBit(GPIOB,GPIO_Pin_10,(BitAction)BitValue);
    Delay_us(10);
}

void I2C_W_SDA(uint8_t BitValue){
    GPIO_WriteBit(GPIOB,GPIO_Pin_11,(BitAction)BitValue);
    Delay_us(10);
}

void I2C_Start(){
    I2C_W_SCL(1);
    I2C_W_SDA(1);
    Delay_us(10); //高电平保持20ms

    I2C_W_SDA(0);
    Delay_us(10);
    I2C_W_SCL(0);
    Delay_us(10);
}

void I2C_Stop(){
    I2C_W_SCL(0);
    I2C_W_SDA(0);
    Delay_us(10);
    I2C_W_SCL(1);
    Delay_us(10);
    I2C_W_SDA(1);

}

void I2C_Receive_Ack(){
    I2C_W_SCL(0);//进入置SCL=0
    Delay_us(10);

    I2C_W_SDA(1);
    I2C_W_SCL(1);
    Delay_us(10);
    I2C_W_SCL(0);
    Delay_us(10);
}

void I2C_Send_Ack(uint8_t SendAckValue){
    I2C_W_SCL(0);
    if(SendAckValue==0){
        I2C_W_SDA(0);
    }
    I2C_W_SCL(1);
    Delay_us(10);
    I2C_W_SCL(0);
}

void I2C_Send_DataByte(uint8_t DataSend){
    uint8_t finger=0x80;
    I2C_W_SCL(0);//进入置SCL=0;
    Delay_us(10);
    for(uint8_t k=0;k<8;k++){

        if(DataSend&finger){
            I2C_W_SDA(1);
            Delay_us(10);
        }
        else{
            I2C_W_SDA(0);
            Delay_us(10);
        }
        I2C_W_SCL(1);
        Delay_us(10);
        I2C_W_SCL(0);
        Delay_us(10);
        finger=finger>>1;
    }
}

uint8_t I2C_Read_DataByte(){//读取8位数据
    uint8_t DataReceive=0x00;
    uint8_t finger=0x80;
    I2C_W_SCL(0);//进入置SCL=0;
    I2C_W_SDA(1);//考虑设置为浮空,详见AHT20收藏
    Delay_us(10);
    for(uint8_t k=0;k<8;k++){
        I2C_W_SCL(1);
        Delay_us(10);
        if(GPIO_ReadInputDataBit(GPIOB,GPIO_Pin_11)==1){
            DataReceive=DataReceive|(finger>>k);
        }
        else{
            //不操作
        }
        I2C_W_SCL(0);
        Delay_us(10);
    }
   return DataReceive;
}

uint8_t I2C_R_SDA(){
    uint8_t BitValue=0;
    BitValue=GPIO_ReadInputDataBit(GPIOB,GPIO_Pin_11);
    Delay_us(10);
    return BitValue;
}


 633
633


 被折叠的 条评论
为什么被折叠?
被折叠的 条评论
为什么被折叠?
 到【灌水乐园】发言


