


数据备份方案;定时任务定期备份;实时备份同步方案
Inofity-tools+Rsync实施复制实战
实时备份 inotify结合rsync实时同步 适用数据量小场景(几十 GB 到几百 GB)。高并发容易无法抓取目录变更造成数据丢失
准备Backup服务器(rsync服务端一键部署)
从0部署,拍摄初始化环境快照

一键部署rsyncd服务端
vim autoPreRsync.sh

#!/bin/bash
yum -y remove rsync
yum install rsync -y
# 系统软件(如守护进程),授权用户设置;用户密码文件及日志文件设置;备份模块路径设置
cat > /etc/rsyncd.conf << 'EOF'
uid = rysncDaemon
gid = rysncDaemon
port = 873
fake super = yes
use chroot = no
max connections = 200
timeout = 600
ignore errors
read only = false
list = false
auth users = auther
secrets file = /etc/rsyncAuther.passwd
log file = /var/log/rsyncd.log
[nfsBackup]
comment = nfs rsync backup!
path = /nfsBackup
EOF

useradd -u 1005 -M -s /sbin/nologin rysncDaemon
mkdir -p /{nfsBackup,data}
##没授权成功不知道咋回事后来自己检查的
chown -R rysncDaemon.rysncDaemon  /{nfsBackup,data}
echo "auther:1" > /etc/rsyncAuther.passwd
chmod 600 /etc/rsyncAuther.passwd
##授权给Daemon认证不通过chown -R rysncDaemon.rysncDaemon /etc/rsyncAuther.passwd
systemctl start rsyncd


3.执行脚本部署服务端的rsync
bash -n autoPreRsync.sh
bash autoPreRsync.sh
准备部署软件inotify-tools
inotify-tools工具
引用文件系统事件 inotify通知机制
yum install inotify-tools -y
inotify-tools 系统自带工具===============================
检查软件命令
rpm -ql inotify-tools |grep bin
ls /proc/sys/fs/inotify/
max_user_watches max_user_instances max_queued_events
系统文件解释
max_user_watches: (单进程)默认只能监控8192个文件
max_user_instances: 默认每个用户可以开启inotify服务128个进程
max_queued_events: 默认监控事件数队列长度为16384===========
安装inotifty-tools工具集 需要配置好epel源
Inotifywait详解
Inotify-tools软件2个重要的命令进程
inotifywait:等候监控目录特定文件系统事件(open、close、delete等事件),执行后处于阻塞状态,事件发生后进行通知或脚本操作
Inotifywatch:监控文件系统目录并统计变化信息
inotifywait使用
所有目录文件变化操作事件,都会被监测到
文件系统事件Events含义
access    文件或目录被读取
modify    文件或目录内容被修改
attrib    文件或目录属性被改变
close    文件或目录封闭,无论读/写模式
open    文件或目录被打开
moved_to    文件或目录被移动至另外一个目录
move    文件或目录被移动到另一个目录或从另一个目录移动至当前目录
create    文件或目录被创建在当前目录
delete    文件或目录被删除
umount    文件系统被卸载
创建监控目录
mkdir /nfs-data
执行监测命令
 --timefmt输出事件模式   --format 输出格式
##### inotifywait -mrq --timefmt '%T' --format "%T----%w------%f 捕获事件:%e" /nfsData
开启其他会话对目录访问操作测试
12:27:56----/nfs-data/------ 捕获事件:CLOSE_NOWRITE,CLOSE,ISDIR
检测具体(目录文件)事件。命令参数用法-e events 事件名,例,删 建
inotifywait -mrq --timefmt ‘%T’ --format “%T----%w------%f 捕获事件:%e” -e modify,create,delete,move /nfsData
inotify工具结合rsyn实时同步 客户端一键部署
脚本实现(1.inotify检测文件变化 2.while read -r var1 var2;do done 执行rsync同步)
vim autoInoRsync.sh
+++++++++++++++++++++++++++++++++++++++++++++++++++++++++++++++++++++++++++++++++++++++
#!/bin/bash
yum -y install rsync
查看内核版本进行安全或兼容功能性检查
echo "uname -r "| cut -d. -f1
yum install inotify-tools -y
mkdir /nfsData
设置源目录和目标目录
source_dir=“/nfsData”
target_dir=“/nfsBackup”
循环验证ssh密钥验证免密登录
免密主机列表,登录形式
servers=(“root@172.16.1.99”)
判断是否存在 SSH 密钥对 --type
if [ -f ~/.ssh/id_rsa.pub ]; then
echo “SSH public key exists. Probably configured for passwordless login.”
else
echo “公钥不存在,即将进行公私钥生成”
ssh-keygen -t rsa
fi
循环遍历服务器列表 进行多服务备份进程
for server in “${servers[@]}”; do
验证远程命令方式是否可以登录
	 ssh $server echo "Passwordless login configured. SSH connection successful."
	 if [ $? eq 1 ];then
	 ###### 无法免密登录需免密验证
		 echo "即将发送公钥到$server"
	   ssh-copy-id $server
	 fi
	 ###### 设置 rsync 同步命令
	rsync_cmd="rsync -av --delete $source_dir/   $server:$target_dir"
读取到信息为真 --raw原始的 搭档|当读到标准输出流while read -r 空格区分赋予变量1和变量2
# 使用 inotifywait 实时监听文件变化执行操作,监控目录文件基本的修改动作 -e events
inotifywait -m -r -e modify,create,delete,move --format ‘%w%f %e’ “$source_dir” |
while read -r changed_file event; do
$rsync_cmd
done > /dev/null 2>&1 &
done
排除查询进程,过滤出脚本进程
sleep 1
echo "一键部署完成 数据同步脚本正在后台运行 pid:ps -aux |grep autoInoRsync.sh |grep grep -v|awk 'NR==1{print $2}' "
++++++++++++++++++++++++++++++++++++++++++++++++++++++++++++++++++++++++++++++++++++
bash -n autoInoRsync.sh
bash autoInoRsync.sh
自行在监控目录写入测试数据即可
关闭进程
kill -9 pgrep -f autoInoRsync.sh
基于sersync工具同步
检测文件事件的工具,某些文件不检测
原理:检测文件调用命令,配合定时任务配置实现定时同步
可以先手动测试rsync是可以正常备份,才能保证服务能进行运作
一键部署
vim autoPreSersync.sh
++++++++++++++++++++++++++++++++++++++++++++
#!/bin/bash
##下载安装解压编译好的程序直接用
cd /opt && wget -O sersync254.tgz https://storage.googleapis.com/google-code-archive-downloads/v2/code.google.com/sersync/sersync2.5.4_64bit_binary_stable_final.tar.gz
tar -xf sersync254.tgz
##修改名字
mv GNU-Linux-x86 sersync
echo “1” > /etc/rsync.passwd
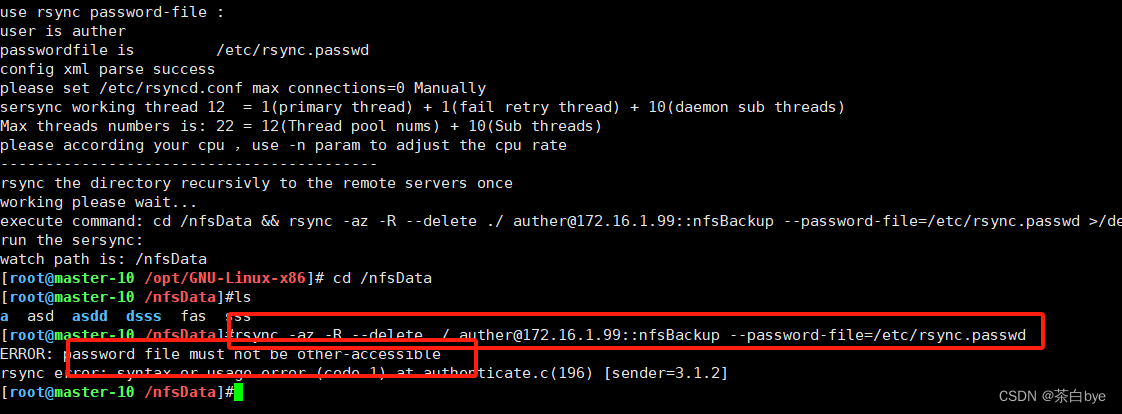
#【坑】密码文件权限位不对,sersync不会检查。需要自己测运行过程经常的命令才知道
echo “1” > /etc/rsync.passwd
#【坑】没连上服务器,看服务器cat /var/log/messages学会看系统,或服务日志;或分析工具启动日志:分析,是为了更好的排错
chmod 600 /etc/rsync.passwd
【坑】手动检查配置文件功能是否已修改
修改配置文件
##
#sed -i -r ‘/<createFile start=“”/>/c ’ /opt/sersync/confxml.xml
#sed -i -r ‘/<crontab start=“false” schedule=“600”>
/c ’ /opt/sersync/confxml.xml
##24
sed -i -r ‘/<localpath watch=“/opt/tongbu”>/c ’ /opt/sersync/confxml.xml
##25
sed -i -r ‘/<remote ip=“127.0.0.1” name=“tongbu1”/>/c <remote ip=“172.16.1.99” name=“nfsBackup”/>’ /opt/sersync/confxml.xml
##28
sed -i -r ‘/<commonParams params=“-artuz”/>/c ’ /opt/sersync/confxml.xml
##31
sed -i -r ‘31c ’ /opt/sersync/confxml.xml
启动服务
#./ /二进制命令daemon守护进程启动
/opt/sersync/sersync2 -r -d -o /opt/sersync/confxml.xml
++++++++++++++++++++++++++++++++++++++++++++++++++++++++++++++++++++++++++++++++++++++
自行测试
查看sersync是否帮你做了同步
查看,关闭进程
ps aux |grep sersync
kill -9 pgrep sersync
其他,查看用户id是否与准备部署的id冲突
getent passwd |awk -v FS=“:” ‘{print $3}’|sort -n -r| head -15
lsyncd工具
需求,可能会同时运行很多个需要rsync数据同步程序,需要用到高性能大数据量的lsyncd工具
https://github.com/lsyncd/lsyncd
Lysncd 实际上是lua语言封装了 inotify 和 rsync 工具,引用(Linux内核2.6之后) inotify 触发机制,然后通过rsync去差异同步。
能够有效地监测并处理大量的文件和目录的实时更新和同步
lua语法配置文件可读性强,多种工作模式可,本地目录cp,本地目录rsync,远程目录rsyncssh。
实现简单高效的本地目录同步备份(nfs网络存储挂载也可以)。
一键部署:安装修改配置文件,运行服务即可
vim autoPreLsyncd.bash
++++++++++++++++++++++++++++++++++++++++++++++++++++++++++++++++++++++++++++++++
#!/bin/bash
确保rsyncd服务正常可传输备份模块。rsync客户端下载安装全称 Live Syncing Daemon
yum install lsyncd -y
mv /etc/lsyncd.conf{,.bak}
cat > /etc/lsyncd.conf << ‘EOF’
– lua语法注释
–全局参数
settings {
logfile =“/var/log/lsyncd/lsyncd.log”,
statusFile =“/var/log/lsyncd/lsyncd.status”,
– CloseWrite文件夹或文件被创建修改删除关闭文件后会被同步
inotifyMode = “CloseWrite”,
maxProcesses = 8,
}
–sync {}只能对应配置一个目录
sync {
default.rsync,
source = “/nfsData”,
target = “auther@172.16.1.99::nfsBackup”,
–去差异化
delete= true,
–排除隐藏文件
exclude = {“.*”},
–服务一秒一次监测目录
delay=1,
–rsync对应命令参数
rsync = {
binary = “/usr/bin/rsync”,
archive = true,
compress = true,
verbose = true,
password_file=“/etc/rsync.passwd”,
–一般都是KB
_extra={“–bwlimit=200”}
}
}
EOF
##启动服务
systemctl start lsyncd
++++++++++++++++++++++++++++++++++++++++++++++++++
##测试
systemctl status lsyncd
for i in {1…100};do echo ${i} > ${i}.log;sleep 0.1;done


 3647
3647


 被折叠的 条评论
为什么被折叠?
被折叠的 条评论
为什么被折叠?
 到【灌水乐园】发言


