


Thymeleaf模板引擎
1.入门
第一步:创建一个SpringBoot工程
引入相关的场景启动器
![[外链图片转存失败,源站可能有防盗链机制,建议将图片保存下来直接上传(img-jROwzUqz-1655975250521)(img\1655817528794.png)]](https://img-blog.csdnimg.cn/f780eae23a774c96b43bc6b76a2e25e9.png)
 <dependencies>
        <dependency>
            <groupId>org.springframework.boot</groupId>
            <artifactId>spring-boot-starter-thymeleaf</artifactId>
        </dependency>
        <dependency>
            <groupId>org.springframework.boot</groupId>
            <artifactId>spring-boot-starter-web</artifactId>
        </dependency>

        <dependency>
            <groupId>org.springframework.boot</groupId>
            <artifactId>spring-boot-devtools</artifactId>
            <scope>runtime</scope>
            <optional>true</optional>
        </dependency>
        <dependency>
            <groupId>org.projectlombok</groupId>
            <artifactId>lombok</artifactId>
            <optional>true</optional>
        </dependency>
        <dependency>
            <groupId>org.springframework.boot</groupId>
            <artifactId>spring-boot-starter-test</artifactId>
            <scope>test</scope>
        </dependency>
    </dependencies>

    <build>
        <plugins>
            <plugin>
                <groupId>org.springframework.boot</groupId>
                <artifactId>spring-boot-maven-plugin</artifactId>
                <configuration>
                    <excludes>
                        <exclude>
                            <groupId>org.projectlombok</groupId>
                            <artifactId>lombok</artifactId>
                        </exclude>
                    </excludes>
                </configuration>
            </plugin>
        </plugins>
    </build>
第二步:编写控制器层
@Controller
public class ThymeleafController {

    @RequestMapping("/")
    public String helloThymeleaf(Model model){
        // 向request域中存储数据
        model.addAttribute("data","欢迎使用Thymeleaf模板引擎");
        return "hello";
    }
}
第三步:编写页面,向request共享域中获取出数据
<!DOCTYPE html>
<html lang="en" xmlns:th="http://www.thymeleaf.org">
<head>
    <meta charset="UTF-8">
    <title>hello页面</title>
</head>
<body>
<h3 style="color: green">Thymeleaf模板引擎的使用</h3>
<p th:text="${data}">数据显示区域</p>
</body>
</html>
![[外链图片转存失败,源站可能有防盗链机制,建议将图片保存下来直接上传(img-5TLT4QnZ-1655975250522)(D:\typora笔记\springboot2\img\1655817482696.png)]](https://img-blog.csdnimg.cn/1d0feb198adb4d64b208bd1b12f36690.png)
2.使用spring.thymeleaf可以修改掉模板引擎中的默认配置
#修改端口号为 80
server.port=80

#在开发阶段,一般会关闭模板缓存 ,让修改立即生效,默认是true开启的,
#在项目上线后,要修改回开启
spring.thymeleaf.cache=false

#编码模式
spring.thymeleaf.encoding=UTF-8

#模板的类型(默认是html,模板是html文件)
spring.thymeleaf.mode=HTML

#模板的前缀:类路径的: classpath:/templates/
spring.thymeleaf.prefix=classpath:/templates/

#模板的后缀:
spring.thymeleaf.suffix=.html
表达式
1.标准变量表达式
语法:
${key}
作用:获取key对于的文本数据,key是request作用域中的key,使用request.setAttribute();或model.addAttribute();
在页面中的html标签中,使用th:text="${key}"
案例:
第0步:编写JavaBean
@Data
@NoArgsConstructor
@AllArgsConstructor
@ToString
public class Person {
    private Integer id;
    private String name;
    private String sex;
    private Integer age;
}
第一步:编写控制器
    @RequestMapping("/expressionl")
    public String expressionl(Model model){
        // 向request共享域中存储数据
        model.addAttribute("site","https://fanyi.baidu.com/");

        model.addAttribute("pojo",new Person(101,"海康","男",23));

        // 指定跳转视图
        return "standard";
    }
第二步:编写页面
<div style="margin-left: 430px">
    <h3 style="color: green">标准变量表达式</h3>
    <a th:href="${site}">去百度翻译</a><br/>
    <p th:text="${pojo.id}">id</p>
    <p th:text="${pojo.name}">姓名</p>
    <p th:text="${pojo.sex}">性别</p>
    <p th:text="${pojo.age}">年龄</p>
</div>
第三步:测试
![[外链图片转存失败,源站可能有防盗链机制,建议将图片保存下来直接上传(img-5aES50a4-1655975436466)(img\1655861093859.png)]](https://img-blog.csdnimg.cn/fc9f3f238034472689df80965dd03712.png)
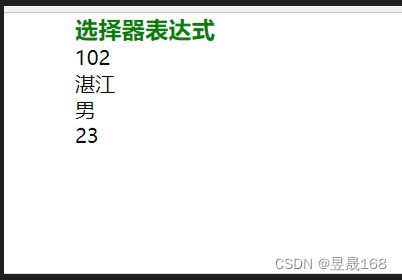
2.选择变量表达式
语法:
*{key}
说明:需要配和th:object一起使用,选择变量表达式,也叫星号变量表达式,使用th:object属性来绑定对象,选择表达式首先使用th:object来绑定后台传来的对象,然后使用*来代表这个对象后面{}中的值此对象的属性
选择变量表达式*{...}是另一种类似于标准变量表达式${...}表示变量的方法,选择变量表达式*{...}在执行时是在选择的对象上求解,而${...}是在上下文的变量model上求解
选择变量表达式使用步骤:
第一步:<div th:object="${后台传入对象}></div>"
第二步:th:text="*{对象属性}"
案例:
第0步:
@Data
@NoArgsConstructor
@AllArgsConstructor
@ToString
public class Person {
    private Integer id;
    private String name;
    private String sex;
    private Integer age;
}
第一步:编写控制器
    @RequestMapping("/expression2")
    public String expression2(Model model){
        model.addAttribute("pojo",new Person(102,"湛江","男",23));
        return "expression2";
    }
第二步:编写页面
<div>
  <h3 style="color: green">选择器表达式</h3>
    <div th:object="${pojo}">
        <p th:text="*{id}">id</p>
        <p th:text="*{name}">name</p>
        <p th:text="*{sex}">sex</p>
        <p th:text="*{age}">age</p>
    </div>
</div>
第三步:测试
3.链接表达式URL
语法:
@{链接url}
说明:主要用来链接,地址的展示,可用于<srcipt src=".."> <link href=".."> <a href=".."> <form action=".."> <img src="..">等,可以在URL路径中动态获取数据
案例:
第0步:
@Data
@NoArgsConstructor
@AllArgsConstructor
@ToString
public class Student {
    private Integer studId;
    private String studName;
}
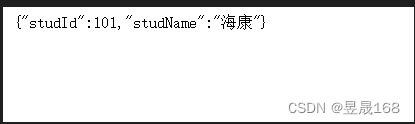
第一步:编写控制器方法
@Controller
@RequestMapping("/thy")
public class LinkController {

    @RequestMapping("/student")
    public String student(Model model){
        model.addAttribute("studId",101);
        return "link";
    }

    @RequestMapping("/queryById")
    @ResponseBody
    public String queryById(@RequestParam("id") Integer id){
        return "根据Id查询的学生信息"+id;
    }

    @RequestMapping("/findStudent")
    @ResponseBody
    public Student student(Student student){
        // 返回Student对象 JSON格式
        return student;
    }
}
第二步:编写页面
<div>
  <h3 style="color: green">链接表达式</h3>
    <a th:href="@{'/thy/queryById?id='+${studId}}">根据Id查询学生信息</a><br/>
<!--    推荐使用 方式二:-->
    <a th:href="@{/thy/findStudent(studId=${studId},studName='海康')}">查询学生信息返回JSON数据格式</a>
</div>
第四步:测试
![[外链图片转存失败,源站可能有防盗链机制,建议将图片保存下来直接上传(img-EmWzYKGe-1655975436468)(img\1655882086172.png)]](https://img-blog.csdnimg.cn/9def5f806d2848088cbb6f0123696af6.png)
Thymeleaf属性
概念:大部分属性和html的一样,只不过前面加了一个th前缀,加了th前缀的属性,是经过模版引擎处理的
1.th:action
定义后台控制器的路径,类似<form>标签的action属性,主要结合url表达式,获取动态变量
<form id="login" th:action="@{/login}" th:method="post">...</form>
2.th:method
设置请求方法
<form id="login" th:action="@{/login}" th:method="post">...</form>
3.th:href
定义超链接,主要结合url表达式,获取动态变量
<a th:href="@{query/student}">相对地址没有传参数</a>
4.th:src
用于外部资源引入,比如<script>标签的src属性,<img>标签的src属性,常与@{}表达式结合使用,在SpringBoot项目的静态资源都放到resources的static目录下,放到static路径下的内容,写路径时不需要写上static
script type="text/javascript" th:src="@{/js/jquery-3.4.1.js}"></script>
5.th:text
用于文本的显示,该属性显示的文本在标签体中,如果文本框,数据会在文本框外显示,要想显示在文本框内,使用th:value
<input type="text" id="realName" name="reaName" th:text="${realName}">
6.th:style
设置样式<a th:onclick="funl('+${user.id}+')" th:style="color:red">点我试试</a>
7.th:each[重点]
这个属性非常非常,比如从后台传来一个对象集合那么就可以使用属性遍历输出,它与jstl中的<c:forEach>类似,此属性既可以循环遍历集合,也可以循环遍历数组及Map
A.List集合
案例:
第0步:
@NoArgsConstructor
@AllArgsConstructor
@ToString
public class Person {
    private Integer id;
    private String name;
    private String sex;
    private Integer age;
}
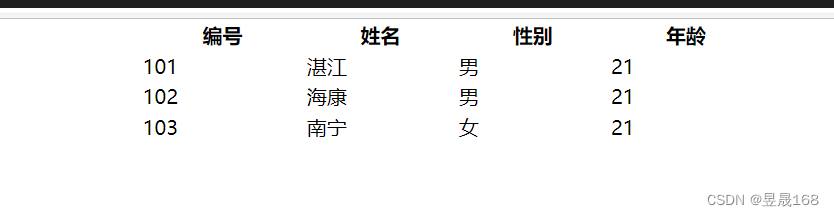
第一步:编写控制器
@Controller
@RequestMapping("/collection")
public class CollectionController {

    @RequestMapping("/list")
    public String list(Model model){
        List<Person> list = new ArrayList<>();
        list.add(new Person(101,"湛江","男",21));
        list.add(new Person(102,"海康","男",21));
        list.add(new Person(103,"南宁","女",21));

        // 向request共享域中存储数据
        model.addAttribute("list",list);

        return "list";
    }
}
第二步:编写页面
<div>
  <table>
    <tr>
      <th>编号</th>
      <th>姓名</th>
      <th>性别</th>
      <th>年龄</th>
    </tr>
    <tr th:each="person:${list}">
      <td th:text="${person.id}"></td>
      <td th:text="${person.name}"></td>
      <td th:text="${person.sex}"></td>
      <td th:text="${person.age}"></td>
    </tr>
  </table>
</div>
第三步:测试
B.数组
案例:
第0步:
@NoArgsConstructor
@AllArgsConstructor
@ToString
public class Person {
    private Integer id;
    private String name;
    private String sex;
    private Integer age;
}
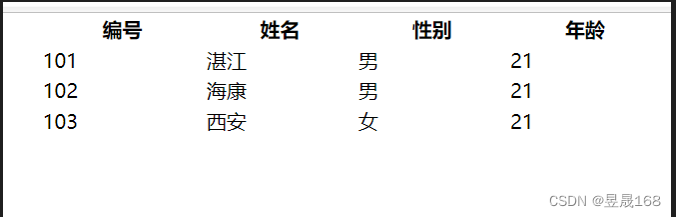
第一步:编写控制器
    @RequestMapping("/arr")
    public String arr(Model model){
        Person[] people = new Person[3];
        people[0] = new Person(101,"湛江","男",21);
        people[1] = new Person(102,"海康","男",21);
        people[2] = new Person(103,"西安","女",21);

        // 向request域中存储数据
        model.addAttribute("arr",people);

        return "arr";
    }
第二步:编写页面
<div>
  <table>
    <tr>
      <th>编号</th>
      <th>姓名</th>
      <th>性别</th>
      <th>年龄</th>
    </tr>
    <tr th:each="person:${arr}">
      <td th:text="${person.id}"></td>
      <td th:text="${person.name}"></td>
      <td th:text="${person.sex}"></td>
      <td th:text="${person.age}"></td>
    </tr>
  </table>
</div>
第三步:测试
语法:
th:each=person,iterStat:${collection}中的${collection}是后台传来的集合
person:定义变量,去接收遍历${collection}集合中的一个数据iterStat${collection}循环体信息
- 其中
person及iterStat自己可以随便取名 iterStat是循环体的信息,通过该变量可以获取如下信息index:当前迭代对象的index(从0开始计算)count:当前迭代对象的个数(从1开始计算)size:被迭代对象的大小current:当前迭代变量even/odd:布尔值,当前循环是否是偶数/奇数(从0开始计算)first:布尔值,当前循环是否第一个last:布尔值,当前循环是否最后一个
注意:循环体信息iterStat也可以不定义,则默认采用迭代变量加上Stat后缀,即personStat
数组和List集合语法总结:
<div th:each="集合循环成员,循环的状态变量:${key}">
    <p th:text="${集合循环成员}" ></p>
</div>

集合循环成员,循环的状态变量:两个名称都是自定义的。 “循环的状态变量”这个名称可以不定义,默认是"集合循环成员Stat"
C.Map集合
案例:
第0步:
@NoArgsConstructor
@AllArgsConstructor
@ToString
public class Person {
    private Integer id;
    private String name;
    private String sex;
    private Integer age;
}
第一步:编写控制器
    @RequestMapping("/map")
    public String map(Model model){
        Map<String,Object> map = new HashMap<>();
        map.put("101",new Person(101,"海康","男",21));
        map.put("102",new Person(102,"湛江","男",22));
        map.put("103",new Person(103,"西安","女",23));
        map.put("104",new Person(104,"南宁","女",21));


        // 向request域中存储数据
        model.addAttribute("map",map);

        return "map";
    }
第二步:编写页面
<div>
  <table>
    <tr>
      <th>编号</th>
      <th>姓名</th>
      <th>性别</th>
      <th>年龄</th>
    </tr>
    <tr th:each="perMap:${map}">
      <td th:text="${perMap.key}"></td>
      <td th:text="${perMap.value.name}"></td>
      <td th:text="${perMap.value.sex}"></td>
      <td th:text="${perMap.value.age}"></td>
    </tr>
  </table>
</div>
第三步:测试
Map集合语法总结
<div th:each="集合循环成员,循环的状态变量:${key}">
    <p th:text="${集合循环成员.key}" ></p>
    <p th:text="${集合循环成员.value}" ></p>
</div>

集合循环成员,循环的状态变量:两个名称都是自定义的。 “循环的状态变量”这个名称可以不定义,默认是"集合循环成员Stat"

key:map集合中的key
value:map集合key对应的value值
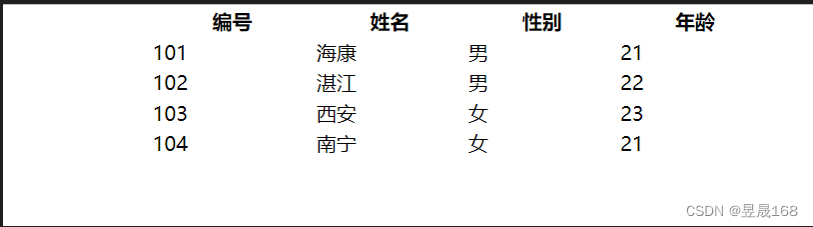
8.条件判断if-unless
语法:
th:if="boolean 条件"条件为
true显示体内容
th:unless是th:if的一个相反操作
注意是:当th:if=${..}语法成立时,才会显示标签体中的内容【就是if为true时,显示】
注意是:当th:unless=${..}语法不成立时,才会显示标签体中的内容【就是unless为false时,显示】
细节点:
- 在
th:if="${""}"语句中【空字符串】代表是true - 在
th:if="${null}"语句中【null代表是false】
案例:
第一步:编写控制器
    @RequestMapping("/MyIf")
    public String myIf(Model model){
        // 向共享域中存储数据
        model.addAttribute("sex","性别不详");

        // 注意是:在`th:if`语句中空字符串,代表是true
        // 注意是:在`th:unless`语句中空字符串,代表是true,true则不显示,false才显示
        model.addAttribute("name","");

        // 注意是:在`th:if`语句中`null`,代表是false
        // 注意是:在`th:unless`语句中`null`,代表是false,false则显示
        model.addAttribute("old",null);


        return "MyIf";
    }
第二步:编写页面
<div>
  <h3 style="color: green">IF判断语句</h3>

<!--    下面的两种写法都是正确的 -->
    <p th:if="${sex=='性别不详'}">性别不详</p>
    <p th:if="${sex}=='性别不详'">显示性别</p>
<!--  空字符串在`th:if`代表是true,true在unless中不显示 -->
    <p th:if="${name}">在th:if中空字符串代表是true</p>
<!--    null在`th:if`代表是false,false在`th:unless`则显示-->
    <p th:unless="${old}">在`th:if`中null代表是false,false则不显示该标签,在nuless中则显示</p>
</div>
第三步:测试
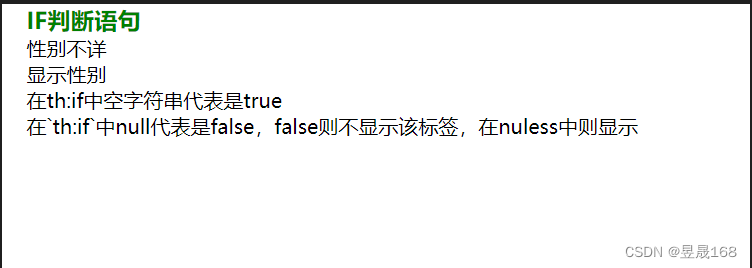
9.th:switch
th:switch和java中的swith一样的
语法:
<div th:switch="要比对的值">
    <p th:case="值1">
        结果1
    </p>
    <p th:case="值2">
        结果2
    </p>
    <p th:case="*">
        默认结果
    </p>
    以上的case只有一个语句执行

</div>
注意是:th:case="*"代表是默认值
案例:
第一步:编写控制器
    @RequestMapping("/switch")
    public String switchCase(Model model){
        // request共享域中存储数据
        // 在switch中匹配了才显示,如果都不匹配可以使用`th:switch="*"`设置默认的
        model.addAttribute("sex","男");

        return "switch";
    }
第二步:编写页面
<div>
  <h3 style="color: green">switch判断语句</h3>
  <div th:switch="${sex}">
    <p th:case="男">性别男</p>
    <p th:case="女">性别女</p>
<!--    `th:case="*"`表示是默认的-->
    <p th:case="*">性别不详</p>
  </div>
</div>
第三步:测试
10.th:inline
th:inline有三个取值类型{text javascript 和 none}
内联text
可以让Thymeleaf表达式不依赖于html标签,直接使用内联表达式即可获取动态数据,要求在父级标签上加th:inline="text"属性
内联javascript
可以在js中,获取模版中的数据
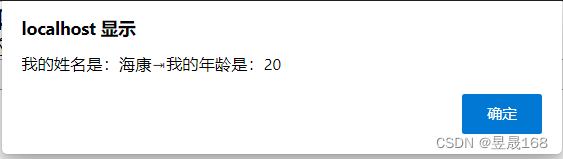
案例:
第一步:编写控制器
    @RequestMapping("/inline")
    public String inline(Model model){

        // request共享域中存储数据
        model.addAttribute("name","海康");
        model.addAttribute("age","20");

        return "inline";
    }
第二步:编写页面
  <style>
    * {
      width: 500px;
      margin: 0 auto;
    }
  </style>

  <script type="text/javascript" th:inline="javascript">
    var name = [[${name}]];

    function fun() {
      alert("我的姓名是:"+name+"\t我的年龄是:"+[[${age}]]);
    }
  </script>
</head>
<body>
<div>
  <h3>内联表达式</h3>

  <p>我的姓名是:[[${name}]],年龄是:[[${age}]]</p>

  <input type="button" value="点我试试" onclick="fun()">
</div>
第三步:测试
![[外链图片转存失败,源站可能有防盗链机制,建议将图片保存下来直接上传(img-NG6NCapt-1655975700898)(img\1655905775137.png)]](https://img-blog.csdnimg.cn/681997aedbb0464ebf451b3a1e94ede9.png)
11.字面量
文本字面量
用单引号'..'包围的字符串为文本字面量
案例:
<p th:text="'城市是'+${city}+'用户登录'+${isLogin}"></p>
数字字面量
<p th:if="${age>10}">age>10</p>

<p th:if="20>5">20大于5</p>
boolean字面量
<p th:if="${isLogin==true}">用户登录</p>
12.字符串连接
方式一:使用''
案例:
<p th:text="'城市是'+${city}+'用户登录'+${isLogin}"></p>
方式二:使用|| 【建议使用方式二】
案例:
<p th:text="|所在城市是${city},我是${name}|">
	显示数据
</p>
案例:
第一步:编写控制器
    @RequestMapping("/strJoin")
    public String strJoin(Model model){
        // 向request域中共享数据
        model.addAttribute("city","海康");
        model.addAttribute("name","明天");
        model.addAttribute("age",23);

        // 视图跳转
        return "strJoin";
    }
第二步:编写页面
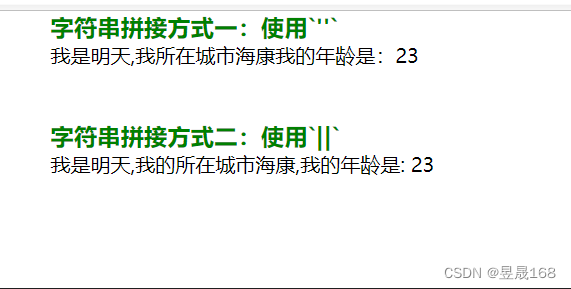
<div>
    <h3 style="color: green">字符串拼接方式一:使用`'..'`</h3>
    <p th:text="'我是'+${name}+',我所在城市'+${city}+'我的年龄是:'+${age}">显示个人信息</p>
    <br/>
    <br/>
    <h3 style="color: green">字符串拼接方式二:使用`||`</h3>
    <p th:text="|我是${name},我的所在城市${city},我的年龄是: ${age}|">显示个人信息</p>
</div>
第三步:测试
13.运算符
算术运算:
+-*/%关系比较:
><>=<=(gt lt ge le)相等判断:
==!=(eq ne)三元运算符:
表达式 ? true的结果 : false的结果
三元运算符可以嵌套
案例:
第一步:编写控制器
    @RequestMapping("/operation")
    public String operation(Model model){
        // 向共享域中存储数据`request`
        model.addAttribute("name","海康");
        model.addAttribute("age",21);

        // 视图跳转
        return "operation";
    }
第二步:编写页面
<div>
    <h3 style="color:green;">运算符</h3>
    <p th:if="${name=='海康'}">表达式为true,则显示</p>
    <p th:if="${age}>20 ? '年龄大于20' : '年龄不大于20'">判断年龄是否大于20</p>
</div>
第三步:测试
![[外链图片转存失败,源站可能有防盗链机制,建议将图片保存下来直接上传(img-PZEWZnAV-1655975700900)(img\1655950053533.png)]](https://img-blog.csdnimg.cn/c49175c3339048d48e48c657a2d73083.png)
Thymeleaf基本对象
1.常用内置对象
模板引擎提供了一组的对象,这些内置对象可以直接在模板中使用,这些对象由#号开始引用,我们比较常用的内置对象
request对象
#request原型:HttpServetRequest对象
session对象
#session原型:HttpSesssion对象
session原型:HttpSession对象
Session表示为Map对象的,是#session的简单表示方法,用来获取session中指定的key的值,#session才是用来调用相关方法的
案例:
第一步:控制器
    @RequestMapping("/baseObject")
    public String baseObject(Model model, HttpSession session){
        // 向request域中存储数据
        model.addAttribute("name","湛江");
        // 向session域中存储数据
        session.setAttribute("age",23);

        return "baseObject";
    }
第二步:编写页面
<div>
      <h3 style="color: green">基本内置对象的使用</h3>
      <p th:text="${#request.getAttribute('name')}"></p>
      <p th:text="${#session.getAttribute('age')}"></p>
      <p th:text="${session.age}"></p>
      <h3 style="color: green">`#request`内置对象的使用</h3>
      getServerPort: <span th:text="${#request.getServerPort()}"></span><br/>
      getRequestURI<span th:text="${#request.getRequestURI()}"></span><br/>
      getRequestURL<span th:text="${#request.getRequestURL()}"></span><br/>

      <h3 style="color: green">`#session`内置对象的使用</h3>
      getId<span th:text="${#session.getId()}"></span>
</div>
第三步:测试
![[外链图片转存失败,源站可能有防盗链机制,建议将图片保存下来直接上传(img-CvVvGl0K-1655976080280)(img\1655951532840.png)]](https://img-blog.csdnimg.cn/035118fbf1e64120bcb98ec7972c5425.png)
2.基于内置对象#ctx
语法:
#ctx: context对象可以获取其他的内置对象
注意是:#vars和#root是同一个对象,和#ctx的作用一样,建议使用#ctx
/*
 * ======================================================================
 * See javadoc API for class org.thymeleaf.context.IContext
 * ======================================================================
 */

${#ctx.locale}
${#ctx.variableNames}

/*
 * ======================================================================
 * See javadoc API for class org.thymeleaf.context.IWebContext
 * ======================================================================
 */

${#ctx.request}
${#ctx.response}
${#ctx.session}
${#ctx.servletContext}
-
#locale # 地点 : direct access to the : 直接进入
java.util.Localeassociated with current request. 与当前请求有关的 【获取当前地点相关的信息】 -
param : for retrieving request parameters. : 用于检索请求参数
${param.foo}is a 是一个String[]with the values of the 的值foorequest parameter, so 请求参数,所以${param.foo[0]}will normally be used for getting the first value. 将通常用于获取第一个值
/*
 * ============================================================================
 * See javadoc API for class org.thymeleaf.context.WebRequestParamsVariablesMap
 * ============================================================================
 */

${param.foo}              // Retrieves a String[] with the values of request parameter 'foo'
${param.size()}
${param.isEmpty()}
${param.containsKey('foo')}
...
- session 会议 : for retrieving session attributes. : 用于检索会话属性
/*
 * ======================================================================
 * See javadoc API for class org.thymeleaf.context.WebSessionVariablesMap
 * ======================================================================
 */

${session.foo}                 // Retrieves the session atttribute 'foo'
${session.size()}
${session.isEmpty()}
${session.containsKey('foo')}
...
- application 申请 : for retrieving application/servlet context attributes. 用于检索 application/servlet 上下文属性
/*
 * =============================================================================
 * See javadoc API for class org.thymeleaf.context.WebServletContextVariablesMap
 * =============================================================================
 */

${application.foo}              // Retrieves the ServletContext atttribute 'foo'
${application.size()}
${application.isEmpty()}
${application.containsKey('foo')}
...
Note there is no need to specify a namespace for accessing request attributes (as opposed to request parameters) because all request attributes are automatically added to the context as variables in the context root:
注意,不需要为访问请求属性指定名称空间(与请求参数相反) ,因为所有请求属性都作为上下文根中的变量自动添加到上下文中:
${myRequestAttribute}
在 Web 环境中,还可以直接访问以下对象(注意,这些是对象,而不是地图/名称空间) :
- #request # 请求 : direct access to the : 直接进入
javax.servlet.http.HttpServletRequestobject associated with the current request. 与当前请求关联的
${#request.getAttribute('foo')}
${#request.getParameter('foo')}
${#request.getContextPath()}
${#request.getRequestName()}
...
- #session # 会议 : direct access to the : 直接进入
javax.servlet.http.HttpSessionobject associated with the current request. 与当前请求关联的
${#session.getAttribute('foo')}
${#session.id}
${#session.lastAccessedTime}
...
- #servletContext # servletContext : direct access to the : 直接进入
javax.servlet.ServletContextobject associated with the current request. 与当前请求关联的
${#servletContext.getAttribute('foo')}
${#servletContext.contextPath}
...
3.内置工具类
内置工具类型:Thymeleaf自己的一些类,提供对string date,集合的一些处理方法
#dates:处理日期的工具类
#numbers:处理数字工具类
#lists:处理list集合工具类
null值:处理,在对象后添加?,表示当前对象是否为null,如果为null则不进行后面的取值例如:
zoo?.dog?.name: 表示如果zoo为null,则不进行dog的取值,如果dog为null,则不进行name的取值,可以防止报错
案例:
第0步:编写实体类
@Data
@ToString
public class Cat {
    private String name;
}


@Data
@ToString
public class Dog {
    private String name;
}

@Data
@ToString
public class Zoo {
    private Dog dog;
    private Cat cat;
}
第一步:编写控制器层
    @RequestMapping("/utilObject")
    public String utilObject(Model model){

        // 向request域存储数据
        model.addAttribute("myDate",new Date());
        // 向request域存储数字
        model.addAttribute("num",168.868);
        // 向request域存储字符串
        model.addAttribute("str","haikang168");

        // 向request域存储list集合
        List<String> list = Arrays.asList("a","b","c","d","e");
        model.addAttribute("list",list);

        // 向request域中存储对象
        Dog dog = new Dog();
        dog.setName("阿狗");
        Cat cat = new Cat();
        cat.setName("阿猫");
        Zoo zoo = new Zoo();
        zoo.setCat(cat);
        zoo.setDog(dog);

        model.addAttribute("zoo",zoo);

        return "utilObject";
    }
第二步:编写页面
  <div>
    <h3 style="color: green">日期工具类</h3>
    <!--    注意是:在方法直接传入属性名,不能使用`${属性名}`-->
    <p th:text="${#dates.format(myDate)}"></p>
    <p th:text="${#dates.format(myDate,'yyyy-MM-dd HH:mm:ss')}"></p>
    <p th:text="${#dates.year(myDate)}"></p>
    <p th:text="${#dates.month(myDate)}"></p>
<!--    createNow创建当前时间  -->
    <p th:text="${#dates.createNow()}"></p>

    <h3 style="color: red">数字工具类</h3>
<!--    Currency是对货币进行格式化的-->
    <p th:text="${#numbers.formatCurrency(num)}"></p>
<!--    formatDecimal是对数字进行格式,表示长度为5,并保存2位小数-->
    <p th:text="${#numbers.formatDecimal(num,5,2)}"></p>

    <h3 style="color: mediumspringgreen">字符串工具类</h3>
    <p th:text="${#strings.indexOf(str,'h')}"></p>
    <p th:text="${#strings.isEmpty(str)}"></p>
    <p th:text="${#strings.length(str)}"></p>

<!--    lists工具类-->
    <h3 style="color: skyblue">list集合工具类</h3>
    <p th:text="${#lists.size(list)}"></p>
    <p th:text="${#lists.toList(list)}"></p>
    <p th:text="${#lists.sort(list)}"></p>

<!--    null值的处理使用`?`-->
    <h3 style="color: blanchedalmond">null值的处理</h3>
    <p th:text="${zoo?.cat?.name}"></p>
    <p th:text="${zoo?.dog?.name}"></p>
  </div>
第三步:测试
![[外链图片转存失败,源站可能有防盗链机制,建议将图片保存下来直接上传(img-1MA7wA8W-1655976080281)(img\1655970443367.png)]](https://img-blog.csdnimg.cn/4f181ecf29c24a08a35991959f12b725.png)
4.模板内容复用
自定义模板是复用的行为,可以把一些内容,多次重复使用
第一步:定义模板
语法:
th:fragment="top":表示定义模板,自定义名称是top
例如:
<div th:fragment="top">
  <p>大海康</p>
  <p>欢迎你的到来!</p>
</div>
定义模板方式二:不使用th:fragment="top",表示定义整个页面都可以被引用
<!DOCTYPE html>
<html lang="en" xmlns:th="http://www.thymeleaf.org">
<head>
    <meta charset="UTF-8">
    <title>Title</title>
</head>
<body>
<div>
  <p>all页面</p>
  <p>不使用`th:fragment`语法定义模板,表示整个页面都可以被当作用模板使用</p>
</div>
</body>
</html>
第二步:引用模板方式【有两种】
<body>

  ...

  <div th:insert="~{footer :: copy}"></div>

</body>
上面和下面是完全等同的
<body>

  ...

  <div th:insert="footer :: copy"></div>

</body>
表示~{footer :: copy}的作用和footer :: copy作用一样
第三步:我们可以使用copy th:insert th:replace th:include三种方式来引入公共页面,注意在thymeleaf3.0后不再建议使用th:include
th:insert th:replace th:include三者的区别
th:insert是最简单的,它将公共的片段插入指定的片段上th:replace实际上将指定片段替换掉th:include与类似,但不是插入片段,而是只插入此片段的内容
公共片段:
<footer th:fragment="copy">
© 2011 The Good Thymes Virtual Grocery
</footer>
三种方式:
<body>

  ...

  <div th:insert="footer :: copy"></div>

  <div th:replace="footer :: copy"></div>

  <div th:include="footer :: copy"></div>

</body>
作用的效果:
<body>
...
<div>
<footer>
© 2011 The Good Thymes Virtual Grocery
</footer>
</div>
<footer>
© 2011 The Good Thymes Virtual Grocery
</footer>
<div>
© 2011 The Good Thymes Virtual Grocery
</div>
</body>
案例:
第一步:编写公共页面fragment.html页面
<!DOCTYPE html>
<html lang="en" xmlns:th="http://www.thymeleaf.org">
<head>
    <meta charset="UTF-8">
    <title>自定义模板</title>
</head>
<body>
<div th:fragment="top">
  <p>大海康</p>
  <p>欢迎你的到来!</p>
</div>
</body>
</html>
all.html页面
<!DOCTYPE html>
<html lang="en" xmlns:th="http://www.thymeleaf.org">
<head>
    <meta charset="UTF-8">
    <title>Title</title>
</head>
<body>
<div>
  <p>all页面</p>
  <p>不使用`th:fragment`语法定义模板,表示整个页面都可以被当作用模板使用</p>
</div>
</body>
</html>
不同层级的页面common.html
注意是:commont文件夹与引用页面同一级
<!DOCTYPE html>
<html lang="en" xmlns:th="http://www.thymeleaf.org">
<head>
    <meta charset="UTF-8">
    <title>公共页面</title>
</head>
<body>
<div th:fragment="body">
  <p>表示是:在不同目录下如何引用公共页面的问题</p>
  <p>th:insert="目标地址【一般使用相对路径】 :: 片段名"</p>
</div>
</body>
</html>
第二步:定义引用页面并且使用语法引用公共页面
<!DOCTYPE html>
<html lang="en" xmlns:th="http://www.thymeleaf.org">
<head>
    <meta charset="UTF-8">
    <title>自定义模板的引用</title>
  <style>
    * {
      width: 500px;
      margin: 0 auto;
    }
  </style>
</head>
<body>
<h3 style="color: mediumspringgreen">引入片段的方式</h3>
<!--方式一:使用insert和~{fragment :: top}的方式引入-->
<div th:insert="~{fragment :: top}"></div>
<!--方式二:使用include和`fragment :: top`-->
<div th:include="fragment :: top"></div>
<!--方式三:使用-->
<div th:replace="fragment :: top"></div>
<br/>
<br/>
<br/>
<h3 style="color: skyblue">引入整个页面方式</h3>
<!--方式一:表示引用 `all`页面,`html`表示是引用整个页面-->
<div th:insert="all :: html"></div>
<!--方式二:可以不写`html`-->
<div th:insert="~{all}"></div>
<br/>
<br/>
<br/>
<h3 style="color: green">引用不同层目录下的公共页面</h3>
<div th:replace="common/common :: body"></div>
</body>
</html>
![[外链图片转存失败,源站可能有防盗链机制,建议将图片保存下来直接上传(img-oLz7w80w-1655976080282)(img\1655975158342.png)]](https://img-blog.csdnimg.cn/a763c0642b1e46d9844bfd8addaa00a8.png)


 385
385


 被折叠的 条评论
为什么被折叠?
被折叠的 条评论
为什么被折叠?
 到【灌水乐园】发言


