


虚拟机环境如下:
| Node1 | 192.168.1.110 | Centos8 |
| Node2 | 192.168.1.111 | Centos8 |
1.在Node1和Node2上安装数据库;
yum install -y mysql*2.关闭防火墙服务,关闭开启自启;
systemctl stop firewalld
systemctl disable firewalld
3.开启数据库服务,并设置开机自启;
systemctl start mysqld
systemctl enable mysqld
4.初始化数据库;
mysql_secure_installation     \\初始化mysqld服务


New password:     \\输入设置密码

Re-enter new password:

Estimated strength of the password: 100
Do you wish to continue with the password provided?(Press y|Y for Yes, any other key for No) : y
By default, a MySQL installation has an anonymous user,
allowing anyone to log into MySQL without having to have
a user account created for them. This is intended only for
testing, and to make the installation go a bit smoother.
You should remove them before moving into a production
environment.

Remove anonymous users? (Press y|Y for Yes, any other key for No) :

 ... skipping.


Normally, root should only be allowed to connect from
'localhost'. This ensures that someone cannot guess at
the root password from the network.

Disallow root login remotely? (Press y|Y for Yes, any other key for No) :

 ... skipping.
By default, MySQL comes with a database named 'test' that
anyone can access. This is also intended only for testing,
and should be removed before moving into a production
environment.


Remove test database and access to it? (Press y|Y for Yes, any other key for No) :

 ... skipping.
Reloading the privilege tables will ensure that all changes
made so far will take effect immediately.

Reload privilege tables now? (Press y|Y for Yes, any other key for No) :

 ... skipping.
All done!
5.在Node1虚拟机上,修改配置文件/etc/my.cnf;
vim /etc/my.cnf

添加以下内容:
[mysqld]
server-id=1    \\指定ID,主从的两台虚拟机ID必须不同
log-bin=mysql-bin    \\mysql根据配置自动设置指定的二进制文件名
6.在Node1虚拟机上,使用systemctl重启数据库服务;
systemctl restart mysqld7.在Node1虚拟机上,进入交互模式,配置同步账户。
(1)通过mysql命令进入数据库交互模式;
mysql -uroot -p

\\输入密码
(2)创建同步账户synch;
create user 'synch'@'192.168.100.131' identified by '123456';
(3)授权账户synch;
grant replication slave on *.* to 'synch'@'192.168.100.131';
(4)通过select命令查看用户是否创建成功;
select * from mysql.user where User='synch'\G;
(5)通过show命令检查synch权限;
show grants for 'synch'@'192.168.100.131';
(6)刷新系统权限;
flush privileges;
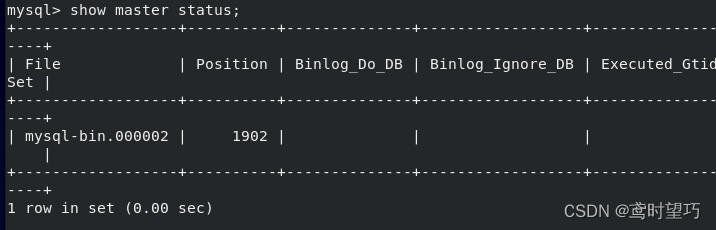
(7)通过show命令查看当前数据库,即主数据库的状态;
8.在Node2虚拟机上,修改配置文件/etc/my.cnf;
vim /etc/my.cnf
添加以下内容
[mysqld]
server-id=2
replicate-do-db=test    \\指定要复制的数据库
9.在Node2虚拟机上,使用systemctl重启数据库服务;
systemctl restart mysqld10.在Node2虚拟机上,进入交互模式,开启同步。
(1)通过mysql命令进入数据库交互模式;
mysql -uroot -p
  \\输入密码
(2)停止同步,默认为开启;
stop slave;(3)修改MASTER的状态;
change
master to
master_host='192.168.100.130',    \\IP地址为Node1的IP地址
master_port=3306,
master_user='synch',
master_password='123456',
master_log_file=‘mysql-bin.000002',    \\文件和位置为show master status图片的内容
master_log_pos=1902;
(4)修改完成后,开启同步;
start slave;11.在Node2数据库上进入交互模式,查看同步状态;
show slave status\G;在同步状态查看到Slave_IO_Running和Slave_SQL_Running两个状态皆为YES即证明主从数据库配置成功。


 939
939


 被折叠的 条评论
为什么被折叠?
被折叠的 条评论
为什么被折叠?
 到【灌水乐园】发言


