前言:
接口自动化是指模拟程序接口层面的自动化,由于接口不易变更,维护成本更小,所以深受各大公司的喜爱。
一、简单介绍
环境:Mac、Python 3,Pytest,Allure,Request
1
2
3
4
5
6
7
8
9
10
11
12
13
14
pytest==3.6.0
pytest-allure-adaptor==1.7.10(弃用)
pytest-rerunfailures==5.0
configparser==3.5.0
PyYAML==3.12
requests==2.18.4
simplejson==3.16.0
----------------------------------------
2020-4-30更新
pytest==5.3.1
allure-pytest==2.8.6
allure-python-commons==2.8.6
⚠️注:pytest-allure-adaptor已弃用,改为allure-pytest;
安装allure-pytest时,需将pytest-allure-adaptor卸载
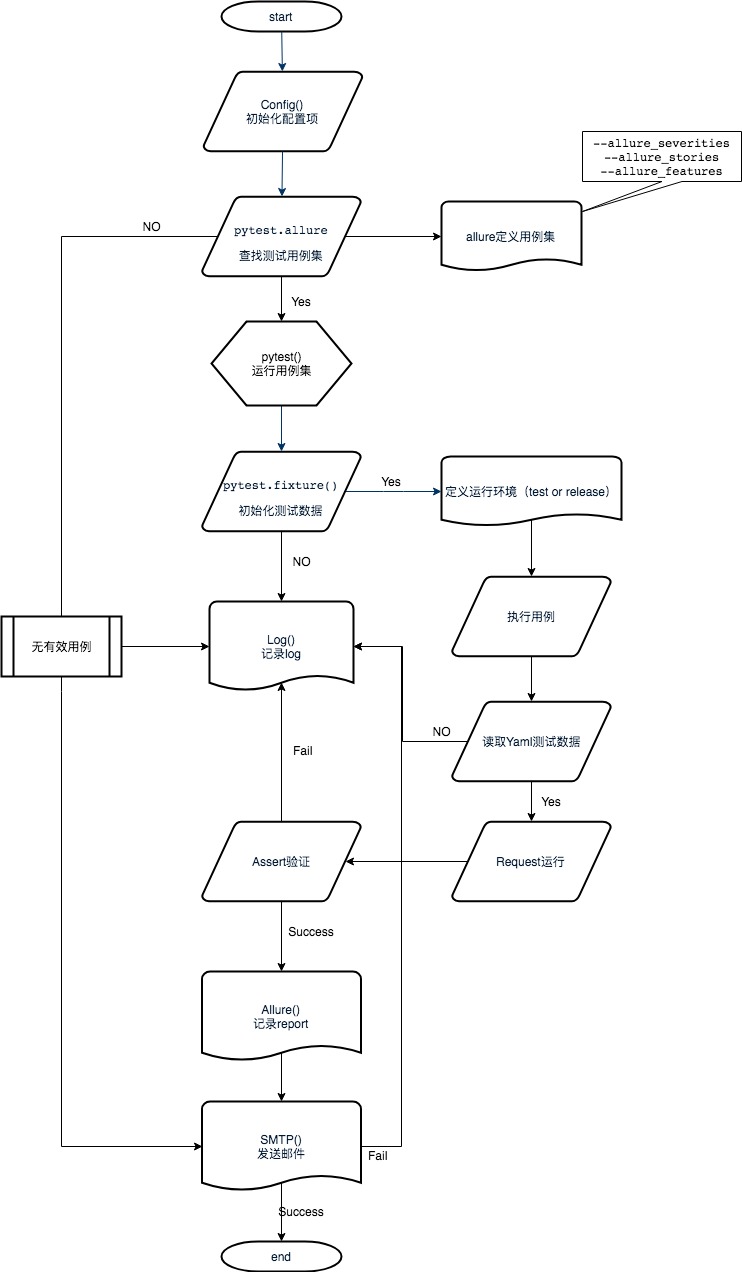
流程:读取Yaml测试数据-生成测试用例-执行测试用例-生成Allure报告
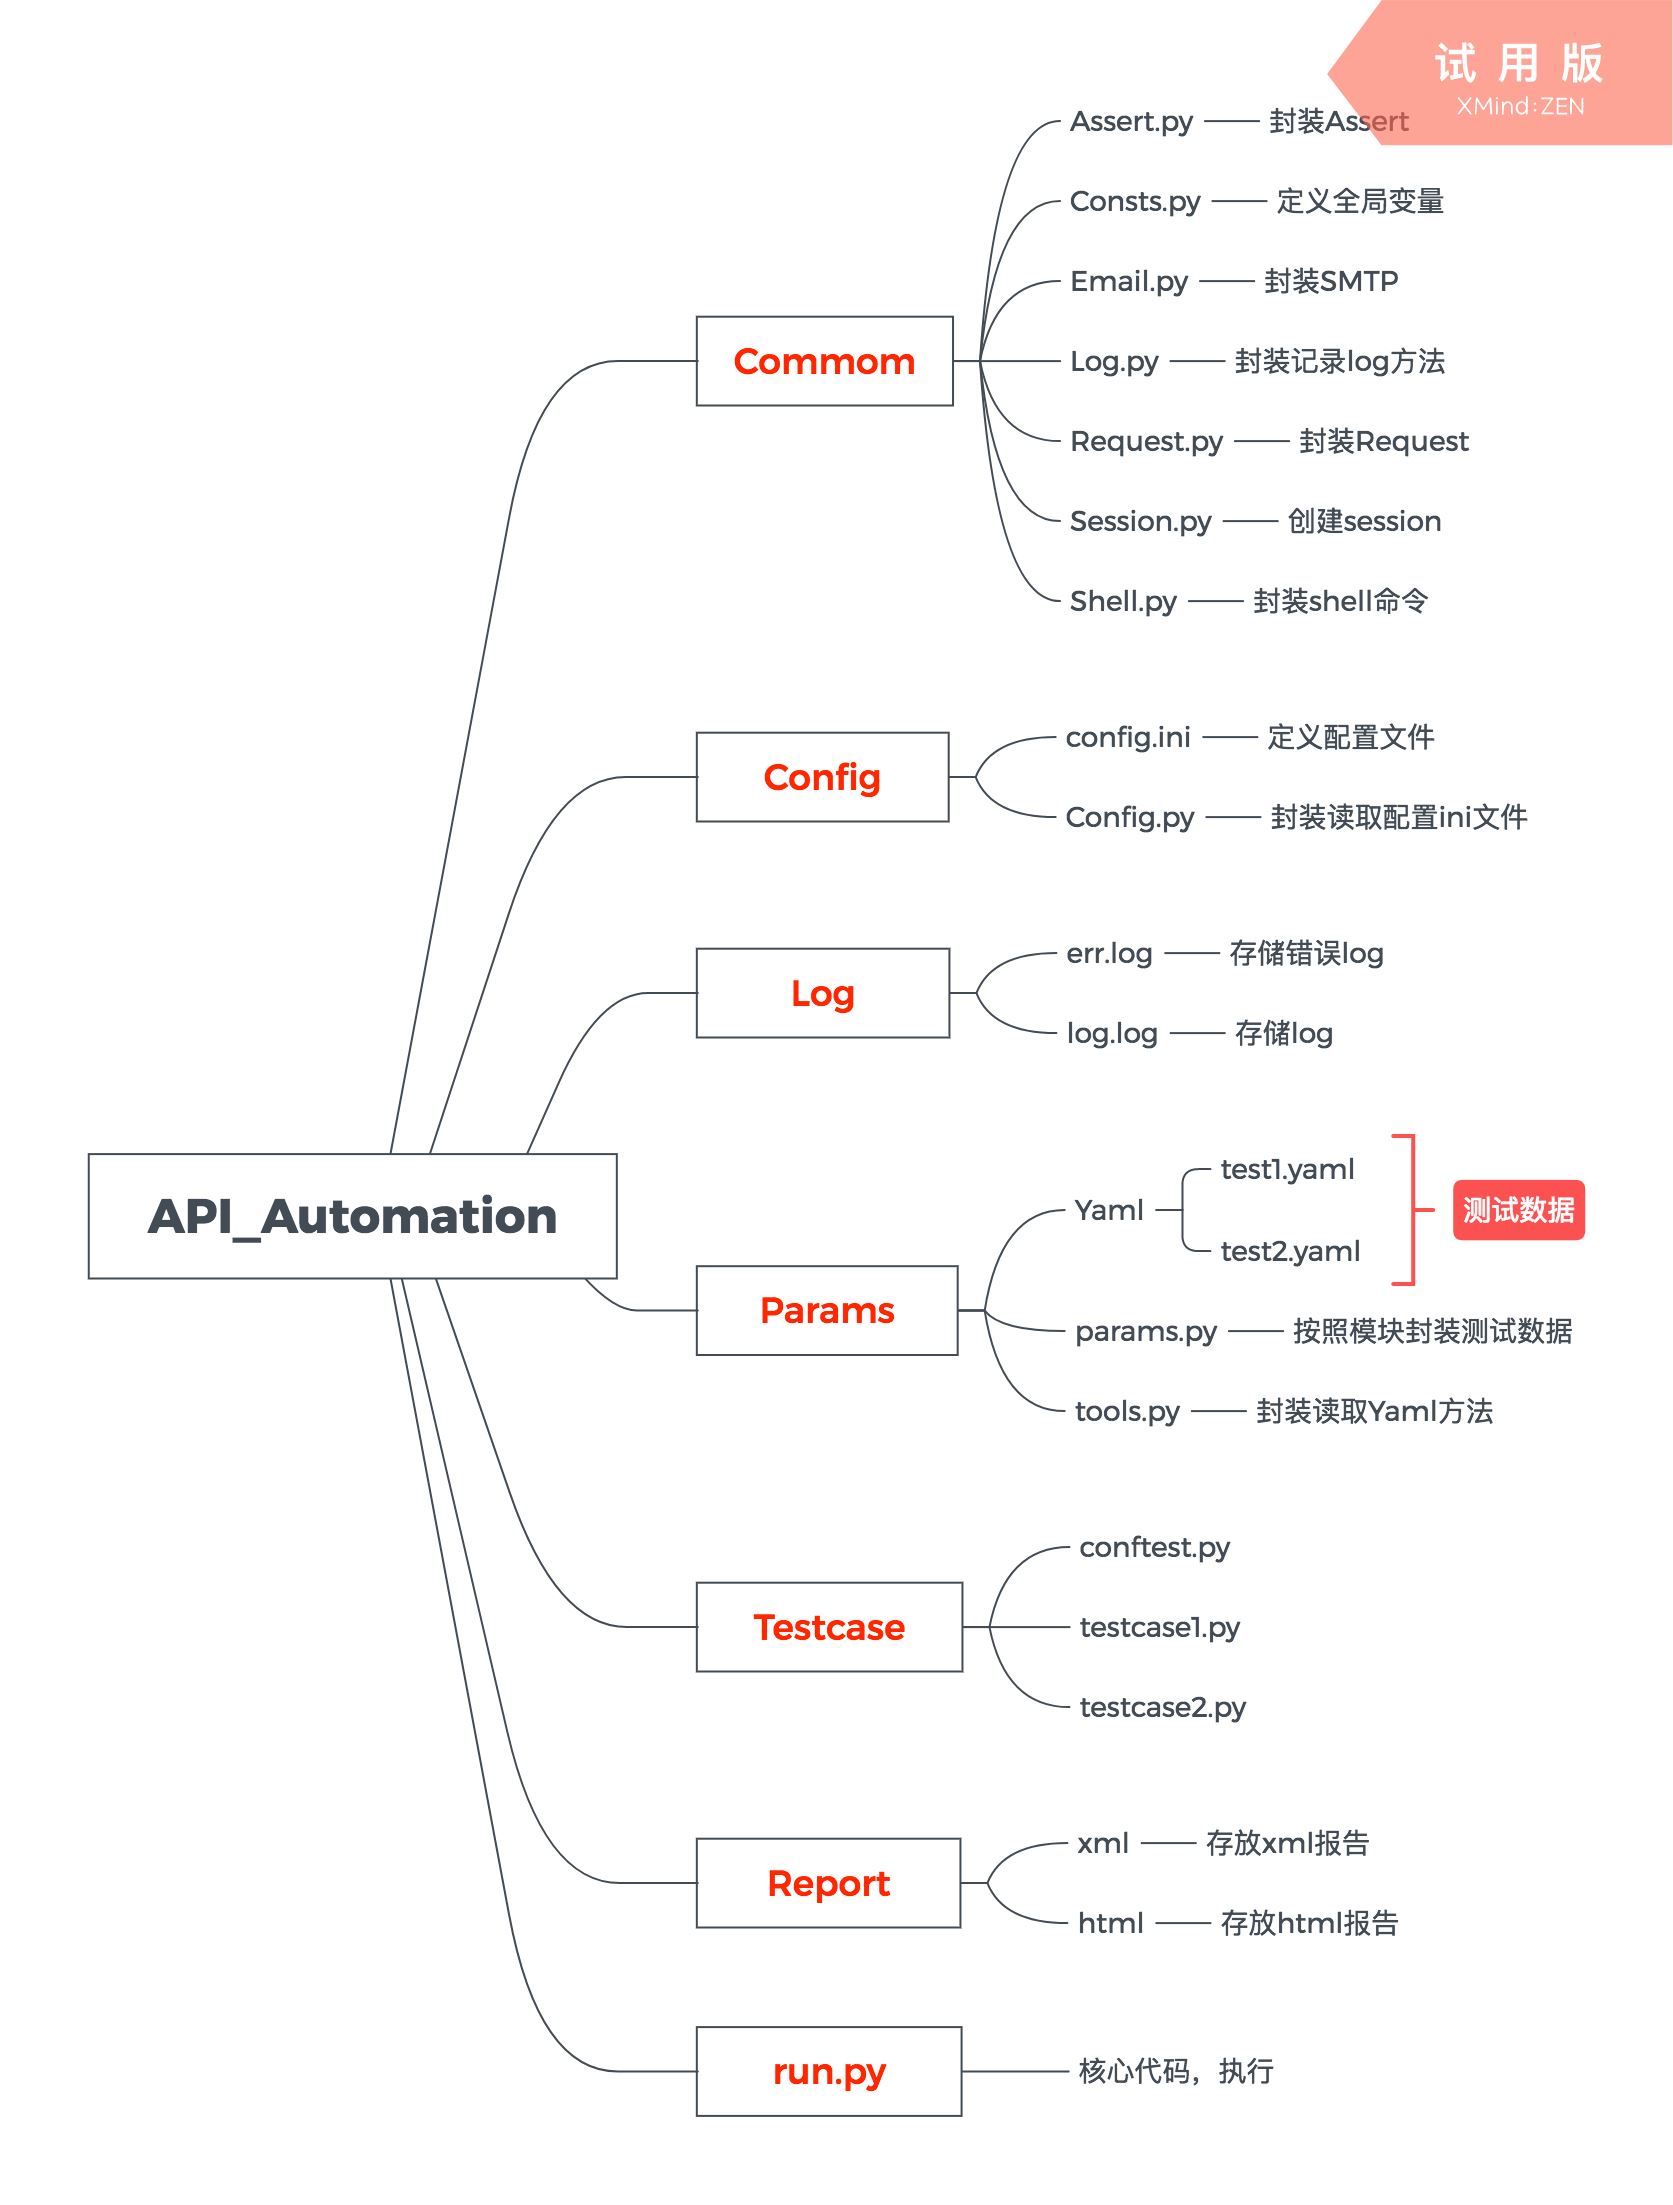
Request.py 封装request方法,可以支持多协议扩展(get\post\put)Config.py读取配置文件,包括:不同环境的配置,email相关配置Log.py 封装记录log方法,分为:debug、info、warning、error、criticalEmail.py 封装smtplib方法,运行结果发送邮件通知Assert.py 封装assert方法run.py 核心代码。定义并执行用例集,生成报告
Yaml测试数据格式如下:
1
2
3
4
5
6
7
8
9
10
11
12
---
Basic:
dec: "基础设置"
parameters:
-
url: /settings/basic.json
data: slug=da1677475c27
header: {
"User-Agent": "Mozilla/5.0 (Macintosh; Intel Mac OS X 10_13_6) AppleWebKit/537.36 (KHTML, like Gecko)\
Chrome/67.0.3396.99 Safari/537.36",
"Content-Type": "keep-alive"
}
二、代码结构与框架流程
1、代码结构见下图:
代码结构.jpg
2、框架流程见下图:
框架流程.jpg
三、详细功能和使用说明
1、定义配置文件config.ini
该文件中区分测试环境[private_debug]和正式环境[online_release]分别定义相关配置项,[mail]部分为邮件相关配置项
1
2
3
4
5
6
7
8
9
10
11
12
13
14
15
16
17
18
19
20
21
22
23
24
25
26
27
# http接口测试框架配置信息
[private_debug]
# debug测试服务
tester = your name
environment = debug
versionCode = your version
host = www.jianshu.com
loginHost = /Login
loginInfo = email=wang@user.com&password=123456
[online_release]
# release正式服务
tester = your name
environment = release
versionCode = v1.0
host = www.jianshu.com
loginHost = /Login
loginInfo = email=wang@user.com&password=123456
[mail]
#发送邮件信息
smtpserver = smtp.163.com
sender = test1@163.com
receiver = wang@user.com
username = wang@user.com
password = 123456
2、读取yaml测试数据后封装
yaml测试数据例子见第一节,一条接口可定义多条case数据,get_parameter为已封装好的读取yaml数据方法,循环读取后将多条case数据存在list中。
1
2
3
4
5
6
7
8
9
class Basic:
params = get_parameter('Basic')
url = []
data = []
header = []
for i in range(0, len(params)):
url.append(params[i]['url'])
data.append(params[i]['data'])
header.append(params[i]['header'])
3、编写用例
1
2
3
4
5
6
7
8
9
10
11
12
13
14
15
16
17
18
19
20
21
22
23
24
25
26
class TestBasic:
@allure.feature('Home')
@allure.severity('blocker')
@allure.story('Basic')
def test_basic_01(self, action):
"""
用例描述:未登陆状态下查看基础设置
"""
conf = Config()
data = Basic()
test = Assert.Assertions()
request = Request.Request(action)
host = conf.host_debug
req_url = 'http://' + host
urls = data.url
params = data.data
headers = data.header
api_url = req_url + urls[0]
response = request.get_request(api_url, params[0], headers[0])
assert test.assert_code(response['code'], 401)
assert test.assert_body(response['body'], 'error', u'继续操作前请注册或者登录.')
assert test.assert_time(response['time_consuming'], 400)
Consts.RESULT_LIST.append('True')
4、运行整个框架run.py
1
2
3
4
5
6
7
8
9
10
11
12
13
14
15
16
17
18
19
if __name__ == '__main__':
# 定义测试集
args = ['-s', '-q', '--alluredir', xml_report_path]
self_args = sys.argv[1:]
pytest.main(args)
cmd = 'allure generate %s -o %s' % (xml_report_path, html_report_path)
try:
shell.invoke(cmd)
except:
log.error('执行用例失败,请检查环境配置')
raise
try:
mail = Email.SendMail()
mail.sendMail()
except:
log.error('发送邮件失败,请检查邮件配置')
raise
5、err.log实例
[ERROR 2018-08-24 09:55:37]Response body != expected_msg, expected_msg is {"error":"继续操作前请注册或者登录9."}, body is {"error":"继续操作前请注册或者登录."}
6、Assert部分代码
1
2
3
4
5
6
7
8
9
10
11
12
13
14
15
16
17
18
19
20
21
22
23
24
25
26
27
28
29
30
31
32
33
34
35
36
37
def assert_body(self, body, body_msg, expected_msg):
"""
验证response body中任意属性的值
:param body:
:param body_msg:
:param expected_msg:
:return:
"""
try:
msg = body[body_msg]
assert msg == expected_msg
return True
except:
self.log.error("Response body msg != expected_msg, expected_msg is %s, body_msg is %s" % (expected_msg, body_msg))
Consts.RESULT_LIST.append('fail')
raise
def assert_in_text(self, body, expected_msg):
"""
验证response body中是否包含预期字符串
:param body:
:param expected_msg:
:return:
"""
try:
text = json.dumps(body, ensure_ascii=False)
# print(text)
assert expected_msg in text
return True
except:
self.log.error("Response body Does not contain expected_msg, expected_msg is %s" % expected_msg)
Consts.RESULT_LIST.append('fail')
raise
7、Request部分代码
1
2
3
4
5
6
7
8
9
10
11
12
13
14
15
16
17
18
19
20
21
22
23
24
25
26
27
28
29
30
31
32
33
34
35
36
37
38
39
40
41
42
43
44
45
46
47
def post_request(self, url, data, header):
"""
Post请求
:param url:
:param data:
:param header:
:return:
"""
if not url.startswith('http://'):
url = '%s%s' % ('http://', url)
print(url)
try:
if data is None:
response = self.get_session.post(url=url, headers=header)
else:
response = self.get_session.post(url=url, params=data, headers=header)
except requests.RequestException as e:
print('%s%s' % ('RequestException url: ', url))
print(e)
return ()
except Exception as e:
print('%s%s' % ('Exception url: ', url))
print(e)
return ()
# time_consuming为响应时间,单位为毫秒
time_consuming = response.elapsed.microseconds/1000
# time_total为响应时间,单位为秒
time_total = response.elapsed.total_seconds()
Common.Consts.STRESS_LIST.append(time_consuming)
response_dicts = dict()
response_dicts['code'] = response.status_code
try:
response_dicts['body'] = response.json()
except Exception as e:
print(e)
response_dicts['body'] = ''
response_dicts['text'] = response.text
response_dicts['time_consuming'] = time_consuming
response_dicts['time_total'] = time_total
return response_dicts
四、Allure报告及Email
1、Allure报告总览,见下图:
Allure报告.jpg
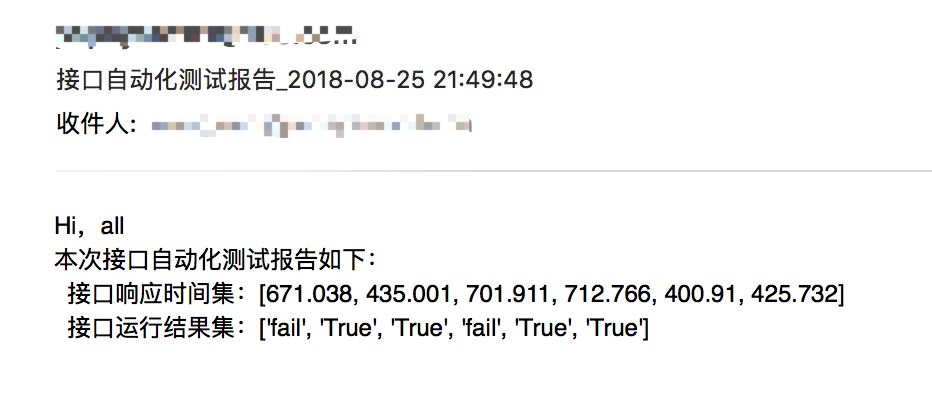
2、Email见下图:
Email.jpg
五、后续优化
1、集成Jenkins,使用Jenkins插件生成Allure报告
最后感谢每一个认真阅读我文章的人,看着粉丝一路的上涨和关注,礼尚往来总是要有的,虽然不是什么很值钱的东西,如果你用得到的话可以直接拿走! 希望能帮助到你!【100%无套路免费领取】


 2755
2755


 被折叠的 条评论
为什么被折叠?
被折叠的 条评论
为什么被折叠?
 到【灌水乐园】发言


