Anaconda:https://www.anaconda.com/download/ eclipse:按照自己的喜好,选择一个能debug就好
cv2.IMREAD_COLOR:彩色图像 cv2.IMREAD_GRAYSCALE:灰度图像 import cv2
import matplotlib. pyplot as plt
import numpy as np
% matplotlib inline
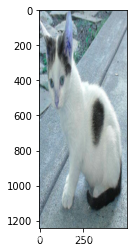
img= cv2. imread( 'cat.jpg' )
img
array([[[142, 151, 160],
        [146, 155, 164],
        [151, 160, 169],
        ...,
        [156, 172, 185],
        [155, 171, 184],
        [154, 170, 183]],

       [[107, 118, 126],
        [112, 123, 131],
        [117, 128, 136],
        ...,
        [155, 171, 184],
        [154, 170, 183],
        [153, 169, 182]],

       [[108, 119, 127],
        [112, 123, 131],
        [118, 129, 137],
        ...,
        [154, 170, 183],
        [153, 169, 182],
        [152, 168, 181]],

       ...,

       [[162, 186, 198],
        [157, 181, 193],
        [142, 166, 178],
        ...,
        [181, 204, 206],
        [170, 193, 195],
        [149, 172, 174]],

       [[140, 164, 176],
        [147, 171, 183],
        [139, 163, 175],
        ...,
        [167, 187, 188],
        [123, 143, 144],
        [104, 124, 125]],

       [[154, 178, 190],
        [154, 178, 190],
        [121, 145, 157],
        ...,
        [185, 198, 200],
        [130, 143, 145],
        [129, 142, 144]]], dtype=uint8)
cv2. imshow( 'image' , img)
cv2. waitKey( 0 )
cv2. destroyAllWindows( )
def cv_show ( name, img) :
cv2. imshow( name, img)
cv2. waitKey( 0 )
cv2. destroyAllWindows( )
img. shape
(414, 500, 3)
img= cv2. imread( 'cat.jpg' , cv2. IMREAD_GRAYSCALE)
img
array([[153, 157, 162, ..., 174, 173, 172],
       [119, 124, 129, ..., 173, 172, 171],
       [120, 124, 130, ..., 172, 171, 170],
       ...,
       [187, 182, 167, ..., 202, 191, 170],
       [165, 172, 164, ..., 185, 141, 122],
       [179, 179, 146, ..., 197, 142, 141]], dtype=uint8)
img. shape
(414, 500)
cv2. imshow( 'image' , img)
cv2. waitKey( 10000 )
cv2. destroyAllWindows( )
cv2. imwrite( 'mycat.png' , img)
True
type ( img)
numpy.ndarray
img. size
207000
img. dtype
dtype('uint8')
cv2.VideoCapture可以捕获摄像头,用数字来控制不同的设备,例如0,1。 如果是视频文件,直接指定好路径即可。 vc = cv2. VideoCapture( 'test.mp4' )
if vc. isOpened( ) :
oepn, frame = vc. read( )
else :
open = False
while open :
ret, frame = vc. read( )
if frame is None :
break
if ret == True :
gray = cv2. cvtColor( frame, cv2. COLOR_BGR2GRAY)
cv2. imshow( 'result' , gray)
if cv2. waitKey( 100 ) & 0xFF == 27 :
break
vc. release( )
cv2. destroyAllWindows( )
img= cv2. imread( 'cat.jpg' )
cat= img[ 0 : 50 , 0 : 200 ]
cv_show( 'cat' , cat)
b, g, r= cv2. split( img)
r
array([[160, 164, 170, ..., 185, 184, 183],
       [126, 131, 137, ..., 184, 183, 182],
       [127, 131, 138, ..., 183, 182, 181],
       ...,
       [198, 193, 178, ..., 206, 195, 174],
       [176, 183, 175, ..., 188, 144, 125],
       [190, 190, 157, ..., 200, 145, 144]], dtype=uint8)
r. shape
(414, 500)
img= cv2. merge( ( b, g, r) )
img. shape
(414, 500, 3)
cur_img = img. copy( )
cur_img[ : , : , 0 ] = 0
cur_img[ : , : , 1 ] = 0
cv_show( 'R' , cur_img)
cur_img = img. copy( )
cur_img[ : , : , 0 ] = 0
cur_img[ : , : , 2 ] = 0
cv_show( 'G' , cur_img)
cur_img = img. copy( )
cur_img[ : , : , 1 ] = 0
cur_img[ : , : , 2 ] = 0
cv_show( 'B' , cur_img)
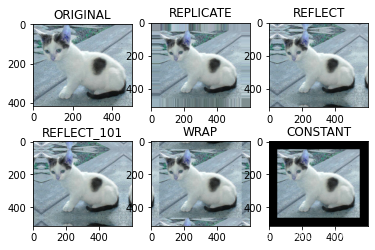
top_size, bottom_size, left_size, right_size = ( 50 , 50 , 50 , 50 )
replicate = cv2. copyMakeBorder( img, top_size, bottom_size, left_size, right_size, borderType= cv2. BORDER_REPLICATE)
reflect = cv2. copyMakeBorder( img, top_size, bottom_size, left_size, right_size, cv2. BORDER_REFLECT)
reflect101 = cv2. copyMakeBorder( img, top_size, bottom_size, left_size, right_size, cv2. BORDER_REFLECT_101)
wrap = cv2. copyMakeBorder( img, top_size, bottom_size, left_size, right_size, cv2. BORDER_WRAP)
constant = cv2. copyMakeBorder( img, top_size, bottom_size, left_size, right_size, cv2. BORDER_CONSTANT, value= 0 )
import matplotlib. pyplot as plt
plt. subplot( 231 ) , plt. imshow( img, 'gray' ) , plt. title( 'ORIGINAL' )
plt. subplot( 232 ) , plt. imshow( replicate, 'gray' ) , plt. title( 'REPLICATE' )
plt. subplot( 233 ) , plt. imshow( reflect, 'gray' ) , plt. title( 'REFLECT' )
plt. subplot( 234 ) , plt. imshow( reflect101, 'gray' ) , plt. title( 'REFLECT_101' )
plt. subplot( 235 ) , plt. imshow( wrap, 'gray' ) , plt. title( 'WRAP' )
plt. subplot( 236 ) , plt. imshow( constant, 'gray' ) , plt. title( 'CONSTANT' )
plt. show( )
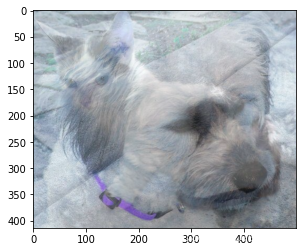
BORDER_REPLICATE:复制法,也就是复制最边缘像素。 BORDER_REFLECT:反射法,对感兴趣的图像中的像素在两边进行复制例如:fedcba|abcdefgh|hgfedcb BORDER_REFLECT_101:反射法,也就是以最边缘像素为轴,对称,gfedcb|abcdefgh|gfedcba BORDER_WRAP:外包装法cdefgh|abcdefgh|abcdefg BORDER_CONSTANT:常量法,常数值填充。 img_cat= cv2. imread( 'cat.jpg' )
img_dog= cv2. imread( 'dog.jpg' )
img_cat2= img_cat + 10
img_cat[ : 5 , : , 0 ]
array([[142, 146, 151, ..., 156, 155, 154],
       [108, 112, 118, ..., 155, 154, 153],
       [108, 110, 118, ..., 156, 155, 154],
       [139, 141, 148, ..., 156, 155, 154],
       [153, 156, 163, ..., 160, 159, 158]], dtype=uint8)
img_cat2[ : 5 , : , 0 ]
array([[152, 156, 161, ..., 166, 165, 164],
       [118, 122, 128, ..., 165, 164, 163],
       [118, 120, 128, ..., 166, 165, 164],
       [149, 151, 158, ..., 166, 165, 164],
       [163, 166, 173, ..., 170, 169, 168]], dtype=uint8)
( img_cat + img_cat2) [ : 5 , : , 0 ]
array([[ 38,  46,  56, ...,  66,  64,  62],
       [226, 234, 246, ...,  64,  62,  60],
       [226, 230, 246, ...,  66,  64,  62],
       [ 32,  36,  50, ...,  66,  64,  62],
       [ 60,  66,  80, ...,  74,  72,  70]], dtype=uint8)
cv2. add( img_cat, img_cat2) [ : 5 , : , 0 ]
array([[255, 255, 255, ..., 255, 255, 255],
       [226, 234, 246, ..., 255, 255, 255],
       [226, 230, 246, ..., 255, 255, 255],
       [255, 255, 255, ..., 255, 255, 255],
       [255, 255, 255, ..., 255, 255, 255]], dtype=uint8)
img_cat + img_dog
---------------------------------------------------------------------------

ValueError                                Traceback (most recent call last)

Input In [33], in <cell line: 1>()
----> 1 img_cat + img_dog


ValueError: operands could not be broadcast together with shapes (414,500,3) (429,499,3)
img_cat. shape
(414, 500, 3)
img_dog = cv2. resize( img_dog, ( 500 , 414 ) )
img_dog. shape
(414, 500, 3)
res = cv2. addWeighted( img_cat, 0.4 , img_dog, 0.6 , 0 )
plt. imshow( res)
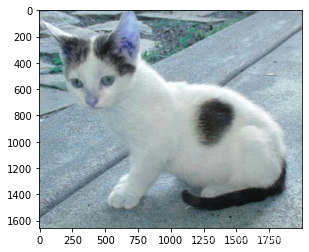
res = cv2. resize( img, ( 0 , 0 ) , fx= 4 , fy= 4 )
plt. imshow( res)
res = cv2. resize( img, ( 0 , 0 ) , fx= 1 , fy= 3 )
plt. imshow( res)
[本文ipynb资源](https://download.csdn.net/download/weixin_48144018/85391339)


 882
882


 被折叠的 条评论
为什么被折叠?
被折叠的 条评论
为什么被折叠?
 到【灌水乐园】发言


