


实验一 熟悉OpenCV环境和基本操作
一、实验目的
熟悉OpenCV运行环境,了解图像的基本操作及直方图均衡化。
二、实验内容
一个简单的图像处理例子。
代码如下:
#include <opencv2/opencv.hpp>
using namespace cv;
int main( ) {
Mat img = imread("result1.bmp");
int nr = img.rows; // number of rows
int nc = img.cols; // number of columns
Mat result;
result.create(img.rows, img.cols, img.type());
for (int j = 0; j < nr; j++) {
for (int i = 0; i < nc; i++) {
result.at<cv::Vec3b>(j, i)[0] = 255 - img.at<cv::Vec3b>(j, i)[0];
result.at<cv::Vec3b>(j, i)[1] = 255 - img.at<cv::Vec3b>(j, i)[1];
result.at<cv::Vec3b>(j, i)[2] = 255 - img.at<cv::Vec3b>(j, i)[2];
} // end of row
}
namedWindow("source");
imshow("source", img);
namedWindow("result");
imshow("result", result);
waitKey(0);
return 0;
}
三、实验要求
1.按上述代码运行,给出结果。
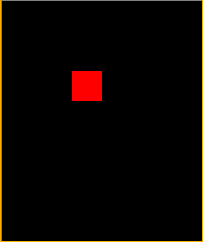
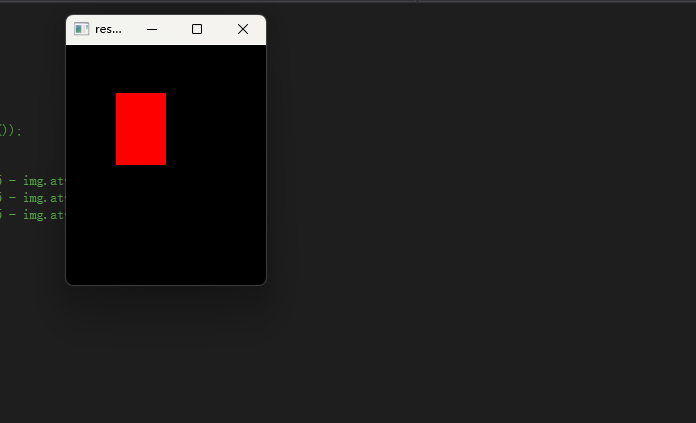
2.利用OpenCV产生一幅图像,尺寸为200*240,三通道,其中某一块为红色,其它皆为黑色,示例图如下。
3.对一副图像进行直方图均衡化处理。要求自行编写直方图均衡化函数,实现图像灰度均衡的算法步骤如下:
- 统计直方图数组,用一个数组p记录p[i];
- i从1开始,令S[i]=S[i-1]+p[i],S[0]=p[0];
- 一个数组L记录新的S索引值,即令L[i]=S[i]*(256-1);
依次循环每一个像素,取原图的像素值作为数组L的下标值,取该下标对应的数组值为均衡化之后的像素值。
四、实验设计思路
1.opencv的安装与环境配置,根据所给代码进行运行并输出结果。
2.先生成一个200*240三通道的黑色图像,再生成一个rgb只有一个红色通道的红色图像。
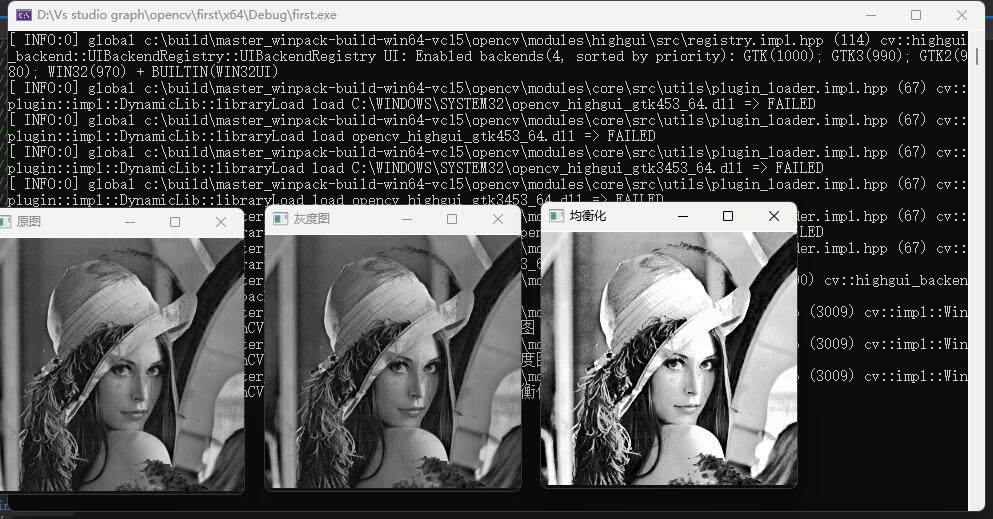
3. 将一副图像的直方图分布变成近似均匀分布,从而增强图像的对比度。对图像进行非线性拉伸,重新分配图像象元值,使一定灰度范围内象元值的数量大致相等。统计每个灰度级别下的像素个数与灰度分布密度,通过均衡化算法累加概率乘以255,并四舍五入步骤等更新原图每个点的像素值。
五、实验代码
1.
#include <opencv2/opencv.hpp>

using namespace cv;

int main() {

    Mat img = imread("result1.bmp");

    int nr = img.rows; // number of rows

    int nc = img.cols; // number of columns

    Mat result;

    result.create(img.rows, img.cols, img.type());

    for (int j = 0; j < nr; j++) {

        for (int i = 0; i < nc; i++) {

            result.at<cv::Vec3b>(j, i)[0] = 255 - img.at<cv::Vec3b>(j, i)[0];

            result.at<cv::Vec3b>(j, i)[1] = 255 - img.at<cv::Vec3b>(j, i)[1];

            result.at<cv::Vec3b>(j, i)[2] = 255 - img.at<cv::Vec3b>(j, i)[2];

        } // end of row

    }

    namedWindow("source");

    imshow("source", img);

    namedWindow("result");

    imshow("result", result);

    waitKey(0);

    return 0;

}
2.
#include <opencv2/opencv.hpp>

using namespace cv;

int main() {

    Mat img = imread("result1.bmp");

    int nr = 240; // number of rows

    int nc = 200; // number of columns

    Mat result;

    result.create(240, 200, img.type());

    for (int j = 0; j < nr; j++) {

        for (int i = 0; i < nc; i++) {

                result.at<cv::Vec3b>(j, i)[0] = 0;

                result.at<cv::Vec3b>(j, i)[1] = 0;

                result.at<cv::Vec3b>(j, i)[2] = 0;

            } // end of row

    }

    for (int j = nr/5; j < nr/2; j++) {

            for (int i = nc/4; i < nc/2; i++) {

                result.at<cv::Vec3b>(j, i)[0] = 0;

                result.at<cv::Vec3b>(j, i)[1] = 0;

                result.at<cv::Vec3b>(j, i)[2] = 255;

            } // end of row

    }

    namedWindow("result");

    imshow("result", result);

    waitKey(0);

    return 0;


}
3.
#include<iostream>

#include<opencv2/opencv.hpp>

using namespace cv;

using namespace std;


int main()

{


    //Mat InputImage = imread("D:\\shana.jpg ", 1);

    Mat InputImage = imread("result1.bmp");

    imshow("原图", InputImage);

    int  Gray_Count[256] = { 0 };  //每个灰度级别下的像素个数

    double Gray_Distribution_Density[256] = { 0 }; //灰度分布密度

    double Gray_Density_Sum[256] = { 0 }; //累计密度

    int Result[256] = { 0 };  //均衡化后的灰度值

    int Pixel_Sum = InputImage.cols * InputImage.rows;

    int Pixel_Value;


    Mat OutputImage(InputImage.size(), CV_8UC1, Scalar(0));

    //gray=0.299R+0.587G+0.114b

    uchar r, g, b;

    float fgray;

    //对图像的灰度处理

    for (int m = 0; m < 100; m++)

        for (int i = 0; i < InputImage.size().height; i++)

            for (int j = 0; j < InputImage.size().width; j++)

            { //默认图像的channel排列顺序为 BGR

                b = InputImage.at<Vec3b>(i, j)[0];

                g = InputImage.at<Vec3b>(i, j)[1];

                r = InputImage.at<Vec3b>(i, j)[2];

                fgray = 0.299 * r + 0.587 * g + 0.114 * b;//R,G,B转换灰度图像的常用公式

                OutputImage.at<uchar>(i, j) = saturate_cast<uchar>(fgray);//防止颜色溢出,对图像色彩变化时做的保护

            }

    imshow("灰度图", OutputImage);//显示灰度图像


    for (int image_y = 0; image_y < InputImage.rows; image_y++)//遍历图片

    {

        uchar* p = InputImage.ptr<uchar>(image_y);

        for (int image_x = 0; image_x < InputImage.cols; image_x++)

        {

            Pixel_Value = p[image_x];

            Gray_Count[Pixel_Value]++;//统计每个灰度下的像素个数

        }

    }


    for (int i = 0; i < 256; i++)

    {

        Gray_Distribution_Density[i] = ((double)Gray_Count[i] / Pixel_Sum);//统计灰度频率

    }

    Gray_Density_Sum[0] = Gray_Distribution_Density[0];

    for (int i = 1; i < 256; i++)

    {

        Gray_Density_Sum[i] = Gray_Density_Sum[i - 1] + Gray_Distribution_Density[i]; //计算累计密度

    }

    for (int i = 0; i < 256; i++)

    {

        Result[i] = 255 * Gray_Density_Sum[i];//计算均衡化后的灰度值

    }


    for (int image_y = 0; image_y < InputImage.rows; image_y++)//遍历图片

    {

        uchar* p = OutputImage.ptr<uchar>(image_y);

        for (int image_x = 0; image_x < InputImage.cols; image_x++)

        {

            p[image_x] = Result[p[image_x]]; //直方图均衡化,更新原图每个点的像素值

        }

    }

    imshow("均衡化", OutputImage);

    waitKey();

    return 0;

}
六、实验结果与心得体会
1.

2.
3.


 4183
4183


 被折叠的 条评论
为什么被折叠?
被折叠的 条评论
为什么被折叠?
 到【灌水乐园】发言


