


话不多说,直接上步骤代码。
由于在windows下进行springboot整合redis,所以需要下载redis(),下载好后解压一下,执行redis-server,执行完毕redis启动,可以再下载一个redis可视化工具RedisDesktopManager
redis下载地址:https://github.com/MicrosoftArchive/redis/tags
下载完成安装后,cmd进入安装目录
执行redis-server.exe redis.windows.conf
我的执行后出现如下提示,说明安装未成功
![]()
随后按照下面步骤执行,分别执行redis-cli.exe, shutdown, exit

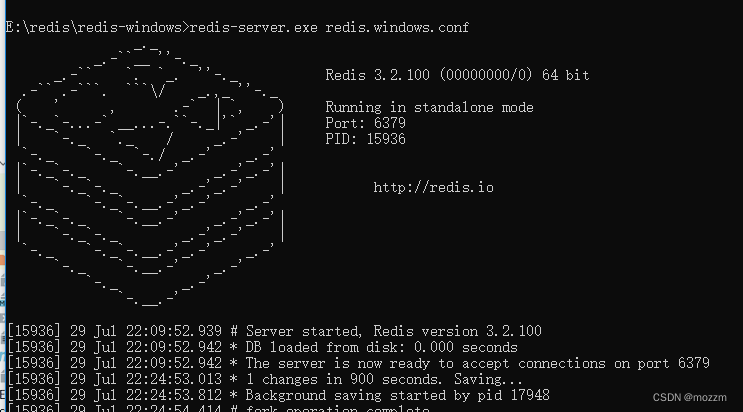
最后再执行redis-server.exe redis.windows.conf,出现如下界面,表示redis启动成功
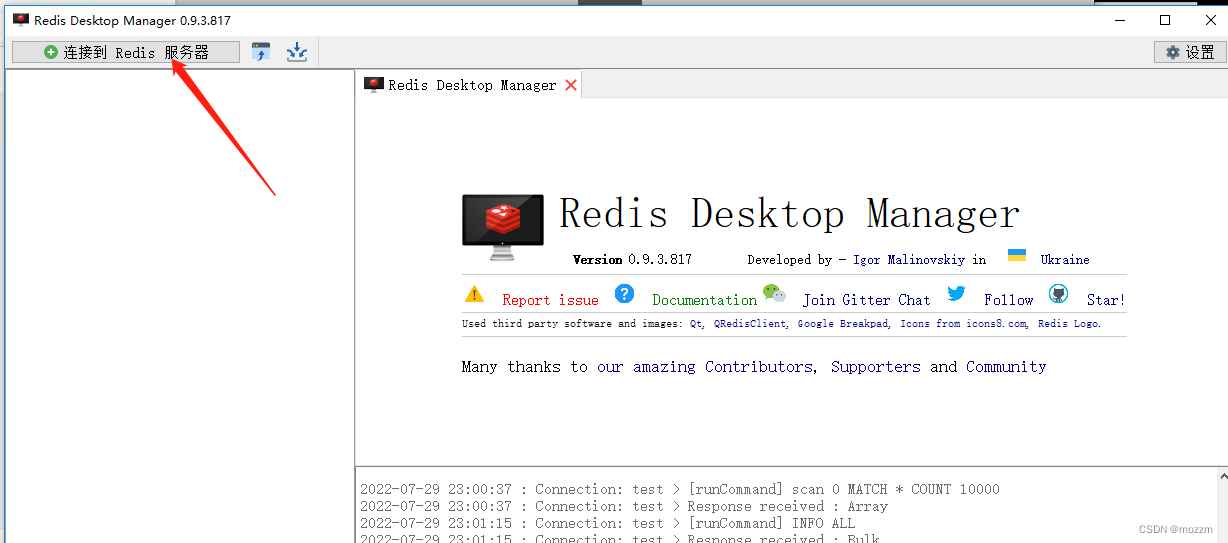
安装redis可视化工具redisdesktopmanager: https://github.com/uglide/RedisDesktopManager/releases/tag/0.9.3
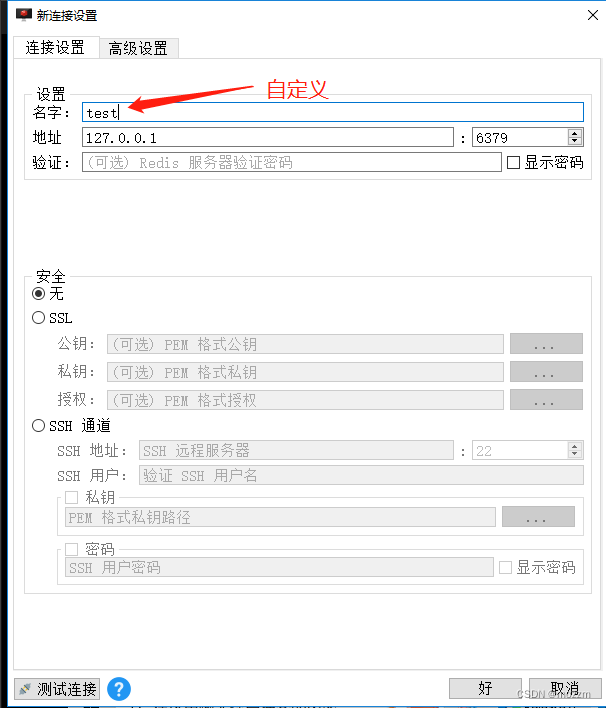
打开redisdesktopmanager
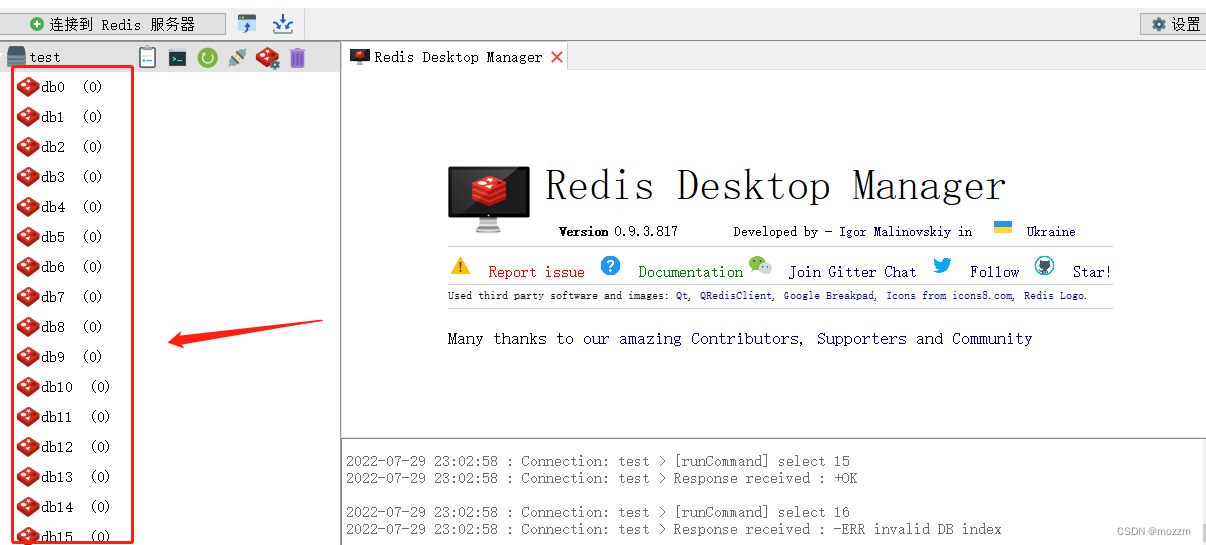
出现如下界面表示连接成功。
1. 在开始项目之前,我们需要自己创建一个数据库dbtest(自己随意命名,但是要注意下面yml配置中的url里面的数据库要跟这个名字对应), 然后在对应的数据库中创建一个表emp(自己命名),并且随便插入三条数据。
CREATE TABLE emp (
	id INT PRIMARY KEY AUTO_INCREMENT,
	`name` VARCHAR(100),
	age INT
) ENGINE = INNODB DEFAULT CHARSET=utf8;

INSERT INTO emp(`name`,age) VALUES ('张三','18');
INSERT INTO emp(`name`,age) VALUES ('李四','19');
INSERT INTO emp(`name`,age) VALUES ('王五','20');
2.直接创建一个springboot项目,添加相关依赖(包含):web, mysql, redis, mybatis, lombok等
<?xml version="1.0" encoding="UTF-8"?>
<project xmlns="http://maven.apache.org/POM/4.0.0" xmlns:xsi="http://www.w3.org/2001/XMLSchema-instance"
         xsi:schemaLocation="http://maven.apache.org/POM/4.0.0 https://maven.apache.org/xsd/maven-4.0.0.xsd">
    <modelVersion>4.0.0</modelVersion>
    <parent>
        <groupId>org.springframework.boot</groupId>
        <artifactId>spring-boot-starter-parent</artifactId>
        <version>2.7.0</version>
        <relativePath/> <!-- lookup parent from repository -->
    </parent>
    <groupId>com.example.mzz</groupId>
    <artifactId>redis</artifactId>
    <version>0.0.1-SNAPSHOT</version>
    <name>redis</name>
    <description>Demo project for Spring Boot</description>
    <properties>
        <java.version>1.8</java.version>
    </properties>
    <dependencies>
        <dependency>
            <groupId>org.springframework.boot</groupId>
            <artifactId>spring-boot-starter-data-redis</artifactId>
        </dependency>
        <dependency>
            <groupId>org.springframework.boot</groupId>
            <artifactId>spring-boot-starter-web</artifactId>
        </dependency>

        <dependency>
            <groupId>mysql</groupId>
            <artifactId>mysql-connector-java</artifactId>
            <scope>runtime</scope>
        </dependency>
        <dependency>
            <groupId>org.projectlombok</groupId>
            <artifactId>lombok</artifactId>
            <optional>true</optional>
        </dependency>
        <dependency>
            <groupId>org.springframework.boot</groupId>
            <artifactId>spring-boot-starter-test</artifactId>
            <scope>test</scope>
        </dependency>
        <dependency>
            <groupId>org.apache.commons</groupId>
            <artifactId>commons-pool2</artifactId>
        </dependency>
        <dependency>
            <groupId>org.mybatis.spring.boot</groupId>
            <artifactId>mybatis-spring-boot-starter</artifactId>
            <version>2.2.2</version>
        </dependency>
        <dependency>
            <groupId>tk.mybatis</groupId>
            <artifactId>mapper-spring-boot-starter</artifactId>
            <version>2.1.5</version>
        </dependency>
    </dependencies>

    <build>
        <plugins>
            <plugin>
                <groupId>org.springframework.boot</groupId>
                <artifactId>spring-boot-maven-plugin</artifactId>
                <configuration>
                    <excludes>
                        <exclude>
                            <groupId>org.projectlombok</groupId>
                            <artifactId>lombok</artifactId>
                        </exclude>
                    </excludes>
                </configuration>
            </plugin>
        </plugins>
    </build>

</project>
添加完依赖后配置yml文件:包括端口号,mysql,redis, mybatis以及log日志
server:
  port: 8888

#mysql
spring:
  datasource:
    username: root
    password: root
    url: jdbc:mysql://127.0.0.1:3306/dbtest?useUnicode=true&characterEncoding=utf-8&useSSL=false&serverTimezone=GMT
    driver-class-name: com.mysql.cj.jdbc.Driver

#redis
  redis:
    host: localhost
    port: 6379
    timeout: 1000
    jedis:
      pool:
        min-idle: 5
        max-idle: 10
        max-wait: -1

mybatis:
  mapper-locations: classpath*:/mapper/**/*.xml
  type-aliases-package: com.example.redis.entities
  configuration:
    map-underscore-to-camel-case: true

logging:
  level:
    com.example.redis: debug
到此依赖以及配置都完成,接下来创建entities实体类,mapper,service,controller
(1)创建实体(j结合lombok注解)
package com.example.redis.entities;

import lombok.Data;

import javax.persistence.GeneratedValue;
import javax.persistence.GenerationType;
import javax.persistence.Id;
import javax.persistence.Table;
import java.io.Serializable;

@Data
@Table(name = "emp")
public class Emp implements Serializable {

    @Id
    @GeneratedValue(strategy = GenerationType.IDENTITY)
    private Integer id;

    private String name;

    private Integer age;

}
(2)创建mapper(EmpMapper):这里继承通用Mapper,代替开发人员对单表的增删改查,不需要再写增删改查的sql了。
package com.example.redis.mapper;

import com.example.redis.entities.Emp;
import tk.mybatis.mapper.common.Mapper;

public interface EmpMapper extends Mapper<Emp> {
}
(3)创建service(接口中写了一个id获取对象的方法,大家有兴趣可以把增删改查方法都写上,这些都是基础,就不做过多介绍了)
package com.example.redis.service;

import com.example.redis.entities.Emp;

public interface EmpService {

    //根据id获取
    public Object getEmpById(Integer id);

}
(3)创建config
package com.example.redis.config;

import org.springframework.context.annotation.Bean;
import org.springframework.context.annotation.Configuration;
import org.springframework.data.redis.connection.RedisConnectionFactory;
import org.springframework.data.redis.core.RedisTemplate;
import org.springframework.data.redis.serializer.Jackson2JsonRedisSerializer;
import org.springframework.data.redis.serializer.StringRedisSerializer;

@Configuration
public class RedisConfig {

    @Bean
    public RedisTemplate<String,Object> redisTemplate(RedisConnectionFactory factory){
        RedisTemplate<String,Object> redisTemplate = new RedisTemplate<>();
        redisTemplate.setConnectionFactory(factory);

        //指定kv序列化
        Jackson2JsonRedisSerializer jackson2JsonRedisSerializer = new Jackson2JsonRedisSerializer(Object.class);
//        redisTemplate.setDefaultSerializer(jackson2JsonRedisSerializer);
        //键值分别采用不同的序列化方式
        redisTemplate.setValueSerializer(jackson2JsonRedisSerializer);
        redisTemplate.setKeySerializer(new StringRedisSerializer());

        return redisTemplate;
    }

}
配置中可以对不同的键值分别采用不同的序列化方式,比如StringRedisSerializer就可以得到String类型的
(4)创建service的实现类
package com.example.redis.service.Impl;

import com.example.redis.entities.Emp;
import com.example.redis.mapper.EmpMapper;
import com.example.redis.service.EmpService;
import org.springframework.beans.factory.annotation.Autowired;
import org.springframework.data.redis.core.RedisTemplate;
import org.springframework.stereotype.Service;

@Service
public class EmpServiceImpl implements EmpService {

    @Autowired
    private RedisTemplate redisTemplate;

    @Autowired
    private EmpMapper empMapper;

    @Override
    public Object getEmpById(Integer id) {

        String key = "userId:"+id;

        //从缓存中获取
        Object obj = redisTemplate.opsForValue().get(key);

        /*
            1.首先判断缓存中是否有值,有的话直接从缓存中获取
            2.缓存中没有则从数据库中获取,并且将获取的结果存入缓存中,下次直接从缓存中取
         */
        if(obj == null){
            //没有值则从数据库中获取
            Emp emp = empMapper.selectByPrimaryKey(id);
            //存入缓存
            redisTemplate.opsForValue().set(key,emp);
            return emp;
        }else{

        }
        return obj;
    }
}
注意:redisTemplate是springboot访问RedisConnectionFactory对多种驱动进行集成,上层通过xxxOperations提供丰富的api,并结合Spring4基于泛型的bean注入,极大的提供了便利,成为日常开发的一大利器。
关于opsForValue的用法,具体可以参考这篇博客:https://blog.csdn.net/qq_25135655/article/details/80357137
当我们获取值的时候,先从缓存中取,缓存中有就直接取,没有的话再去数据库中取。一般像电商某个产品点击量比较大,不可能每次都从数据库获取,这样也可能会导致数据库扛不住,所以这时候就可以用缓存。
(5)最后创建controller
package com.example.redis.controller;

import com.example.redis.service.EmpService;
import org.springframework.beans.factory.annotation.Autowired;
import org.springframework.data.redis.core.RedisTemplate;
import org.springframework.web.bind.annotation.GetMapping;
import org.springframework.web.bind.annotation.PathVariable;
import org.springframework.web.bind.annotation.RequestMapping;
import org.springframework.web.bind.annotation.RestController;

@RestController
@RequestMapping("/emp")
public class EmpController {

    @Autowired
    private EmpService empService;

    @GetMapping("/getEmp/{id}")
    public Object getEmpById(@PathVariable("id") Integer id){
        return empService.getEmpById(id);
    }

}
启动类:
package com.example.redis;

import org.springframework.boot.SpringApplication;
import org.springframework.boot.autoconfigure.SpringBootApplication;
import tk.mybatis.spring.annotation.MapperScan;

@SpringBootApplication
@MapperScan("com.example.redis.mapper")
public class RedisApplication {

    public static void main(String[] args) {
        SpringApplication.run(RedisApplication.class, args);
    }

}
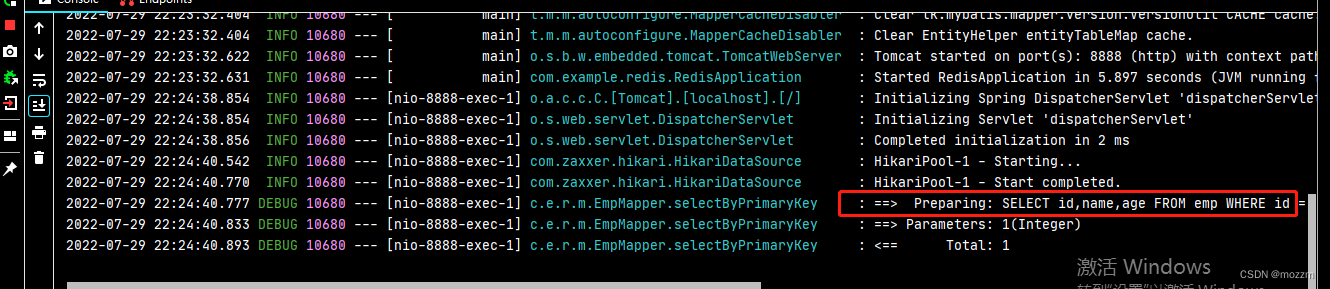
运行项目:
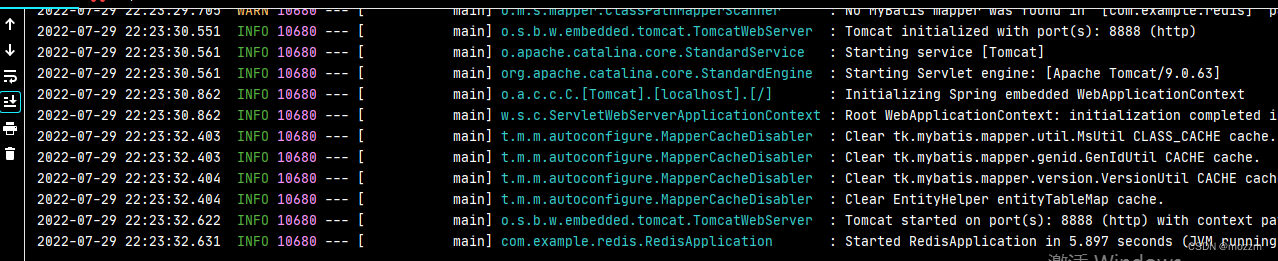
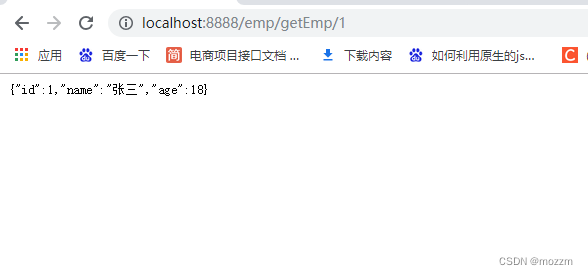
能够正常获取到值,通过查看日志可以看到是通过数据库获取到的,这是因为原先的缓存中没有记录
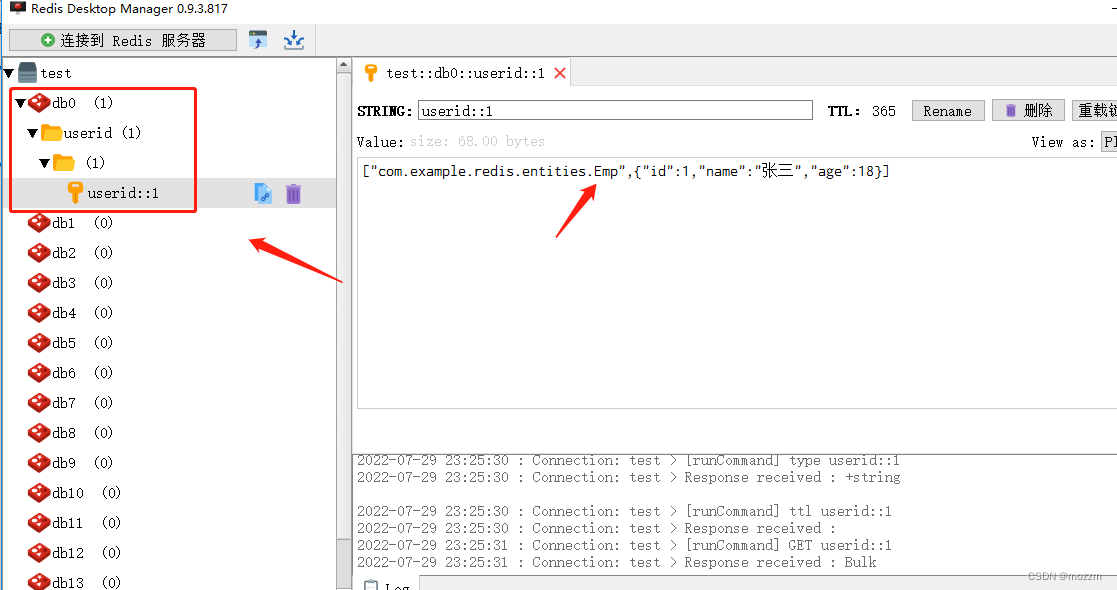
执行http://localhost:8888/emp/getEmp/1请求后从数据库获取到数据,会保存到缓存中,通过redisdeskmanager查看:
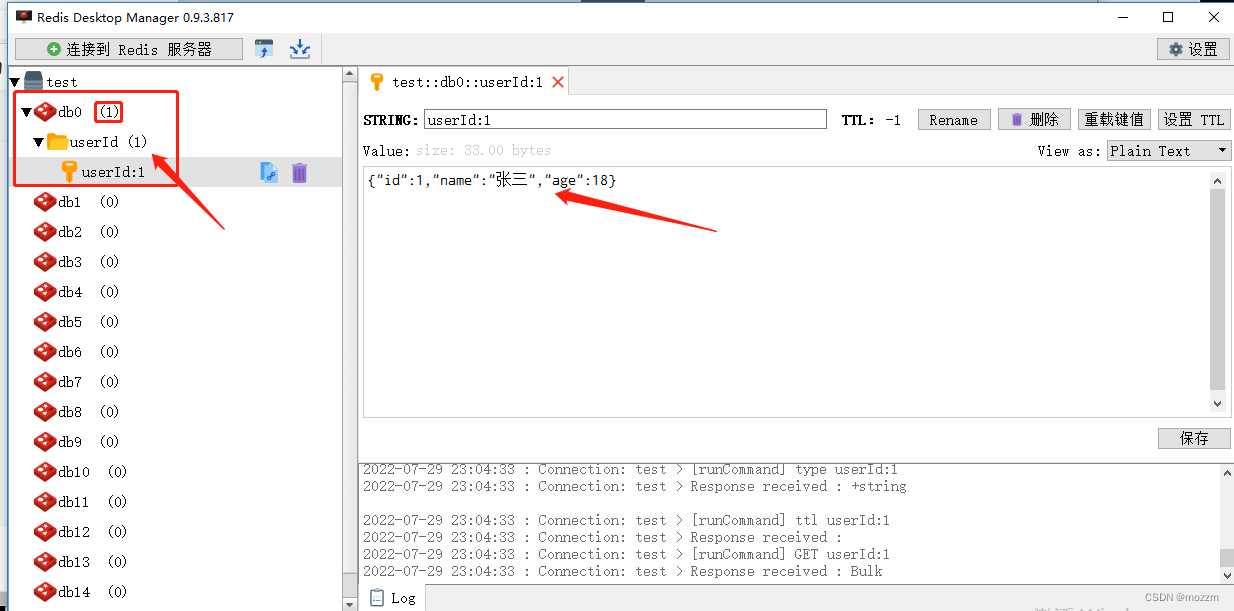
这时里面会有记录。
此时清空控制台日志,再次执行http://localhost:8888/emp/getEmp/1请求,可以看到此时的控制台不会出现数据库信息,这是因为此时获取的值都是从缓存中获取到的。

当然,对于上述实现现在都可以通过注解的方式来实现,redis主要涉及这样几个注解: @EnableCaching,@Cacaheable,@CacaheEvict,@CachePut以及@Caching等
在启动类上我们需要加上@EnableCaching注解,@EnableCaching注解是spring framework中的注解驱动的缓存管理功能。自spring版本3.1起加入了该注解。如果你使用了这个注解,那么你就不需要在xml文件中配置cache manager了。
上述启动类修改:
package com.example.redis;

import org.springframework.boot.SpringApplication;
import org.springframework.boot.autoconfigure.SpringBootApplication;
import org.springframework.cache.annotation.EnableCaching;
import tk.mybatis.spring.annotation.MapperScan;

@SpringBootApplication
@MapperScan("com.example.redis.mapper")
@EnableCaching
public class RedisApplication {

    public static void main(String[] args) {
        SpringApplication.run(RedisApplication.class, args);
    }

}
config配置文件修改:
package com.example.redis.config;

import com.fasterxml.jackson.annotation.JsonAutoDetect;
import com.fasterxml.jackson.annotation.PropertyAccessor;
import com.fasterxml.jackson.databind.ObjectMapper;
import org.springframework.cache.CacheManager;
import org.springframework.cache.annotation.CachingConfigurerSupport;
import org.springframework.cache.annotation.EnableCaching;
import org.springframework.context.annotation.Bean;
import org.springframework.context.annotation.Configuration;
import org.springframework.data.redis.cache.RedisCacheConfiguration;
import org.springframework.data.redis.cache.RedisCacheManager;
import org.springframework.data.redis.connection.RedisConnectionFactory;
import org.springframework.data.redis.core.RedisTemplate;
import org.springframework.data.redis.serializer.Jackson2JsonRedisSerializer;
import org.springframework.data.redis.serializer.RedisSerializationContext;
import org.springframework.data.redis.serializer.RedisSerializer;
import org.springframework.data.redis.serializer.StringRedisSerializer;

import java.time.Duration;

@EnableCaching      //开启缓存
@Configuration
public class RedisConfig extends CachingConfigurerSupport {
    @Bean
    public RedisTemplate<String, Object> redisTemplate(RedisConnectionFactory factory) {
        RedisTemplate<String, Object> template = new RedisTemplate<>();
        RedisSerializer<String> redisSerializer = new StringRedisSerializer();
        Jackson2JsonRedisSerializer jackson2JsonRedisSerializer = new Jackson2JsonRedisSerializer(Object.class);
        ObjectMapper om = new ObjectMapper();
        om.setVisibility(PropertyAccessor.ALL, JsonAutoDetect.Visibility.ANY);
        om.enableDefaultTyping(ObjectMapper.DefaultTyping.NON_FINAL);
        jackson2JsonRedisSerializer.setObjectMapper(om);
        template.setConnectionFactory(factory);
        //key序列化方式
        template.setKeySerializer(redisSerializer);
        //value序列化
        template.setValueSerializer(jackson2JsonRedisSerializer);
        //value hashmap序列化
        template.setHashValueSerializer(jackson2JsonRedisSerializer);
        return template;
    }

    @Bean
    public CacheManager cacheManager(RedisConnectionFactory factory) {
        RedisSerializer<String> redisSerializer = new StringRedisSerializer();
        Jackson2JsonRedisSerializer jackson2JsonRedisSerializer = new Jackson2JsonRedisSerializer(Object.class);
        //解决查询缓存转换异常的问题
        ObjectMapper om = new ObjectMapper();
        om.setVisibility(PropertyAccessor.ALL, JsonAutoDetect.Visibility.ANY);
        om.enableDefaultTyping(ObjectMapper.DefaultTyping.NON_FINAL);
        jackson2JsonRedisSerializer.setObjectMapper(om);
        // 配置序列化(解决乱码的问题),过期时间600秒
        RedisCacheConfiguration config = RedisCacheConfiguration.defaultCacheConfig()
                .entryTtl(Duration.ofSeconds(600))  //设置数据过期时间600秒
                .serializeKeysWith(RedisSerializationContext.SerializationPair.fromSerializer(redisSerializer))
                .serializeValuesWith(RedisSerializationContext.SerializationPair.fromSerializer(jackson2JsonRedisSerializer))
                .disableCachingNullValues();
        RedisCacheManager cacheManager = RedisCacheManager.builder(factory)
                .cacheDefaults(config)
                .build();
        return cacheManager;
    }
}
//package com.example.redis.config;
//
//import org.springframework.cache.annotation.CachingConfigurerSupport;
//import org.springframework.context.annotation.Bean;
//import org.springframework.context.annotation.Configuration;
//import org.springframework.data.redis.connection.RedisConnectionFactory;
//import org.springframework.data.redis.core.RedisTemplate;
//import org.springframework.data.redis.serializer.Jackson2JsonRedisSerializer;
//import org.springframework.data.redis.serializer.StringRedisSerializer;
//
//@Configuration
//public class RedisConfig extends CachingConfigurerSupport {
//
//    @Bean
//    public RedisTemplate<String,Object> redisTemplate(RedisConnectionFactory factory){
//        RedisTemplate<String,Object> redisTemplate = new RedisTemplate<>();
//        redisTemplate.setConnectionFactory(factory);
//
//        //指定kv序列化
//        Jackson2JsonRedisSerializer jackson2JsonRedisSerializer = new Jackson2JsonRedisSerializer(Object.class);
        redisTemplate.setDefaultSerializer(jackson2JsonRedisSerializer);
//        //键值分别采用不同的序列化方式
//        redisTemplate.setValueSerializer(jackson2JsonRedisSerializer);
//        redisTemplate.setKeySerializer(new StringRedisSerializer());
//
//        return redisTemplate;
//    }
//
//}
EmpserviceImpl修改:
package com.example.redis.service.Impl;

import com.example.redis.entities.Emp;
import com.example.redis.mapper.EmpMapper;
import com.example.redis.service.EmpService;
import org.springframework.beans.factory.annotation.Autowired;
import org.springframework.data.redis.core.RedisTemplate;
import org.springframework.stereotype.Service;

@Service
public class EmpServiceImpl implements EmpService {

    @Autowired
    private RedisTemplate redisTemplate;

    @Autowired
    private EmpMapper empMapper;

    @Override
    public Object getEmpById(Integer id) {

//        String key = "userId:"+id;
//
//        //从缓存中获取
//        Object obj = redisTemplate.opsForValue().get(key);
//
//        /*
//            1.首先判断缓存中是否有值,有的话直接从缓存中获取
//            2.缓存中没有则从数据库中获取,并且将获取的结果存入缓存中,下次直接从缓存中取
//         */
//        if(obj == null){
//            //没有值则从数据库中获取
//            Emp emp = empMapper.selectByPrimaryKey(id);
//            //存入缓存
//            redisTemplate.opsForValue().set(key,emp);
//            return emp;
//        }else{
//
//        }
//        return obj;
        return empMapper.selectByPrimaryKey(id);
    }
}
controller修改
Cacheable注解:相当于执行该方法时,会先去缓存中查找,查找不到再去数据库中查找,然后再将该值存入到缓存中以便下次使用。
package com.example.redis.controller;

import com.example.redis.service.EmpService;
import lombok.extern.slf4j.Slf4j;
import org.springframework.beans.factory.annotation.Autowired;
import org.springframework.cache.annotation.Cacheable;
import org.springframework.data.redis.core.RedisTemplate;
import org.springframework.web.bind.annotation.GetMapping;
import org.springframework.web.bind.annotation.PathVariable;
import org.springframework.web.bind.annotation.RequestMapping;
import org.springframework.web.bind.annotation.RestController;

@RestController
@RequestMapping("/emp")
public class EmpController {

    @Autowired
    private EmpService empService;

    @GetMapping("/getEmp/{id}")
    @Cacheable(value = "userid")
    public Object getEmpById(@PathVariable("id") Integer id){
        return empService.getEmpById(id);
    }

}
启动后,可以看到缓存中没有数据,执行后从数据库获取到数据

可以看到,利用注解得到的结果与上述通过redisTemplate得到的结果是一致的,所以对于缓存可以通过注解实现,简单方便。
还有其他注解后续有时间再更。


 907
907


 被折叠的 条评论
为什么被折叠?
被折叠的 条评论
为什么被折叠?
 到【灌水乐园】发言


